はじめに
いくつかの記事を参考にMac(M1)にFlutter環境を構築をし、Android Studioを使って色々といじっていたが、急に使えなくなる事が多く、その都度エラーメッセージをググりながら対処していたが、最終的にはcocoapodsに再インストールができなくなり、Flutterを起動できなくなってしまった。
(構築時にあまり分かっておらずに色々とインストールしたのが悪いのではあるが・・・)
1回構築を試してMacの場合はどんなソフトが必要なのかも分かってきたので、一旦初期化して少し整理しながら再度構築してみることにした。
そして今回はAndroid Studioは入れずに、代わりにVScodeをセットアップしている。
構築した環境
【PC】
MacBook Air (M1, 2020)
今回の記事の流れ
1.今回登場するツールの基礎となる情報を整理
2.Flutterのセットアップ
3.Xcodeのセットアップ
4.CocoaPods のインストール
5.VScodeのセットアップ
※Flutter環境構築の手順は2以降に記載
1.今回登場するツールの基礎となる情報を整理
gem とは?
ライブラリ1つ1つをRubyでは 'gem' と呼んでいる。
少しややこしいが、これらライブラリを管理するためgemコマンドがある。
今回デフォルトで入っていたgemコマンドのバージョンは以下。
※gem(ライブラリ)のパッケージ管理ツールとしてはbundlerが有名だが、これもgem(ライブラリ)の一種である。
% gem --version
3.0.3
gemコマンドでインストールしたライブラリのインストール先は基本的にいつも決まった場所にインストールされる。(詳細は以下のコマンドで確認できる。)
% gem environment

RubyGems Environment:
  - RUBYGEMS VERSION: 3.0.3
  - RUBY VERSION: 2.6.3 (2019-04-16 patchlevel 62) [universal.arm64e-darwin20]
  - INSTALLATION DIRECTORY: 【ライブラリのインストール先】
  - USER INSTALLATION DIRECTORY: 【--user-install オプションの指定時のインストール先】
  -   - RUBY EXECUTABLE: /System/Library/Frameworks/Ruby.framework/Versions/2.6/usr/

///// <以下省略>-----------------
初期の状態でINSTALLATION DIRECTORYとUSER INSTALLATION DIRECTORYの中身を確認してみる。
# INSTALLATION DIRECTORYの中
ls -a /Library/Ruby/Gems/2.6.0
.		build_info	doc		gems
..		cache		extensions	specifications

# USER INSTALLATION DIRECTORYの中
ls -a /Users/***********/.gem/ruby/2.6.0
ls: /Users/***********/.gem/ruby/2.6.0: No such file or directory
※デフォルトではUSER INSTALLATION DIRECTORYに設定されているパスの.gemディレクトリが存在しない。
ついでに言うと、gem environmentコマンドにより出力される以下の情報により、gemのパスがわかる。(デフォルトではINSTALLATION DIRECTORYやUSER INSTALLATION DIRECTORYにパス設定されているはず。)
- GEM PATHS:
     - /Library/Ruby/Gems/2.6.0
     - /Users/************/.gem/ruby/2.6.0
     - /System/Library/Frameworks/Ruby.framework/Versions/2.6/usr/lib/ruby/gems/2.6.0
cocoapodsとは?
iOSプロジェクトで使用するパッケージの、依存関係をコントロールするためのパッケージマネージャー。cocoapodsもgem(Rubyライブラリ)の1つ。
インストールする際に、デフォルトのRubyバージョンがcocoapodsに対応していないことがあったりするので、注意する必要がある。
Rosetta2 とは?
Rosetta2は従来のインテル用のアプリをApple Silicon Mac上で自動的に変換して実行できるようにする技術。Rosetta2は最初からMacにインストールされている訳ではないので、インテルCPUでしか動かないアプリを実行したりするタイミングで、Rosetta2のインストールが求められる。
2.Flutterのセットアップ
以下の公式サイトでSDKをダウンロードする。
(デフォルトではSafariでダウンロードした場合、ダウンロード完了後に安全ファイルと確認されると自動解凍されてしまう可能性があるため、設定を変更しておくとよい。)
https://flutter.dev/docs/get-started/install/macos
※M1の場合、Flutterのバージョンが2.5以上である事が推奨されていて、Rosetta2が必要になる場合がある。
以下のコマンドでdevelopmentフォルダを作り、そこにダウンロードファイルを解凍する。
mkdir ~/development
cd ~/development
unzip ~/Downloads/flutter_macos_2.5.3-stable.zip
以下のコマンドより、解凍したFlutter SDKへのPATHを通す。(今回は使用しているシェルがzsh前提) ※使用しているシェルを確認する方法は、echo $SHELLで確認できる。
nano ~/.zshrc
export PATH="$PATH:【flutterフォルダまでのパス/bin】"
ちゃんとPATHが通っているか確認したい場合は、一度terminalを再起動してwhich flutterを実行する。
次にflutter doctorを実行する流れになるが、恐らくこの状態で実行しようとすると、gitが入っていないため実行できない。このタイミングでダウンロードする事も可能だが、一旦 Xcode のインストールを先にする。
※Xcodeをインストールすると、gitも入るため。
3.Xcodeのセットアップ
App StoreからXcodeをインストールする。
※ダウンロードとMac内での展開で合わせて1時間くらいかかった。
インストールが完了したらライセンスに同意。(ライセンスに同意しないとgit --versionが実行できなかった。)
sudo xcodebuild -license
Xcodeのインストール先を確認する。(正確にはインストール先というより、アクティブになっているXcode環境のパス)
xcode-select -print-path
/Applications/Xcode.app/Contents/Developer
※上記の場所になっていない場合は、xcode-selectコマンドより以下の様にアクティブなディレクトリを変更する。
xcode-select -switch /Applications/Xcode.app/Contents/Developer
Xcode に関する豆知識!
実はxcode-selectコマンドもxcodebuildコマンドも、macOSの標準ツールとして入っているらしい。
which xcode-select
/usr/bin/xcode-select

which xcodebuild
/usr/bin/xcodebuild
しかし、 xcodebuildコマンドは『アクティブなデベロッパディレクトリからxcodebuildを実行する』というコマンドのため、Xcodeがインストールされていないと実行ができない。
Xcodeがインストールされている場合、以下のコマンドよりディレクト内を潜ってみると、xcodebuildがあるのが分かる。
ls -l /Applications/Xcode.app/Contents/Developer/usr/bin
flutter doctor の実行!
ここで一旦flutter doctorを実行してみる。
※もしこのタイミングで実行できない場合、以下が理由かもしれないので参考に。
FlutterとDartはM1チップのMacに適応している最中であるため、
M1 MacではFlutter SDKのインストール後に下記のエラーが出ることがある。
Bad CPU Type in executable
その場合、下記コマンドでRosetta2をインストールすることで解決する。
softwareupdate --install-rosetta --agree-to-license
flutter doctor

Running "flutter pub get" in flutter_tools...                       8.8s
Doctor summary (to see all details, run flutter doctor -v):
[✓] Flutter (Channel stable, 2.5.3, on macOS 11.6.1 20G224 darwin-arm, locale
    ja-JP)
[✗] Android toolchain - develop for Android devices
    ✗ Unable to locate Android SDK.
      Install Android Studio from:
      https://developer.android.com/studio/index.html
      On first launch it will assist you in installing the Android SDK
      components.
      (or visit https://flutter.dev/docs/get-started/install/macos#android-setup
      for detailed instructions).
      If the Android SDK has been installed to a custom location, please use
      `flutter config --android-sdk` to update to that location.

[!] Xcode - develop for iOS and macOS
    ✗ CocoaPods not installed.
        CocoaPods is used to retrieve the iOS and macOS platform side's plugin
        code that responds to your plugin usage on the Dart side.
        Without CocoaPods, plugins will not work on iOS or macOS.
        For more info, see https://flutter.dev/platform-plugins
      To install see
      https://guides.cocoapods.org/using/getting-started.html#installation for
      instructions.
[✗] Chrome - develop for the web (Cannot find Chrome executable at
    /Applications/Google Chrome.app/Contents/MacOS/Google Chrome)
    ! Cannot find Chrome. Try setting CHROME_EXECUTABLE to a Chrome executable.
[!] Android Studio (not installed)
[!] Connected device
    ! No devices available
Xcode関連でCocaPodsがインストールされていないというエラーと、Android Studioがインストールされていないエラーが出ている。
(Chromeに関わる❌も出ているが、web向けのアプリ構築はしないつもりなので今回は無視する。)
4.CocoaPods のインストール
以下のコマンドよりcocoapodsをインストールする。
sudo gem install -v 1.8.4 cocoapods
※最新版は上手くインストールできなく、調べてみたところ依存関係の問題がありそうだったので、上記コマンドは少し古めのバージョンをインストールするコマンドとなっている。
cocoapodsの全バージョン履歴 → https://rubygems.org/gems/cocoapods/versions
しかし、Firebase関連のパッケージを追加する際などに、cocoapodsにある程度のバージョンを求められることもあるため、その場合こちらの記事を参考に最新版にすると良い。(自分はこの方法で新しめのバージョンにでき、Firebaseパッケージもちゃんと使えている。)
再度flutter doctor の実行してみる!
flutter doctor

[✓] Flutter (Channel stable, 2.5.3, on macOS 11.6.1 20G224 darwin-arm, locale
    ja-JP)
[✗] Android toolchain - develop for Android devices
    ✗ Unable to locate Android SDK.
      Install Android Studio from:
      https://developer.android.com/studio/index.html
      On first launch it will assist you in installing the Android SDK
      components.
      (or visit https://flutter.dev/docs/get-started/install/macos#android-setup
      for detailed instructions).
      If the Android SDK has been installed to a custom location, please use
      `flutter config --android-sdk` to update to that location.

[!] Xcode - develop for iOS and macOS
    ! CocoaPods 1.8.4 out of date (1.10.0 is recommended).
        CocoaPods is used to retrieve the iOS and macOS platform side's plugin
        code that responds to your plugin usage on the Dart side.
        Without CocoaPods, plugins will not work on iOS or macOS.
        For more info, see https://flutter.dev/platform-plugins
      To upgrade see
      https://guides.cocoapods.org/using/getting-started.html#installation for
      instructions.
[✗] Chrome - develop for the web (Cannot find Chrome executable at
    /Applications/Google Chrome.app/Contents/MacOS/Google Chrome)
    ! Cannot find Chrome. Try setting CHROME_EXECUTABLE to a Chrome executable.
[!] Android Studio (not installed)
[!] Connected device
    ! No devices available
Xcode関連のエラーについて、cocoapodsが最新じゃない注意が出ているが、一旦は解消できたとする。
iOSエミュレータにサンプルアプリをデプロイ
ここまで進むと、iOSのエミュレータ上でFlutterのサンプルアプリを動かせるはずなので、確認してみる。(以下、ターミナル上でのコマンド)
open -a Simulator
サンプルプロジェクトの作成と実行。
mkdir ~/flutter_app_pj
flutter create ~/flutter_app_pj/my_app
cd ~/flutter_app_pj/my_app
flutter run
上記コマンドを実行後、エミュレータ上にサンプルアプリ(右下のfloatingbuttonをクリックすると、中央の数字がカウントされるアプリ)が実行できていればOK。
5.VScodeのセットアップ
M1向けのVScodeインストールはこちらのサイトが参考になった。
https://kunolog.com/m1_vscode/
VScode公式のダウンロードサイトはこちら
必要なプラグインのインストールやFlutterプロジェクトの作成については、以下の記事の3章、5章を参考に。
【Windows10上にFlutterの開発環境を構築する。】
また、VScodeで編集時のソースコードの自動整形はこちらを参考に設定。
その他 備考
AndroidStudioのセットアップが上手くいかない
Android Studioセットアップは大まかに以下のステップで進めていくが、SDKのインストールで失敗することがある。
① 以下の公式サイトに入ったら『Download options』を選択して、Platformが【Mac(64-bit, ARM)】のパッケージをダウンロードする。
https://developer.android.com/studio/index.html
② ダウンロードしたzipファイルをアプリケーションフォルダに移動させ、展開すればインストール完了。
③ Android Studioを起動させると初回の場合セットアップになるため、[Install Type]などを選択してSDKのインストールを行うことになるが、以下のバージョンのAndroid Studioでは、下記の様なエラーが出てしまいインストールができない。
バージョン:android-studio-2020.3.1.25-mac_arm
An error occurred while trying to compute required packages.
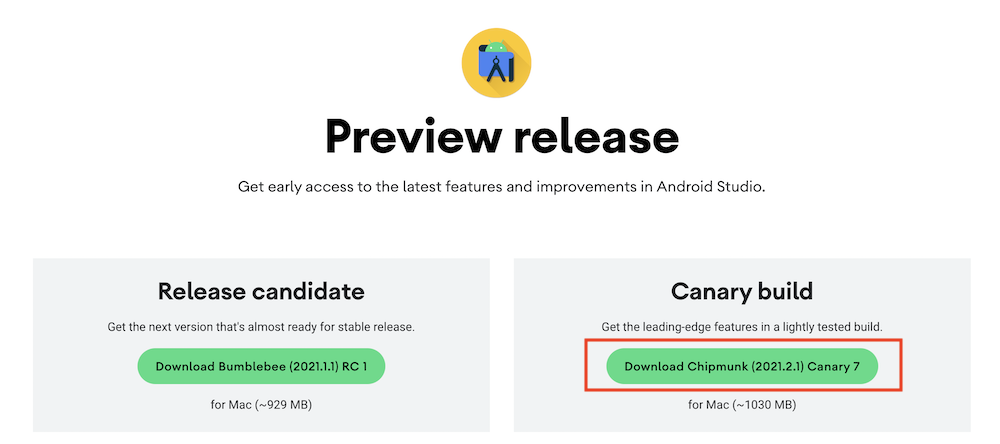
ググって調べてみたところ、android-studio-2021.2.1系-mac_armであれば、sdkのインストールはちゃんとできるらしい。
以下のサイトより『Canary build』の方をダウンロードし、上記の②、③を実行すれば上手くインストールできるはず。
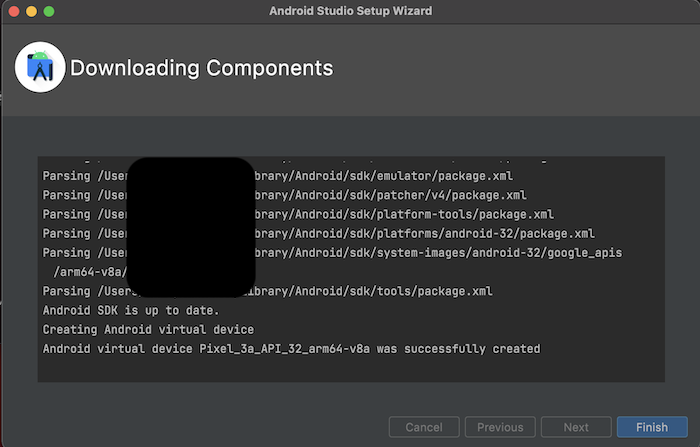
途中でライセンスの同意を求められるので同意して次に進む。
最終的に以下の様なインストール成功メッセージが出ていればOK。
VScodeからAndroidエミュレータを立ち上げる
VScodeのみで開発やテストを完結させたかったので、以下のサイトを参考に構築した。
※追加したプラグイン『Android iOS Emulator』の設定値については、自分はMacだったのでサイトに書かれている場所とは多少異なる。
●Macの場合
【Emulator: Emulator Path Mac】に
/Users/[ユーザー名]/Library/Android/sdk/emulatorを設定。
上記設定を終えflutter runを実行したところ、自分は一発目に以下のエラーメッセージが出てしまいAndroidエミュレータ上でサンプルアプリが起動できなかった。
The operation couldn’t be completed. Unable to locate a Java Runtime.
Please visit http://www.java.com for information on installing Java.
以下のコマンドを実行した後、flutter runをしたら上記エラーは消えた。
cd /Applications/"Android Studio Preview.app"/Contents/jre
ln -s ../jre jdk
ln -s "/Library/Internet Plug-Ins/JavaAppletPlugin.plugin" jdk
最後に、デフォルトのエミューレータでは正常に動かなかったため、以下のサイトの『エミュレータの設定』の部分を参考にした。
ここまでやったらFlutterのサンプルプロジェクトを、VScodeからAndroidエミューレータ上で動かせる様になった。
その他、実際に使っているパッケージやSDKのバージョンによっては色々と上手くいかないことがある。その際の参考になりそうなサイトを以下に随時追記していく。
META-INF/work-runtime_release.kotlin_module: Module was compiled with an incompatible version of Kotlin. The binary version of its metadata is 1.5.1, expected version is 1.1.15.
com.android.builder.dexing.DexArchiveMergerException: Error while merging dex archives:
The number of method references in a .dex file cannot exceed 64K.
Targeting S+ (version 31 and above) requires that an
explicit value for android:exported be defined when intent filters are present]
Error launching application on sdk gphone64 arm64.
Built build/app/outputs/flutter-apk/app-debug.apk.
Installing build/app/outputs/flutter-apk/app.apk...
色々な原因により上記エラーは出るが、一番良くあるのは容量不足らしい。
しかし、自分が上記エラーが出た原因は、ApplicationID変更時の変更箇所が足りていなかったため、以下サイトが参考になった。
Sourcetreeのインストール
gitとの連携のために以下をインストール。
① 以下の公式サイトよりダウンロード。 ※ダウンロードしたのは『for Mac OS X』
② ダウンロードファイルを展開して、アプリケーションフォルダに移す。
③ Sourcetree 起動させて『アカウント』をクリック
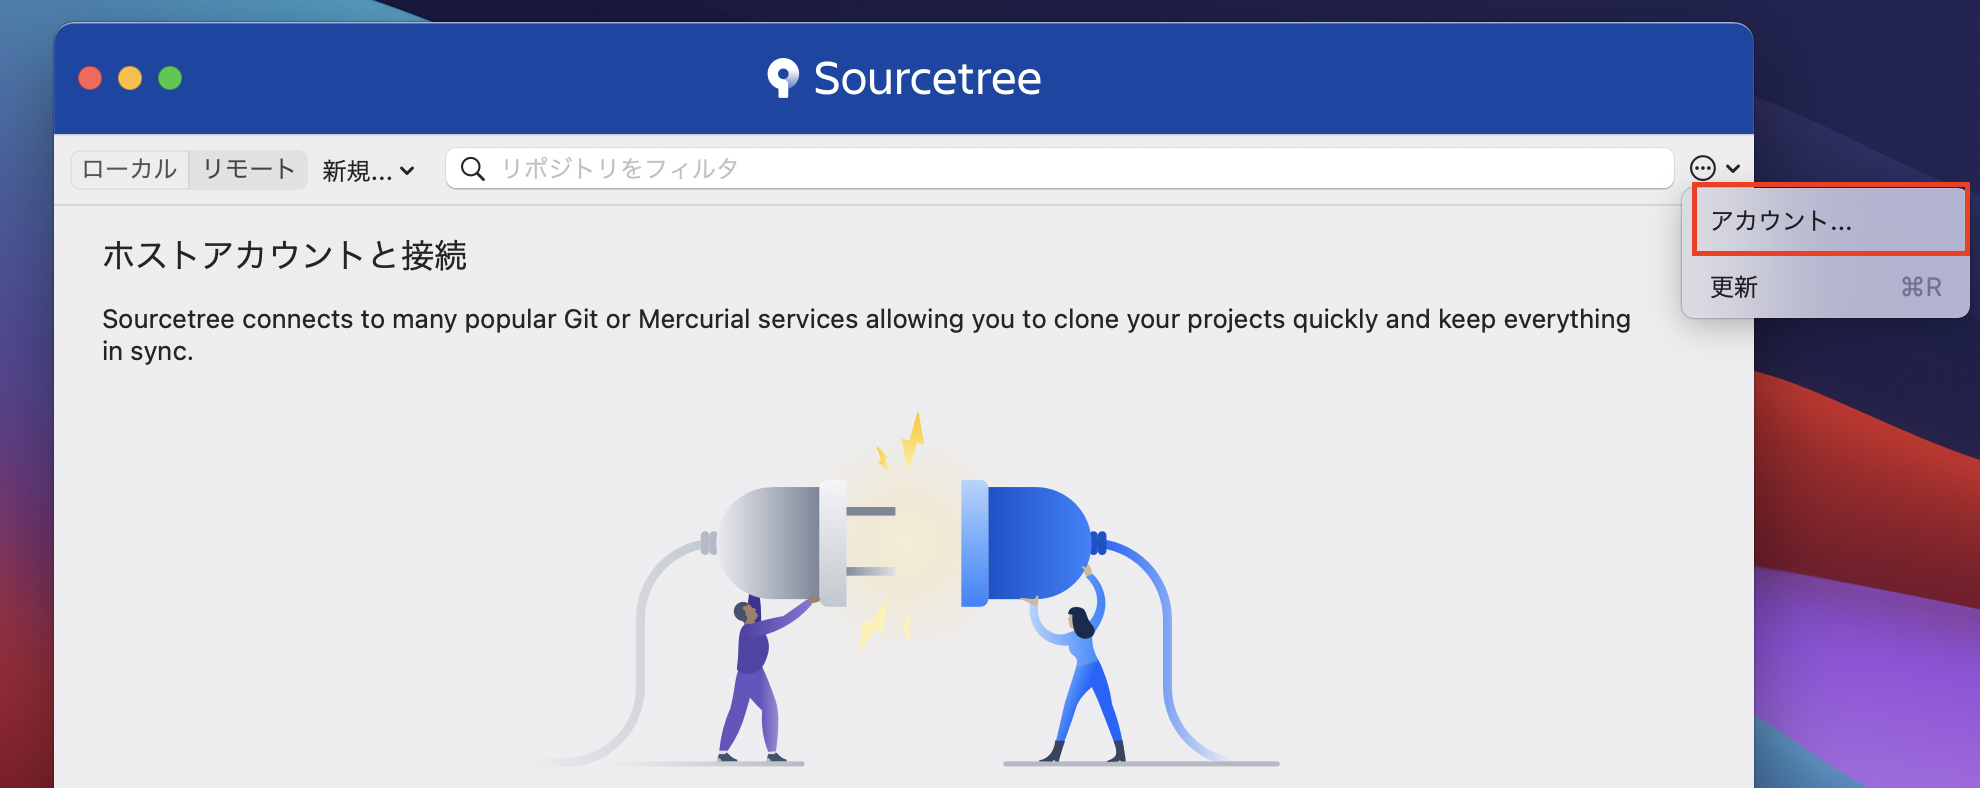
④ アカウントタブを選択し、『追加』をクリック。
※ 今回、追加情報は以下の様にした。
ホスト:GitHub
認証タイプ:Basic
ユーザー名:[GitHubのユーザー名]
パスワード:[GitHubで発行している、Personal access tokens]
プロトコル:HTTPS