tags: Raspberry Pi RaspberryPi Raspberry Pi Pico RaspberryPiPico MicroPython
Introduction
My name is Salvatore and I am a Development Engineer at 株式会社Rist.
- Robotics team, responsible for Robotics R&D.
- Robot design, control, motion, perception and manipulation.
- Image analysis, recognition and classification.
- AI algorithms design and implementation.
- UI/UX design and implementation.
About this article
This article aims to give a quick introduction to the Raspberry Pi Pico, through simple step-by-step instructions to its setup and providing some code examples in MicroPython.
※ No soldering nor external components are required to follow this tutorial~
What is the Raspberry Pi Pico
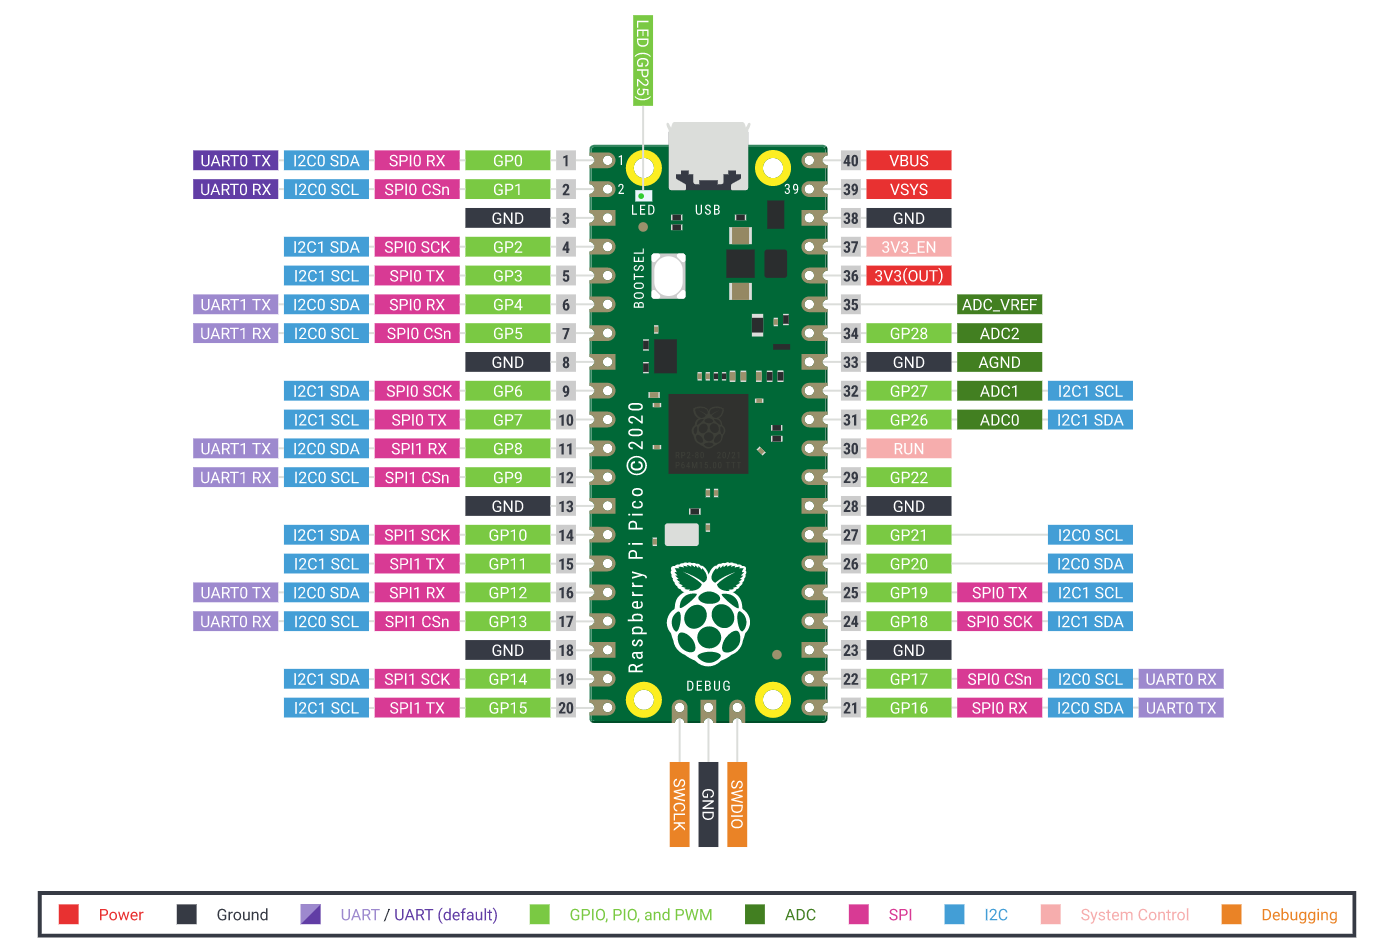
The Raspberry Pi Pico is a microcontroller able to acquire various inputs and provide outputs through a series of GPIO pins, similar to a Raspberry Pi computer [1][2].
Microcontrollers are most suitable for embedded applications or any other situations in which the use of a full computer running an Operating System would be considered not necessary.
Environment Setup
User group
In order to have read/write permission to the serial port created upon connecting the Pico, the current user must belong to the dialout group.
Verify the current groups the user belongs to with:
$ groups
If the user does not belong to the dialout group, add it as follows:
# usermod -a -G dialout $USER
To make the changes effective, relog the current user to the system.
※ A reboot might be needed after performing the operation, in the case which a simple relog would not be sufficient.
Thonny and MicroPython
Proceed with the installation of the Thonny Python IDE [3]:
As of writing this article, the easiest way to get the most updated version of the IDE on a variety of linux distributions is through pip.
$ pip install thonny
※ For more information and other platforms support, visit thonny.org.
Once installed, the Thonny IDE would look similar to:
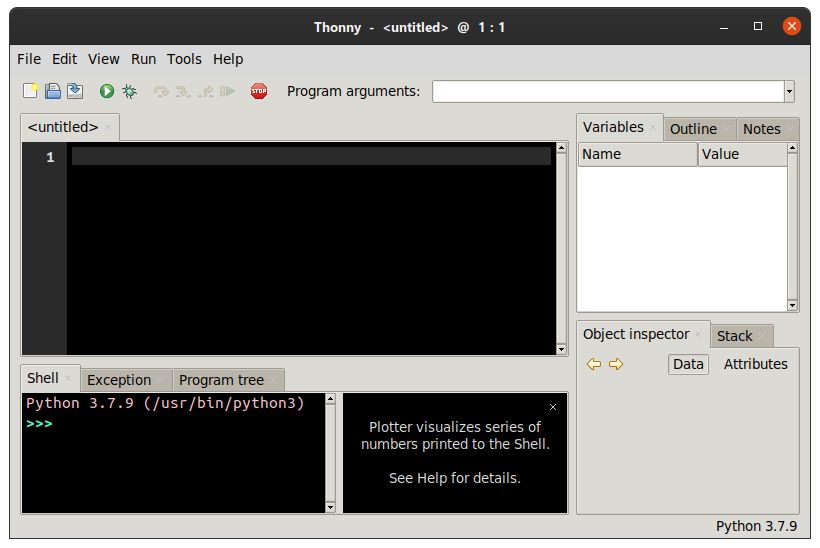
In order to control the Pico, it is necessary to switch the Python interpreter to MicroPython (Raspberry Pi Pico).
Click on the bottom right corner to switch the interpreter:
Python 3.7.9 > Configure interpreter...
Then select MicroPython (Raspberry Pi Pico) from the combo box list.
Or alternatively, from the Thonny menu, select:
Run > Select interpreter... > Interpreter > MicroPython (Raspberry Pi Pico)
Connecting the Pico to the PC
As the Pico comes out of the box, it needs to be initialised by installing the MicroPython firmware.
This can be done easily from the Thonny IDE itself.
To connect the Pico to the computer:
- Press and hold the BOOTSEL button on the Pico
- Connect the Pico to the computer via micro USB
- Release the BOOTSEL button
The Pico is now connected as a USB mass storage device.
MicroPython firmware installation
By clicking the Stop/Restart button on the Thonny toolbar, the IDE will connect to the Pico and it will prompt for the MicroPython firmware installation.
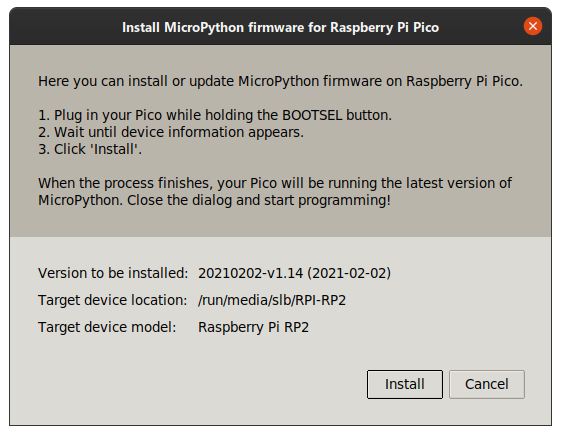
Proceed with the installation.
At this point, the environment setup is complete.

Code
As mentioned in the introduction, for this tutorial no external component are required.
The provided sample code will make use of the on-board power LED (GPIO 25) and the embedded temperature sensor.
LED test
Let's skip the basic LED on/off/blink tests and try the PWM controlled brightness test instead.
Create a new file and paste the following code [1]:
from machine import Pin, PWM
from time import sleep

pwm = PWM(Pin(25))
pwm.freq(1000)

while True:
    for duty in range(1024, 65025, 2):
        pwm.duty_u16(duty)
        sleep(0.0001)
    for duty in range(65025, 1024, -4):
        pwm.duty_u16(duty)
        sleep(0.0005)
By running this code, the on-board LED will pulse smoothly according to the values specified in the ranges of the duty cycles and the sleep intervals.
※ The value 65025 corresponds to the LED maximum brightness.
Temperature test
For the temperature test, use the following code [4]:
import machine
from time import sleep

sensor_temp = machine.ADC(4)
conversion_factor = 3.3 / 65535

while True:
    reading = sensor_temp.read_u16() * conversion_factor
    temperature = 27 - (reading-0.706)/0.001721
    print(temperature)
    sleep(2)
The temperature measured by the sensor will be printed in the Shell standard output every 2 seconds.
Putting it together
The following code will make the on-board LED pulse with variable speed.
from machine import Pin, PWM
from time import sleep

sensor_temp = machine.ADC(4)
conversion_factor = 3.3 / 65535

pwm = machine.PWM(machine.Pin(25))
pwm.freq(1000)

while True:
    reading = sensor_temp.read_u16() * conversion_factor

    temperature = 27 - (reading-0.706)/0.001721
    print(temperature)

    if temperature < 19:  # Lower threshold
        steps = 16
    elif temperature > 23:  # Higher threshold
        steps = 64
    else:
        steps = temperature

    for duty in range(0, 65025, int(steps**2)):
        pwm.duty_u16(duty)
        sleep(0.001)
    for duty in range(65025, 0, -int(steps**3)):
        pwm.duty_u16(duty)
        sleep(0.05)
The LED will blink in three different ways, depending on the ambient temperature measured by the on-board sensor:
- Temperature below the lower threshold:
- The LED pulses at a slow pace
- Temperature within the thresholds interval:
- The LED pulses at a pace proportional to the temperature
- Temperature above the upper threshold:
- The LED pulses at a fast pace
Adjust the Lower and Higher thresholds to best suit the local environment temperature.
Stand-alone operation
It is time to store the program in the Pico.
File > Save as...
And select Raspberry Pi Pico from the following dialog window:
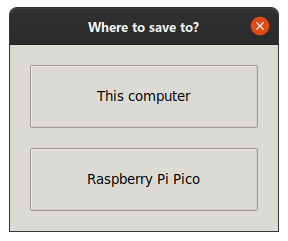
In order to make the code run upon power up, the file must be named main.py.

※ Safe operating voltages are between 1.8V and 5.5V.
References
[G] https://github.com/slabua/RaspberryPiPico
[Q] https://qiita.com/slabua/items/ed0a49cd587d0c8103b8
[1] https://www.raspberrypi.org/documentation/pico/getting-started/
[2] https://projects.raspberrypi.org/en/projects/getting-started-with-the-pico
[3] https://hsmag.cc/picobook
[4] https://tkrel.com/14899