はじめに
この記事はAndroidの画面をPCにミラーリングするソフトを作る1の続きです。
Androidの画面をミラーリングする機能の作り方は、そちらで解説しています。
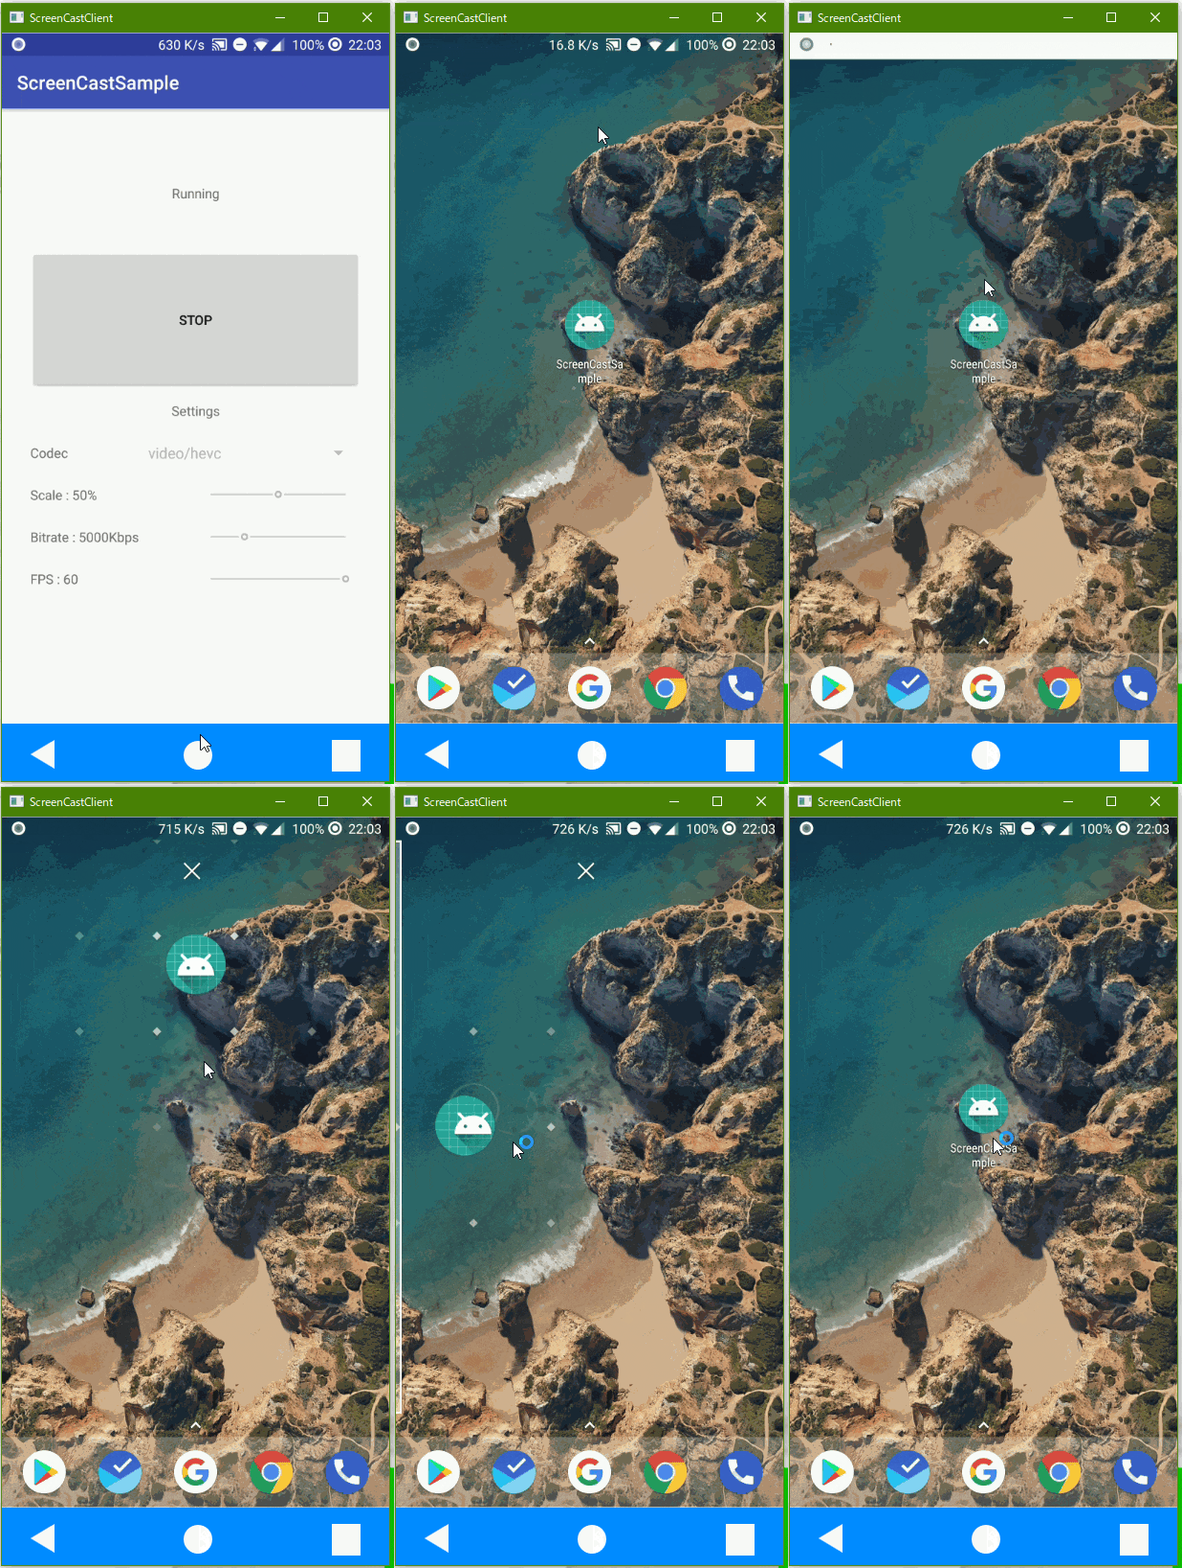
こんなものをつくります
マウスでAndroid端末を操作できるようにします。
仕様
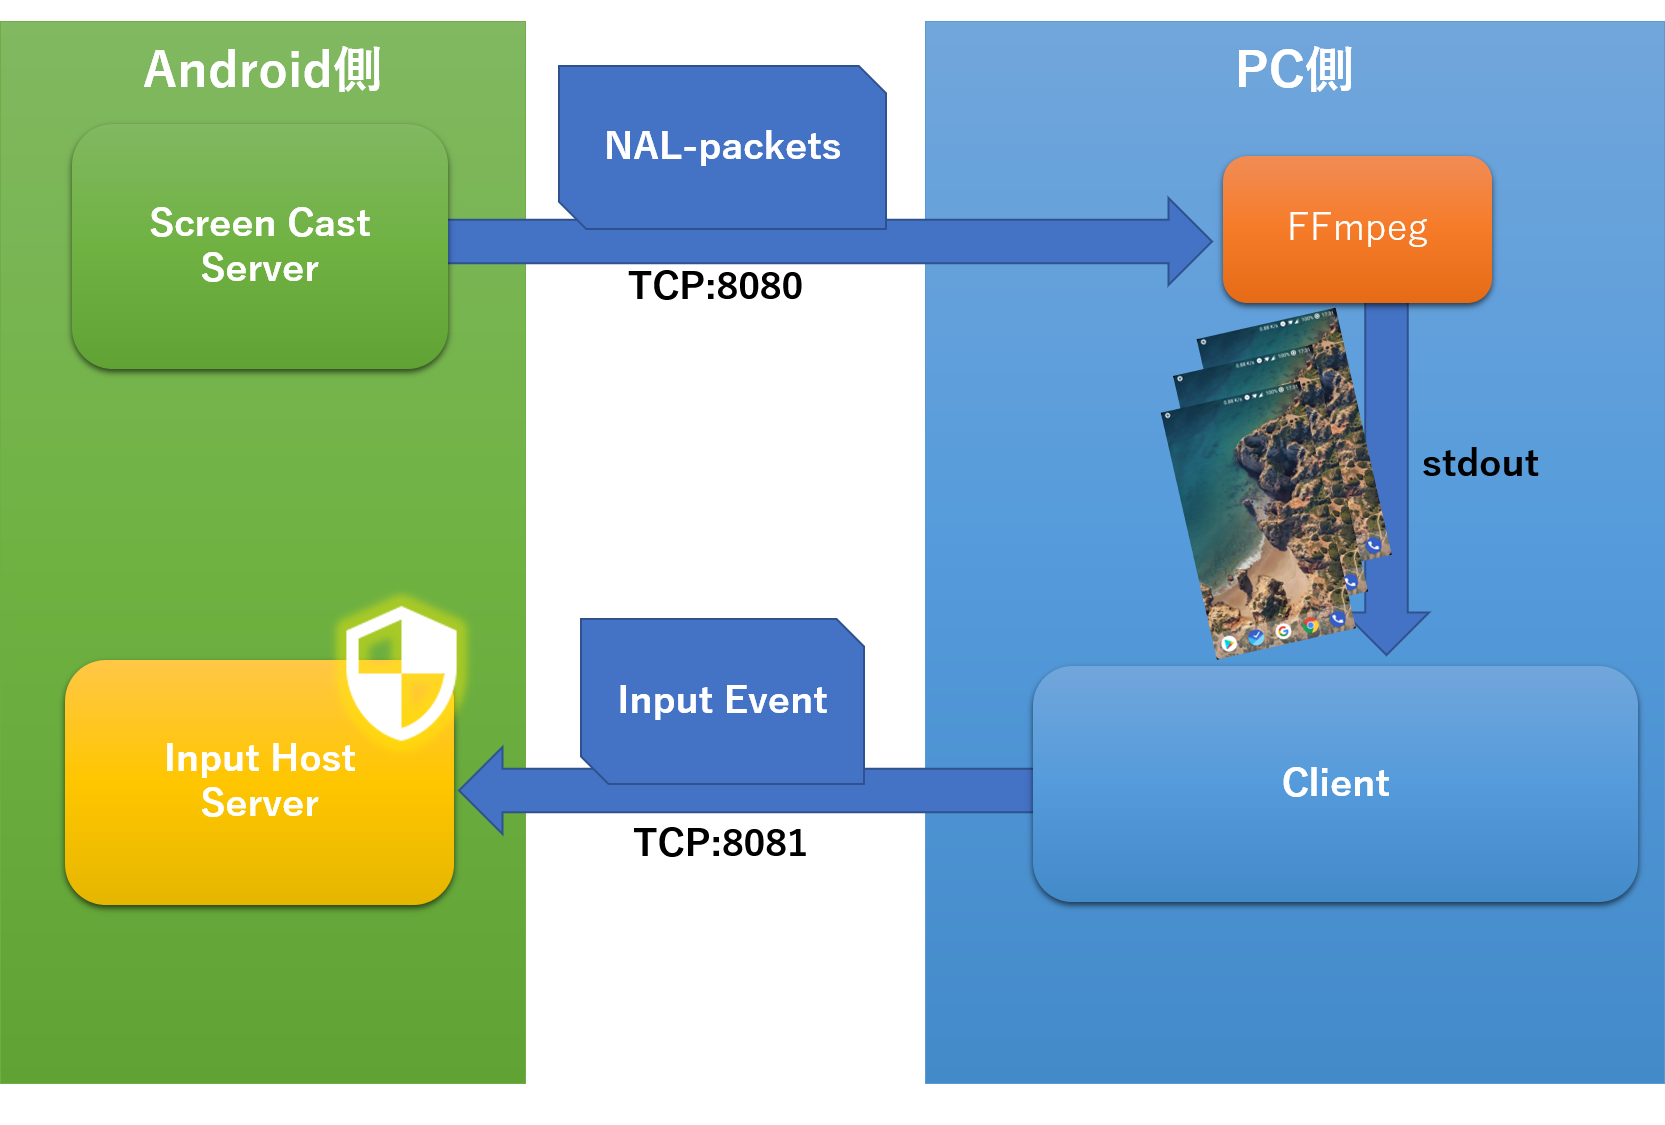
AndroidとPC間のコネクションは1本にしたいところですが、プログラムが複雑になりそうだったので妥協しました。
クライアントソフトですること
FFmpegから流れてくるデータを表示します。
また、マウス操作をスクリーンのタッチ操作に変換して端末側に投げます。
Android側ですること
前回同様、画面の内容をエンコードし、PC側に流します。
また、PC側からタッチイベントを受取り、それをシステムに介入させます。
PCからAndroid端末を操作する
このセクションでは、Android端末がどのようにタッチやキー操作を扱っているかについての説明をします。
知らなくてもリアルタイムタッチの実装はできますので、興味がなければ「いざ、実装」まで飛ばしてください。
PCからAndroidを操作するにはどうすればいいのでしょうか?
簡単な例から見てみます。
端末のシェルに入ってコマンドを叩く
AndroidはLinuxベースのOSです。ですから、機能限定版であるものの、Linuxのターミナルを使用できます。
adb shell
とすることで対話に入ることができます。
そして、タッチ操作やキー操作などを送るinputというコマンドが用意されているのでそれを使用します。
以下に例を出します。
input touchscreen tap x y
input touchscreen swipe x1 y1 x2 y2
input keyevent Key
input text Text
これらを実行することで手軽に端末にイベントを送ることができます。
しかし実行してみると、イベントが発行されるまで時間がかかります。
これではリアルタイムな操作に向きません。
また、タップやスワイプ以外の複雑な操作をしたい場合はどうすればよいのでしょうか。
getEvent sendEventを使う
geteventコマンドは端末のタッチパネルや物理キーから送られてくるデータを出力してくれるコマンドです。
以下のコマンドを実行してからタッチパネルを操作してみてください。
getevent
すると以下の画像のように数値がズラッと表示されると思います。
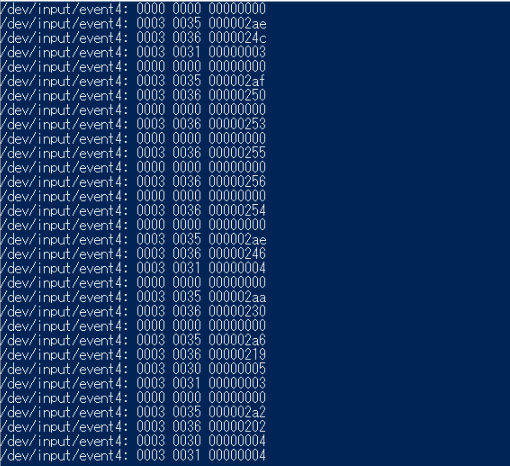
これはタッチパネルから送られてくるデータです。
OSはこのデータを解釈し、反映させます。
実際にどのように解釈されているかについては【Android】プログラムから端末をタッチする【ADB】で説明されているのでご覧ください。
sendeventはあたかもタッチパネルなどから送られてきたデータのように、任意のデータを送ることができるコマンドです。
つまり、geteventで得たデータをsendeventで送り直すことでタッチ操作を再現することができます。
しかし、このコマンドも実行速度が遅く、完全再現とは行きません。
デバイスファイルを直接操作する
AndroidはLinuxベースのため、デバイスファイルを使用しています。
WindowsといったUnix系でないOSを使っている方には馴染みが無いかもしれませんが、
デバイスファイルとは、接続されている様々なデバイスとやり取りを行うのに使用する特殊なファイルのことです。
例えば、タッチパネルのデバイスファイルを開くと、geteventで得たようなタッチパネルの操作に関するデータを読み出すことができます。
逆に、デバイスファイルに書き込むとsendeventと同じように、書き込んだデータはそのデバイスから送られてきたものとして処理されます。
デバイスファイル (device file)
デバイススペシャルファイル
このあたりが参考になると思います。
では実際にデバイスファイルを開いてみましょう。
先程の画像に/dev/input/event4というパスが記載されていると思います。
これがデバイスファイルの場所になります。
/dev/inputディレクトリにはevent0、event1....といくつかのデバイスファイルが存在しており、それがタッチパネルや物理キー、センサーなどと対応しています。対応する番号は端末によって違うので、注意してください。
cat /dev/input/event●
このコマンドを実行するとそのデバイスからのデータが流れてきます。が、こうなります。
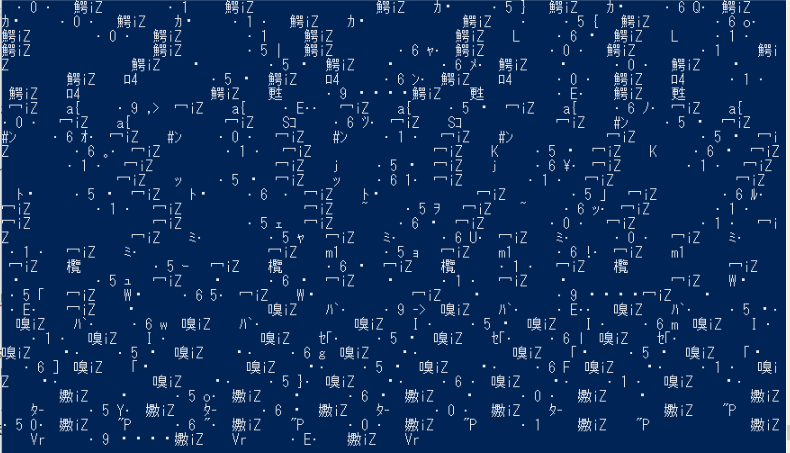
デバイスファイルから得られる生データはバイナリデータであり、文字で表示するものではないのです。
getEventやsendEvent、冒頭で紹介したinputコマンドは、バイナリ⇔文字(数値)の変換を行ってくれているのです。
ちなみに、
cat /dev/input/event● > /sdcard/event.bin
と、することで生データをファイルに保存することができるので
cat /sdcard/event.bin > /dev/input/event●
とすると、タッチデータを再現することができますが、ここにも罠があります。
それは、実行速度が早すぎることです(苦笑)。
数秒間で記録したイベントデータが一瞬で流れてしまうので、早すぎてうまく操作できないと思います。
操作を再現するにはsleepを挟むなどして、適切なタイミングでデータが送られるようにしなければいけません。
結局どうするのか
要はPC側から送られてくるタッチイベントをデバイスファイルに流せれば良いわけです。
シェルスクリプトでも書けるかもしれませんが、せっかくAndroid Studioで開発を行っているので
Java/Kotlinで書ければ楽ですよね。しかし、今まで好き勝手にデバイスファイルにアクセスしていましたが、shell権限があってこそ成せた技なのです。つまり、通常のアプリにシステムファイルをいじる権限はないのです。(Root化されていれば別ですが)
自分も諦めかけていましたがこんな質問を見つけました。
How does vysor create touch events on a non rooted device?
VysorはRootを取っていない端末でどうやってリアルタイムのタッチイベントを実行しているのか?という質問です。
そして解答は
What he does is, he then starts his Main class as a separate process using this shell user. Now, the Java code inside that Main class has the same privileges as the shell user (because duh, it's linux).
彼が何をしているのかというと、Shellユーザーの権限を使用してMainクラスを別プロセスで起動しているんだよ。これでMainクラス内のJavaコードはShellユーザーと同じ権限を持っているわけさ(だってAndroidはLinuxだからね)
つまり、shellからapkパッケージに含まれるクラスを実行するとその起動されたプログラムもshell権限を使用できるのです。
言われてみれば、不思議な事ではありませんが、思いつきませんでした。
今回はこの手法でリアルタイムタッチを実装しようと思います。
いざ、実装
前述のようにアプリからシステム領域に介入するにはshellの力が必要です。
まず、apkパッケージに含まれるクラスをshell権限で起動するには以下のようにします。
sh -c "CLASSPATH=[apkファイルへのパス] /system/bin/app_process /system/bin [パッケージ名].[mainメソッドを含むクラスの名前]"
apkファイルへのパスは
pm path [パッケージ名]
で取得できますが、ここで普通にAndroid Studioでデバッグをしていると複数のパスが表示されます。
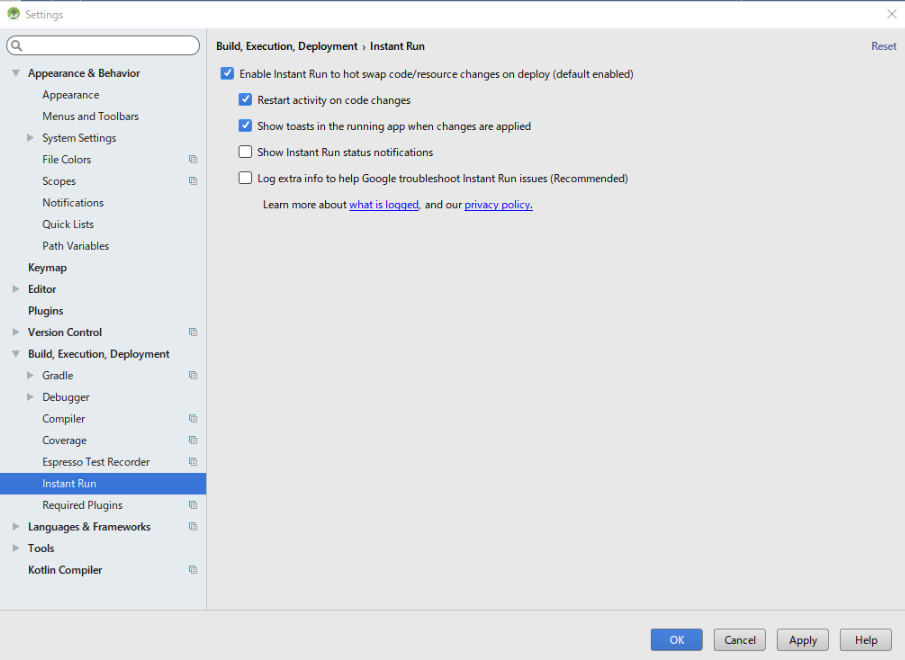
これはInstant Runという、ビルド時間を短縮したりプログラムの変更をリアルタイムで反映させる機能を使っている際に起こる現象です。
apkを複数に分割することで、変更時に差分のみをビルド、インストールして時短を図っているものと思われます。
しかし、分割されてしまっては上記のコマンドが正しく動かないので、Instant Runを無効にする必要があります。
設定の場所は以下のとおりです。
さらに注意なのが、ユーザーが起動するアプリ本体とshell権限で起動するプログラムは、同じパッケージに属するものの、プロセスが違うため、staticの共有などは一切できません。
その為、やり取りをしたい場合はsocketなどを通して行うことになります。
プログラムからイベントをシステムに介入させる
まずは以下のコードを見てください。
public class InputService {
    InputManager im;
    Method injectInputEventMethod;


    public InputService() throws Exception {

        //InputManagerのインスタンスを取得
        im = (InputManager) InputManager.class.getDeclaredMethod("getInstance").invoke(null, new Object[0]);

        //MotionEventを生成するstaticメソッドを呼べるようにする
        MotionEvent.class.getDeclaredMethod(
                "obtain",
                long.class, long.class, int.class, int.class,
                MotionEvent.PointerProperties[].class, MotionEvent.PointerCoords[].class,
                int.class, int.class, float.class, float.class, int.class, int.class, int.class, int.class
        ).setAccessible(true);

        //システムにイベントを介入させるメソッドを取得
        injectInputEventMethod = InputManager.class.getDeclaredMethod("injectInputEvent", new Class[]{InputEvent.class, int.class});

    }

    //タッチイベントを生成
    public void injectMotionEvent(int inputSource, int action, float x, float y) throws InvocationTargetException, IllegalAccessException {

        MotionEvent.PointerProperties[] pointerProperties = new MotionEvent.PointerProperties[1];
        pointerProperties[0] = new MotionEvent.PointerProperties();
        pointerProperties[0].id = 0;


        MotionEvent.PointerCoords[] pointerCoords = new MotionEvent.PointerCoords[1];
        pointerCoords[0] = new MotionEvent.PointerCoords();
        pointerCoords[0].pressure = 1;
        pointerCoords[0].size = 1;
        pointerCoords[0].touchMajor = 1;
        pointerCoords[0].touchMinor = 1;
        pointerCoords[0].x = x;
        pointerCoords[0].y = y;

        MotionEvent event = MotionEvent.obtain(SystemClock.uptimeMillis(), SystemClock.uptimeMillis(), action, 1, pointerProperties, pointerCoords, 0, 0, 1, 1, 0, 0, inputSource, 0);
        injectInputEventMethod.invoke(im, new Object[]{event, 0});
    }

    //キーイベントを生成
    public void injectKeyEvent(KeyEvent event)throws InvocationTargetException, IllegalAccessException{
        injectInputEventMethod.invoke(im, new Object[]{event, 0});
    }
}
このコードはここを参考に、新しいAPIを使用するように多少変更しています。
通常はアクセスできないシステムのメソッドやインスタンスに、shell権限を利用してリフレクションでアクセスするという力技を行っています。
「injectInputEvent」というのがそうで、そのメソッドにイベントデータを渡すとイベントが実行されます。
そのメソッドは実際どこにあるのか、AOSPのソースを見てみたところ、ここの914行目にありました。
Hideアノテーションで普通はアクセス出来ないようになっています。
リフレクション?という方はこの記事が参考になるかと思います。
Input Host Serverの実装
パソコンから送られてくるイベントを上記のInputServiceクラスを使用して実行します。
public class InputHost {
    static InputService inputService;

    static ServerSocket listener;//サーバーソケット

    static Socket clientSocket;//クライアント側へのソケット
    static InputStream inputStream;//クライアントからのメッセージ受信用
    static OutputStream outputStream;//クライアントへのデータ送信用ストリーム


    static boolean runnning = false;


    public static void main(String args[]) {
        try {
            inputService = new InputService();
        } catch (Exception ex) {
            ex.printStackTrace();
        }

        try {
            listener = new ServerSocket();
            listener.setReuseAddress(true);
            listener.bind(new InetSocketAddress(8081));
            System.out.println("Server listening on port 8081...");

            clientSocket = listener.accept();//接続まで待機

            System.out.println("Connected");

            inputStream = clientSocket.getInputStream();
            outputStream = clientSocket.getOutputStream();

            runnning = true;

            BufferedReader reader = new BufferedReader(new InputStreamReader(inputStream));

            while (runnning) {
                String msg = reader.readLine();
                String[] data = msg.split(" ");

                if (data.length > 0) {
                    if (data[0].equals("screen")) {//タッチデータの場合
                        inputService.injectMotionEvent(InputDeviceCompat.SOURCE_TOUCHSCREEN, Integer.valueOf(data[1]), Integer.valueOf(data[2]), Integer.valueOf(data[3]));
                    } else if (data[0].equals("key")) {//キーの場合
                        inputService.injectKeyEvent(new KeyEvent(Integer.valueOf(data[1]), Integer.valueOf(data[2])));
                    } else if (data[0].equals("exit")) {//終了コール
                        Disconnect();
                    }
                }
            }

        } catch (Exception e) {
            e.printStackTrace();
            Disconnect();
        }

    }

    //切断処理
    private static void Disconnect() {

        runnning = false;

        try {

            listener.close();
            if (clientSocket != null)
                clientSocket.close();

        } catch (Exception ex) {
            ex.printStackTrace();
        }

        System.out.println("Disconnected");

    }
}
単純なサーバープログラムです。
PCとのデータのやり取りをjsonを使ってモダンにすることも考えたのですが、
大したことはしないので、空白を区切りとしたcsvのような形式で送ることにしました。
Android側の実装はこれだけです。
全体のコードはこちら
次にPC側の実装を行います。
クライアントの作成
C# & WPFで作成しようと思います。
WinFormsを選ばなかった理由は、仕様的?に画像を60FPSで表示することが困難だったからです。
実装してみたら体感30FPSくらいでした。
DoubleBufferedを無効にすると60FPSになりましたがチラツキがすごく、実用的ではありませんでした。
WPFも微妙な感じがしますが、GPUを描画に使っている分WinFormsよりはマシです。
本気でやるならOpenGL(C#ならOpenTK)などのグラフィックAPIを使うことになりますね...
まさか、送信側より受信側がボトルネックになるとは思いませんでした^^;
クライアントの全体のコードはこちら
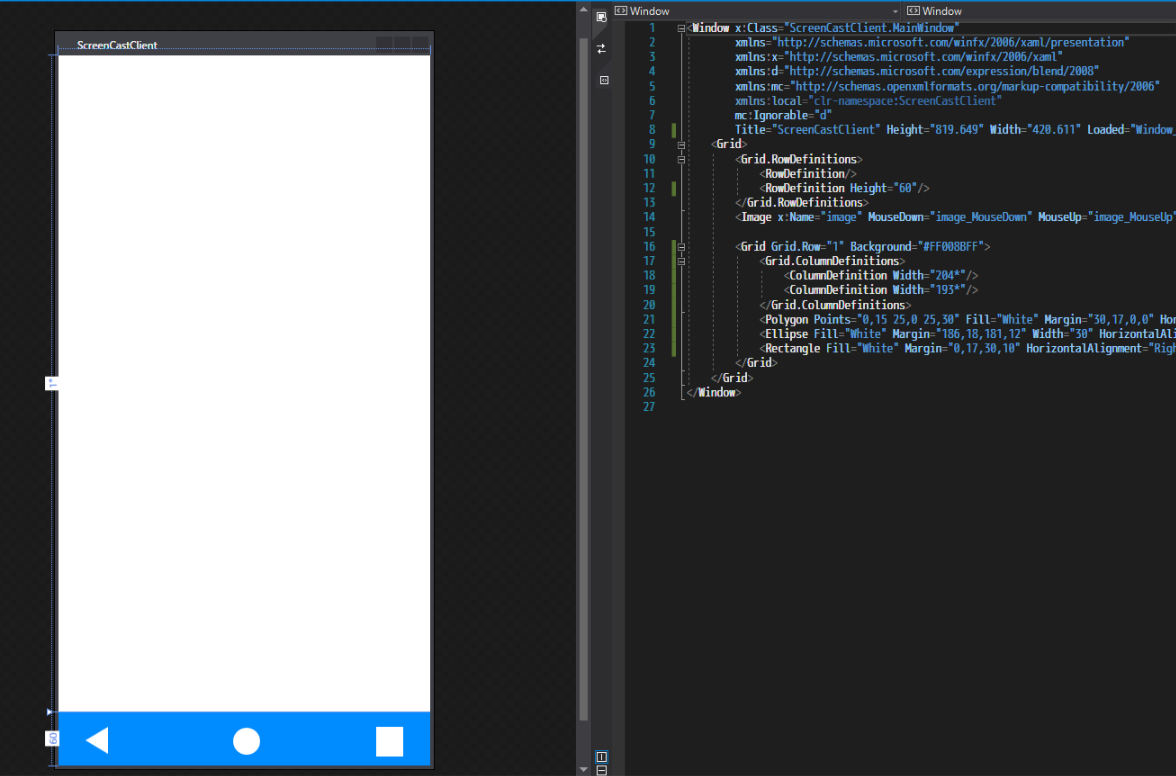
UI
<Window x:Class="ScreenCastClient.MainWindow"
        xmlns="http://schemas.microsoft.com/winfx/2006/xaml/presentation"
        xmlns:x="http://schemas.microsoft.com/winfx/2006/xaml"
        xmlns:d="http://schemas.microsoft.com/expression/blend/2008"
        xmlns:mc="http://schemas.openxmlformats.org/markup-compatibility/2006"
        xmlns:local="clr-namespace:ScreenCastClient"
        mc:Ignorable="d"
        Title="ScreenCastClient" Height="819.649" Width="420.611" Loaded="Window_Loaded" Closing="Window_Closing">
    <Grid>
        <Grid.RowDefinitions>
            <RowDefinition/>
            <RowDefinition Height="60"/>
        </Grid.RowDefinitions>
        <Image x:Name="image" MouseDown="image_MouseDown" MouseUp="image_MouseUp" MouseMove="image_MouseMove"/>

        <Grid Grid.Row="1" Background="#FF008BFF">
            <Grid.ColumnDefinitions>
                <ColumnDefinition Width="204*"/>
                <ColumnDefinition Width="193*"/>
            </Grid.ColumnDefinitions>
            <Polygon Points="0,15 25,0 25,30" Fill="White" Margin="30,17,0,0" HorizontalAlignment="Left" Width="36" MouseDown="Polygon_MouseDown" MouseUp="Polygon_MouseUp" />
            <Ellipse Fill="White" Margin="186,18,181,12" Width="30" HorizontalAlignment="Center" MouseDown="Ellipse_MouseDown" MouseUp="Ellipse_MouseUp" Grid.ColumnSpan="2"/>
            <Rectangle Fill="White" Margin="0,17,30,10" HorizontalAlignment="Right" Width="30" MouseDown="Rectangle_MouseDown" MouseUp="Rectangle_MouseUp" Grid.Column="1"/>
        </Grid>
    </Grid>
</Window>
この先使うメソッド
この先頻繁に使う機能をまとめておきます。
あるデータから必要な数値のみを取り出す、といった場合正規表現がかなり便利です。
さらにその検証にOnline regex tester and debugger: PHP, PCRE, Python, Golang and JavaScript
こういったサイトがとても便利です。
        //コマンド実行して標準出力を返すだけ
        private string Exec(string str)
        {
            Process process = new Process
            {
                StartInfo =
                 {
                    FileName =  "cmd",
                    Arguments = @"/c " + str,
                    UseShellExecute = false,
                    CreateNoWindow = true,
                    RedirectStandardInput = true,
                    RedirectStandardError = true,
                    RedirectStandardOutput = true
                 },
                EnableRaisingEvents = true
            };
            process.Start();
            string results = process.StandardOutput.ReadToEnd();
            process.WaitForExit();
            process.Close();
            return results;
        }

        //正規表現でマッチしたデータを配列で返す
        private string[] GetRegexResult(string src, string pattern)
        {
            Regex regex = new Regex(pattern);
            Match match = regex.Match(src);
            string[] res = new string[match.Groups.Count - 1];
            for (int i = 1; i < match.Groups.Count; i++)
                res[i - 1] = match.Groups[i].Value;
            return res;
        }
FFmpegと連携して動画をデコード、表示する
どんなOSのアプリケーションにも標準で入力、出力する機能が備わっています。
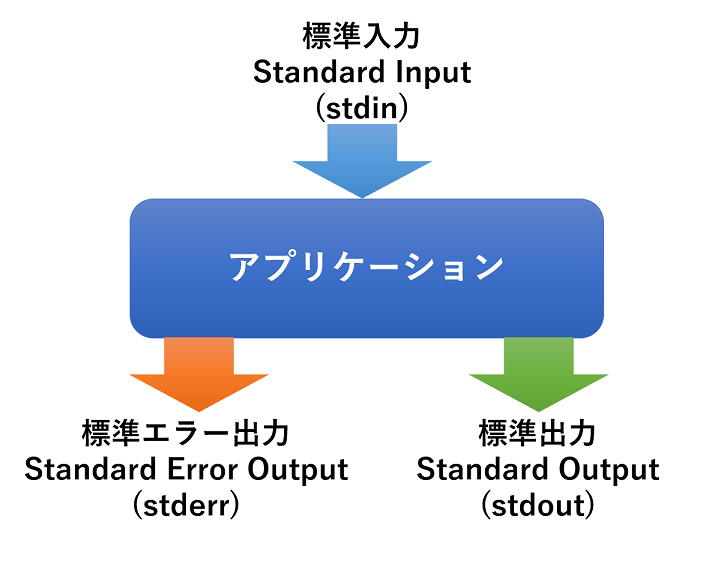
一般的な動画変換ソフトでは入出力をファイルで行いますが、FFmpegは標準入出力が使えるので出力先をstdoutにすることで、プログラムからデコードされたデータを読むことができます。また、FFmpegの場合、stderrからログが出力される仕様になっています。
以下のプログラムはFFmpegを起動し、stdout、stderrとのコネクションを確立するものです。
        private void StartFFmpeg()
        {
            //ポートの設定
            Exec("adb forward tcp:8080 tcp:8080");

            var inputArgs = "-framerate 60  -analyzeduration 100 -i tcp://127.0.0.1:8080";
            var outputArgs = "-f rawvideo -pix_fmt bgr24 -r 60 -flags +global_header - ";
            Process process = new Process
            {
                StartInfo =
                 {
                    FileName = "ffmpeg.exe",
                    Arguments = $"{inputArgs} {outputArgs}",
                    UseShellExecute = false,
                    CreateNoWindow = true,
                    RedirectStandardInput = true,
                    RedirectStandardError = true,//stderrを読めるようにする
                    RedirectStandardOutput=true//stdoutを読めるようにする
                 },
                EnableRaisingEvents = true
            };
            process.ErrorDataReceived += Process_ErrorDataReceived;//stderrからはログが流れてくるので別途処理する
            process.Start();
            rawStream = process.StandardOutput.BaseStream;//stdoutからはデータが流れてくるのでストリームを取得しておく
            process.BeginErrorReadLine();
            running = true;
            Task.Run(() =>
            {
                //別スレッドで読み取り開始
                ReadRawData();
            });
        }
必要な引数を設定しFFmpegを起動します。
出力からデータを取得する方法には2つの方法があり、1つ目がイベントに登録する方法、2つ目がストリームを取得し自分で読む方法です。
前者は手軽に取得することができますが、文字データに変換されるのでバイナリデータのやり取りには使用できません。
後者はストリームを扱うので少々面倒ですが細かい制御が可能です。
今回、stderrからはログが流れてくるので前者を、stdoutからは画像のバイナリデータが流れてくるので後者の方法でデータを読み出します。
FFmpegから送られてくるログを処理する
        //FFmpegからの標準エラー出力を読む
        private void Process_ErrorDataReceived(object sender, DataReceivedEventArgs e)
        {
            if (e.Data == null) return;

            Console.WriteLine(e.Data);

            if (imageWidth == 0 && imageHeight == 0)//送られてくるサイズがまだ確定していないとき
            {
                //FFmpegの出力からサイズを抜き取る荒業
                string[] res = GetRegexResult(e.Data, @"([0-9]*?)x([0-9]*?), [0-9]*? fps");
                if (res.Length == 2)
                {
                    imageWidth = int.Parse(res[0]);
                    imageHeight = int.Parse(res[1]);
                    bytePerframe = imageWidth * imageHeight * 3;

                    if(imageWidth>imageHeight)//横向き画面の場合
                    {
                        //タッチ座標の最大値と最小値を入れ替える
                        int tmp = displayWidth;
                        displayWidth = displayHeight;
                        displayHeight = tmp;
                    }

                    Dispatcher.Invoke(() => {//UIスレッドでBitmapを作成しないと、UIに反映できない
                        writeableBitmap = new WriteableBitmap(imageWidth, imageHeight, 96, 96, PixelFormats.Bgr24, null);
                        image.Source = writeableBitmap;
                    });
                }
            }

        }
今後送られてくる生データを復元するには画像のサイズが必須です。
FFmpegは変換を開始する時に、これから出力するストリームの情報をログに出力するのでそこから画像のサイズを抜き取る荒業を行います。
またbytePerFrameという変数は1フレームの画像の生成に必要なバイト数です。
画像の縦x横x1ピクセルに使用するバイト数で算出できます。
今回はFFmpegにrgb24で出力するよう設定している(rgbにそれぞれ8bitで24bit)ので1ピクセルに使用するバイト数は3です。
画像の仕組みの知識に不安がある方は、意外と知らない?画像の基礎知識とファイルの構造。を読んでみてください。
FFmpegから送られてくるデータを画像に戻す
        //FFmpegからのrawStreamを読んでBitmapに書き込む
        private void ReadRawData()
        {
            MemoryStream ms = new MemoryStream();

            byte[] buf = new byte[10240];
            while (running)
            {
                int resSize = rawStream.Read(buf, 0, buf.Length);

                if (ms.Length + resSize >= bytePerframe)//今回読んだデータで1フレーム分のデータに達したか、上回った場合
                {
                    int needSize = bytePerframe - (int)ms.Length;//1フレームに必要な残りのデータのサイズ
                    int remainSize = (int)ms.Length + resSize - bytePerframe;//余ったデータのサイズ

                    ms.Write(buf, 0, bytePerframe - (int)ms.Length);//1フレームに必要な残りのデータを読む

                    Dispatcher.Invoke(() =>
                    {
                        if (writeableBitmap != null)//データを書き込む
                            writeableBitmap.WritePixels(new Int32Rect(0, 0, imageWidth, imageHeight), ms.ToArray(), 3 * imageWidth, 0);
                    });

                    ms.Close();
                    ms = new MemoryStream();
                    ms.Write(buf, needSize + 1, remainSize);//余ったデータを書き込む
                }
                else
                {
                    ms.Write(buf, 0, resSize);//データを蓄積
                }
            }
        }
ストリームからデータを取得し、MemoryStreamに蓄積していきます。
1フレーム分のデータが確保できた場合、MemoryStream内のデータを画像に復元します。
WritableBitmapに配列から復元してくれるメソッドがあるのでそれを使用します。
また、WritableBitmapへのアクセスはUIスレッドで行う必要があります。
InputHostを起動し、接続する
        //InputHostを起動し、接続する
        private void StartInputHost()
        {
            string inputInfo = Exec("adb shell getevent -i");//Android端末の入力に関わるデータを取得
            //中からタッチ座標の最大値を抜き取る
            string[] tmp = GetRegexResult(inputInfo, @"ABS[\s\S]*?35.*?max (.*?),[\s\S]*?max (.*?),");
            displayWidth = int.Parse(tmp[0]);
            displayHeight = int.Parse(tmp[1]);

            //ポートの設定
            Exec("adb forward tcp:8081 tcp:8081");
            //アプリのパスを取得
            //余計な文字や改行コードは削除
            string pathToPackage = Exec("adb shell pm path space.siy.screencastsample").Replace("package:", "").Replace("\r\n", "");

            Process process = new Process
            {
                StartInfo =
                 {
                    FileName = "adb",
                    Arguments = $"shell",
                    UseShellExecute = false,
                    CreateNoWindow = true,
                    RedirectStandardInput = true,
                    RedirectStandardError = true,
                    RedirectStandardOutput = true
                 },
                EnableRaisingEvents = true
            };
            process.Start();
            process.OutputDataReceived += (s, e) =>
            {
                Console.WriteLine(e.Data);//今後なにか処理をするかも
            };
            process.BeginOutputReadLine();
            //Shell権限でInputHostを起動
            process.StandardInput.WriteLine($"sh -c \"CLASSPATH={pathToPackage} /system/bin/app_process /system/bin space.siy.screencastsample.InputHost\"");
            System.Threading.Thread.Sleep(1000);//起動するまで待機
            TcpClient tcp = new TcpClient("127.0.0.1", 8081);//InputHostに接続
            streamToInputHost = tcp.GetStream();
        }
始めに adb shell getevent -iを実行し、出力を読み取っていますが、
このコマンドはAndroidの入力デバイスに関するデータを表示するコマンドです。
ここでは、タッチパネルがとり得る座標の最大値を取得しています。
そして、InputHostを起動しています。
起動するまで1秒待機と荒いことをやっていますがご了承ください。
InputHostにデータを送る
接続周りの準備は完了したので、あとはInputHostにデータを送信していくだけです。
        private void image_MouseDown(object sender, MouseButtonEventArgs e)
        {
            Point p = GetDisplayPosition(e.GetPosition(image));
            byte[] sendByte = Encoding.UTF8.GetBytes($"screen 0 {p.X} {p.Y}\n");
            streamToInputHost.Write(sendByte, 0, sendByte.Length);
            mouseDown = true;
        }

        private void image_MouseMove(object sender, MouseEventArgs e)
        {
            if (mouseDown)
            {
                Point p = GetDisplayPosition(e.GetPosition(image));
                byte[] sendByte = Encoding.UTF8.GetBytes($"screen 2 {p.X} {p.Y}\n");
                streamToInputHost.Write(sendByte, 0, sendByte.Length);
            }
        }

        private void image_MouseUp(object sender, MouseButtonEventArgs e)
        {
            Point p = GetDisplayPosition(e.GetPosition(image));
            byte[] sendByte = Encoding.UTF8.GetBytes($"screen 1 {p.X} {p.Y}\n");
            streamToInputHost.Write(sendByte, 0, sendByte.Length);
            mouseDown = false;
        }

        //マウスの位置を端末のタッチ座標に変換
        private Point GetDisplayPosition(Point p)
        {
            int x = (int)(p.X / image.ActualWidth * displayWidth);
            int y = (int)(p.Y / image.ActualHeight * displayHeight);
            return new Point(x, y);
        }
imageのマウスに関するイベントを使用し、データを送信しています。
空白区切で2つ目の0,1,2という数値は0がDonw、1がUp、2がMoveの意味です。
また、キーイベントは以下のようにしています。
        private void Polygon_MouseDown(object sender, MouseButtonEventArgs e)
        {
            byte[] sendByte = Encoding.UTF8.GetBytes($"key 0 4\n");
            streamToInputHost.Write(sendByte, 0, sendByte.Length);
        }

        private void Polygon_MouseUp(object sender, MouseButtonEventArgs e)
        {
            byte[] sendByte = Encoding.UTF8.GetBytes($"key 1 4\n");
            streamToInputHost.Write(sendByte, 0, sendByte.Length);
        }

        private void Ellipse_MouseDown(object sender, MouseButtonEventArgs e)
        {
            byte[] sendByte = Encoding.UTF8.GetBytes($"key 0 3\n");
            streamToInputHost.Write(sendByte, 0, sendByte.Length);
        }

        private void Ellipse_MouseUp(object sender, MouseButtonEventArgs e)
        {
            byte[] sendByte = Encoding.UTF8.GetBytes($"key 1 3\n");
            streamToInputHost.Write(sendByte, 0, sendByte.Length);
        }

        private void Rectangle_MouseDown(object sender, MouseButtonEventArgs e)
        {
            byte[] sendByte = Encoding.UTF8.GetBytes($"key 0 187\n");
            streamToInputHost.Write(sendByte, 0, sendByte.Length);
        }

        private void Rectangle_MouseUp(object sender, MouseButtonEventArgs e)
        {
            byte[] sendByte = Encoding.UTF8.GetBytes($"key 1 187\n");
            streamToInputHost.Write(sendByte, 0, sendByte.Length);
        }
空白区切で2つ目は上と同じ意味です。
3つ目はキーの固有番号で、KeyEventで確認ができます。
また、端末に実装されていないキーも送ることができます。
例えば120にはPrintScreenキーが割り振られています。
スクリーンショットは普段は電源キーと音量Downの同時押しで行っていますが
このキーを送信するだけでスクリーンショットが取れたりします。
すぐに試したい方は
adb shell input keyevent 120
で再現できます。
実際に動かしてみる
ポートフォアーティングやInputHostをshellから起動するなど、
面倒なことは全てクライアントソフトに実装したので簡単です。
手順
1.Android側でアプリを起動し、スタートを押す
2.クライアントソフトを起動する
これだけです。
これで画面が映し出され、マウスで画面を操作することができます。
感想
Shellでapk内のクラスを実行するというのが普段のアプリ開発で無いことなので最初は戸惑いましたが、実装することができました。
今回の機能でadbは必須になってしまったので通常のユーザーに配布するならadbを導入して貰う必要が出てしまいました。
最も、今はadbのみのダウンロードができるようになっているので、導入の敷居も下がってると思いますが。(同梱はありなのかな?)
これでだいぶVysorに近づいてきました。
ただ、まだ文字入力やファイル転送ができていないので、次はそこを実装したいと思います。
では、最後までご覧下さりありがとうございました。
