はじめに
- 初心者が簡単なWebアプリを開発していきます。
- 手順をStep-by-Step方式で記載していきます。
- 前回(Step3)は、ルーティングを使ってみました。
開発環境
- Windows10 Home
- MySQL 8.0.12
- Python3.7.0 (pip 18.0)
- Flask 1.0.2
- Jinja2 2.10
- mysql-connector-python 8.0.12
※最新バージョン(2018/11/3時点)
- MySQL 8.0.13
- Python3.7.1 (pip 18.1)
- mysql-connector-python 8.0.13
前準備
MySQLをインストールする
MySQLにrootユーザでログインする
c:\>mysql -u root -p
Enter password: *****
Welcome to the MySQL monitor.  Commands end with ; or \g.
Your MySQL connection id is 12
Server version: 8.0.12 MySQL Community Server - GPL

Copyright (c) 2000, 2018, Oracle and/or its affiliates. All rights reserved.

Oracle is a registered trademark of Oracle Corporation and/or its
affiliates. Other names may be trademarks of their respective
owners.

Type 'help;' or '\h' for help. Type '\c' to clear the current input statement.
mysqlユーザを作成する
mysql> CREATE USER mysql@localhost;
Query OK, 0 rows affected (0.04 sec)
パスワードを設定する
mysql> SET PASSWORD FOR mysql@localhost='NewPassword';
Query OK, 0 rows affected (0.06 sec)
データベースを作成する
mysql> CREATE DATABASE kaggle;
Query OK, 1 row affected (0.12 sec)
権限を付与&確認する
mysql> GRANT ALL ON kaggle.* TO mysql@localhost;
Query OK, 0 rows affected (0.08 sec)

mysql> SHOW GRANTS FOR mysql@localhost;
+-----------------------------------------------------------+
| Grants for mysql@localhost                                |
+-----------------------------------------------------------+
| GRANT USAGE ON *.* TO `mysql`@`localhost`                 |
| GRANT ALL PRIVILEGES ON `kaggle`.* TO `mysql`@`localhost` |
+-----------------------------------------------------------+
2 rows in set (0.00 sec)
mysqlユーザでアクセス出来ることを確認する
mysql> exit
Bye

c:\>mysql -u mysql -p
Enter password: *****
Welcome to the MySQL monitor.  Commands end with ; or \g.
Your MySQL connection id is 13
Server version: 8.0.12 MySQL Community Server - GPL

Copyright (c) 2000, 2018, Oracle and/or its affiliates. All rights reserved.

Oracle is a registered trademark of Oracle Corporation and/or its
affiliates. Other names may be trademarks of their respective
owners.

Type 'help;' or '\h' for help. Type '\c' to clear the current input statement.

mysql> SHOW DATABASES;
+--------------------+
| Database           |
+--------------------+
| information_schema |
| kaggle             |
+--------------------+
2 rows in set (0.01 sec)
テーブルの作成
CREATE TABLE users (
  id INT UNSIGNED AUTO_INCREMENT,
  name VARCHAR(255) NOT NULL,
  age TINYINT UNSIGNED NOT NULL,
  gender VARCHAR(10) NOT NULL,
index(id)
)ENGINE=InnoDB DEFAULT charset=utf8;
データの追加
INSERT INTO users (
  name,
  age,
  gender
) VALUES (
  '日本 花子',
  32,
  '女'
), (
  '東京 次郎',
  22,
  '男'
), (
  '日本 太郎',
  34,
  '男'
);
前回までの復習として
- 仮想環境**(step4)**を作成
- 仮想環境の有効化
- pipのアップグレード
- flaskのインストール
- アプリの作成(ルーティング)
- テンプレートの作成(複数ページ)
Hello Flask
index.py
from flask import Flask
from flask import redirect
from flask import url_for
from flask import render_template

app = Flask(__name__)

@app.route('/')
def main():
    props = {'title': 'Step-by-Step Flask - index', 'msg': 'Welcome to Index Page.'}
    html = render_template('index.html', props=props)
    return html

@app.route('/hello')
def hello():
    props = {'title': 'Step-by-Step Flask - hello', 'msg': 'Hello World.'}
    html = render_template('hello.html', props=props)
    return html

@app.errorhandler(404)
def not_found(error):
    return redirect(url_for('main'))

if __name__ == '__main__':
    app.run(debug=True)
templates\index.html
<!DOCTYPE html>
<html>
    <head>
        <meta charset="utf-8">
        <title>{{props.title}}</title>
    </head>
    <body>
        <div id="contents">
            <p>{{props.msg}}</p>
        </div>
        <hr>
        <ul>
            <li><a href="/hello">Hello World</a></li>
        </ul>
    </body>
</html>
templates\hello.html
<!DOCTYPE html>
<html>
    <head>
        <meta charset="utf-8">
        <title>{{props.title}}</title>
    </head>
    <body>
        <div id="contents">
            <p>{{props.msg}}</p>
        </div>
        <hr>
        <ul>
            <li><a href="/">Home</a></li>
        </ul>
    </body>
</html>
Step4 - MySQLを利用する
簡単な接続テスト
(step4) C:\pystudy\lesson-flask\step4>python
Python 3.7.0 (default, Jun 28 2018, 08:04:48) [MSC v.1912 64 bit (AMD64)] :: Anaconda custom (64-bit) on win32
Type "help", "copyright", "credits" or "license" for more information.
>>> import mysql.connector
>>> config={'user':'mysql', 'host':'localhost', 'password': 'NewPassword', 'database':'kaggle'}
>>> dbh = mysql.connector.connect(**config)
>>> cursor = dbh.cursor()
>>> cursor.execute("SHOW DATABASES")
>>> cursor.fetchall()
[('information_schema',), ('kaggle',)]
>>> cursor.close()
True
>>> dbh.close()
アプリを修正する
- モジュールを作成する
- DataStoreフォルダ
- DataStore\_init_.pyファイル
- DataStore\MySQL.pyファイル
- DataStore\MySQLをインポートする
- users関数の作成
2018/11/03 修正
バージョンが上がった関係か、preparedを使用した際に以下のエラーを吐くようになった。
NotImplementedError: Alternative: Use connection.MySQLCursorPrepared修正箇所(前)def _open(self): self.dbh = mysql.connector.connect(**self.dns)
DataStore\MySQL.py
import mysql.connector

class MySQL:
    def __init__(self, **dns):
        self.dns = dns
        self.dbh = None

    def _open(self):
        self.dbh = mysql.connector.MySQLConnection(**self.dns)

    def _close(self):
        self.dbh.close()

    def query(self, stmt, *args, **kwargs):
        self._open()
        if kwargs.get('prepared', False):
            cursor = self.dbh.cursor(prepared=True)
            cursor.execute(stmt, args)
        else:
            cursor = self.dbh.cursor()
            cursor.execute(stmt)
        data = cursor.fetchall()
        cursor.close()
        self._close()
        return data
index.py
from flask import Flask
from flask import url_for
from flask import redirect
from flask import render_template

from DataStore.MySQL import MySQL
dns = {
    'user': 'mysql',
    'host': 'localhost',
    'password': 'NewPassword',
    'database': 'kaggle'
}
db = MySQL(**dns)

app = Flask(__name__)

@app.route('/')
def main():
    props = {'title': 'Step-by-Step Flask - index', 'msg': 'Welcome to Index Page.'}
    html = render_template('index.html', props=props)
    return html

@app.route('/hello')
def hello():
    props = {'title': 'Step-by-Step Flask - hello', 'msg': 'Hello World.'}
    html = render_template('hello.html', props=props)
    return html

@app.route('/users')
def users():
    props = {'title': 'Users List', 'msg': 'Users List'}
    stmt = 'SELECT * FROM users'
    users = db.query(stmt)
    html = render_template('users.html', props=props, users=users)
    return html

@app.route('/users/<int:id>')
def user(id):
    props = {'title': 'User Information', 'msg': 'User Information'}
    stmt = 'SELECT * FROM users WHERE id = ?'
    user = db.query(stmt, id, prepared=True)
    html = render_template('user.html', props=props,user=user[0])
    return html

@app.errorhandler(404)
def not_found(error):
    return redirect(url_for('main'))

if __name__ == '__main__':
    app.run(debug=True)
テンプレートファイルを追加・修正する
templates\users.html
<!DOCTYPE html>
<html>
    <head>
        <meta charset="utf-8">
        <title>{{props.title}}</title>
    </head>
    <body>
        <div id="contents">
            <p>{{props.msg}}</p>
            <table>
                <tr>
                    <th>ID</th>
                    <th>Name</th>
                </tr>
                {% for user in users %}
                <tr>
                    <td><a href="./users/{{user[0]}}">{{user[0]}}</a></td>
                    <td>{{user[1]}}</td>
                </tr>
                {% endfor %}
            </table>
        </div>
        <hr>
        <a href="/">Home</a>
    </body>
</html>
templates\user.html
<!DOCTYPE html>
<html>
    <head>
        <meta charset="utf-8">
        <title>{{props.title}}</title>
    </head>
    <body>
        <div id="contents">
            <p>{{props.msg}}</p>
            <table>
                <tr>
                    <th>ID</th>
                    <th>Name</th>
                    <th>Age</th>
                    <th>Gender</th>
                </tr>
                <tr>
                    {% for col in user %}
                    <td>{{ col }}</td>
                    {% endfor %}
                </tr>
            </table>
        </div>
        <hr>
        <a href="/users">Users List</a>
        <a href="/">Home</a>
    </body>
</html>
templates\index.html
<!DOCTYPE html>
<html>
    <head>
        <meta charset="utf-8">
        <title>{{props.title}}</title>
    </head>
    <body>
        <div id="contents">
            <p>{{props.msg}}</p>
        </div>
        <hr>
        <ul>
            <li><a href="/hello">Hello World</a></li>
            <li><a href="/users">Users List</a></li>
        </ul>
    </body>
</html>
実行
- MySQLの起動
- 環境変数の設定
- サーバ起動
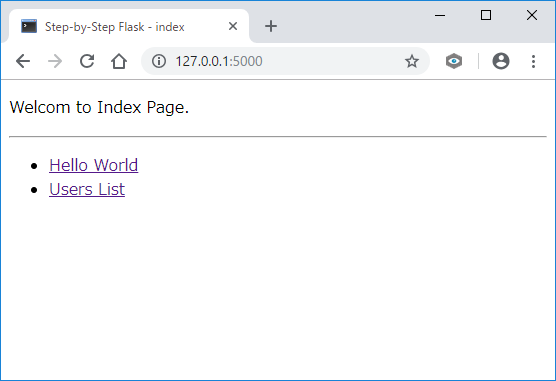
ルート(/)へアクセス
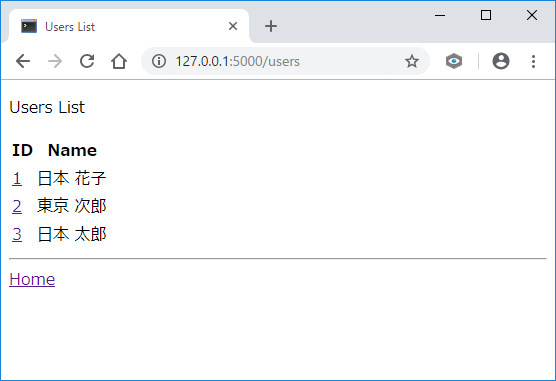
/usersへアクセス
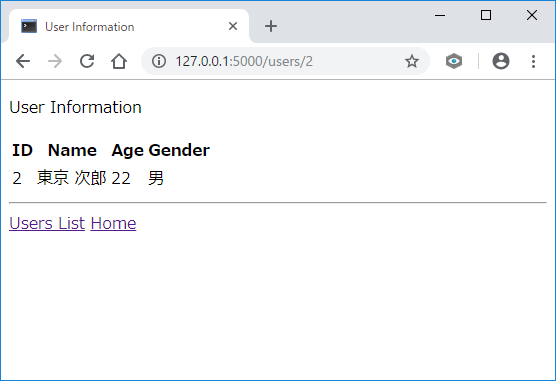
/users/<int:id>へアクセス
今回のまとめ
- MySQLを使うと本格的な感じがします。
- SQLインジェクションなど、セキュリティ対策を忘れずに。
おわりに
- 簡単なアプリを作成しました。この後は、ユーザの新規登録・更新・削除機能など追加してみて下さい。


