はじめに
- 初心者が簡単なWebアプリを開発していきます。
- 手順をStep-by-Step方式で記載していきます。
- 前回(Step2)では、テンプレートを使ってみました。
開発環境
- Windows10 Home
- Python3.7.0 (pip 18.0)
- Flask 1.0.2
- Jinja2 2.10
前回の復習として
- 仮想環境**(step3)**を作成
- 仮想環境の有効化
- pipのアップグレード
- flaskのインストール
- アプリの作成
- テンプレートの作成
Hello Flask
hello.py
from flask import Flask
from flask import render_template

app = Flask(__name__)

@app.route('/')
def main():
    props = {'title': 'Step-by-Step Flask', 'msg': 'Hello World.'}
    html = render_template('hello.html', props=props)
    return html

if __name__ == '__main__':
    app.run(debug=True)
templates\hello.html
<!DOCTYPE html>
<html>
    <head>
        <meta charset="utf-8">
        <title>{{props.title}}</title>
    </head>
    <body>
        <div id="contents">
            <p>{{props.msg}}</p>
        </div>
    </body>
</html>
Step3 - ルーティングを利用する
アプリを修正する
- url_for, redirectをインポートする
- main関数を修正
- hello関数の作成
- not_found関数の作成
index.py
from flask import Flask
from flask import redirect
from flask import url_for
from flask import render_template
app = Flask(__name__)
@app.route('/')
def main():
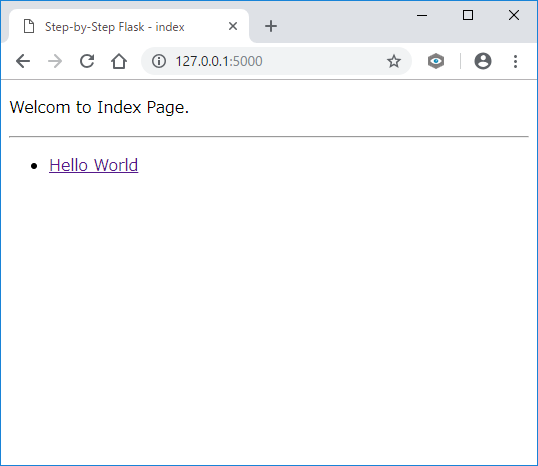
props = {'title': 'Step-by-Step Flask - index', 'msg': 'Welcome to Index Page.'}
html = render_template('index.html', props=props)
return html
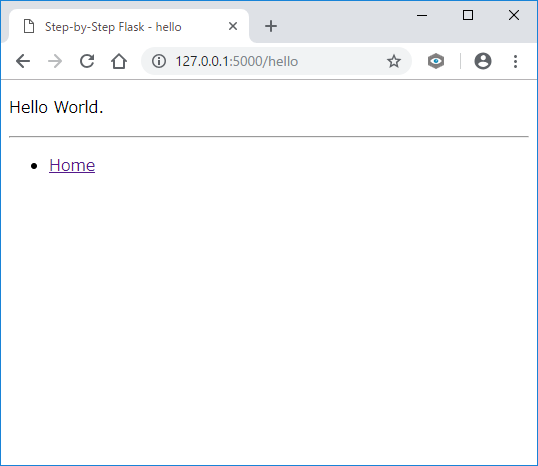
@app.route('/hello')
def hello():
props = {'title': 'Step-by-Step Flask - hello', 'msg': 'Hello World.'}
html = render_template('hello.html', props=props)
return html
@app.errorhandler(404)
def not_found(error):
return redirect(url_for('main'))
if __name__ == '__main__':
app.run(debug=True)
テンプレートファイルを追加・修正する
templates\index.html
<!DOCTYPE html>
<html>
    <head>
        <meta charset="utf-8">
        <title>{{props.title}}</title>
    </head>
    <body>
        <div id="contents">
            <p>{{props.msg}}</p>
        </div>
        <hr>
        <ul>
            <li><a href="/hello">Hello World</a></li>
        </ul>
    </body>
</html>
templates\hello.html
<!DOCTYPE html>
<html>
    <head>
        <meta charset="utf-8">
        <title>{{props.title}}</title>
    </head>
    <body>
        <div id="contents">
            <p>{{props.msg}}</p>
        </div>
        <hr>
        <ul>
            <li><a href="/">Home</a></li>
        </ul>
    </body>
</html>
実行
- 環境変数の設定 SET FLASK_APP=index.py
- サーバ起動
ルート(/)へアクセス
/helloへアクセス
/hogeへアクセス
存在しないページへのアクセスはルートへリダイレクトする。
今回のまとめ
- ルーティングを使うとページ遷移を制御出来ます。
Step4で実施すること
- MySQLへ接続してみます。