はじめに
- AWS Amplifyコンソールのチュートリアルを実施するにあたり、今更ながら、React.jsに入門したので備忘録。
AWS Amplify Consoleとは
- 継続的なデプロイによるフルスタックのサーバーレスウェブアプリケーションのホスティング
AWS Amplify Consoleの無料枠
1000 ビルド分/月
5GB のデータストレージ/月
15GB のホスティングサービス/月
開発環境
- Windows10 Home
- node.js: 12.16.3 LTS
- Visual Studio Code
環境整備
- node.js のインストール
- 自分の環境に合わせたものをダウンロードしてインストールする。
- Win64zip版
- 環境変数にパス追加
- ダウンロードしたファイルを解凍して、保存する。
- 環境変数(C:\Windows\System32\SystemPropertiesAdvanced.exe)のpathに、保存したフォルダを追加する。
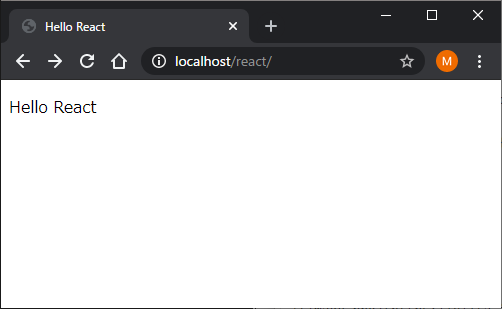
Hello React
index.html
<!DOCTYPE html>
<html lang="ja">
    <head>
        <meta charset="UTF-8">
        <title>Hello React</title>
        <script crossorigin src="https://unpkg.com/react@16/umd/react.development.js"></script>
        <script crossorigin src="https://unpkg.com/react-dom@16/umd/react-dom.development.js"></script>
    </head>
    <body>
        <div id="main">Loading...</div>
        <script>
            const dom = document.querySelector('#main');
            const el = React.createElement('p', {}, 'Hello React');
            ReactDOM.render(el, dom);
        </script>
    </body>
</html>
Reactプロジェクトの作成
- npm と npx がある。
- npx は、npmの拡張版
npx
C:\Dev> npx create-react-app react_app
npx: installed 98 in 22.36s

Creating a new React app in C:\Dev\react_app.

Installing packages. This might take a couple of minutes.
Installing react, react-dom, and react-scripts with cra-template...
:
Created git commit.

Success! Created react_app at C:\Dev\react_app
Inside that directory, you can run several commands:

  npm start
    Starts the development server.

  npm run build
    Bundles the app into static files for production.

  npm test
    Starts the test runner.

  npm run eject
    Removes this tool and copies build dependencies, configuration files
    and scripts into the app directory. If you do this, you can’t go back!

We suggest that you begin by typing:

  cd react_app
  npm start

Happy hacking!
Hint:
npm
C:\Dev> npm init react-app react_app
:
# npxと同じようにプロジェクトが生成される
プロジェクト操作のコマンド
- npm と yarn がある。
- npm は、node.js標準
- yarnは、Facebook製
| 操作 | npm | yarn |
|---|---|---|
| 開発サーバでアプリの起動 | npm start | yarn start |
| アプリのビルド | npm run build | yarn build |
| アプリのテスト | npm test | yarn test |
| プロジェクトのイジェクト | npm run eject | yarn eject |
アプリの起動
C:\> npm start
アプリのビルド
- buildフォルダ内にアプリが生成される。
- 生成されたファイルを、Webサーバのドキュメントルートに置く。
- サブフォルダに置くなら、package.jsonを編集して、ビルドする。
C:\> npm run build

> react_app@0.1.0 build C:\Dev\react_app
> react-scripts build

Creating an optimized production build...
Compiled successfully.

File sizes after gzip:

  39.38 KB  build\static\js\2.0103c501.chunk.js
  772 B     build\static\js\runtime-main.ad7bb390.js
  644 B     build\static\js\main.1e39e194.chunk.js
  547 B     build\static\css\main.5f361e03.chunk.css

The project was built assuming it is hosted at /.
You can control this with the homepage field in your package.json.

The build folder is ready to be deployed.
You may serve it with a static server:

  npm install -g serve
  serve -s build

Find out more about deployment here:

  bit.ly/CRA-deploy
Hint:
- The project was built assuming it is hosted at /.
- You can control this with the homepage field in your package.json.
package.json
{
  "name": "react_app",
  "version": "0.1.0",
  "private": true,
  "homepage": "./", #追加する
  "dependencies": {
:
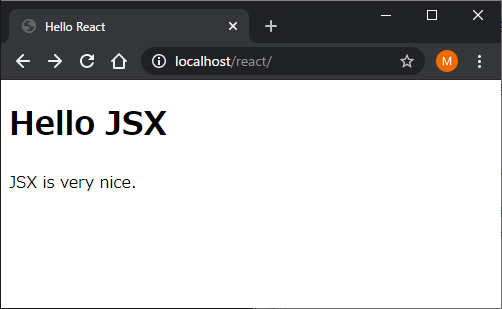
Hello JSX
index.html
<!DOCTYPE html>
<html lang="ja">
    <head>
        <meta charset="UTF-8">
        <title>Hello React</title>
        <script crossorigin src="https://unpkg.com/react@16/umd/react.development.js"></script>
        <script crossorigin src="https://unpkg.com/react-dom@16/umd/react-dom.development.js"></script>
        <script src="https://unpkg.com/@babel/standalone/babel.min.js"></script>
    </head>
    <body>
        <div id="main">Loading...</div>
        <script type="text/babel">
            const dom = document.querySelector('#main');
            const el = (
                <div>
                    <h1>Hello JSX</h1>
                        <p>JSX is very nice.</p>
                </div>
            );
            ReactDOM.render(el, dom);
        </script>
    </body>
</html>
スクリプトを別ファイルへ切り出し
./public/js/index.js
const dom = document.querySelector('#main');
const el = (
    <div>
        <h1>Hello JSX</h1>
        <p>JSX is very nice.</p>
    </div>
);
ReactDOM.render(el, dom);
index.html
<!DOCTYPE html>
<html lang="ja">
    <head>
        <meta charset="UTF-8">
        <title>Hello React</title>
        <script crossorigin src="https://unpkg.com/react@16/umd/react.development.js"></script>
        <script crossorigin src="https://unpkg.com/react-dom@16/umd/react-dom.development.js"></script>
        <script src="https://unpkg.com/@babel/standalone/babel.min.js"></script>
    </head>
    <body>
        <div id="main">Loading...</div>
        <script type="text/babel" src="./public/js/index.js"></script>
    </body>
</html>
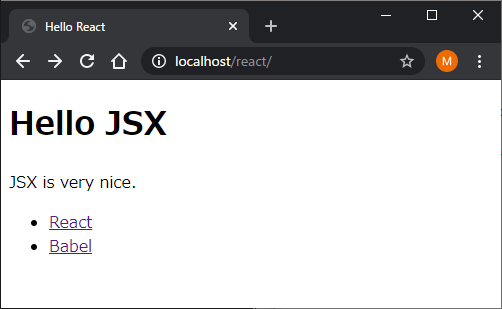
繰返し
./public/js/index.js
const links = [
    {key: 1, url: 'https://ja.reactjs.org/', name: 'React'},
    {key: 2, url: 'https://babeljs.io/', name: 'Babel'}
]

const dom = document.querySelector('#main');
const el = (
    <div>
        <h1>Hello JSX</h1>
        <p>JSX is very nice.</p>
        <ul>
            {links.map((link) => (
                <li key={link.key}><a href={link.url}>{link.name}</a></li>
            ))}
        </ul>
    </div>
);
ReactDOM.render(el, dom);
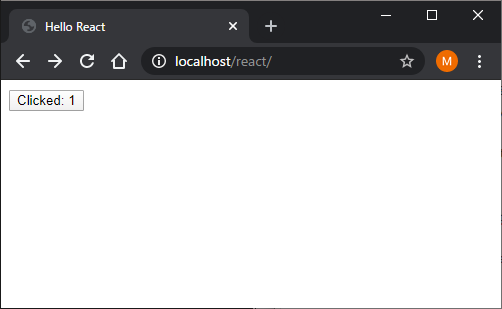
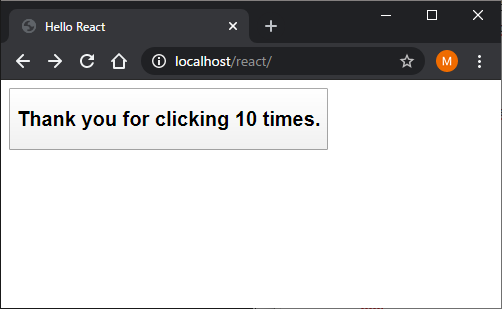
分岐とイベント
index.html
<!DOCTYPE html>
<html lang="ja">
    <head>
        <meta charset="UTF-8">
        <title>Hello React</title>
        <script crossorigin src="https://unpkg.com/react@16/umd/react.development.js"></script>
        <script crossorigin src="https://unpkg.com/react-dom@16/umd/react-dom.development.js"></script>
        <script src="https://unpkg.com/@babel/standalone/babel.min.js"></script>
    </head>
    <body>
        <button id="cnt" onclick="counter();">Click Me</button>
        <script type="text/babel" src="./public/js/index.js"></script>
    </body>
</html>
./publuc/js/index.js
const cnt_dom = document.querySelector('#cnt');
let count_num = 0;
function counter() {
    count_num++;
    const cnt_el = (
        <div>
        {count_num >= 10 ?
            <h2>Thank you for clicking 10 times.</h2>
        :
            <span>Clicked: {count_num}</span>
        }
        </div>
    );
    ReactDOM.render(cnt_el, cnt_dom);
}

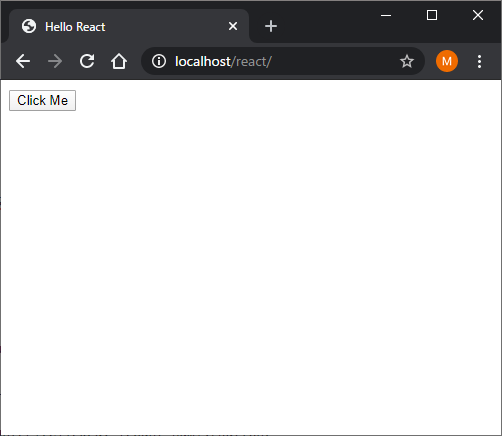
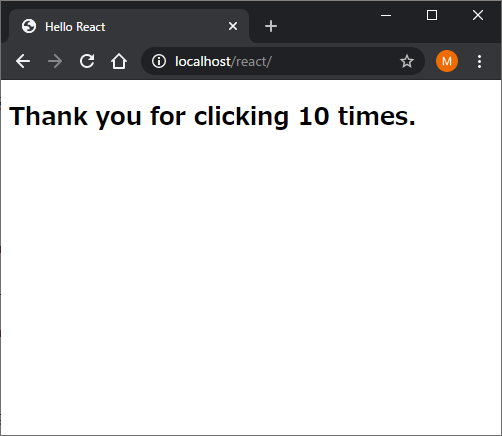
分岐その2
index.html
<!DOCTYPE html>
<html lang="ja">
    <head>
        <meta charset="UTF-8">
        <title>Hello React</title>
        <script crossorigin src="https://unpkg.com/react@16/umd/react.development.js"></script>
        <script crossorigin src="https://unpkg.com/react-dom@16/umd/react-dom.development.js"></script>
        <script src="https://unpkg.com/@babel/standalone/babel.min.js"></script>
    </head>
    <body>
        <div id="cnt2">Loading...</div>
        <script type="text/babel" src="./public/js/index.js"></script>
    </body>
</html>
./public/js/index.js
const cnt2_dom = document.querySelector('#cnt2');
let count_num = -1;
let counter = (event) => {
    count_num++;
    const cnt2_el = (
        <div>
        {count_num == 0 ?
            <button onClick={counter}>Click Me</button>
        :count_num >= 10 ?
            <h2>Thank you for clicking 10 times.</h2>
        :
            <button onClick={counter}>Clicked: {count_num}</button>
        }
        </div>
    );
    ReactDOM.render(cnt2_el, cnt2_dom);
}
counter();

おわりに
- AWS Amplifyを使うと、Githubにpushするだけで自動デプロイされて便利。
- コンポーネントの使い方とか、もう少し勉強していく。