今日は閑話休題。
フロント側のリンターとフォーマッターのお話ですね。
実は快適開発にとても大事な要素です。
想定環境は Laravel の VILT スタックと VSCode での開発です。
Editor Config の調整
まず初めに VSCode 文字コードなどを調整してくれる Editor Config を入れましょう。
Laravel のデフォルトでは .editorconfig が入っていますが、インデントが PHP 依存の4スぺになってて辛いです。。
直しましょう。
  root = true

  [*]
  charset = utf-8
  end_of_line = lf
  indent_size = 4
  indent_style = space
  insert_final_newline = true
  trim_trailing_whitespace = true

+ [*.{js,jsx,ts,tsx,vue}]
+ indent_size = 2

  [*.md]
  trim_trailing_whitespace = false

  [*.{yml,yaml}]
  indent_size = 2

  [compose.yaml]
  indent_size = 4
こうすることで VSCode 上で ts,vue 系のファイルは 2スぺ で利用可能になります!
見てわかる通り拡張子で制御できるので、いい感じに設定しましょう。
スタイリング
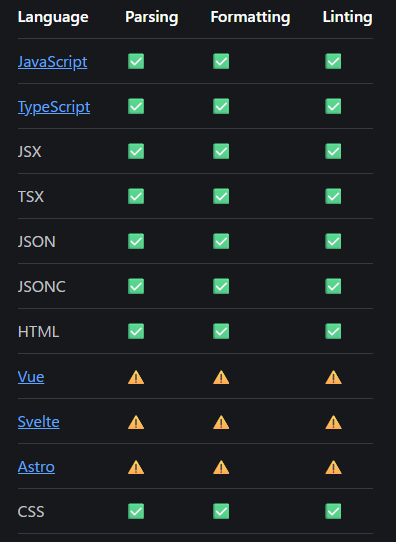
世間では Biome だの言われてますが、奴は Vue に完全対応していません...。 ![]()
また、まだエコシステムとしては新参のため、過渡期かと思います。
なので暫くは ESLint を信仰していきましょう。
Laravel のデフォルト構成は ESLint + Prettier になっています。
この構成、実は Prettier が死ぬほど邪魔をしてくるので、代わりに ESLint Stylistic を導入します。
これは昔 ESLint 側にあったコードスタイルの調整ルールを分離したもので、 Prettier と同じように利用することができます。
まずは Prettier を始末します。
$ npm remove prettier prettier-plugin-organize-imports prettier-plugin-tailwindcss eslint-config-prettier
$ rm ./.prettier*
    // ...
    "scripts": {
        "build": "vite build",
        "build:ssr": "vite build && vite build --ssr",
        "dev": "vite",
-       "format": "prettier --write resources/",
-       "format:check": "prettier --check resources/",
        "lint": "eslint . --fix"
    },
そしたら Stylistic をいれます。
$ npm i -D @stylistic/eslint-plugin
あわせて設定も調整します。
- import prettier from 'eslint-config-prettier'
+ import stylistic from '@stylistic/eslint-plugin'
  import vue from 'eslint-plugin-vue'

  import { defineConfigWithVueTs, vueTsConfigs } from '@vue/eslint-config-typescript'

  export default defineConfigWithVueTs(
      vue.configs['flat/essential'],
      vueTsConfigs.recommended,
      {
          ignores: ['vendor', 'node_modules', 'public', 'bootstrap/ssr', 'tailwind.config.js', 'resources/js/components/ui/*'],
      },
      {
          rules: {
              'vue/multi-word-component-names': 'off',
              '@typescript-eslint/no-explicit-any': 'off',
          },
      },
-     prettier,
+     stylistic.configs.customize({
+       // the following options are the default values
+       indent: 2,
+       quotes: 'single',
+       semi: false,
+       jsx: true,
+       // ...
+     }),
+   )
  );
これで lint を行うだけで、きれいになります!
手間は Prettier とさほど変わりません。
$ npm run lint --fix
ちなみに、この style の初期設定はこちらにあるので、いい感じに調整しましょう。
braceStyleは好みが分かれそう。
スタイリングは本質ではないので warn にしたい場合は以下の設定を入れると良いです。
  stylistic.configs.customize({
    // the following options are the default values
    indent: 2,
    quotes: 'single',
    semi: false,
    jsx: true,
    // ...
+   severity: 'warn',
  }),
さらに速度を上げたい場合は、 ignores などの設定で、対象フォルダを絞りましょ。
デフォルトではなぜか resources/js/components/ui/* が ignore 対象なのでお気をつけを...。
Tailwind の整列
Tailwind って class の順番が人によってカオスになりがちですよね...。
こういうとここそ、自動整列して読みやすさを向上させる必要があります。
francoismassart/eslint-plugin-tailwindcss を利用するのがメジャーな構成ですが、v4 対応に合わせてフルスクラッチするといっていて、まだ完成していません。。。。
なので今は schoero/eslint-plugin-better-tailwindcss を採用しましょ。
$ npm i -D eslint-plugin-better-tailwindcss
設定はこんな感じで追加します。
v4 の場合、 taiwlind の設定ファイルは app.css に記載されています。
なのでこのパスを指定してあげます。
+ import eslintPluginBetterTailwindcss from 'eslint-plugin-better-tailwindcss'

  export default defineConfigWithVueTs(
    // ...
+   {
+     plugins: {
+       'better-tailwindcss': eslintPluginBetterTailwindcss,
+     },
+     rules: {
+       ...eslintPluginBetterTailwindcss.configs['recommended-warn'].rules,
+     },
+     settings: {
+       "better-tailwindcss": {
+         entryPoint: 'resources/css/app.css',
+       },
+     },
+   },
    // ...
  )
rule は recommended-warn と recommended-error は好きなほうを導入してください。
これを導入すると class に書いた tailwind が自動整形されます!
プレフィックスがついていると複数行に分離してくれます。

未定義 Class エラー
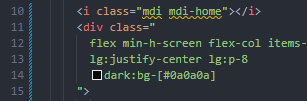
このプラグインには、標準で tailwind で未定義の class はエラーとしてくれます。
とても便利なのですが、例えば mdi-icon を導入していると、絵文字の指定もエラーとなってしまいます...
これを回避する設定も可能です。
better-tailwindcss/no-unregistered-classes のルールを上書きします。
ignore の中は正規表現に対応しているため、いい感じに指定しましょう。
    rules: {
      ...eslintPluginBetterTailwindcss.configs['recommended-warn'].rules,
+     'better-tailwindcss/no-unregistered-classes': [
+       'warn',
+       {
+         ignore: ['mdi.*'],
+       },
+     ],
    },
他にも整形対象の Attribute を追加できたりするので、ドキュメントを一読する価値ありです。
import の整列
他にカオスになる場所といえば、 import ですよね...。
あれを人の手で管理するのは無理すぎる...。
ということで eslint-plugin-import を導入します。
$ npm install eslint-plugin-import --save-dev
正直このプラグインの設定は難しいので、この方の設定内容を参考にさせていただきました!
大きく import/no-unresolved と import/order の二つのルールを入れます。
+ import eslintPluginBetterTailwindcss from 'eslint-plugin-better-tailwindcss'

  export default defineConfigWithVueTs(
    // ...
+   importPlugin.flatConfigs.recommended,
+   {
+     rules: {
+       'import/no-unresolved': 'off', // path は ts 側で検査
+       'import/order': [
+         'error',
+         {
+           'groups': ['builtin', 'external', 'internal', 'parent', 'sibling', 'index', 'object', 'type'],
+           'newlines-between': 'always', // import groups の間 1行あける
+          'pathGroupsExcludedImportTypes': ['builtin'],
+           'alphabetize': { order: 'asc', caseInsensitive: true }, // 大文字小文字関係なくアルファベット順にしたい
+         },
+       ],
+     },
+   },
    // ...
  )
import/order はこのプラグインの核。
linting を行うと奇麗に整列してくれます!
import/no-unresolved は off にしておかないと @/xxx などのエイリアスパスがエラーになります。
これは off でも TypeScript のチェックで弾けるので特に問題はないです。
Vue の設定
最後に Vue の調整。
デフォルトだとこいつらが入ってます。
  vue.configs['flat/essential'],
  vueTsConfigs.recommended,
Vue 側は flat/essential flat/strongly-recommended flat/recommended から選べます。
flat/recommended まで上げるとガッチガチの縛りになるので、flat/strongly-recommended くらいにはしておくと平和ですかね。
TypeScript 側は recommended recommended-type-checked strict strict-type-checked から選べます。
こっちも好きな縛りにしておきましょう。
拡張機能設定
これはおまけですが、VSCode でファイルを保存する際に、自動的に Lint を流しておくと幸せになります。
以下の拡張機能と設定を追加してください。
{
  "eslint.format.enable": true
  "editor.codeActionsOnSave": {
    "source.fixAll.eslint": "explicit",
  },
}
こうすることで、ファイルを更新して「Ctrl + S」で自動保存がかかります!
手動派ってのも分かるのですが、適当に書いて整形は任せてコードチェックってフローが爆速開発のコツな気がします。
おわりに
flat config ってはじめは不評でしたが、機能ごとにまとめられるのでだいぶ使いやすいですよね。
Vue の Compositon API パターンと思想が似てる。