AWSでサーバレスなAPIの開発
AWS Lambdaの最大実行可能時間が5分から15分に拡大され、Lambdaを使ったサーバレスな業務ロジックも今後さらに増えていくことでしょう。
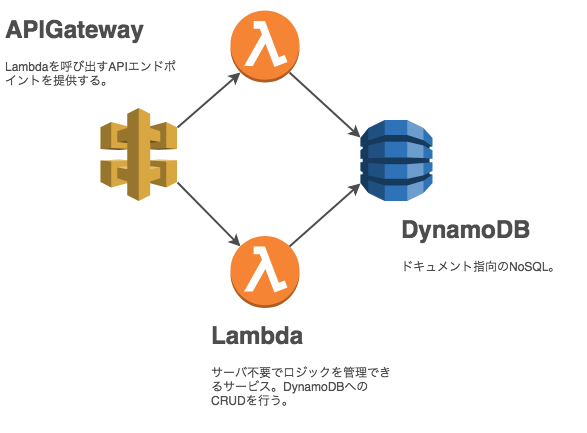
今回はAPI Gatewayと組み合わせてエンドポイントを作成し、DynamoDBでデータ管理を行うことで、コストを最小限に抑えたサーバレスAPIをAWS上に構築していきます。
さらにSAM(Serverless Application Model)を利用して、API GatewayとLambdaのデプロイまでをすべてコードで管理していくことを目指します。
シンプルなAPIを高速に開発・管理したいという時の手順にしていただければ幸いです。
今回作成するAPI一覧
![]() リクエストパラメータの情報を返却するシンプルなAPI(hello-world)
リクエストパラメータの情報を返却するシンプルなAPI(hello-world)
![]() リクエストボディの情報をDynamoDBに登録するAPI(score-register)
リクエストボディの情報をDynamoDBに登録するAPI(score-register)
![]() DynamoDBからPrimaryKeyを指定してデータを取得するAPI(score-fetcher)
DynamoDBからPrimaryKeyを指定してデータを取得するAPI(score-fetcher)
テンプレートの作成
まずは、APIを構築する上で必要になる「プロジェクト」のテンプレートを作成していきます。AWSが公式に提供しているSAM initコマンドを使用して簡単に作成できます。
![]() SAM init コマンドを使用した AWS SAM CLI によるシンプルなサーバレスアプリケーションの構築
SAM init コマンドを使用した AWS SAM CLI によるシンプルなサーバレスアプリケーションの構築
samのインストールがまだの場合は下記サイトをご参考にしてください。
![]() aws-sam-local 改め aws-sam-cli の新機能 sam init を試す
aws-sam-local 改め aws-sam-cli の新機能 sam init を試す
samが正しくインストールされているか、バージョンを確認してみます。
$ sam --version
SAM CLI, version 0.6.0
2018年10月時点で最新バージョンは0.6.0になります。
今回はGo言語を使用して開発していきたいので、以下のコマンドを実行して雛形を作成します。
$ sam init --runtime go
ディレクトリ直下に「sam-app」というプロジェクトが作成されていれば成功です。
ビルドコマンドの準備
Go言語をコンパイルする場合は注意が必要です。Lambdaで動かすためには、Linux上でも動作するようにクロスコンパイルの設定をビルドコマンドに追加してあげる必要があります。
デフォルトで以下のコマンドがMakefileに記載済みであることを確認してください。
...
build:
	GOOS=linux GOARCH=amd64 go build -o hello-world/hello-world ./hello-world
このコマンドでは、hello-worldディレクトリ下にあるmain.goをコンパイルして、直下にhello-worldという実行ファイルを作成していきます。
クロスコンパイルを意識せず、go build ...で実行ファイルを作成した場合、No such file or directoryというエラーが発生しますので、このエラーをみたらMakefileの記述をまず疑ってみましょう。
ただし、Ethereumと接続する場合など、ごく一部のライブラリでは上記コマンドでもLinux上で動作しない場合があります。その場合はDockerを利用しLinux上でコンパイルしてあげると解消することがありますので、いざという場合の選択肢として頭の片隅に置いておくと良いかと思います。
Makefileの作成
ビルドコマンドなど長くて覚えられないコマンドが多く存在するため、Makefileを使用してコマンドを管理する方法が一般的です。以下サイトに基本文法が紹介されていますので、もし詳しく学びたい方はご参照ください。
![]() Make入門講座 - Makefileの基本:ルール
Make入門講座 - Makefileの基本:ルール
基本的には以下のテンプレートを使いまわしてもらえれば十分かと思います。
# [sam init]デフォルトの記載
.PHONY: deps clean build

deps:
	go get -u ./...

clean:
	rm -rf ./hello-world/hello-world

build:
	GOOS=linux GOARCH=amd64 go build -o hello-world/hello-world ./hello-world
        #複数のLambdaを用意する場合はここにビルド対象を追加していく

# 追加
packege:
      sam package --template-file sam-app/template.yaml --output-template-file sam-app/output-template.yaml --s3-bucket template-store --profile koike

# 追加
deploy:
    sam deploy --template-file sam-app/output-template.yaml --stack-name go-lambda --capabilities CAPABILITY_IAM --profile koike
今回追加分の詳細は下記で順に追って解説していきます。
main.goの作成
まずは「200 OK」を返すだけのシンプルなAPIを用意します。デフォルトで既にmain.goのテンプレートが存在するかと思いますので、リクエストパラメータを受け取ってJSONを返すように書き換えます。
package main

import (
	"encoding/json"

	"github.com/aws/aws-lambda-go/events"
	"github.com/aws/aws-lambda-go/lambda"
)

func handler(request events.APIGatewayProxyRequest) (events.APIGatewayProxyResponse, error) {
	personID := request.PathParameters["personID"]
	personName := request.QueryStringParameters["personName"]
	old := 25

	person := PersonResponse{
		PersonID:   personID,
		PersonName: personName,
		Old:        old,
	}
	jsonBytes, _ := json.Marshal(person)

	return events.APIGatewayProxyResponse{
		Body:       string(jsonBytes),
		StatusCode: 200,
	}, nil
}

func main() {
	lambda.Start(handler)
}

type PersonResponse struct {
	PersonID   string `json:"personID"`
	PersonName string `json:"personName"`
	Old        int    `json:"old"`
}
今回のポイントは以下の3つです。
 パスパラメータの受け取り方
request.PathParametersを使用して取得します。
クエリ文字列の受け取り方
request.QueryStringParametersを使用して取得します。
JSONでの返却方法
json.Marshalでシリアライズし、stringでキャストしてBodyに渡します。
以上でLambdaのロジックは完成です。
template.yamlの作成
ここからはAPI Gatewayの定義を記述していきましょう。template.yamlも既にデフォルトで作成されていますので、/hello/{personID}でアクセスできるよう、以下のようにPathの部分だけを修正します。
AWSTemplateFormatVersion: '2010-09-09'
Transform: AWS::Serverless-2016-10-31
Description: >
  sam-app

  Sample SAM Template for sam-app

# More info about Globals: https://github.com/awslabs/serverless-application-model/blob/master/docs/globals.rst
Globals:
  Function:
    Timeout: 5

Resources:
  HelloWorldFunction:
    Type: AWS::Serverless::Function # More info about Function Resource: https://github.com/awslabs/serverless-application-model/blob/master/versions/2016-10-31.md#awsserverlessfunction
    Properties:
      CodeUri: hello-world/
      Handler: hello-world
      Runtime: go1.x
      Tracing: Active # https://docs.aws.amazon.com/lambda/latest/dg/lambda-x-ray.html
      Events:
        CatchAll:
          Type: Api # More info about API Event Source: https://github.com/awslabs/serverless-application-model/blob/master/versions/2016-10-31.md#api
          Properties:
            Path: /hello/{personID} # ここを変更
            Method: GET
ローカル実行(動作確認)
ここで動作確認をしてみます。まずはmain.goをビルドからです。Makefileに記述されているコマンドを使用するため、下記順番でコマンドを叩きます。
$ cd sam-app # sam-app下に移動
$ make build
$ sam local start-api
* Running on http://127.0.0.1:3000/
上記のようにRunning on http:/...と表示されれば成功です。
別ターミナルからcurlコマンドでAPIを呼び出してみましょう。
$ curl http://127.0.0.1:3000/hello/111?personName=koike
{"personID":"111","personName":"koike","old":25}
パスパラメータとクエリ文字列が返ってくるレスポンスであれば、main.goの修正が正しく反映されています。失敗する場合はmake buildの実行が失敗してビルドできてない可能性が高いので、ビルドコマンドをもう一度確認してみましょう。
デプロイ&リモート実行
ローカルでの動作が確認できたので、次はAPI GatewayとLambdaをデプロイして実行してみます。API GatewayとLambdaを作成するためには、CloudFormationのテンプレートを保存しておくバケットを用意する必要があるため、まずはS3バケットを作成しましょう。
$ aws s3 mb s3://sam-template-store --profile koike
make_bucket: sam-template-store
誤って操作を行わないよう、awsコマンドを実行するときは必ずprofileを指定するようにしましょう。awsコマンドの設定方法は以下を参照してください。
![]() AWS-CLIの初期設定のメモ
AWS-CLIの初期設定のメモ
S3バケットを作成できたらpackageコマンドを実行していきます。Makefileに以下を追加してください。
...
package:
	sam package --template-file template.yaml --output-template-file output-template.yaml --s3-bucket sam-template-store --profile koike
その後、以下のコマンドを実行します。
$ make package
...
Successfully packaged artifacts and wrote output template to file output-template.yaml.
Successfully ...と表示されていれば成功です。AWSマネジメントコンソールのS3ページから、バケット内にテンプレートが作成されていることが確認できます。
※以下エラーに注意してください。
![]() Makefileでmake時に 「*** missing separator. Stop.」 と出たときの対処法
Makefileでmake時に 「*** missing separator. Stop.」 と出たときの対処法
続いてCloudFormationを実行します。以下のコマンドをMakefileに追加しましょう。
...
deploy:
	sam deploy --template-file output-template.yaml --stack-name sam-template-store --capabilities CAPABILITY_IAM --profile koike
$ make deploy
...
Successfully created/updated stack - sam-template-store
AWSマネジメントコンソールより、API Gatewayの画面を開くと新たにリソースが作成されていることがわかります。
「ステージ」からURLを確認し、curlコマンドで動作確認してみましょう。Prod/Stageはどちらでも構いません。
curl https://aof90ysa43.execute-api.us-east-1.amazonaws.com/Prod/hello/111?personName=koike1
{"personID":"111","personName":"koike1","old":25}
ここまでで、API Gateway+Lambdaをテンプレートから作成して実行までできるようになりました。
![]() Completion
Completion
DynamoDBの用意
続いて、DynamoDBへデータを登録するAPIを作成していきます。
まずはデータを保存するためのDynamoDBテーブルを1つ作成します。
ユースケースとして、「受験者のテストデータを蓄積していく」場合を考えてみましょう。以下の属性を考慮した「Score」テーブルを作成してみます。
- PersonID(String) -> Hash Key
- TestID(String) -> Range Key
- PersonName(String)
- Score(Int)
- PassingMark(Bool)
後から再作成可能なように、コマンドをMakefileに保存しておきましょう。
...
dynamodb:
	aws dynamodb create-table --table-name Score --attribute-definitions AttributeName=PersonID,AttributeType=S AttributeName=TestID,AttributeType=S --key-schema AttributeName=PersonID,KeyType=HASH AttributeName=TestID,KeyType=RANGE --provisioned-throughput ReadCapacityUnits=1,WriteCapacityUnits=1 --profile koike
DynamoDBへのCreate操作
Scoreテーブルにデータを登録するAPIを追加していきます。「sam-app」の下に「score-register」という名のディレクトリを作成します。
sam-app
  |-- hello-world
        |-- main.go
  |-- template.yaml
  |-- output-template.yaml
  |-- Makefile
  |-- score-register (<- New)
        |-- main.go
Makefileにビルド対象を追加します。
...
build:
	GOOS=linux GOARCH=amd64 go build -o hello-world/hello-world ./hello-world
	GOOS=linux GOARCH=amd64 go build -o score-register/score-register ./score-register # 追加
...
template.yamlにも追加修正します。
...
Resources:
  ScoreRegisterFunction:
    Type: AWS::Serverless::Function # More info about Function Resource: https://github.com/awslabs/serverless-application-model/blob/master/versions/2016-10-31.md#awsserverlessfunction
    Properties:
      CodeUri: score-register/
      Handler: score-register
      Runtime: go1.x
      Tracing: Active # https://docs.aws.amazon.com/lambda/latest/dg/lambda-x-ray.html
      Events:
        CatchAll:
          Type: Api # More info about API Event Source: https://github.com/awslabs/serverless-application-model/blob/master/versions/2016-10-31.md#api
          Properties:
            Path: /scores
            Method: POST
      Policies: AmazonDynamoDBFullAccess
  HelloWorldFunction:
    Type: AWS::Serverless::Function # More info about Function Resource: https://github.com/awslabs/serverless-application-model/blob/master/versions/2016-10-31.md#awsserverlessfunction
    Properties:
      CodeUri: hello-world/
      Handler: hello-world
      Runtime: go1.x
      Tracing: Active # https://docs.aws.amazon.com/lambda/latest/dg/lambda-x-ray.html
      Events:
        CatchAll:
          Type: Api # More info about API Event Source: https://github.com/awslabs/serverless-application-model/blob/master/versions/2016-10-31.md#api
          Properties:
            Path: /hello/{personID}
            Method: GET
...
DynamoDBなどのAWSサービスにLambdaからアクセスする場合、Policiesの指定がないと権限エラーが発生します。今回はAmazonDynamoDBFullAccessを使用しましたが、必要に応じて適切なポリシーを指定してください。
※Resourcesを複数書いてしまうと最後の定義で上書きされてしまうので注意が必要です。
Goのロジックを記載していきます。
package main

import (
	"encoding/json"
	"fmt"

	"github.com/aws/aws-sdk-go/service/dynamodb/dynamodbattribute"

	"github.com/aws/aws-sdk-go/aws"

	"github.com/aws/aws-lambda-go/events"
	"github.com/aws/aws-lambda-go/lambda"
	"github.com/aws/aws-sdk-go/aws/session"
	"github.com/aws/aws-sdk-go/service/dynamodb"
)

func handler(request events.APIGatewayProxyRequest) (events.APIGatewayProxyResponse, error) {
	// リクエストボディ取得
	reqBody := request.Body
	jsonBytes := ([]byte)(reqBody)
	presonReq := new(PersonRequest)
	if err := json.Unmarshal(jsonBytes, presonReq); err != nil {
		fmt.Println("[ERROR]", err)
	}
	personID := presonReq.PersonID
	personName := presonReq.PersonName
	testID := presonReq.TestID
	score := presonReq.Score
	passingMark := false
	if score >= 80 {
		passingMark = true
	}

	// DynamoDBへ永続化
	person := Person{
		PersonID:    personID,
		PersonName:  personName,
		TestID:      testID,
		Score:       score,
		PassingMark: passingMark,
	}
	av, err := dynamodbattribute.MarshalMap(person)
	if err != nil {
		fmt.Println("[ERROR]", err)
	}

	session, err := session.NewSession()
	conn := dynamodb.New(session)
	param, err := conn.PutItem(&dynamodb.PutItemInput{
		TableName: aws.String("Score"),
		Item:      av,
	})
	if err != nil {
		fmt.Println("[ERROR]", err)
	}
	fmt.Println(param)

	return events.APIGatewayProxyResponse{
		Body:       string(jsonBytes),
		StatusCode: 200,
	}, nil
}

func main() {
	lambda.Start(handler)
}

type PersonRequest struct {
	PersonID   string `json:"personID"`
	PersonName string `json:"personName"`
	TestID     string `json:"testID"`
	Score      int    `json:"score"`
}

type Person struct {
	PersonID    string
	PersonName  string
	TestID      string
	Score       int
	PassingMark bool
}
ここでのポイントは2点。
リクエストボディの取得方法
json.Unmarshalを使ってリクエストボディのバイト配列を構造体につめてあげます。
DynamoDBへの永続化方法
dynamodbattribute.MarshalMapで構造体をDynamoDBに永続化する用のAttributeValueに変換してあげてPutItemInputで永続化してあげます。
下記コマンドでデプロイまでを行い、curlで動作確認をしてみましょう。
$ make build
$ make package
$ make deploy
$ curl -X POST https://aof90ysa43.execute-api.us-east-1.amazonaws.com/Prod/scores -d '{"personID":"121","personName":"koike","testID":"a1","score":80}'
{"personID":"121","personName":"koike","testID":"a1","score":80}
DynamoDBのマネジメントコンソールを確認すると、データが1件作成されていることを確認できます。
![]() Completion
Completion
DynamoDBへのQuery操作
最後に、今DynamoDBに登録したデータを取得するAPIを作成していきます。
score-register追加時と同様に、Makefileから修正していきましょう。
...
build:
	#GOOS=linux GOARCH=amd64 go build -o hello-world/hello-world ./hello-world ビルド時間短縮のため省略
	GOOS=linux GOARCH=amd64 go build -o score-register/score-register ./score-register
	GOOS=linux GOARCH=amd64 go build -o score-fetcher/score-fetcher ./score-fetcher
...
Resources:
  ScoreRegisterFunction:
    Type: AWS::Serverless::Function # More info about Function Resource: https://github.com/awslabs/serverless-application-model/blob/master/versions/2016-10-31.md#awsserverlessfunction
    Properties:
      CodeUri: score-register/
      Handler: score-register
      Runtime: go1.x
      Tracing: Active # https://docs.aws.amazon.com/lambda/latest/dg/lambda-x-ray.html
      Events:
        CatchAll:
          Type: Api # More info about API Event Source: https://github.com/awslabs/serverless-application-model/blob/master/versions/2016-10-31.md#api
          Properties:
            Path: /scores
            Method: POST
      Policies: AmazonDynamoDBFullAccess
  ScoreFetcherFunction:
    Type: AWS::Serverless::Function # More info about Function Resource: https://github.com/awslabs/serverless-application-model/blob/master/versions/2016-10-31.md#awsserverlessfunction
    Properties:
      CodeUri: score-fetcher/
      Handler: score-fetcher
      Runtime: go1.x
      Tracing: Active # https://docs.aws.amazon.com/lambda/latest/dg/lambda-x-ray.html
      Events:
        CatchAll:
          Type: Api # More info about API Event Source: https://github.com/awslabs/serverless-application-model/blob/master/versions/2016-10-31.md#api
          Properties:
            Path: /people/{personID}/scores
            Method: GET
      Policies: AmazonDynamoDBReadOnlyAccess # READのみのため権限を絞る
今回のFetcherは、PartitionKeyとSortKeyで1件取得するサンプルになります。
package main

import (
	"encoding/json"
	"fmt"

	"github.com/aws/aws-sdk-go/service/dynamodb/dynamodbattribute"

	"github.com/aws/aws-lambda-go/events"
	"github.com/aws/aws-lambda-go/lambda"
	"github.com/aws/aws-sdk-go/aws"
	"github.com/aws/aws-sdk-go/aws/session"
	"github.com/aws/aws-sdk-go/service/dynamodb"
)

func handler(request events.APIGatewayProxyRequest) (events.APIGatewayProxyResponse, error) {
	personID := request.PathParameters["personID"]
	testID := request.QueryStringParameters["testID"]

	session, err := session.NewSession()
	conn := dynamodb.New(session)

	param, err := conn.Query(&dynamodb.QueryInput{
		TableName: aws.String("Score"),
		ExpressionAttributeNames: map[string]*string{
			"#PersonID":    aws.String("PersonID"),
			"#TestID":      aws.String("TestID"),
			"#PersonName":  aws.String("PersonName"),
			"#Score":       aws.String("Score"),
			"#PassingMark": aws.String("PassingMark"),
		},
		ExpressionAttributeValues: map[string]*dynamodb.AttributeValue{
			":personID": {
				S: aws.String(personID),
			},
			":testID": {
				S: aws.String(testID),
			},
		},
		KeyConditionExpression: aws.String("#PersonID=:personID AND #TestID=:testID"),
		ProjectionExpression:   aws.String("#PersonID, #TestID, #PersonName, #Score, #PassingMark"),
	})
	if err != nil {
		fmt.Println("[ERROR]", err)
	}
	fmt.Println(param)
	scores := make([]*ScoreRes, 0)
	if err := dynamodbattribute.UnmarshalListOfMaps(param.Items, &scores); err != nil {
		fmt.Println("[ERROR]", err)
	}
	jsonBytes, _ := json.Marshal(scores)

	return events.APIGatewayProxyResponse{
		Body:       string(jsonBytes),
		StatusCode: 200,
	}, nil
}

func main() {
	lambda.Start(handler)
}

type ScoreRes struct {
	PersonID    string `json:"personID"`
	PersonName  string `json:"personName"`
	TestID      string `json:"testID"`
	Score       int    `json:"score"`
	PassingMark bool   `json:"PassingMark"`
}
再度デプロイして処理を確認します。
$ make build
$ make package
$ make deploy
$ curl https://aof90ysa43.execute-api.us-east-1.amonaws.com/Prod/people/121/scores?testID=a1
[{"personID":"121","personName":"koike","testID":"a1","score":80,"PassingMark":true}]
先ほど登録したデータが返ってくれば成功です。
![]() Completion
Completion
※発展編
 CORSの403を回避する
例えばS3にデプロイしたJavaScriptファイルからAPI Gatewayのエンドポイントをコールする場合、CORSエラーが発生する場合があります。
GoのレスポンスとAPI Gateway両方に追加で記載が必要になりますので、リクエストを許可するよう以下を追記してください。
...
return events.APIGatewayProxyResponse{
	Headers: map[string]string{
		"Access-Control-Allow-Origin": "*",
		"Access-Control-Allow-Headers": "origin,Accept,Authorization,Content-Type",
		"Content-Type":                 "application/json",
	},
	Body:       "OK",
	StatusCode: 200,
}, nil
Globals:
  Function:
    Runtime: go1.x
    Timeout: 5
    Environment: # More info about Env Vars: https://github.com/awslabs/serverless-application-model/blob/master/versions/2016-10-31.md#environment-object
      Variables:
        PARAM1: VALUE
  Api:
    Cors:
      AllowMethods: "'DELETE,GET,HEAD,OPTIONS,PATCH,POST,PUT'"
      AllowHeaders: "'Content-Type,Authorization,X-Amz-Date,X-Api-Key,X-Amz-Security-Token'"
      AllowOrigin: "'*'"
...
*をAllowMethodsやAllowHeadersに記載しても有効にならないため注意が必要です。下記サイトが大変参考になりました。
![]() CORS を分かってないから動くコード書いて理解する
CORS を分かってないから動くコード書いて理解する
複雑なクエリの実装例
Queryを組み合わせることで、上記Fetcherで紹介したPrimaryKeyによる取得だけでなく、柔軟な取得が可能になります。
![]() AWS SDK for Go API Reference
AWS SDK for Go API Reference
まとめ
上記のテンプレートを一度つくってしまえば、少しロジックを変えるだけで他のユースケースでもAPIを高速に開発していくことが可能です。さらにサーバレスであるため、本番運用を見据えたリクエスト量ではない限りインフラ費用を極限まで抑えることが可能になります。
![]() AWS Lambda 料金
AWS Lambda 料金
![]() Amazon DynamoDB 料金表
Amazon DynamoDB 料金表
こういった便利なものはどんどん利用していきたいところですね。