はじめに
個人的にスクレイピングをする機会があったのですが、
準備方法がまとまった記事がなく、
手間に感じたため、動かすためのベース作りのメモとして投稿できればと思います。
本題
前提
この記事のゴールとしては、
Spreadsheetの値を使用して、対象サイトからスクレイピングを行い、
値を取得できる初期段階の準備をすることです。
必要な環境の準備やライブラリのinstall部分は割愛しています。
- Spreadsheet使用準備
- Spreadsheetからの値の取得
- Seleniumでのスクレイピング
1. Spreadsheet使用準備
Google Cloud Platformへログインします。
https://console.cloud.google.com/cloud-resource-manager
下記画像の左上から「プロジェクトを作成」を選択し、新規プロジェクトを作成します。

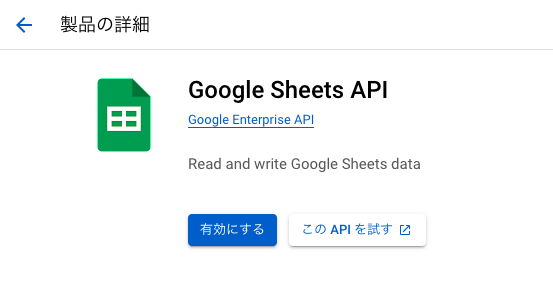
プロジェクトが作成できたら、検索窓に「Google Spreadsheet API」と検索します。

検索候補から選択できたら、「有効にする」を選択します。
有効にしたのち、「APIとサービス」から「サービスアカウントを管理」を選択します。

次に遷移した画面にて、「サービスアカウントを作成」を選択します。

選択できたら、「作成して続行」を選択します。

作成されたサービスアカウントの「鍵を管理」を選択し、
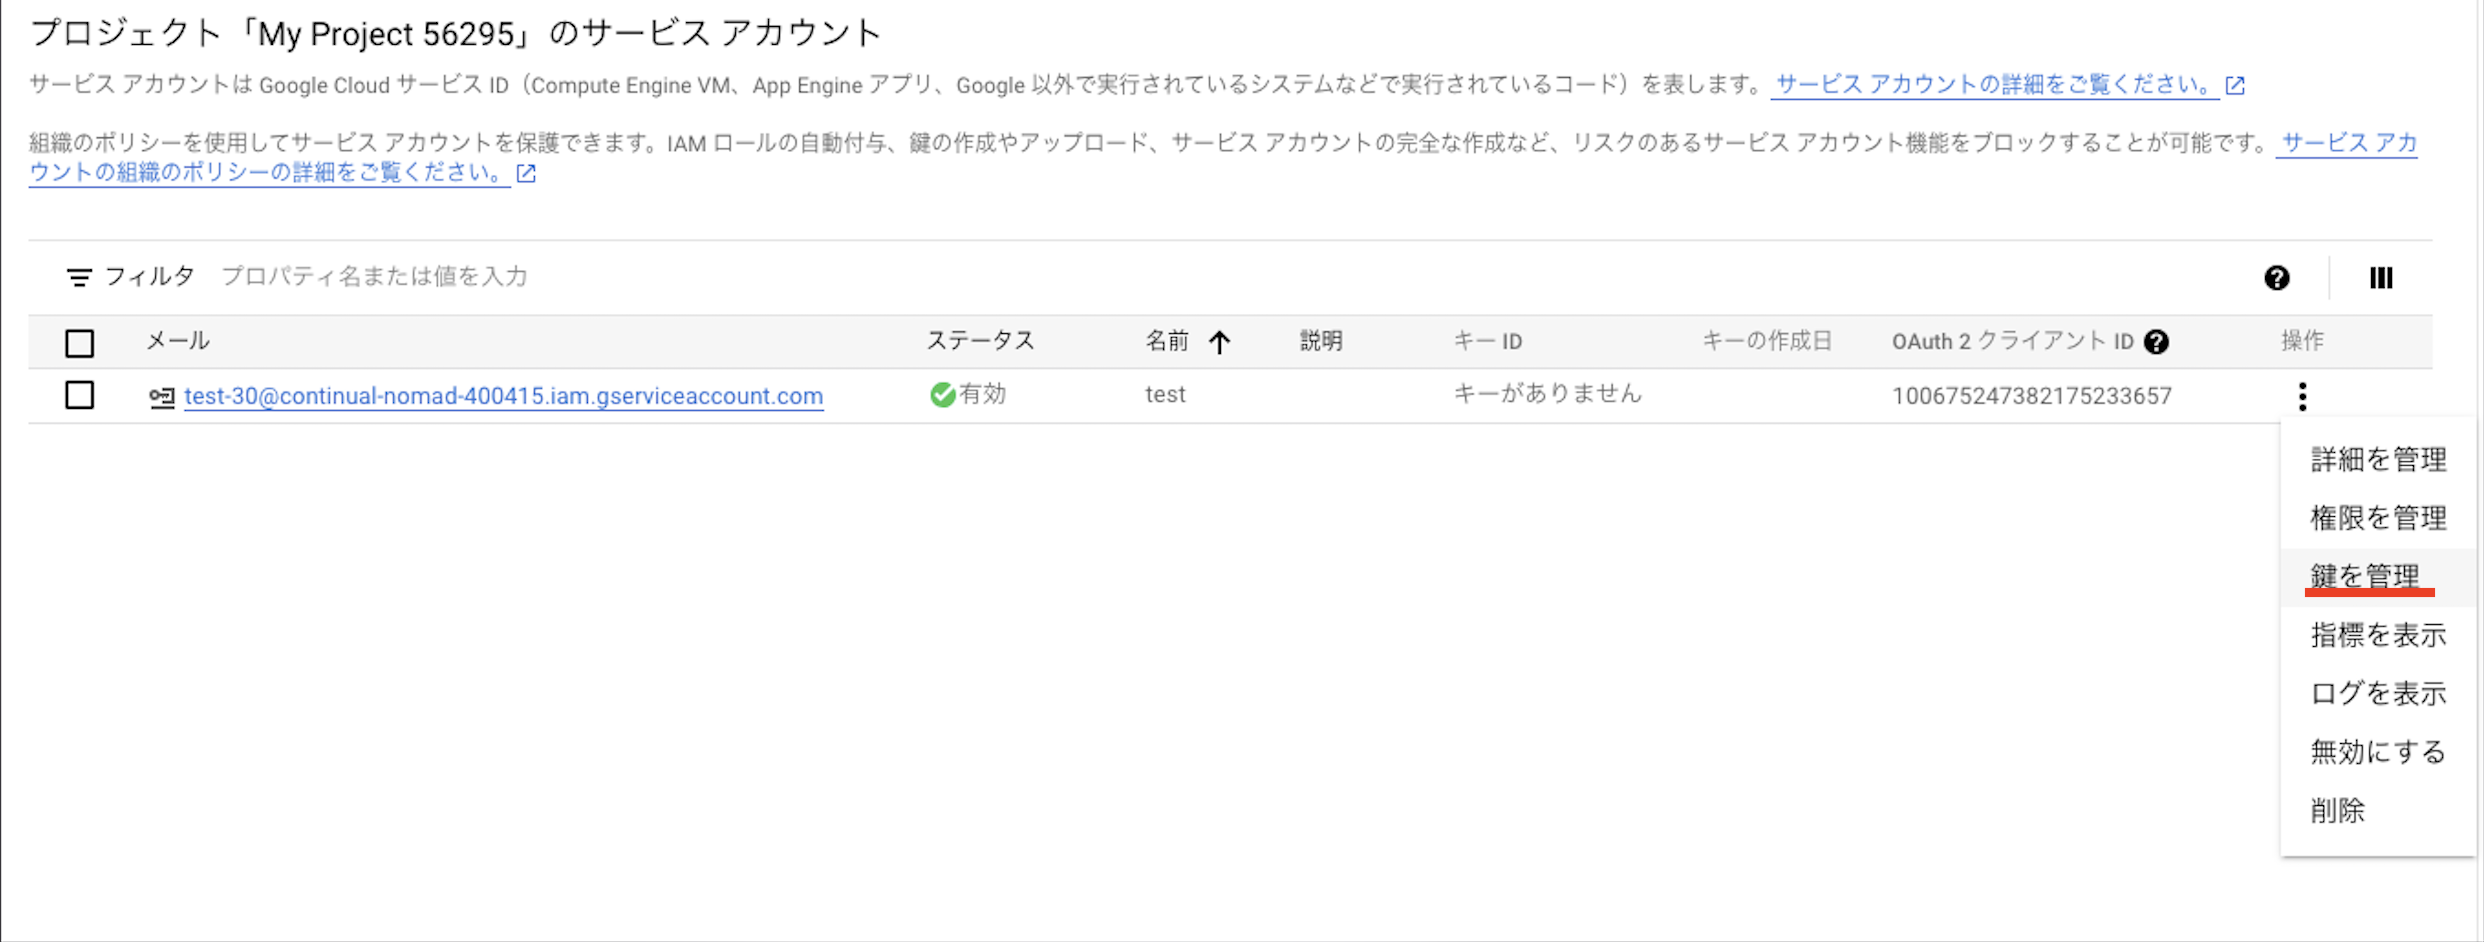
「鍵を追加」からJSONで作成をします。

作成が完了すると、ブラウザにjsonファイルがダウンロードがされます。
このjsonファイルに記載されている「client_email」の値を
使用したいSpreadsheetの共有から追加して、Spreadsheetの使用準備は完了となります。
また、このjsonファイルはコード上でも使用するため、とっておいてください。
2. Spreadsheetからの値の取得
ここからSpreadsheetから値を取得するコードを記載します。
適当なpythonのファイルを作成し、以下のようにコードを書きます。
from oauth2client.service_account import ServiceAccountCredentials
import gspread

    def get_from_gs():
      #APIの指定
      scope = ['https://spreadsheets.google.com/feeds','https://www.googleapis.com/auth/drive']

      #ダウンロードしたjsonファイルのパスを指定
      json = 'ダウンロードしたjsonファイル'

      #credentialsの取得
      credentials = ServiceAccountCredentials.from_json_keyfile_name(json, scope)

      gc = gspread.authorize(credentials)

      #Spreadsheetのキー指定
      SPREADSHEET_KEY = 'Spreadsheetのキー'

      #開くSpreadsheetを指定
      worksheet = gc.open_by_key(SPREADSHEET_KEY).sheet1

      val = worksheet.acell('A1').value

      return val
上に記載したメソッドでは、指定したSpreadsheetのA2セルから値を取得する処理を記載しています。
気を付ける部分としては、
-
json =の部分に先ほどダウンロードしたjsonファイルが置かれているパスを指定する - Spreadsheetのキー指定部分では対象としたSpreadsheetのURLの
https://docs.google.com/spreadsheets/d/xxxxxxxxxxxxxxxx/edit#gid=0
上記「xxxxxxxxxxxxxxxx」の部分を指定する
になります。
valの部分は今回は例として、対象シートのA2セルの値を取得するようにしていますが、
適宜取りたい値に合わせて変更してください。
3. Seleniumでのスクレイピング
次にSeleniumでの簡単なスクレイピング処理について、記載します。
コードとしては以下になります。
from selenium import webdriver
from selenium.webdriver.common.by import By
from bs4 import BeautifulSoup

import requests
import re

    def extract(hogehoge):
      # chromedriverの取得
      driver = webdriver.Chrome(r'/xxxx/xxxx/chromedriver-mac-x64/chromedriver')

      # 遷移したいURLを指定
      driver.get('https://www.google.com/')

      # Google検索でトップにヒットした検索結果をクリック
      search = driver.find_element(By.NAME,"q")
      search.send_keys(hogehoge)
      search.submit()
      driver.find_element(By.CLASS_NAME,"LC20lb").click();

      # クリックで遷移したサイトのURLを取得
      cur_url = driver.current_url
      html = requests.get(cur_url)

      # トップページのソースコードを取得
      soup = BeautifulSoup(html.text, "html.parser")

      # 取得したい文字列を指定
      search = re.compile('^hogehoge')
      found = soup.find(string=search)

      return found
上記の処理としてはseleniumを使用し、Google検索でTopに出てきた検索結果のサイトに遷移し、
BeautifulSoupでサイトのソースコードを取得後、前方一致で見つかった要素のテキストを取得する処理になっています。
気を付ける点としては、
seleniumを使用する際に必要なchromedriverのバージョンとChromeのバージョンが異なると
うまく動作しないため、使用しているChromeのバージョンに合わせて以下から
chromedriverをインストールしてください。
この2つのメソッドを組み合わせて呼ぶことで、Spreadsheetから取得した値で、
スクレイピングする部分までは動くようにはなるので、必要に応じて適宜変更して頂き、
目的の値を取得するベースになればと思います。
コードの全体像としては、以下のような形になります。
test.py
from oauth2client.service_account import ServiceAccountCredentials
from selenium import webdriver
from selenium.webdriver.common.by import By
from bs4 import BeautifulSoup

import gspread
import requests
import re

def get_from_gs():
  #APIの指定
  scope = ['https://spreadsheets.google.com/feeds','https://www.googleapis.com/auth/drive']

  #ダウンロードしたjsonファイルのパスを指定
  json = 'ダウンロードしたjsonファイル'

  #credentialsの取得
  credentials = ServiceAccountCredentials.from_json_keyfile_name(json, scope)
  gc = gspread.authorize(credentials)

  #Spreadsheetのキー指定
  SPREADSHEET_KEY = 'Spreadsheetのキー'

  #開くSpreadsheetを指定
  worksheet = gc.open_by_key(SPREADSHEET_KEY).sheet1
  val = worksheet.acell('A1').value

  return val

def extract(hogehoge):
  # chromedriverの取得
  driver = webdriver.Chrome(r'/xxxx/xxxx/chromedriver-mac-x64/chromedriver')

  # 遷移したいURLを指定
  driver.get('https://www.google.com/')

  # Google検索でトップにヒットした検索結果をクリック
  search = driver.find_element(By.NAME,"q")
  search.send_keys(hogehoge)
  search.submit()
  driver.find_element(By.CLASS_NAME,"LC20lb").click();

  # クリックで遷移したサイトのURLを取得
  cur_url = driver.current_url
  html = requests.get(cur_url)

  # トップページのソースコードを取得
  soup = BeautifulSoup(html.text, "html.parser")

  # 取得したい文字列を指定
  search = re.compile('^hogehoge')
  found = soup.find(string=search)

  return found

#Spreadsheetから値を取得
hogehoge = get_from_gs()
#取得した値で検索する
val = extract(hogehoge)

print(val)
上記をベースにして、他ファイルでimportして使用したり、検索部分をカスタマイズしていくと
より実用性の高いものになるかなと思います。
また、Spreadsheetからの取得部分を書き込みに変更しても使用できるため、
seleniumで取得した値をSpreadsheetで活用したいときなどにも使用できると思います。
最後に
自分が作業を始めるまでに手間だなと思った部分をまとめてみました。
少しでもこれから取り組んでみたいと思っている方の助けになれば幸いです。