はじめに
ES7+ React/Redux/React-Native snippets拡張機能でコードが書きやすくなったのですが、スニペットを自分が使うようにカスタムしたいと思い方法をまとめました。
https://marketplace.visualstudio.com/items?itemName=dsznajder.es7-react-js-snippets
既存のスニペット(rafceなど)は編集できないらしいです。
解決方法
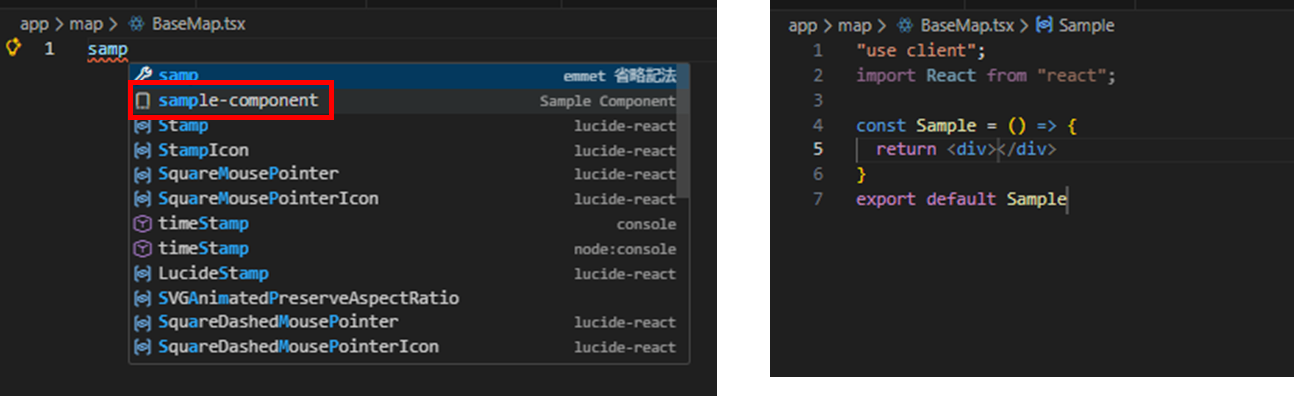
sample-componentと入力すると、次のようなコンポーネントが自動作成されるスニペットを作成します。
展開後のコンポーネント
"use client";
import React from "react";

const Sample = () => {
  return <div></div>
}
export default Sample
- コマンドパレット(Ctrl+Shift+P)で「Snippets」と検索
- 「Snippets: Configure Snippets」を選択
- 今回はtsxのカスタムスニペットを作成したいので
typescriptreactを選択 -
typescriptreact.jsonが開くので以下内容を記述する
typescriptreact.json
{
	"Sample Component": {
		"prefix": "sample-component",
		"body": [
			"\"use client\";",
			"import React from \"react\";",
			"",
			"const Sample = () => {",
			"  return <div>$1</div>",
			"}",
			"export default Sample"
		],
		"description": "Sampleというクライアント関数コンポーネントを生成"
	}
}
$1はスニペット展開後のコードで最初にカーソルがあてられる位置を指定するための変数です。
上記の場合、return <div>と</div>の間にカーソルがあてられます。
保存をすると次のキャプチャのように、カスタマイズしたスニペットが使えるようになります。
おわりに
頻繁に使うソースコードを時短で記述できるようになるため、結構便利です。
JISOUのメンバー募集中!
プログラミングコーチングJISOUでは、新たなメンバーを募集しています。
日本一のアウトプットコミュニティでキャリアアップしませんか?
興味のある方は、ぜひホームページをのぞいてみてください!
▼▼▼
https://projisou.jp