要約
API Gateway は、内部的に Cloud Endpoints と同じ ESPv2 を立てているので、仕様を共有しているようです。
このため、Cloud Endpoints 側の仕様も理解しておくと良いです。特に Open API の制限事項については、以下公式ページを良く確認したほうが良いです。
OpenAPI 機能の制限
例えば、API キーを HTTP ヘッダに設定する場合は、x-api-key ヘッダしか認められません。クエリの場合は、key もしくは api_key しか認められません。
これは、API Gateway 側の制限事項に書かれていないので、注意が必要です。(2026年2月執記述現在)
はじめに
Google Cloud の中に API Gateway というサービスがあります。
公式:
https://docs.cloud.google.com/api-gateway/docs?hl=ja
Google Cloud で API を公開しようとすると、Cloud Load Balancing から Cloud Endpoints まで様々なリソースの用意が必要なのですが、それらを一括して作成してくれるので、便利です。
ただし、細かいことができないので、お試し的に API を公開したい場合に、活用するといった用途になるかと思います。
今回の記事は、API キーを使った API 公開をするにあたって、その OpenAPI定義書の設定にハマったので、それを記述したいと思います。
API Gateway の作成
Web のコンソールからも作れますが、概念的に少しわかりづらいので、Google Cloud CLI を使います。
1. テスト用の Cloud Run をつくる
以下に、Google が用意した hello world イメージがあるので活用すると良いです。
コンテナイメージ: us-docker.pkg.dev/cloudrun/container/hello
2. 定義書を作る
API Gatway が提供する API 定義書を作成します。以下サンプル。
https://hello-xxxxxx.asia-northeast1.run.app は先に作ったテスト用の Run の URL です。
api.yaml
swagger: "2.0"
info:
  title: HELLO API
  version: 1.0.0

schemes:
  - https

produces:
  - test/html

paths:
  /hello:
    get:
      operationId: id_heallo
      x-google-backend:
        address: "https://hello-xxxxxx.asia-northeast1.run.app"
        deadline: 180.0
      security:
        - ApiKeyAuth: []
      responses:
        "200":
          description: Success

securityDefinitions:
  ApiKeyAuth:
    type: apiKey
    name: x-api-key
    in: header
3. API を作る
パラメータ
- api_id:
test-api(API名、API 全体の名前になります。API の名前ではないです) - location:
asia-northeast1(API が動くロケーション)
gcloud api-gateway apis create {api_id} --location={location}
4. 構成を作る
パラメータ
- config_ver:
v1構成名。API 定義書の更新ごとに作成するので、それが分かる名前が良い。 - config_path:
./api.yaml先につくった API 定義書ファイル(yaml)へのパス
gcloud api-gateway api-configs create {config_ver} --api={api_id} --openapi-spec={config_path}
5. 実際の Gateway サーバを作る
パラメータ
- gate_name:
test-api-gw(この名前で API の URL も作成される)
gcloud api-gateway gateways create {gate_name} --api={api_id} --api-config={config_ver} --location={location}
API 定義書を更新する場合は、コマンドの create を update に変更してください。
サービス有効化
パラメータ
- service_name:
{api_id}-xxxx.apigateway.{プロジェクト番号}.cloud.goog
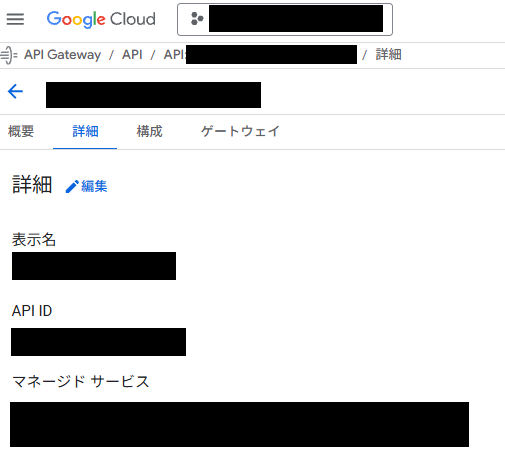
service_name は、実際にはコンソールから確認してください。黒塗りばかりで申し訳ないですが、API Gateway のページから、詳細タブの「マネージドサービス」欄に書かれているのが、service_name です。
gcloud services enable {geniac-prize-domain2-api-037sw6qbey0nw.apigateway.basic-geniac-prize-domain2.cloud.goog}
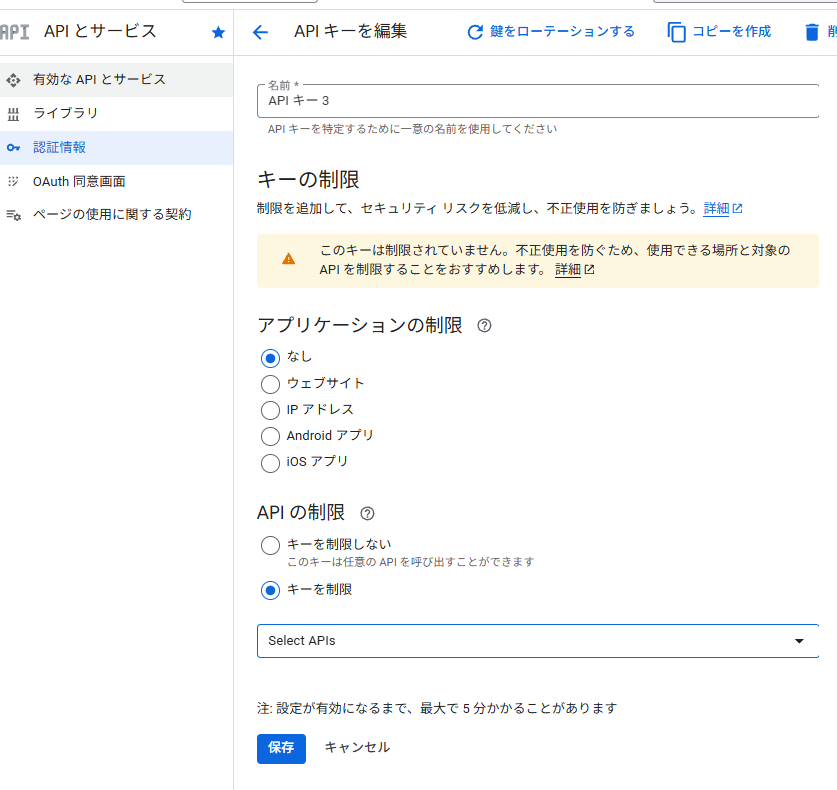
API キー発行と制限
コンソールの認証情報ページから、API キーを発行します。この際、制限としてキーを制限を選択し、「Select APIs」から、作成した API を選択します。API 名は、OpenAPI定義書に書いた「title」に示された名前が表示されているはずです。(例では HELLO TEST)
ハマりポイント
私がハマったポイントとして、OpenAPI定義書において、securityDefinitions に定義できる API キーには制限があることです。要約にも書きましたが、name 値に任意のヘッダー名を設定できると考えたのですが、実際には x-api-key 固定です。
    securityDefinitions:
      ApiKeyAuth:
        type: apiKey
        name: x-api-key
        in: header
まとめ
Google Cloud は各サービスごとにそこそこドキュメントがそろっており助かるのですが、Api Gateway と Cloud Endpoints のように、仕様を共有するサービスについては、個々にドキュメントが作られるため、兄弟サービスは相互に目を通した方が良いということですね。