2020/8/18/に東北TECH道場Flutter講座に参加しました.
今回はFlutterについて様々な勉強会で登壇されている,神原健一さんのお話をお伺いしました.
そのお話の中でも「UI/UXの改善例」が興味深かったので,実際に手を動かしてみてアウトプットしてみるといった内容です.
何かツッコミなどあれば編集リクエストかコメントかTwitterでいただければ修正いたします
今回学ぶこと
・FlutterでのUI/UXの改善例
①paddingをつける
②外枠をつける
③ラベルをつける
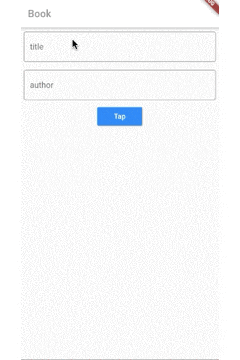
目指す成果物
こちらのように,Textを入力するためのWidgetのUI/UX改善をしてみます.
| before | after |
|---|---|
 |
 |
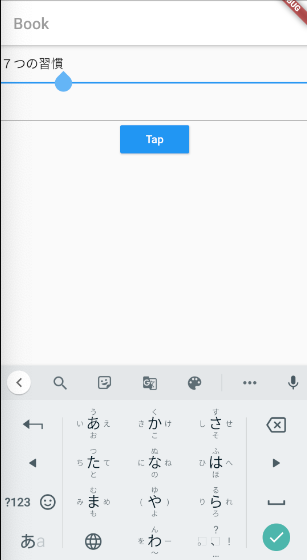
beforeのコードはこちらです.
import 'package:flutter/material.dart';

void main() => runApp(MyApp());

class MyApp extends StatelessWidget {
  @override
  Widget build(BuildContext context) {
    return MaterialApp(
      home: Scaffold(
          appBar: AppBar(
            title: Text(
              'Book',
              style: TextStyle(
                color: Colors.grey,
              ),
            ),
            backgroundColor: Colors.white,
          ),
          body: Center(
            child: Column(
              children: <Widget>[
                TextField(),
                TextField(),
                RaisedButton(
                  onPressed: () {},
                  color: Colors.blue,
                  child: Text(
                    'Tap',
                    style: TextStyle(
                      color: Colors.white,
                    ),
                  ),
                ),
              ],
            ),
          )),
    );
  }
}
ステップ
1. 余白(padding)をつける
やり方は,このようにPadding()でTextFile()をネストしてあげるとpaddingが設定できます.
Padding(
 padding: const EdgeInsets.all(8.0),
 child: TextField(),
),
全体のコードはこちらです.
import 'package:flutter/material.dart';

void main() => runApp(MyApp());

class MyApp extends StatelessWidget {
  @override
  Widget build(BuildContext context) {
    return MaterialApp(
      home: Scaffold(
          appBar: AppBar(
            title: Text(
              'Book',
              style: TextStyle(
                color: Colors.grey,
              ),
            ),
            backgroundColor: Colors.white,
          ),
          body: Center(
            child: Column(
              children: <Widget>[
                Padding(
                  padding: const EdgeInsets.all(8.0),
                  child: TextField(),
                ),
                Padding(
                  padding: const EdgeInsets.all(8.0),
                  child: TextField(),
                ),
                RaisedButton(
                  onPressed: () {},
                  color: Colors.blue,
                  child: Text(
                    'Tap',
                    style: TextStyle(
                      color: Colors.white,
                    ),
                  ),
                ),
              ],
            ),
          )),
    );
  }
}
2. 外枠(border)をつける
外枠をつけると,こんなイメージです.
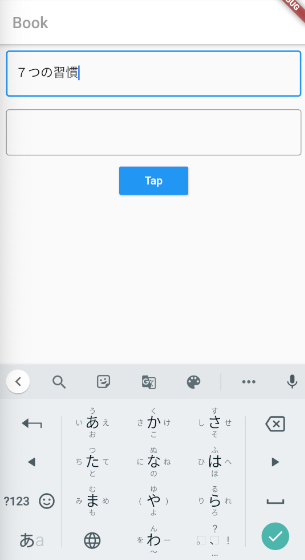
やり方は,このようにTextFiled()内でdecoration: InputDecoration(border: OutlineInputBorder(),を加えると外枠が設定できます.
Padding(
  padding: const EdgeInsets.all(8.0),
  child: TextField(
    decoration: InputDecoration(border: OutlineInputBorder(),
  ),
),
全体のコードはこちらです.
import 'package:flutter/material.dart';

void main() => runApp(MyApp());

class MyApp extends StatelessWidget {
  @override
  Widget build(BuildContext context) {
    return MaterialApp(
      home: Scaffold(
          appBar: AppBar(
            title: Text(
              'Book',
              style: TextStyle(
                color: Colors.grey,
              ),
            ),
            backgroundColor: Colors.white,
          ),
          body: Center(
            child: Column(
              children: <Widget>[
                Padding(
                  padding: const EdgeInsets.all(8.0),
                  child: TextField(
                    decoration: InputDecoration(border: OutlineInputBorder()),
                  ),
                ),
                Padding(
                  padding: const EdgeInsets.all(8.0),
                  child: TextField(
                    decoration: InputDecoration(border: OutlineInputBorder()),
                  ),
                ),
                RaisedButton(
                  onPressed: () {},
                  color: Colors.blue,
                  child: Text(
                    'Tap',
                    style: TextStyle(
                      color: Colors.white,
                    ),
                  ),
                ),
              ],
            ),
          )),
    );
  }
}
3. ラベルをつける
ラベルをつけると,こんなイメージです.
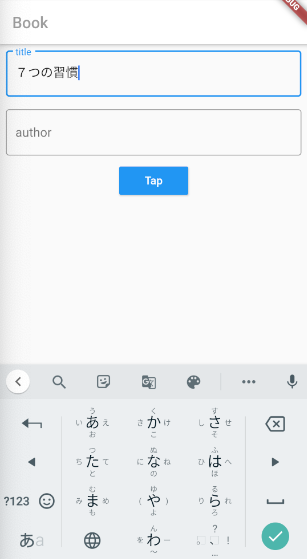
やり方は,このようにTextFiled()内でlabelText: 'title',を加えるとラベルが設定できます.
Padding(
  padding: const EdgeInsets.all(8.0),
  child: TextField(
    decoration: InputDecoration(
    labelText: 'title', border: OutlineInputBorder()),
  ),
),
全体のコードはこちらです.
import 'package:flutter/material.dart';

void main() => runApp(MyApp());

class MyApp extends StatelessWidget {
  @override
  Widget build(BuildContext context) {
    return MaterialApp(
      home: Scaffold(
          appBar: AppBar(
            title: Text(
              'Book',
              style: TextStyle(
                color: Colors.grey,
              ),
            ),
            backgroundColor: Colors.white,
          ),
          body: Center(
            child: Column(
              children: <Widget>[
                Padding(
                  padding: const EdgeInsets.all(8.0),
                  child: TextField(
                    decoration: InputDecoration(
                        labelText: 'title', border: OutlineInputBorder()),
                  ),
                ),
                Padding(
                  padding: const EdgeInsets.all(8.0),
                  child: TextField(
                    decoration: InputDecoration(
                        labelText: 'author', border: OutlineInputBorder()),
                  ),
                ),
                RaisedButton(
                  onPressed: () {},
                  color: Colors.blue,
                  child: Text(
                    'Tap',
                    style: TextStyle(
                      color: Colors.white,
                    ),
                  ),
                ),
              ],
            ),
          )),
    );
  }
}
このようにテキストの入力するときに,ラベルが外枠に重なるように表示されるようになります.
以上でUI/UX改善例は終了です.
ソースコード
Github:
https://github.com/syuheifujita/flutter-tech-dojo-fix-ui
参考資料
登壇された神原健一さんの各種アカウント
神原健一さんのTwitter: https://twitter.com/korodroid
【東北TECH道場】で発表させていただいた資料です。「Flutterアプリ開発入門」です。非公開セミナーですが、登壇資料は公開できる内容にしました。興味ありましたらご参照ください。あえて基本を中心にお話させていただきました。お疲れ様でした😀https://t.co/mUTfmxmJc2#東北TECH道場 #flutterjp
— Kenichi Kambara (@korodroid) August 18, 2020
HP: http://www.iplatform.org/blog/profile
東北TECH道場
http://tohokutechdojo.appspot.com/
おわりに:他にもっとわかりやすい方法あれば教えてください
もしかすると,情報が古かったり間違っていたり,他にもっとわかりやすい方法があるのかもしれません.
皆さんの中で上手に使い方をまとめているかたがいればぜひ教えてください!
Twitterやコメントなどでお待ちしています.質問でもお気軽に!