管理しているサーバ環境が増えるにつれて踏み台サーバも増えてきているので、
なにか統合管理出来ないかを調べていたところ、
Teleport By GRAVIRATIONAL というを見つけたので触ってみました。
Teleport について
Teleport By GRAVIRATIONAL とは、(直訳ですが)
『Gravitational Teleportは、SSHまたはKubernetes APIを介してLinuxサーバーのクラスターへのアクセスを管理するためのゲートウェイです。従来のOpenSSHの代わりに使用する必要がある組織向けに使用することを目的としています。』
OepnSSHの代わりに利用する踏み台システムと解釈しました。
Teleport の基本構成
以下の3つの機能を繋ぎ合わせる事で実現しています。
- Authサーバ
認証サーバです。管理画面へのログイン管理と管理するノードサーバの認証を制御します。
構築時と同時に証明書を扱うget-certとtokenを扱うpublish-tokenを導入します - Proxyサーバ
Proxyサーバです。管理画面を提供します。
ここで取得したTokenとCAを使用して、ProxyサーバーとしてAuthサーバーに紐づきます。 - Nodeサーバ
管理されるクラスタ、ノードサーバです。
ここでTokenを使用してNodeサーバーとしてAuthサーバーに紐づきます。
今回の Teleport の環境
AWS での実装はいくつかのサイトで紹介されているので、今回は GCPをベースにした以下のような構成での確認を行ってみました。
環境
-
クラウド基盤
Google Cloud Platform
リージョン:asia-northeast1 -
クラスタ
EC2 : CentOS 7.7.1908
Teleport : v4.1.4 -
イメージ
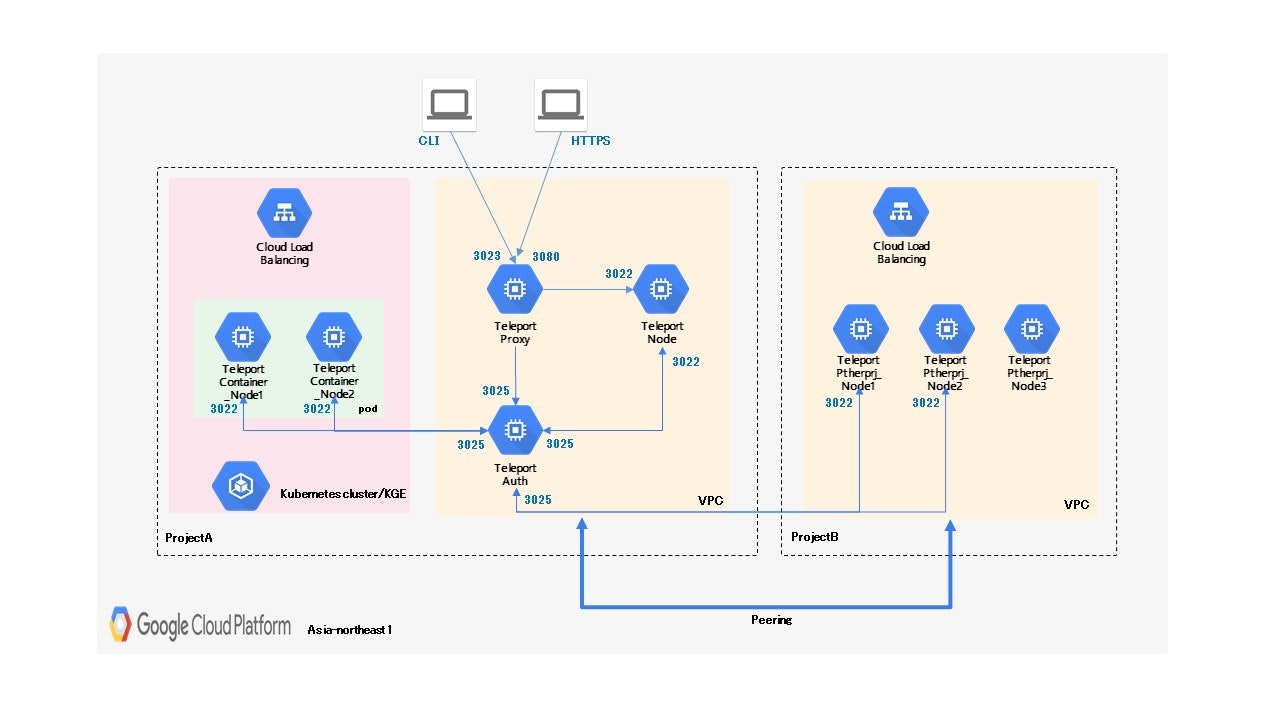
青字の数字は各クラスタに許可するポート番号です。
Google Compute Engine の構築、ファイヤーウォールのルールなど詳細は省略します。
やりたい事
- teleportの基本インストール
- プロジェクトをまたいでのクラスタ管理
- GKE(Kubenetes)上のクラスタ管理
teleportの基本インストール
- teleportのインストール
※全てのサーバ共有作業
wget https://get.gravitational.com/teleport-v4.1.4-linux-amd64-bin.tar.gz
tar xvf teleport-v4.1.4-linux-amd64-bin.tar.gz
cd teleport
sudo ./install
Auth サーバ
- 設定ファイル(/etc/teleport.yaml)
GCPで作成するという事で、証明書やユーザー作業データの保管は GCS と Firestore あたりで出来るのかと探ってみたのですが、
v4.1.4 ではまだ AWS の S3 と DynamoDB しかサポートされていない模様。。。
今回はディレクトリ管理で進める事に。
teleport:
  nodename: <teleportで表示される名前を指定>
  data_dir: /var/lib/teleport
  pid_file: /var/run/teleport.pid
  auth_token: cluster-join-token
  auth_servers:
  - 0.0.0.0:3025
  connection_limits:
    max_connections: 1000
    max_users: 250
  log:
    output: stderr
    severity: INFO
  storage:
    type: dir
    collection_name: cluster-data
auth_service:
  enabled: "yes"
  listen_addr: 0.0.0.0:3025
  tokens:
  - proxy,node:cluster-join-token
  session_recording: ""
  client_idle_timeout: 0s
  disconnect_expired_cert: false
ssh_service:
  enabled: "no"
proxy_service:
  enabled: "no"
- 自動起動の設定(/lib/systemd/system/teleport.service)
[Unit]
Description=Teleport SSH Service
After=network.target

[Service]
Type=simple
Restart=on-failure
ExecStart=/usr/local/bin/teleport start --config=/etc/teleport.yaml
ExecReload=/bin/kill -HUP $MAINPID
PIDFile=/var/run/teleport.pid

[Install]
WantedBy=multi-user.target
起動
 systemctl start teleport
 chkconfig teleport on
Proxy サーバ
- 設定ファイル(/etc/teleport.yaml)
証明書はLet'sEncryptを利用。取得の仕方は省略します。
teleport:
  nodename: <teleportで表示される名前を指定>
  data_dir: /var/lib/teleport
  pid_file: /var/run/teleport.pid
  auth_servers: #
  - <AuthサーバのIPを指定>:3025
  connection_limits:
    max_connections: 1000
    max_users: 250
  log:
    output: stderr
    severity: INFO

auth_service:
  enabled: "no"

ssh_service:
  enabled: "no"

proxy_service:
  enabled: "yes"
  listen_addr: 0.0.0.0:3023
  web_listen_addr: 0.0.0.0:3080
  https_key_file: /etc/letsencrypt/<ドメイン名>/privkey.pem
  https_cert_file: /etc/letsencrypt/<ドメイン名>/fullchain.pem
ここまで出来たら、Authサーバで招待トークンを発行
tctl nodes add --roles node --ttl=5m
Proxyサーバでクラスタ参加起動
teleport start \
   --roles=node \
   --token=******************************* \
   --ca-pin=sha256:******************************* \
   --auth-server=<AuthサーバのIP>:3025 \
   --config=/etc/teleport.yaml
接続が確立出来たら認証情報は保持してくれるので、次回以降はAuthサーバ同様に起動設定を行って問題ありません。
Node サーバ
- 設定ファイル(/etc/teleport.yaml)
teleport:
  nodename: <teleportで表示される名前を指定>
  data_dir: /var/lib/teleport
  pid_file: /var/run/teleport.pid
  auth_token: cluster-join-token
  auth_servers:
  - <AuthサーバのIPを指定>:3025
  connection_limits:
    max_connections: 1000
    max_users: 250
  log:
    output: stderr
    severity: INFO
  storage:
    type: dir
    collection_name: cluster-data

auth_service:
  enabled: "no"
ssh_service:
  enabled: "no"
  enabled: "yes"
  listen_addr: 0.0.0.0:3022
  public_addr: <ProxyサーバのIPを指定>:3022
  commands:
  - name: hostname
    command: [/bin/hostname]
    period: 1m0s
  - name: arch
    command: [/bin/uname, -p]
    period: 1h0m0s

proxy_service:
  enabled: "no"
ここまでProxyサーバの時と同様に、Authサーバで招待トークンを発行
tctl nodes add --roles node --ttl=5m
Nodeサーバでクラスタ参加起動
teleport start \
   --roles=node \
   --token=******************************* \
   --ca-pin=sha256:******************************* \
   --auth-server=<AuthサーバのIP>:3025 \
   --config=/etc/teleport.yaml
あとは Proxyサーバの時と同じく、起動設定を行います。
ユーザー追加
Teleport を利用するユーザ名(そのユーザでアクセス可能なOSユーザ名なども指定可能。)
以下コマンドをAuthサーバにて実行。
tctl users add hoge
表示されたURL(Proxyサーバ)へブラウザでアクセスし、パスワード設定とMFA設定を行いログインした結果がこちら

ログイン後に、Nodeサーバが追加されている事。
Nodeサーバを選択する事で、コマンド操作が可能な事を確認。
プロジェクトをまたいでのクラスタ管理
先程作成したTeleport環境とは別のGCP Project にクラスタを3台立てた構成を追加出来るかを確認。
VPC Network Peering
ProjectA と ProjectB の「VPCネットワーク設定」より「VPC ネットワーク ピアリング」を行う。
ここでは接続を確立する為に双方のProjectで設定を行う必要がある。
Teleport環境へはProjectBのsubnetからのみファイヤーウォールで許可を行い、Nodeサーバ追加と同じ手順を踏むことで、
別プロジェクトでのNodeの追加を確認。

3台のNodeが新たに追加されている事が確認出来て、操作も可能。
GKE(Kubenetes)上のクラスタ管理
Teleport環境にてKubenetesにて管理されているコンテナ環境を追加して管理を行えるかを確認。
今回はGKE(Google Kubernetes Engine)を利用。
予め、 設定ファイル teleport.yaml を組み込んだコンテナイメージを GCR(Google Container Registry)へ保存しておく。
podを2つ起動させて追加させてみる。
クラスタ作成
gcloud container clusters create --num-nodes=2 <クラスタ名> \
--zone asia-northeast1-a \
--machine-type g1-small \
--enable-autoscaling \
--min-nodes=2 \
--max-nodes=5
起動
kubectl run <アプリケーション名> --image=asia.gcr.io/sample/kubernetes_container_images:latest --replicas=2 --limits=cpu=200m
podの設定
kubectl exec -it <pod名> /bin/sh
でログインした上で、これまでのNodeサーバと同様にAuthサーバとの認証を実行。

コンテナもノードとしてこれまでと同様に追加され、ログインしての操作も可能な事を確認。
※コンテナのユーザがrootしか許可していなかったので、ここだけrootユーザでログインし直し。
おわりに
今回は GCP環境におけるTeleportでのクラスタ管理の確認を行いました。
個人的にはコンテナへのコンソールログインが出来たのがよかったです。
コンテナへの導入に関してはもっと自動化出来るように進めなければと。
さらに、AWSのS3,DynamoDBに代わる管理方法が実現出来なかった事は今後の課題です。
![]() FORK Advent Calendar 2019
FORK Advent Calendar 2019
![]() 2日目 Dialogflowを使ってプログラミングなしでbot作成 @nag244
2日目 Dialogflowを使ってプログラミングなしでbot作成 @nag244
![]() : 4日目 AppleScriptでMacのシャットダウン時にファイルを削除する @lilysweet
: 4日目 AppleScriptでMacのシャットダウン時にファイルを削除する @lilysweet