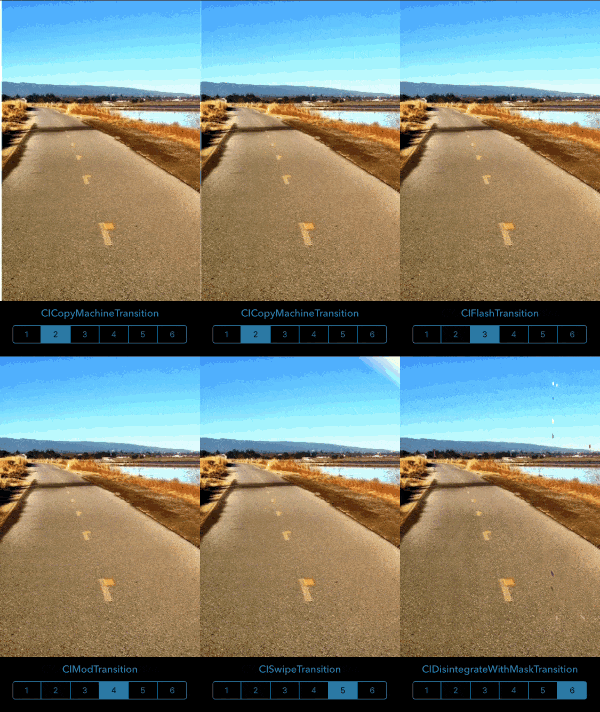
Core Image のフィルタ (CIFilter) には、CICategoryTransition というカテゴリーがあり、次のような遷移エフェクトが用意されています。
- CIBarsSwipeTransition
- CICopyMachineTransition
- CIDisintegrateWithMaskTransition
- CIDissolveTransition
- CIFlashTransition
- CIModTransition
- CISwipeTransition
- CIAccordionFoldTransition(iOS 8)
- CIPageCurlTransition(iOS 9)
- CIPageCurlWithShadowTransition(iOS 9)
- CIRippleTransition(iOS 9)
次のような一風変わった遷移エフェクトを実現できます。
サンプルコード『CoreImageTransition』
Githubにサンプルをアップしてあります。iOS 9 で追加された3種類を含む、全9種類の遷移エフェクトを試すことができます。
※GPUを利用するためシミュレータではなく実機でご確認ください
以下実装手順です。
宣言と初期化処理の実装
使い方の基本的な部分は CIFilter の他のフィルタと同じなのですが、遷移エフェクトなので、遷移前と遷移後の2つの画像を用意します。
@interface TransitionView ()
{
    NSTimeInterval  base;
    CGRect imageRect;
}
@property (nonatomic, strong) CIImage *image1;
@property (nonatomic, strong) CIImage *image2;
@property (nonatomic, strong) CIFilter *transition;
@end
// 遷移前後の画像を生成
UIImage *uiImage1 = [UIImage imageNamed:@"sample1.jpg"];
UIImage *uiImage2 = [UIImage imageNamed:@"sample2.jpg"];
self.image1 = [CIImage imageWithCGImage:uiImage1.CGImage];
self.image2 = [CIImage imageWithCGImage:uiImage2.CGImage];

// マスク画像を生成
UIImage *uiMaskImage = [UIImage imageNamed:@"mask.jpg"];
CIImage *maskImage = [[CIImage alloc] initWithCGImage:uiMaskImage.CGImage];

// CIFilterオブジェクトを生成
self.transition = [CIFilter filterWithName: @"CIDisintegrateWithMaskTransition"
                             keysAndValues:
                   @"inputMaskImage", maskImage,
                   nil];

// 表示領域を示す矩形(CGRect型)
imageRect = CGRectMake(0, 0, uiImage1.size.width / 2, uiImage1.size.height / 2);

// 遷移アニメーション制御の基準となる時刻
base = [NSDate timeIntervalSinceReferenceDate];

// 遷移アニメーションを制御するタイマー
[NSTimer scheduledTimerWithTimeInterval:1.0/30.0
                                 target:self
                               selector:@selector(onTimer:)
                               userInfo:nil
                                repeats:YES];
初期化処理では各種 CIImage オブジェクトの生成、CIFilter オブジェクトの生成と、表示領域を示す矩形、遷移アニメーション制御に必要な時刻とタイマーの生成を行います。(※実際にはNSTimer ではなく CADisplayLink を使うべき)
CIDisintegrateWithMaskTransition はマスクを使用するエフェクトなので、マスク画像の CIImage オブジェクトを生成し、@"inputMaskImage"キーの値に設定しています。
フィルタ処理の実装
遷移アニメーション中の各フレームで行うフィルタ処理を実装します。
- (CIImage *)imageForTransitionAtTime:(float)time
{
    // 遷移前後の画像をtimeによって切り替える
    if (fmodf(time, 2.0) < 1.0f)
    {
        [self.transition setValue:self.image1 forKey:@"inputImage"];
        [self.transition setValue:self.image2 forKey:@"inputTargetImage"];
    }
    else
    {
        [self.transition setValue:self.image2 forKey:@"inputImage"];
        [self.transition setValue:self.image1 forKey:@"inputTargetImage"];
    }

    // 遷移アニメーションの時間を指定
    [self.transition setValue:@(fmodf(time, 1.0f)) forKey:@"inputTime"];

    // フィルタ処理実行
    CIImage *transitionImage = [self.transition valueForKey:@"outputImage"];

    return transitionImage;
}
遷移前後の画像をそれぞれ @"inputImage" キーと @"inputTargetImage" キーに指定し、遷移アニメーションの時間(範囲は0〜1)を @"inputTime" キーに指定します。
アニメーション制御
初期化時に生成したタイマーのハンドラではsetNeedsDisplayをコールし、
- (void)onTimer:(NSTimer *)timer {

    [self setNeedsDisplay];
}
それにより呼ばれるようになる UIView の drawRect: で次のように処理を行います。
- (void)drawRect:(CGRect)rect {

    CGFloat time = 0.4 * ([NSDate timeIntervalSinceReferenceDate] - base);

    CIImage *image = [self imageForTransitionAtTime:time];
    UIImage *uiImage = [UIImage imageWithCIImage:image];

    [uiImage drawInRect:imageRect];
}
先に実装した imageForTransitionAtTime: をコールし、受け取ったフィルタ処理結果の画像を描画しています。
GLKView を用いた高速化
スムーズにアニメーションさせるには描画が追いつかないので、GLKView に描画します。このあたりはコメント欄をご参照ください。(サンプルは GLKit を利用して実装してあります。また拙著にも解説を書きました)
