Core ML 4(iOS 14)に合わせて、coremltools 4.0がリリースされた。coremltools 4.0の目玉となるアップデートが、PyTorchモデルがONNXを経由することなく直接Core MLモデルに変換できるようになった点。
New converter path to directly convert PyTorch models without going through ONNX.
(coremltools 4.0b1のWhat's Newより)
ドキュメントも一新され、Examplesのページに"Converting a PyTorch Segmentation Model to Core ML"というセグメンテーションモデルを変換するチュートリアルがあったので、そちらで変換を試してみた。
このモデルを利用すると、iOSやmacOSアプリでこんな感じでセグメンテーションを行える。
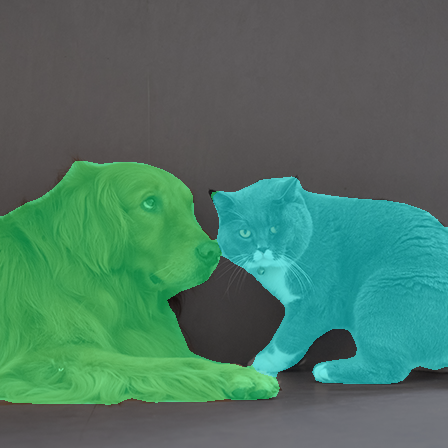
ちなみにDeepLabV3のCore MLモデルは公式配布のものが既にあるが、PyTorchを用いて独自データセットで学習させたセグメンテーションモデルをiOS上で動かしたい場合、本記事の手順でCore MLモデルに変換する必要が出てくる。
Unified Conversion API
以前のcoremltoolsでは、Kerasモデルを変換する場合はconvertes.keras.convert、TensorFlow 1.xモデルを変換する場合はtfcoremlといった感じで変換を担うコンバーターがバラバラだった。
これがcoremltools 4.0では一つのコンバーターに統合され、これひとつでTensorFlowモデル(1.x, 2.x, tf.keras)とPyTorchモデルを変換できるようになった。
Convert TensorFlow or Pytorch models to Core ML model format. Whether a parameter is required may differ between frameworks (see below). Note that this function is aliased as ct.convert in the tutorials.
こちらはUnified Conversion APIと呼ばれている。
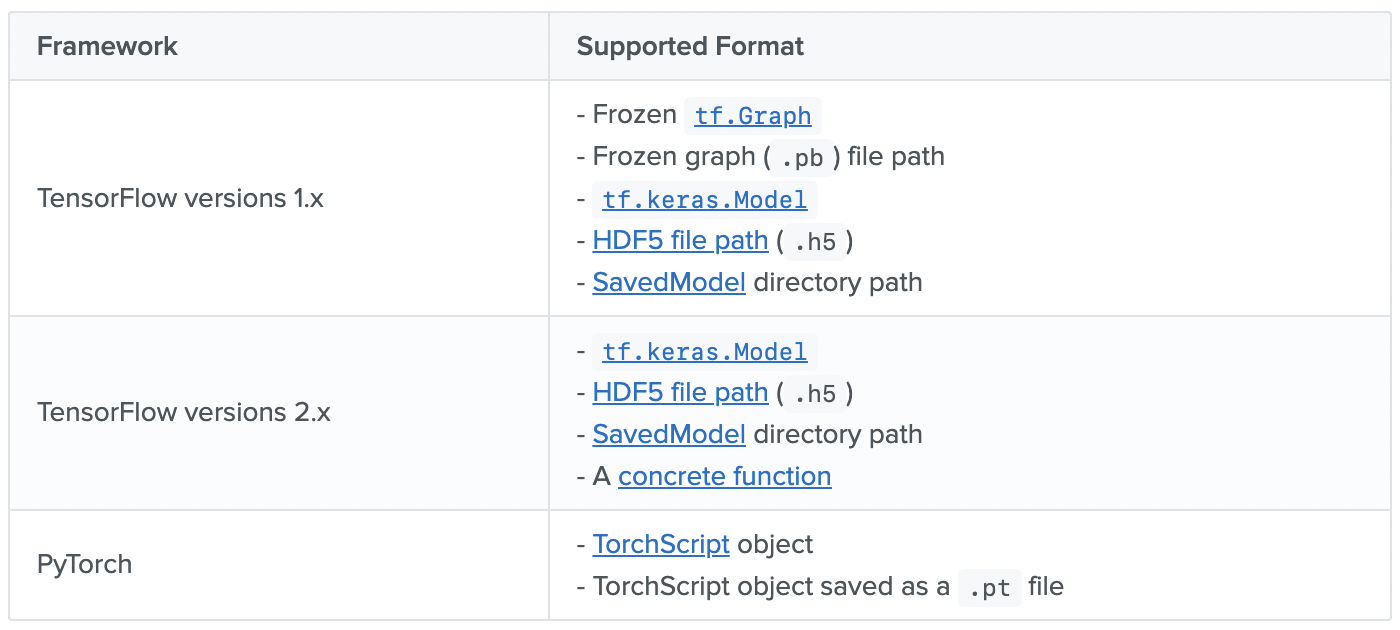
このUnified Conversion APIがサポートするフォーマットは以下:
coremltools.converters.convert
新しいUnifiedなコンバータのリファレンスを見ると、convertメソッドの定義は次のようになっていて、
coremltools.converters.convert(model, source='auto', inputs=None, outputs=None, classifier_config=None, minimum_deployment_target=None, **kwargs)
第1引数modelの説明によると、Pytorch向けには、以下の2種類をモデルを示す値として受け取るようだ。
- A TorchScript object
- Path to a .pt file
TorchScriptとtorch.jit.trace
TorchScriptというのは、「PyTorchの中間表現コードとその変換機構」を表すもので、次のような利点があるらしい:
- TorchScriptコードは独自のインタプリタで実行・解釈され、Pythonインタプリタのグローバルインタプリタロック (GIL) とも無縁なので、マルチスレッドで並列計算できる
- コードとパラメータをまるごと保存でき、Python以外の実行環境でもロードできる
- 中間コードへ落とし込むコンパイラにて最適化しやすくなる
PyTorchのモデルをTorchScriptへ変換する - け日記
で、変換にはtorch.jit.traceを使う。
モデルのforwardメソッドを実行し、その処理を記録 (トレース) することで変換する、ということらしい。
coremltools 4.0へのアップデート
$ pip install -U coremltools
バージョン確認
import coremltools as ct

ct.__version__    # 4.0
PyTorchモデルをCore MLモデルに変換するための最小実装
こちらの手順のうち、実はなくても大丈夫な手順をカットした最小実装を提示する。
1. モデルのロード
DeepLabV3モデルのロード自体はtorch.hub.loadを用いて次のように行えるのだが、
import torch
import torchvision

model = torch.hub.load('pytorch/vision:v0.6.0', 'deeplabv3_resnet101', pretrained=True).eval()
これをtorch.jit.traceに渡すとエラーになってしまう。出力でdictionaryを返しているのが問題らしい。
When running this code, the tracer outputs an error that Only tensors or tuples of tensors can be output from traced functions, but our model returns a dictionary.
ので、チュートリアルでは次のようにラッパークラスを定義して、出力時にdictionaryからtensorを抽出して返すようにするワークアラウンドが提示されている。
Get around this limitation by wrapping the model in a module that extracts the output we want from the dictionary:
import torch.nn as nn

class WrappedDeeplabv3Resnet101(nn.Module):

   def __init__(self):
       super(WrappedDeeplabv3Resnet101, self).__init__()
       self.model = torch.hub.load(
           'pytorch/vision:v0.6.0',
           'deeplabv3_resnet101',
           pretrained=True
       ).eval()

   def forward(self, x):
       res = self.model(x)
       # Extract the tensor we want from the output dictionary
       x = res["out"]
       return x
traceable_model = WrappedDeeplabv3Resnet101().eval()
2. traceに渡す入力テンソルを生成
公式チュートリアルでは1枚の入力画像を読み込んでそれを加工したものをtraceに渡しているが、
input_image = Image.open("dog_and_cat.jpg")
preprocess = transforms.Compose([
   transforms.ToTensor(),
   transforms.Normalize(
       mean=[0.485, 0.456, 0.406],
       std=[0.229, 0.224, 0.225],
   ),
])

input_tensor = preprocess(input_image)
input_batch = input_tensor.unsqueeze(0)
実はテンソルのshapeさえ合っていればランダムで良いらしい。
Note: A random input of the same shape would also work.
ので、次のようにrandで1x3x448x448のテンソルを生成するコードで置き換えた。
example_input = torch.rand(1, 3, 448, 448)
3. TorchScriptオブジェクトを生成
converterにわたすためのTorchScriptオブジェクトをtorch.jit.traceを用いて生成する。
trace = torch.jit.trace(traceable_model, example_input)
4. Core MLモデルに変換
import coremltools as ct

mlmodel = ct.convert(
   trace,
   inputs=[ct.TensorType(name="input", shape=example_input.shape)],
)
第1引数にTorchScriptオブジェクト、第2引数で入力テンソルの名前やshapeを渡している。
5. mlmodelファイルとして保存
mlmodel.save('./PyTorchDeepLabV3.mlmodel')
6. 動作確認
画像読み込み
from PIL import Image

input_image = Image.open("dog_and_cat.jpg")
display(input_image)
前処理
from torchvision import transforms

preprocess = transforms.Compose([
   transforms.ToTensor(),
   transforms.Normalize(
       mean=[0.485, 0.456, 0.406],
       std=[0.229, 0.224, 0.225],
   ),
])

input_tensor = preprocess(input_image)
input_batch = input_tensor.unsqueeze(0)
推論処理の実行
with torch.no_grad():
   output = model(input_batch)['out'][0]
torch_predictions = output.argmax(0)
結果のビジュアライズ
def display_segmentation(input_image, output_predictions):
   # Create a color pallette, selecting a color for each class
   palette = torch.tensor([2 ** 25 - 1, 2 ** 15 - 1, 2 ** 21 - 1])
   colors = torch.as_tensor([i for i in range(21)])[:, None] * palette
   colors = (colors % 255).numpy().astype("uint8")

   # Plot the semantic segmentation predictions of 21 classes in each color
   r = Image.fromarray(
       output_predictions.byte().cpu().numpy()
   ).resize(input_image.size)
   r.putpalette(colors)

   # Overlay the segmentation mask on the original image
   alpha_image = input_image.copy()
   alpha_image.putalpha(255)
   r = r.convert("RGBA")
   r.putalpha(128)
   seg_image = Image.alpha_composite(alpha_image, r)
   display(seg_image)

display_segmentation(input_image, torch_predictions)
生成したモデルをXcodeでプレビュー
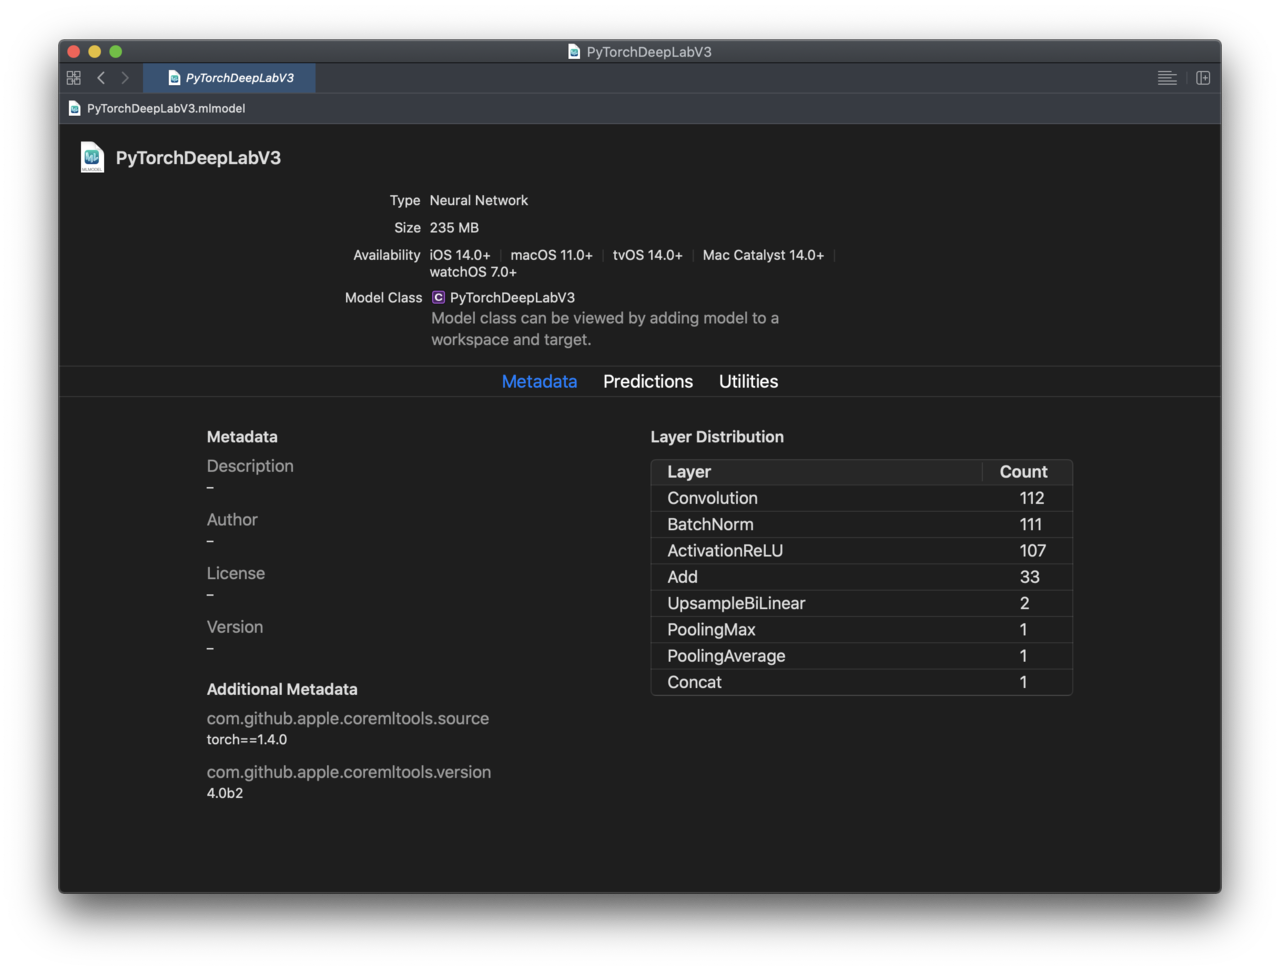
(coremltoolsのバージョンが4.0b2となっているのはb2の頃に試した際のスクショを使用しているため)