TensorFlow1.7で、TensorFlow Hubという新たなライブラリが追加されました。
これにより、学習済みの深層学習モデルを、より簡単に転移学習やFine-Tuningに利用できるようになり、さらに独自のモデルを、他のユーザーにTensorFlow Hub経由で共有できるようになりました。
この記事では、TensorFlow Hubを利用して、Inception-v3の転移学習のコードを作成してみたいと思います。
TensorFlow Hubのインストール
TensorFlow Hubを利用するには、TensorFlowを1.7以上にアップグレードし、別途パッケージをインストールする必要があります。
pip install "tensorflow>=1.7.0"
pip install tensorflow-hub
TensorFlow HubによるInception-v3モジュールの使い方
TensorFlow Hubでは学習済みのモデルデータをモジュールと呼ばれる単位で扱います。
Inception-v3を読み込むには、Module google/imagenet/inception_v3/feature_vector/1 | TensorFlowに従い、
import tensorflow_hub as hub
module = hub.Module("https://tfhub.dev/google/imagenet/inception_v3/feature_vector/1")
とします。実行されると、モジュールがダウンロードされます。保存場所は環境変数TFHUB_CACHE_DIRにより指定することができます。
このmoduleに、画像データのTensorを入力で渡すと、Inception-v3のネットワークの出力のTensorを得ることが出来ます。このInception-v3への入力画像サイズは299×299のカラー画像、出力は2048次元のTensorです。
# imagesは[batch, 299, 299, 3]のTensor
# outputsは[batch, 2048]のTensor
outputs = module(images)
後は、この出力を解きたい問題に合わせて、続くネットワークの入力に使用できます。例えば、10クラス分類問題であれば、以下のように、各クラスへの分類確率を計算できます。
logits = tf.layers.dense(inputs=outputs, units=10)
predictions = {
    "classes": tf.argmax(input=logits, axis=1),
    "probabilities": tf.nn.softmax(logits)
}
Inception-v3による転移学習
実際に、MNIST画像をInception-v3で学習するコードを作成してみたいと思います。MNISTは28×28のグレースケール画像なので、Inception-v3への入力は299×299のカラー画像とは合わないですが、あくまでTensorFlow Hubを使った一連の処理を試すため、ここではコードサンプルの多いMNISTを使用します。
MNISTのチュートリアルにあるコードをベースにします。
Githubに作成したコードを置いてあります: https://github.com/shu-yusa/tensorflow-hub-sample
Estimatorの作成
tf.estimator.Estimatorのコンストラクタのmodel_fnに渡す関数を、Inception-v3を使ったものにします。
def inceptionv3_model_fn(features, labels, mode):
    # Load Inception-v3 model.
    module = hub.Module("https://tfhub.dev/google/imagenet/inception_v3/feature_vector/1")
    input_layer = adjust_image(features["x"])
    outputs = module(input_layer)

    logits = tf.layers.dense(inputs=outputs, units=10)

    predictions = {
        # Generate predictions (for PREDICT and EVAL mode)
        "classes": tf.argmax(input=logits, axis=1),
        # Add `softmax_tensor` to the graph. It is used for PREDICT and by the
        # `logging_hook`.
        "probabilities": tf.nn.softmax(logits, name="softmax_tensor")
    }

    if mode == tf.estimator.ModeKeys.PREDICT:
        return tf.estimator.EstimatorSpec(mode=mode, predictions=predictions)

    # Calculate Loss (for both TRAIN and EVAL modes)
    loss = tf.losses.sparse_softmax_cross_entropy(labels=labels, logits=logits)

    # Configure the Training Op (for TRAIN mode)
    if mode == tf.estimator.ModeKeys.TRAIN:
        optimizer = tf.train.GradientDescentOptimizer(learning_rate=0.001)
        train_op = optimizer.minimize(
            loss=loss,
            global_step=tf.train.get_global_step())
        return tf.estimator.EstimatorSpec(mode=mode, loss=loss, train_op=train_op)

    # Add evaluation metrics (for EVAL mode)
    eval_metric_ops = {
        "accuracy": tf.metrics.accuracy(
            labels=labels, predictions=predictions["classes"])}
    return tf.estimator.EstimatorSpec(
        mode=mode, loss=loss, eval_metric_ops=eval_metric_ops)
logits計算以前の部分のコードを、Inception-v3を使ったものに書き換えています。adjust_image()という関数が、呼ばれていますが、これは、以下のように、バッチサイズ×784サイズのfeatures["x"]を、Inception-v3の入力画像に合わせている処理です。
def adjust_image(data):
    # Reshape to [batch, height, width, channels].
    imgs = tf.reshape(data, [-1, 28, 28, 1])
    # Adjust image size to Inception-v3 input.
    imgs = tf.image.resize_images(imgs, (299, 299))
    # Convert to RGB image.
    imgs = tf.image.grayscale_to_rgb(imgs)
    return imgs
このinceptionv3_model_fnを使って、Estimatorを作成します。
# Create an estimator
classifier = tf.estimator.Estimator(
    model_fn=inceptionv3_model_fn, model_dir="/tmp/convnet_model")
残りの部分は、おおよそ、元のチュートリアルと同じです。
グラフの確認
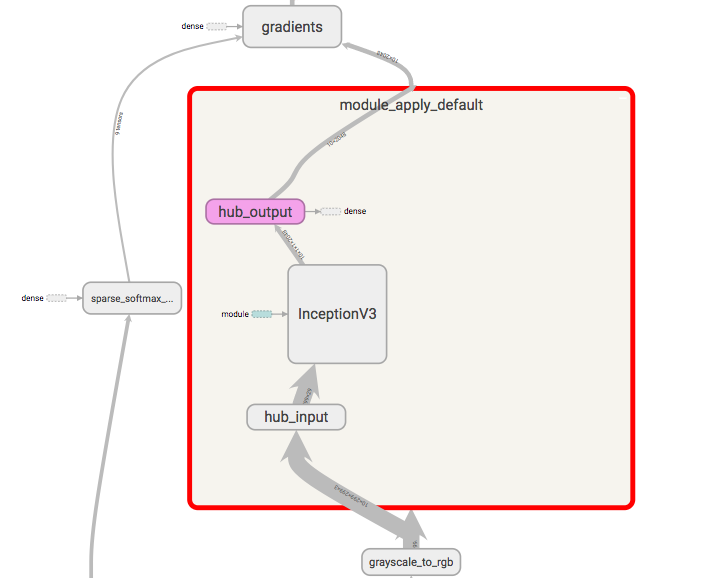
実際にコードを実行し、TensorBoardでグラフを確認すると、TensorFlow Hubの部分は、以下のようになっていました。hub_inputに画像のTensorが渡され、内部でInceptionV3モデルを経て、hub_outputで出力されていることが確認できます。
まとめ
TensorFlow1.7で導入されたTensorFlow Hubを利用して、Inception-v3モデルの転移学習を行う簡単なコードを書いてみました。
これ以前に同様のことを行うには、Inception-v3のモデルの定義スクリプト、学習済みのチェックポイントファイルを持ってきて、グラフを抜き出したり、変数を学習から外すために固めたりする必要がありましたが、それらの処理を数行で簡単に行えるようになりました。
今後、転移学習を行うのであれば、これを使わない手はないと思います。この記事がその助けになれば幸いです。