はじめに
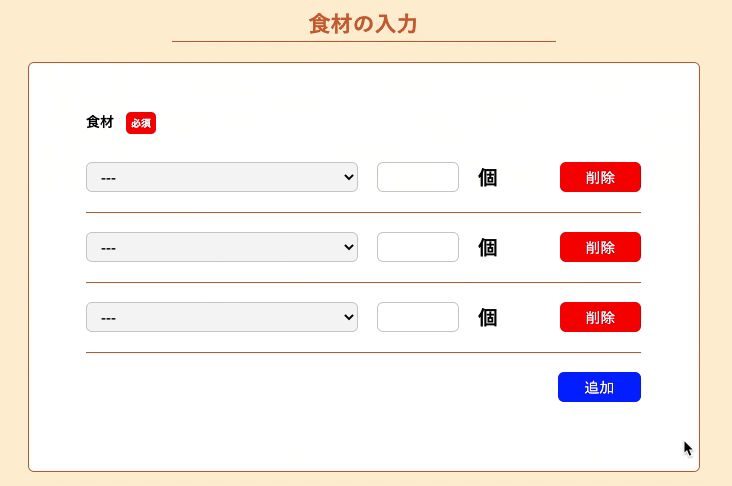
本記事では、以下のような入力フォームを作成することをゴールとしています。
概要
レシピとレシピに必要となる食材をまとめてDBに保存する機能の作成
テーブル構成
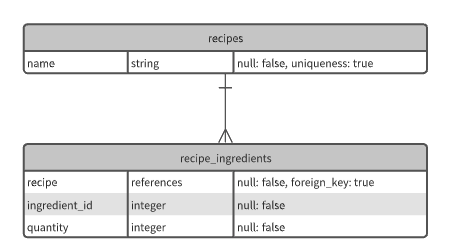
レシピとレシピの食材は親子関係であるため、以下のテーブル構成となります
親:レシピ( recipes )
子:レシピの食材( recipe_ingredients )
※ingredient_idはactivie_hashで実装します
実装
以下の順に実施していきます。
1.jqueryの導入
2.cocoonの導入
3.モデルの作成
4.コントローラーの作成
5.ビューの作成
1.jqueryの導入
rails6でcocoonを使えるようにするために、jqueryをインストールします。
$ yarn add jquery
config/webpack/environment.jsを編集します
const { environment } = require('@rails/webpacker')

# 追記ここから
const webpack = require('webpack')
environment.plugins.prepend('Provide',
    new webpack.ProvidePlugin({
        $: 'jquery/src/jquery',
        jQuery: 'jquery/src/jquery'
    })
)
# 追記ここまで

module.exports = environment
2.cocoonの導入
gemの導入
gem 'cocoon'
$ bundle install
ライブラリの追加
$ yarn add github:nathanvda/cocoon#c24ba53
実行後、以下2点の項目をクリアできていればOKです。
・app/assets/javascripts/cocoon.jsが作成されている
・package.jsonに以下の記述が追加されている
"cocoon": "github:nathanvda/cocoon#c24ba53"
最後に、app/javascriptspacks/application.jsに以下の内容を追記
require('jquery')
import "cocoon";
3.モデルの作成
今回の実装内容と関係のない記述は省いております。
モデルの作成
$ rails g model Recipe
$ rails g model RecipeIngredient
マイグレーションファイルの編集
class CreateRecipes < ActiveRecord::Migration[6.0]
  def change
    create_table :recipes do |t|
      t.string     :name,     null: false
      t.timestamps
    end
  end
end
class CreateRecipeIngredients < ActiveRecord::Migration[6.0]
  def change
    create_table :recipe_ingredients do |t|
      t.references :recipe,            null: false, foreign_key: true
      t.integer    :ingredient_id,     null: false
      t.integer    :quantity,          null: false
      t.timestamps
    end
  end
end
マイグレーションの実行
$ rails db:migrate
アソシエーションの設定
class Recipe < ApplicationRecord
  has_many :recipe_ingredients, dependent: :destroy
  accepts_nested_attributes_for :recipe_ingredients
end
class RecipeIngredient < ApplicationRecord
  belongs_to :recipe
end
accepts_nested_attributes_for
指定したモデルのデータを配列としてパラメーターに含めることが出来ます。
つまり、recipeとrecipe_ingredients両モデルのデータをまとめて保存できるようになります。
4.コントローラーの作成
コントローラーの作成
$ rails g controller recipes new create
コントローラーの内容を編集
class RecipesController < ApplicationController
  def new
    @recipe = Recipe.new
    @recipe_ingredients = @recipe.recipe_ingredients.build
  end

  def create
    @recipe = Recipe.new(recipe_params)
    if @recipe.save
      redirect_to root_path
    else
      render action: :new
    end
  end

  private

  def recipe_params
    params.require(:recipe).permit(:name, recipe_ingredients_attributes: [:id, :ingredient_id, :quantity, :_destroy])
  end
end
accepts_nested_attributes_forで指定したrecipe_ingredientモデルを、
paramsにrecipe_ingredients_attributes: []として、追加して送っています。
5.ビューの作成
モデルと同様に、今回の実装内容と関係のない記述は省いております。
※クラス名等も記述していないため、このコードのままではレイアウトは崩れます。
<%= form_with model: @recipe, url: '/recipes', method: :post, local: true do |f| %>

  <!-- レシピ名 -->
  <%= f.text_area :name %>

  <!-- 食材入力フィールド -->
  <%= f.fields_for :recipe_ingredients do |t| %>
    <%= render "recipes/recipe_ingredient_fields", f: t %>
  <% end %>

  <!-- 食材追加ボタン -->
  <%= link_to_add_association "追加", f, :recipe_ingredients %>
<% end %>
fields_for
form_with内で異なるモデルを編集できるようになります。
<div class="nested-fields">
    <%= f.collection_select(:ingredient_id, {}, :id, :name, {}) %>
    <%= f.number_field :quantity %>
    <div>個</div>
    <%= link_to_remove_association "削除", f %>
</div>
nested-fieldsクラスが指定されたdivタグで囲んだ範囲が追加・削除する領域です。
レンダリングする部分テンプレート名には注意してください。
「_子モデル_fields.html.erb」でないとエラーとなります。
お疲れさまでした。
以上で、動的入力フォームが作成できるかと思います。
参考
Rails6でのcocoonの導入
ネストしたフォームを簡潔に実装できるcocoon gemをwebpack環境でセットアップする
動的入力フォームの作成について
【Rails】cocoonを用いて親子孫関係のテーブルに複数のデータを同時保存する方法
fields_forについて
fields_forの上手な使い方