はじめに
以前、TensorFlow2.0を使ってFashion-MNISTをResNet-50で学習するを書きました。このとき、Test Accuracyが91.3%とあまりいい結果ではなく、その原因を調べているといくつかの発見がありました。
- 論文のメインの(と勝手に思っている)4.1.はImageNet Classificationについて書かれており、取り扱うデータのShapeは(224, 224, 3)です。しかし、Fashion-MNISTは(28, 28, 1)、CIFAR-10は(32, 32, 3)と、ImageNetと比べると縦横のピクセルが小さいです。そのため、ResNet-50の初めにある以下のコードは不要そうです
Conv2D(channels[0], input_shape=input_shape, kernel_size=(7, 7), strides=(2, 2), padding="same", kernel_initializer="he_normal", kernel_regularizer=l2(1e-4))
MaxPool2D(pool_size=(3, 3), strides=(2, 2), padding="same")
- さらによくよく論文を読んでみると、4.2. CIFAR-10 and Analysisとして、CIFAR-10用の少し異なるモデルが載っているのを見つけました
ということで、今回はCIFAR-10をResNet-56で学習することにしました。
環境
- Google Colaboratory
- TensorFlow 2.0 Alpha
コード
こちらです。
コード解説
モデル定義(ResNet-56)
from tensorflow.keras.layers import Conv2D, Dense, BatchNormalization, Activation, MaxPool2D, GlobalAveragePooling2D, Add, Input, Flatten
from tensorflow.keras import Model
from tensorflow.keras.regularizers import l2

n = 9 # 56 layers
channels = [16, 32, 64]

inputs = Input(shape=(32, 32, 3))
x = Conv2D(channels[0], kernel_size=(3, 3), padding="same", kernel_initializer="he_normal", kernel_regularizer=l2(1e-4))(inputs)
x = BatchNormalization()(x)
x = Activation(tf.nn.relu)(x)

for c in channels:
    for i in range(n):
        subsampling = i == 0 and c > 16
        strides = (2, 2) if subsampling else (1, 1)
        y = Conv2D(c, kernel_size=(3, 3), padding="same", strides=strides, kernel_initializer="he_normal", kernel_regularizer=l2(1e-4))(x)
        y = BatchNormalization()(y)
        y = Activation(tf.nn.relu)(y)
        y = Conv2D(c, kernel_size=(3, 3), padding="same", kernel_initializer="he_normal", kernel_regularizer=l2(1e-4))(y)
        y = BatchNormalization()(y)
        if subsampling:
            x = Conv2D(c, kernel_size=(1, 1), strides=(2, 2), padding="same", kernel_initializer="he_normal", kernel_regularizer=l2(1e-4))(x)
        x = Add()([x, y])
        x = Activation(tf.nn.relu)(x)

x = GlobalAveragePooling2D()(x)
x = Flatten()(x)
outputs = Dense(10, activation=tf.nn.softmax, kernel_initializer="he_normal")(x)

model = Model(inputs=inputs, outputs=outputs)
model.type = "resnet" + str(6 * n + 2)
こちらがCIFAR-10用のモデルです。以下の特徴があります。
- あまり画像のサイズを小さくしないようになっています。論文には
on the feature maps of sizes {32, 16, 8}と書かれていますが、Shapeを(32, 32, 3) -> (32, 32, 16) -> (16, 16, 32) -> (8, 8, 64)と変化させていきます - なぜかbottleneckアーキテクチャーは使われていません。論文にはbottleneckアーキテクチャーの方が経済的だと書かれているのですが・・・
-
nを変更することで20層や110層のResNetも作ることができます。論文によるとResNet-56のパラメーター数は0.85Mと、ResNet-50と比べてかなり少ないです(確かResNet-50だと11Mほどだったと思います) - 本質ではないですが、今回はSequentialモデルで書いてみました。以前書いたResidualBlockクラスの
__init__とcallメソッドを一度に書けるイメージなのでこちらの方が楽に感じました
最適化手法
from tensorflow.keras.optimizers import Adam, SGD

# lr = 0.001
# optimizer = Adam(learning_rate=lr)
lr = 0.1
optimizer = SGD(learning_rate=lr, momentum=0.9)
model.compile(optimizer=optimizer, loss="sparse_categorical_crossentropy", metrics=["accuracy"])
今回は論文の通りSGD + momentumを使いました。初めの学習率は0.1で半分まで学習したときに0.01に、全体の3/4まで学習したときに0.001に変更します(学習率の変更は次のコードで実施)。
学習率の変更
from tensorflow.keras.callbacks import Callback
import time

class LearningController(Callback):
    def __init__(self, num_epoch=0, learn_minute=0):
        self.num_epoch = num_epoch
        self.learn_second = learn_minute * 60
        if self.learn_second > 0:
            print("Leraning rate is controled by time.")
        elif self.num_epoch > 0:
            print("Leraning rate is controled by epoch.")

    def on_train_begin(self, logs=None):
        if self.learn_second > 0:
            self.start_time = time.time()

    def on_epoch_end(self, epoch, logs=None):
        if self.learn_second > 0:
            current_time = time.time()
            if current_time - self.start_time > self.learn_second:
                self.model.stop_training = True
                print("Time is up.")
                return

            if current_time - self.start_time > self.learn_second / 2:
                self.model.optimizer.lr = lr * 0.1
            if current_time - self.start_time > self.learn_second * 3 / 4:
                self.model.optimizer.lr = lr * 0.01

        elif self.num_epoch > 0:
            if epoch > self.num_epoch / 2:
                self.model.optimizer.lr = lr * 0.1
            if epoch > self.num_epoch * 3 / 4:
                self.model.optimizer.lr = lr * 0.01

        print('lr:%.2e' % self.model.optimizer.lr.value())
学習率を変更するためにKerasのCallbackを自作しました。このCallbackは次の特徴を持っています。
- 学習時間を指定した場合、その時間の半分を過ぎれば学習率を0.01に、3/4を過ぎれば学習率を0.001に変更する
- エポック数を指定した場合、そのエポック数の半分を過ぎれば学習率を0.01に、3/4を過ぎれば学習率を0.001に変更する
- 学習時間を指定した場合、その時間で学習を打ち切る
単なる学習率の変更だけであれば、既にあるLearningRateSchedulerを利用するだけで実現可能です。
その他
- tfds.loadを使ってtf.Tensorを取得する方法を使い、tf.Tensorとしてデータセットを取得しています
- ImageDataGeneratorを拡張しcutoutを実装するを使い、Data Augmentation(水増し)を行っています
- Hyperdashの使い方を使い、パラメーターやAccuracyを記録しています
結果
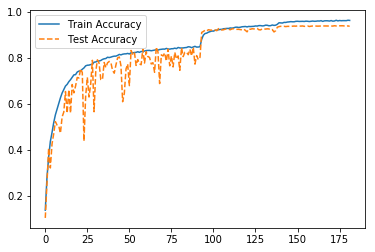
Accuracyが93.58%でした。論文の結果を少し上回っておりいい結果と言えそうです。

ちなみにCIFAR-10のベンチマークはこちらです。SOTAは99.0%なんですね。