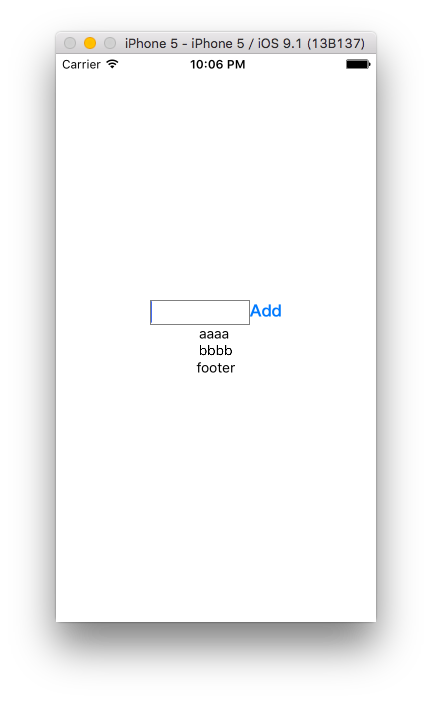
FluxはReact Nativeに限った話ではなくReactで使われるアーキテクチャですが、React Nativeのアプリを作るのにも使います。2015年12月時点で最有力のFlux系アーキテクチャはReduxですが、今回はFacebookの実装であるfacebook/fluxを説明したいと思います。(Reduxは後ほど)
アーキテクチャは下記のようになります。1方向にデータが流れてくがポイントです。これはReactの哲学にも一致します。

Fluxには下記の役割があり、それぞれを実装していきます。
- Dispatcher
- Action
- Store
- (Constant Action-Store間で使う合言葉を収納)
Install
facebook/fluxで使われてるモジュールをインストールします。React Nativeでも問題なくインストールできます。
$ npm install flux --save
$ npm install events --save
$ npm install keymirror --save
$ npm install object-assign --save
Directory structure
Exampleと同じTodoアプリをReact Nativeを作ってみます。ディレクトリも同じように作れます。
index.ios.js
app/
├── actions
│   └── TodoActions.js
├── app.js
├── components
│   ├── Footer.js
│   ├── Header.js
│   ├── MainSection.js
│   └── TodoApp.js
├── constants
│   └── TodoConstants.js
├── dispatcher
│   └── Dispatcher.js
└── stores
    └── TodoStore.js
コードの解説
index.ios.jsでRegister
// index.ios.js
'use strict';

import React, { AppRegistry } from 'react-native';
import App from './app/app';

var ReactNativeAdvent2015 = React.createClass({
  render() {
    return (
      <App />
    );
  }
});

AppRegistry.registerComponent('ReactNativeAdvent2015', () => ReactNativeAdvent2015);
app.jsはトップでコンポーネントを呼びます。このトップの使い道はloginしてる、してないなどの切り分けをここに記述したりできます。
// app/app.js
import React from 'react-native';
import TodoApp from './components/TodoApp';

var App  = React.createClass({
  render() {
    return (
      <TodoApp />
    );
  }
});

export default App;
Todoアプリではメイン画面です。TodoStoreを用いてイベントを追加し、TodoStoreへのGetterを持ってます。1方向なのでTodoStoreへのSetterはありません。
// compoents/TodoApp.js
import React, { StyleSheet, Text, View} from 'react-native';
import Header from './Header';
import Footer from './Footer';
import MainSection from './MainSection';
import TodoStore from '../stores/TodoStore';


var TodoApp  = React.createClass({

  getInitialState: function() {
    return {
      allTodos: TodoStore.getAll(),
      areAllComplete: TodoStore.areAllComplete()
    }
  },

  componentDidMount: function() {
     TodoStore.addChangeListener(this._onChange);
   },

   componentWillUnmount: function() {
     TodoStore.removeChangeListener(this._onChange);
   },

  render(){
    return(
      <View style={styles.container}>
        <Header/>
        <MainSection
          allTodos={this.state.allTodos}
          areAllComplete={this.state.areAllComplete}
        />
        <Footer/>
      </View>
    )
  },

  _onChange: function() {
    this.setState({
      allTodos: TodoStore.getAll(),
      areAllComplete: TodoStore.areAllComplete()
    });
  }
});
Headerでinputを受け入れます。ボタンが押されたらActions.createでアクションを実行します。
// components/Header.js

import React, {View, Text, TextInput} from 'react-native';
import Button from 'react-native-button';
import TodoActions from '../actions/TodoActions';


var Header  = React.createClass({

  getInitialState(){
    return {
      text: ""
    }
  },
  _handlePress(){
    TodoActions.create(this.state.text);
    this.setState({text: ""});
  },

  render(){
    return(
      <View style={{flexDirection: 'row'}}>
      <TextInput
        style={{width:100, height: 25, borderColor: 'gray', borderWidth: 1}}
        onChangeText={(text) => this.setState({text})}
        value={this.state.text}
      />
      <Button onPress={this._handlePress}>Add</Button>
      </View>
    )
  }
});

export default Header;
基本的にAction/Store/Dispatcherはfacebook/fluxのexampleそのままです。該当箇所だけ見ていきましょう。ActionではTypeとTextを指定して、dispatcherに渡します。
// TodoAction抜粋
var AppDispatcher = require('../dispatcher/Dispatcher');
var TodoConstants = require('../constants/TodoConstants');

var TodoActions = {

  create: function(text) {
    AppDispatcher.dispatch({
      actionType: TodoConstants.TODO_CREATE,
      text: text
    });
  },
実はDispatcherは2行でおまじないです。Storeへ投げるための道具だと思えば良いでしょう。
// Dispatcher.js
var Dispatcher = require('flux').Dispatcher;
module.exports = new Dispatcher();
TodoConstはキーだけ格納してます。TODO_CREATEという文字列だけがStoreとの合言葉として使われます。
// TodoConstant抜粋
var keyMirror = require('keymirror');

module.exports = keyMirror({
  TODO_CREATE: null,
  ...
したがって、Actionは合言葉を持って、Textを投げてるイメージになります。そして、Storeでその合言葉を持って保存します。
// todoStore抜粋
var _todos = {};

function create(text) {
  var id = (+new Date() + Math.floor(Math.random() * 999999)).toString(36);
  _todos[id] = {
    id: id,
    complete: false,
    text: text
  };
}

Dispatcher.register(function(action) {
  var text;

  switch(action.actionType) {
    case TodoConstants.TODO_CREATE:
      text = action.text.trim();
      if (text !== '') {
        create(text);
        TodoStore.emitChange();
      }
      break;
 ...
保存後にTodoStore.emitChangeでイベントを発火させ変更をComponentに通知します。TodoApp.jsの_onChangeが通知を受け取りコンポーネントの状態(state)を変化させます。変更が直に子コンポーネントへとpropsを通じて渡り、MainSectionに変化が伝播します。
import React, {View, Text} from 'react-native';

var MainSection  = React.createClass({
  render(){
    const {allTodos, areAllComplete} = this.props;
    let todos = Object.keys(allTodos).map((id) => {
       return (
        <View>
          <Text>{allTodos[id].text}</Text>
        </View>
      )
    });
    return(
      <View>{todos}</View>
    )
  }
});
基本的にこのような流れでFluxはデータが更新されていきます。必ず、1方向からデータの流れてくるため、データの流れがはっきりして見通しの良いアプリを作ることができます。
明日はfacebook/fluxの亜種Refluxを見てみましょう。
