Oracle Database から Autonomous Database(ADB)へのデータベースリンクを作成できます。
ということで、Oracle Database 11gR2 (11.2.0.4) から Autonomous Database(19c)へデータベースリンクを作成してみてみます。
■ 構成
今回は自宅とOCIをIPSec VPN接続して,11gR2とADB接続してみてみます。
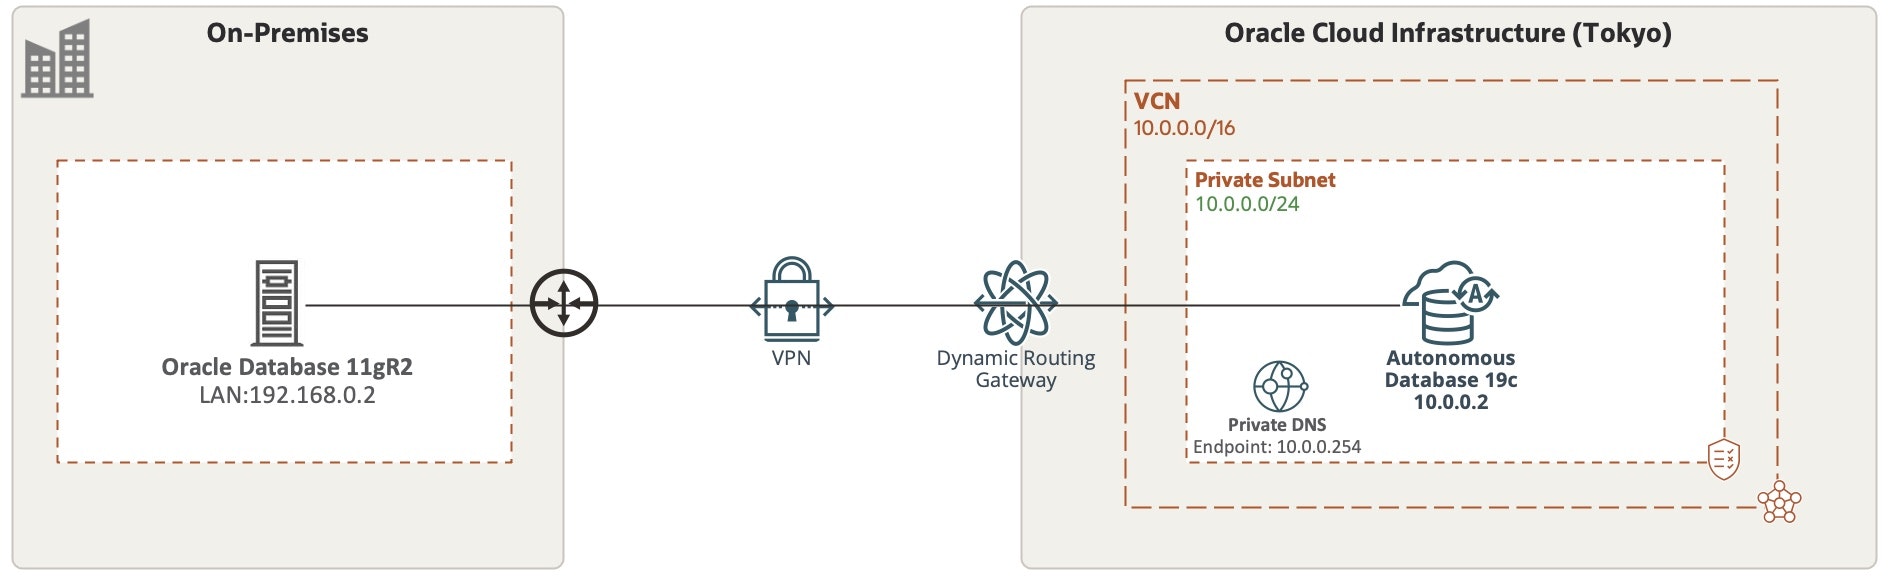
ADB, 11gR2 と IPsec VPNは事前に作成動作確認し、今回は、Database Link作成から実施します。
・参考
- VMwareへOracle Real Application Clusters 11.2 (RAC) をインストールしてみてみた
- Oracle Cloud: NEC IXルーターを冗長構成でIKEv2 IPSec VPN接続してみてみた
■ 手順
● 1. ADBで wallet ダウンロード
-
データベース接続画面
接続する ADB のWeb Consoleにある [DB接続]をクリックし、
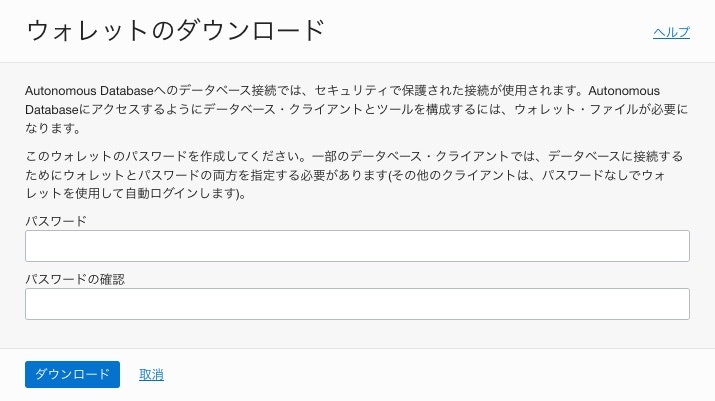
ウォレット・タイプを選択し、[ウォレットのダウンロード]をクリック

-
ウォレットのダウンロード画面
ADMINユーザーのパスワードを入力し、[ダウンロード]をクリックして、クライアント資格証明(Wallet_ADB名.zip)ファイルをダウンロード
● 2. 11gR2 Database へ walletをアップロード
- wallet ディレクトリ作成
任意の場所に任意の名前で wallet ディレクトリ作成
[oracle@11gR2 ~]$ mkdir ~/targetwallet
- walletファイル配置
[oracle@11gR2 ~]$ cd ~/targetwallet
[oracle@11gR2 targetwallet]$ ls -l
	total 20
	-rw-rw-r-- 1 oracle dba 20369 May 19 15:02 Wallet_ATP.zip
● 3. wallet ファイル unzip
- wallet ファイル unzip
[oracle@11gR2 ~]$ cd /u01/targetwallet
[oracle@11gR2 targetwallet]$ unzip Wallet_ATP.zip
	Archive:  Wallet_ATP.zip
	inflating: README
	inflating: cwallet.sso
	inflating: tnsnames.ora
	inflating: truststore.jks
	inflating: ojdbc.properties
	inflating: sqlnet.ora
	inflating: ewallet.p12
	inflating: keystore.jks

[oracle@dbcs11g targetwallet]$ ls -l
	total 60
	-rw-r--r-- 1 oracle oinstall   317 May 19 05:52 README
	-rw-rw-r-- 1 oracle dba      20369 May 19 15:02 Wallet_ATP.zip
	-rw-r--r-- 1 oracle oinstall  6661 May 19 05:52 cwallet.sso
	-rw-r--r-- 1 oracle oinstall  6616 May 19 05:52 ewallet.p12
	-rw-r--r-- 1 oracle oinstall  3242 May 19 05:52 keystore.jks
	-rw-r--r-- 1 oracle oinstall   691 May 19 05:52 ojdbc.properties
	-rw-r--r-- 1 oracle oinstall   114 May 19 05:52 sqlnet.ora
	-rw-r--r-- 1 oracle oinstall  1756 May 19 05:52 tnsnames.ora
	-rw-r--r-- 1 oracle oinstall  3335 May 19 05:52 truststore.jks
- tnsnames.ora 確認
[oracle@11gR2 targetwallet]$ cat tnsnames.ora
	atp_high = (description= (retry_count=20)(retry_delay=3)(address=(protocol=tcps)(port=1522)(host=adb.ap-tokyo-1.oraclecloud.com))(connect_data=(service_name=atp_high.adb.oraclecloud.com))(security=(ssl_server_cert_dn="CN=adb.ap-tokyo-1.oraclecloud.com,OU=Oracle ADB TOKYO,O=Oracle Corporation,L=Redwood City,ST=California,C=US")))

	atp_low = (description= (retry_count=20)(retry_delay=3)(address=(protocol=tcps)(port=1522)(host=adb.ap-tokyo-1.oraclecloud.com))(connect_data=(service_name=atp_low.adb.oraclecloud.com))(security=(ssl_server_cert_dn="CN=adb.ap-tokyo-1.oraclecloud.com,OU=Oracle ADB TOKYO,O=Oracle Corporation,L=Redwood City,ST=California,C=US")))

	atp_medium = (description= (retry_count=20)(retry_delay=3)(address=(protocol=tcps)(port=1522)(host=adb.ap-tokyo-1.oraclecloud.com))(connect_data=(service_name=atp_medium.adb.oraclecloud.com))(security=(ssl_server_cert_dn="CN=adb.ap-tokyo-1.oraclecloud.com,OU=Oracle ADB TOKYO,O=Oracle Corporation,L=Redwood City,ST=California,C=US")))

	atp_tp = (description= (retry_count=20)(retry_delay=3)(address=(protocol=tcps)(port=1522)(host=adb.ap-tokyo-1.oraclecloud.com))(connect_data=(service_name=atp_tp.adb.oraclecloud.com))(security=(ssl_server_cert_dn="CN=adb.ap-tokyo-1.oraclecloud.com,OU=Oracle ADB TOKYO,O=Oracle Corporation,L=Redwood City,ST=California,C=US")))

	atp_tpurgent = (description= (retry_count=20)(retry_delay=3)(address=(protocol=tcps)(port=1522)(host=adb.ap-tokyo-1.oraclecloud.com))(connect_data=(service_name=atp_tpurgent.adb.oraclecloud.com))(security=(ssl_server_cert_dn="CN=adb.ap-tokyo-1.oraclecloud.com,OU=Oracle ADB TOKYO,O=Oracle Corporation,L=Redwood City,ST=California,C=US")))
- 名前解決設定
On-PremisesからOCIのATP接続は、ATPのATPのホスト名を名前解決できるようにする必要があります。
OCI Private DNSを使うか、/etc/hosts へ設定します
今回は以下のように、/etc/hostsファイルへ10.0.0.2 adb.ap-tokyo-1.oraclecloud.comを追加
[oracle@11gR2 targetwallet]$ vi /etc/hosts

	10.0.0.2  adb.ap-tokyo-1.oraclecloud.com
● 4.Set GLOBAL_NAMES to FALSE.
名前がリモートデータベース名と異なることを確認せずにデータベースリンク名を使用するには、GLOBAL_NAMESをFALSEに設定します。
GLOBAL_NAMESがTRUEに設定されている場合、データベースでは、データベースリンクが接続先のデータベースと同じ名前である必要があります。
詳細については、GLOBAL_NAMESを参照してください。
- 11gR2 Database へ接続
[oracle@11gR2 ~]$ sqlplus / as sysdba

	SQL*Plus: Release 11.2.0.4.0 Production on Mon Nov 23 12:22:13 2020

	Copyright (c) 1982, 2013, Oracle.  All rights reserved.


	Connected to:
	Oracle Database 11g Enterprise Edition Release 11.2.0.4.0 - 64bit Production
	With the Partitioning, Real Application Clusters, Automatic Storage Management, OLAP,
	Data Mining and Real Application Testing options
- GLOBAL_NAMESパラメータ確認
SQL> show parameter GLOBAL_NAMES

		NAME          TYPE        VALUE
	------------- ----------- ---------
	global_names  boolean	  TRUE
- GLOBAL_NAMESパラメータ設定
SQL> ALTER SYSTEM SET GLOBAL_NAMES = FALSE;

	System altered.
- GLOBAL_NAMESパラメータ設定確認
SQL> SHOW PARAMETER GLOBAL_NAMES

	NAME          TYPE        VALUE
	------------- ----------- ---------
	global_names  boolean	  FALSE
● 5. Create the database link
ターゲットの自律データベースへのデータベースリンクを作成します。
securityパスには my_wallet_directory が含まれていることに注意してください。
※(security項目へ追加:my_wallet_directory=<unzipしたWalletパス>
SQL> CREATE DATABASE LINK atp_high
		CONNECT TO admin IDENTIFIED BY passward
		USING
		'(description= (retry_count=20)(retry_delay=3)
		(address=(protocol=tcps)(port=1522)(host=adb.ap-tokyo-1.oraclecloud.com))
		(connect_data=(service_name=atp_high.adb.oraclecloud.com))
		(security= (my_wallet_directory=/home/oracle/targetwallet)
			(ssl_server_dn_match=true)
			(ssl_server_cert_dn="CN=adb.ap-tokyo-1.oraclecloud.com,OU=Oracle ADB TOKYO,O=Oracle Corporation,L=Redwood City,ST=California,C=US")))'
	;

	Database link created.
● 8. Database Link接続確:
- Database Link接続確認
SQL> select * from dual@atp_high;

	D
	-
	X
- 接続インスタンス確認
SQL> select instance_name from v$instance;

	INSTANCE_NAME
	----------------
	atp
■ おまけ
● ORA-12696 エラーが出力された場合
SQL> select * from dual@atp_high;
	select * from dual@atp_high
					*
	ERROR at line 1:
	ORA-12696: Double Encryption Turned On, login disallowed
このエラーは、
Remove either the ASO native encryption or the SSL encryption.
Using both methods at the same time is not supported.
ということなので、
・Database Linkでは、ADBのクライアント資格証明(Wallet)ディレクトリ内のsqlnet.oraで設定された通信暗号化
・SQL*PLUSセッションは、11gR2のデフォルト$TNS_ADMIN配下にあるsqlnet.oraで設定された通信暗化
の2つが使われて重複しているため、このORA-12696 エラーが出力されます。
ということで、
どちらか1つのsqlnet.oraを使用する必要があるので、今回は、SQL*Plus接続のときDatabase Linkと同じWalletディレクトリのsqlnet.oraを使用するように環境変数 'TNS_ADMIN=Walletディレクトリ'を設定して接続します。
- TNS_ADMIN環境変数設定
Database Linkで設定したWalletディレクトリを設定
[oracle@11gR2 ~]$ export TNS_ADMIN=/home/oracle/targetwallet
[oracle@11gR2 ~]$ env | grep TNS
	TNS_ADMIN=/home/oracle/targetwallet
- Database Link アクセス確認
ORA-12696 エラーが出力されないことを確認
[oracle@11gR2 admin]$ sqlplus / as sysdba
SQL> select * from dual@atp_high;

	D
	-
	X
● 11gR2 から ADBへSQL*Plus接続
11gR2 から ADBへ接続できるか確認
- 環境変数設定
[oracle@11gR2 ~]$ export ORACLE_HOME=/u01/app/oracle/product/11.2.0.4/dbhome_1
[oracle@11gR2 ~]$ export TNS_ADMIN=/home/oracle/targetwallet
[oracle@11gR2 ~]$ export PATH=$PATH:$ORACLE_HOME
- sqlnet.ora設定
DIRECTORY項目を、unzipしたwalletディレクトリへ設定
[oracle@11gR2 ~]$ cd $TNS_ADMIN
[oracle@11gR2 targetwallet]$ cp sqlnet.ora sqlnet.ora.org
[oracle@11gR2 targetwallet]$ vi sqlnet.ora
	WALLET_LOCATION = (SOURCE = (METHOD = file) (METHOD_DATA = (DIRECTORY="/home/oracle/targetwallet")))
	SSL_SERVER_DN_MATCH=yes
- ADBへ接続
[oracle@11gR2 targetwallet]$ sqlplus admin/password@atp_high

	SQL*Plus: Release 11.2.0.4.0 Production on Wed May 19 23:56:16 2021

	Copyright (c) 1982, 2013, Oracle.  All rights reserved.


	Connected to:
	Oracle Database 19c Enterprise Edition Release 19.0.0.0.0 - Production

SQL> select INSTANCE_NAME from v$instance;

	INSTANCE_NAME
	----------------
	pdb
■ 参考
● Document
・Use Database Links with Autonomous Database
・SQL*Plusでの接続
・Oracle Call Interface (OCI)、ODBCおよびJDBC OCI接続の準備
● My Oracle Support
・Doc ID 2592265.1: Create and Configure Database Link in Autonomous Database
・Doc ID 207303.1: Client / Server Interoperability Support Matrix for Different Oracle Versions
・Doc ID 2330023.1: Oracle Standard Edition で TCPS サポートを有効化する方法
● アナウンス
Oracle Cloud Infrastructureデータベース・クラウド 11gR2(11.2.0.4) サポート終了のお知らせ