Windows Subsystem for Linux (WSL) を使用すると、Windows マシン上で Windows と Linux の両方の機能に同時にアクセスできます。
開発者は Linux ディストリビューション (Ubuntu、OpenSUSE、Debian、Oracle Linuxなど) をインストールし、Linux アプリケーション、ユーティリティ、Bash コマンド ライン ツールを、従来の仮想マシンやデュアルブートのセットアップや変更なしで Windows に直接使用できます。

また WSLは、WSL1 と WSL2 がありそれぞれ構造が異なります。
WSL 1 と WSL 2 の比較 より〜
WSL1とWSL2の主な違いは、WSL1がLinuxシステムコールをWindows APIに変換する方式なのに対し、WSL2は軽量仮想マシン(VM)上で完全なLinuxカーネルを実行する点にあり、これによりWSL2は高い互換性(Docker対応など)とLinuxファイルシステム内での高速なI/Oを実現しますが、Windowsファイルへのアクセスは遅くなり、ネットワークも独立したIPアドレスを持つなど、アーキテクチャが根本的に異なります。
レイテンシ(遅延)のRTT(Round Trip Time:往復時間)測定では、WSL と WSL2 は「同じ精度」ではありません。
仮想NIC を介さない WSL(= WSL1)の方が RTT 測定では明確に有利です。
| 項目 | WSL1 | WSL2 |
|---|---|---|
| 実装 | Windows カーネル直結 | 軽量VM(Hyper-V) |
| NIC | Windows TCP/IP を直接使用 | 仮想NIC(vEthernet) |
| RTT への影響 | 最小 | +0.1〜0.3ms 乗ることあり |
| RTTの揺れ | 少ない | 揺れやすい |
| μs測定 | やりやすい | 正直つらい |
| 内部構造 | netperf ↓ Windows TCP/IP(直結) ↓ 物理NIC |
netperf ↓ Linux TCP/IP ↓ 仮想NIC ↓ Hyper-V Switch ↓ Windows TCP/IP ↓ 物理NIC |
| どちらを選ぶべきか? | Windowsファイルへの高速アクセスが最重要で、Linuxの高度な機能が不要な場合(特定の古いツールなど) | ほとんどの開発ワークロード(Docker、データベース、npm installなど)で、高い互換性とファイルI/O性能が求められる場合に最適(現在はこちらが推奨されることが多い) |
-
クラウドでのネットワーク レイテンシの測定より
クラウド アーキテクトによく寄せられる質問の一つに、「2 つのエンドポイント間でリクエストとレスポンスをどの程度まで迅速に交換できるのですか?」というのがあります。ネットワークのラウンドトリップ レイテンシを測定するツールには ping、iperf、netperf などがありますが、すべてが同じように実装、構成されるわけではないため、ツールによって結果が異なる場合があります。ほとんどの場合、この質問に対する代表的な回答が得られるツールは、netperf であると考えられます。
netperfコマンドは、単一リージョン内の単一のゾーンにある 2 台のマシン間でゾーン内レイテンシ ベンチマークを実行します。このようなゾーン内ベンチマークを使用することで、緊密に連携するマシン間の非常に低いレイテンシをマイクロ秒単位で示すことができます。
ということで、Windows に WSL を導入し、netperf で Linux 側とのレイテンシ(RTT)を μs 単位で測定します。さらに WSL1 と WSL2 を同一環境で比較し、構造差が測定値に与える影響を確認してみてみます。
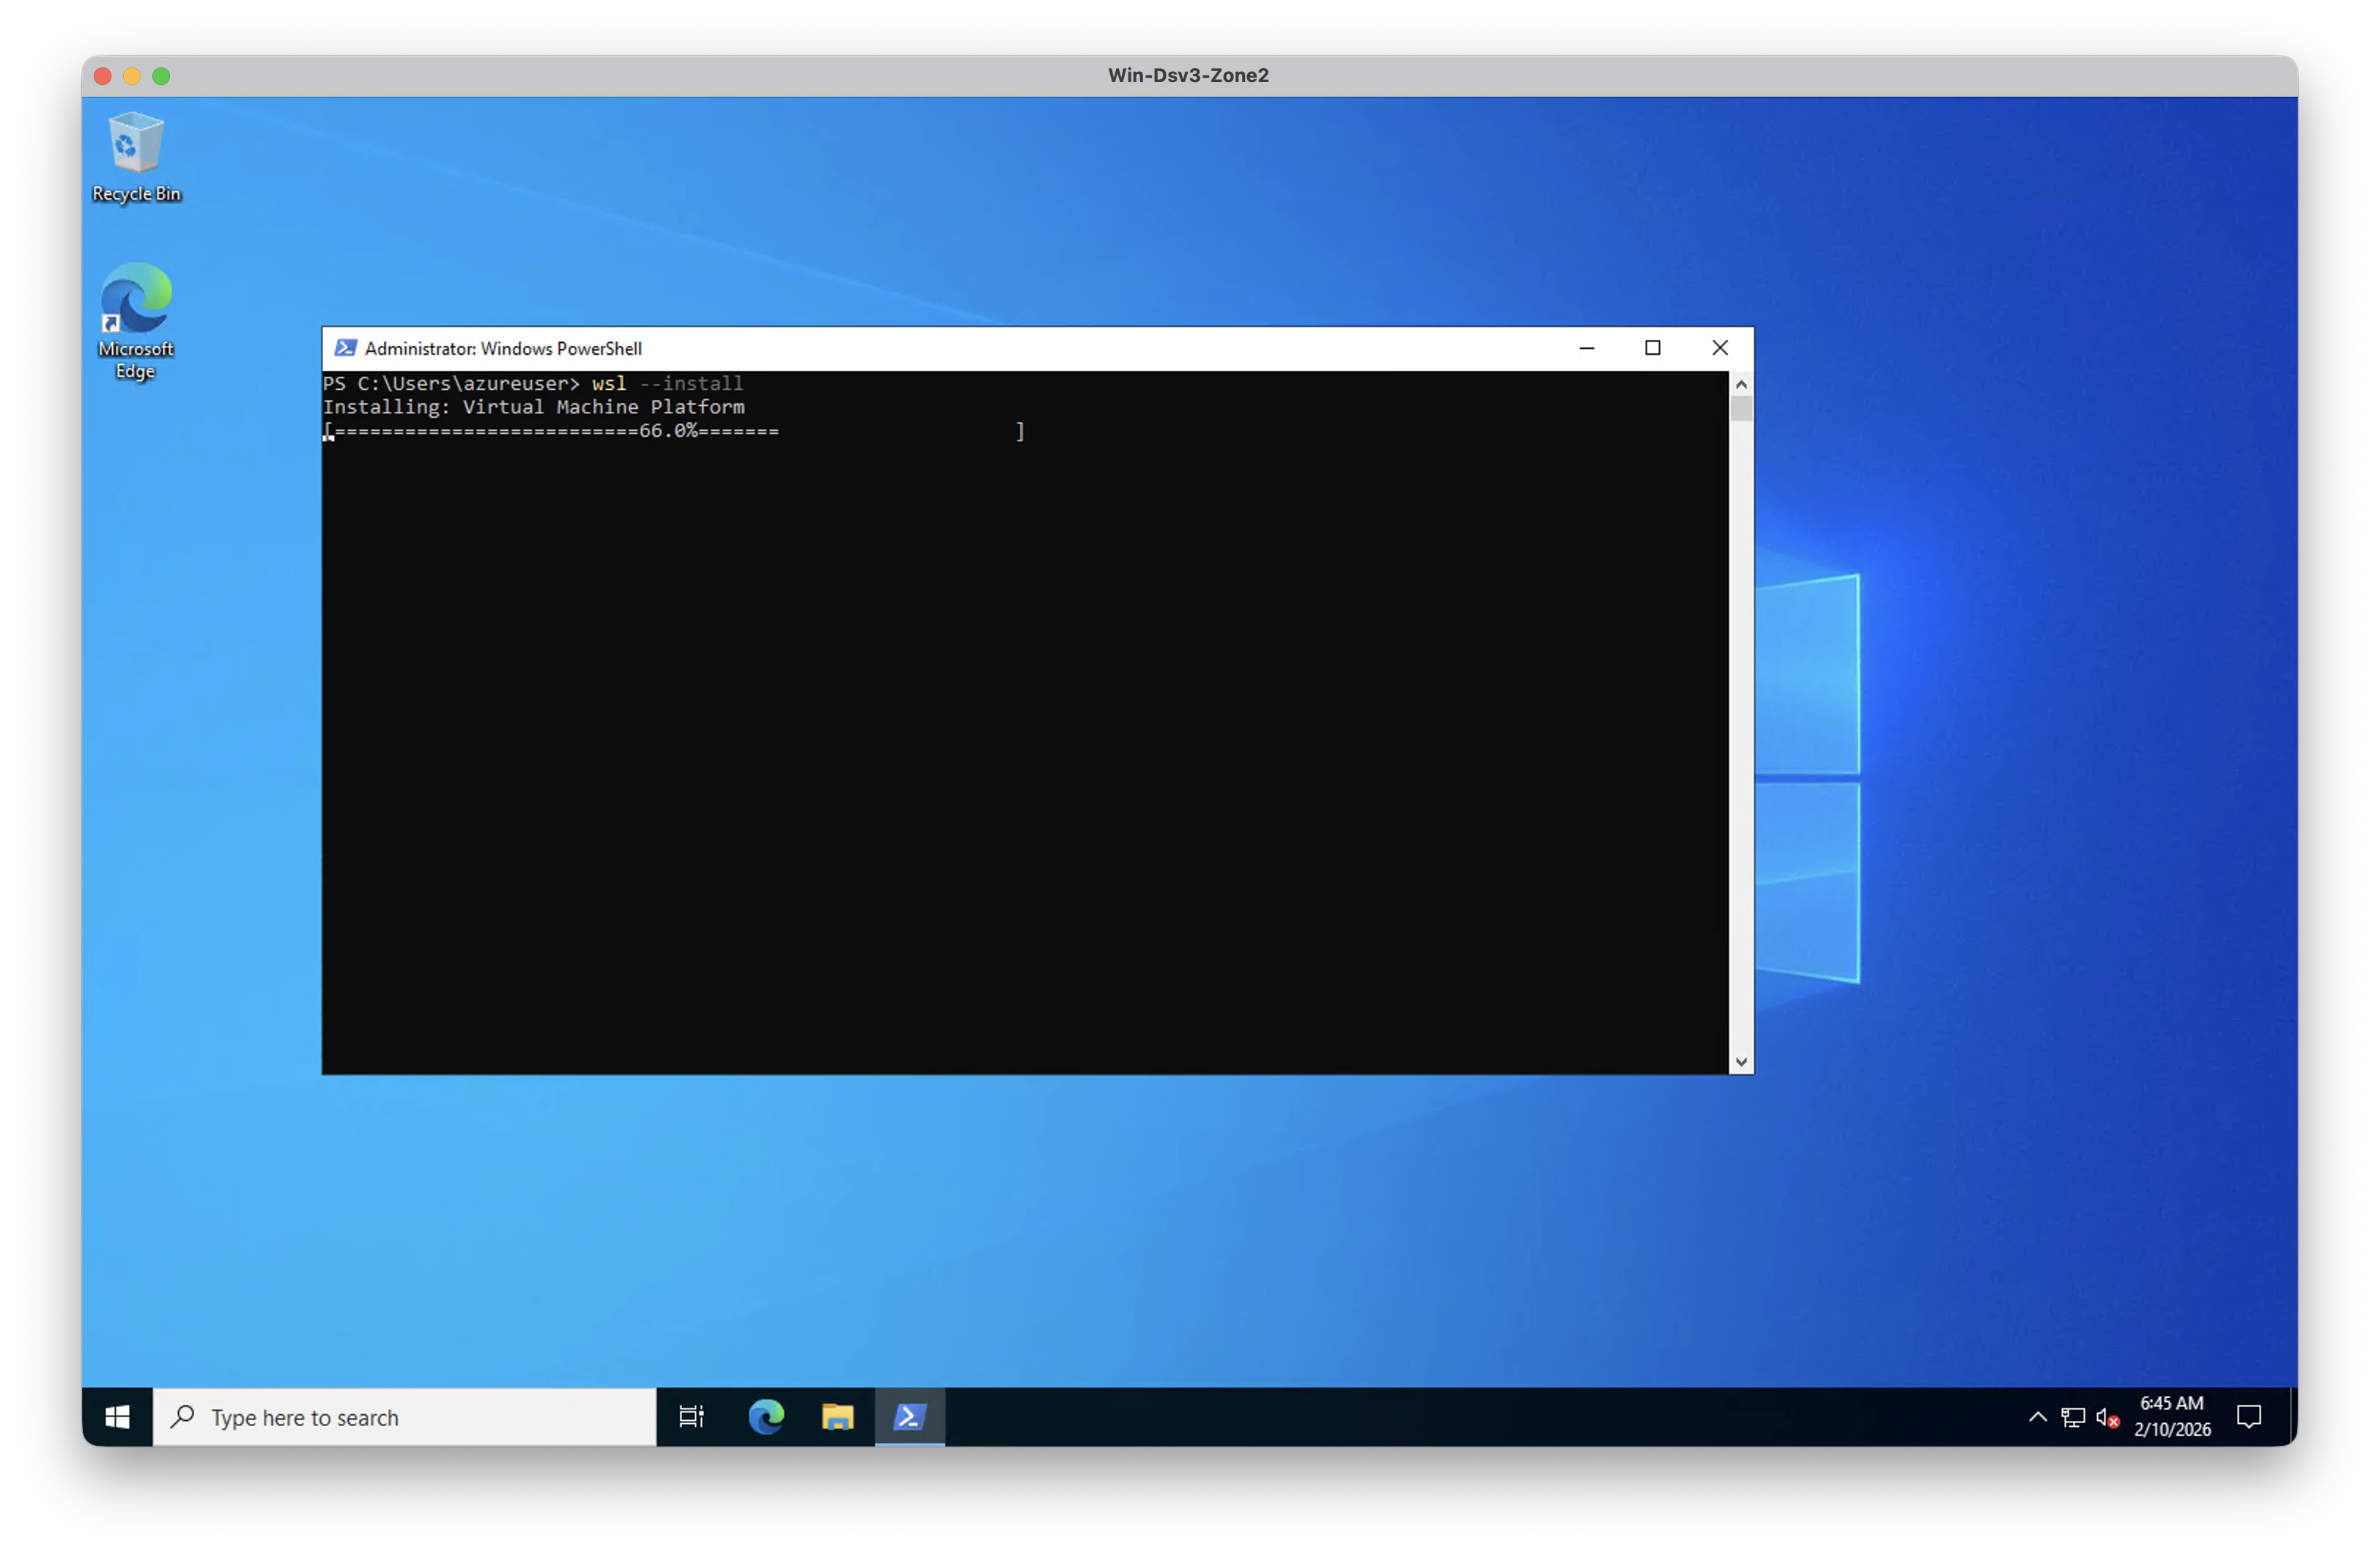
■ WSLインストール
右クリックして [ 管理者 として実行] を選択して管理者モードで PowerShell を開き、wsl --install --distribution <distribution name> コマンドを入力して、コンピューターを再起動します。
1) WSL ディストリビューション一覧確認
ディストリビューション名の有効な一覧を表示
このリストから好みのディストリビューションを設定できます。
PS C:\Users\azureuser> wsl --list --online
	The following is a list of valid distributions that can be installed.
	Install using 'wsl.exe --install <Distro>'.

	NAME                            FRIENDLY NAME
	Ubuntu                          Ubuntu
	Ubuntu-24.04                    Ubuntu 24.04 LTS
	openSUSE-Tumbleweed             openSUSE Tumbleweed
	openSUSE-Leap-16.0              openSUSE Leap 16.0
	SUSE-Linux-Enterprise-15-SP7    SUSE Linux Enterprise 15 SP7
	SUSE-Linux-Enterprise-16.0      SUSE Linux Enterprise 16.0
	kali-linux                      Kali Linux Rolling
	Debian                          Debian GNU/Linux
	AlmaLinux-8                     AlmaLinux OS 8
	AlmaLinux-9                     AlmaLinux OS 9
	AlmaLinux-Kitten-10             AlmaLinux OS Kitten 10
	AlmaLinux-10                    AlmaLinux OS 10
	archlinux                       Arch Linux
	FedoraLinux-43                  Fedora Linux 43
	FedoraLinux-42                  Fedora Linux 42
	eLxr                            eLxr 12.12.0.0 GNU/Linux
	Ubuntu-20.04                    Ubuntu 20.04 LTS
	Ubuntu-22.04                    Ubuntu 22.04 LTS
	OracleLinux_7_9                 Oracle Linux 7.9
	OracleLinux_8_10                Oracle Linux 8.10
	OracleLinux_9_5                 Oracle Linux 9.5
	openSUSE-Leap-15.6              openSUSE Leap 15.6
	SUSE-Linux-Enterprise-15-SP6    SUSE Linux Enterprise 15 SP6
2) wsl --install
このコマンドにより、WSL を実行し、Linux の Ubuntu ディストリビューションをインストールするために必要な機能が有効になります。
--distribution オプションを指定しない場合、既定の Ubuntu になります。
PS C:\Users\azureuser> wsl --install --distribution Ubuntu
Installing: Virtual Machine Platform
「=========================66.9%======= ]
・・・
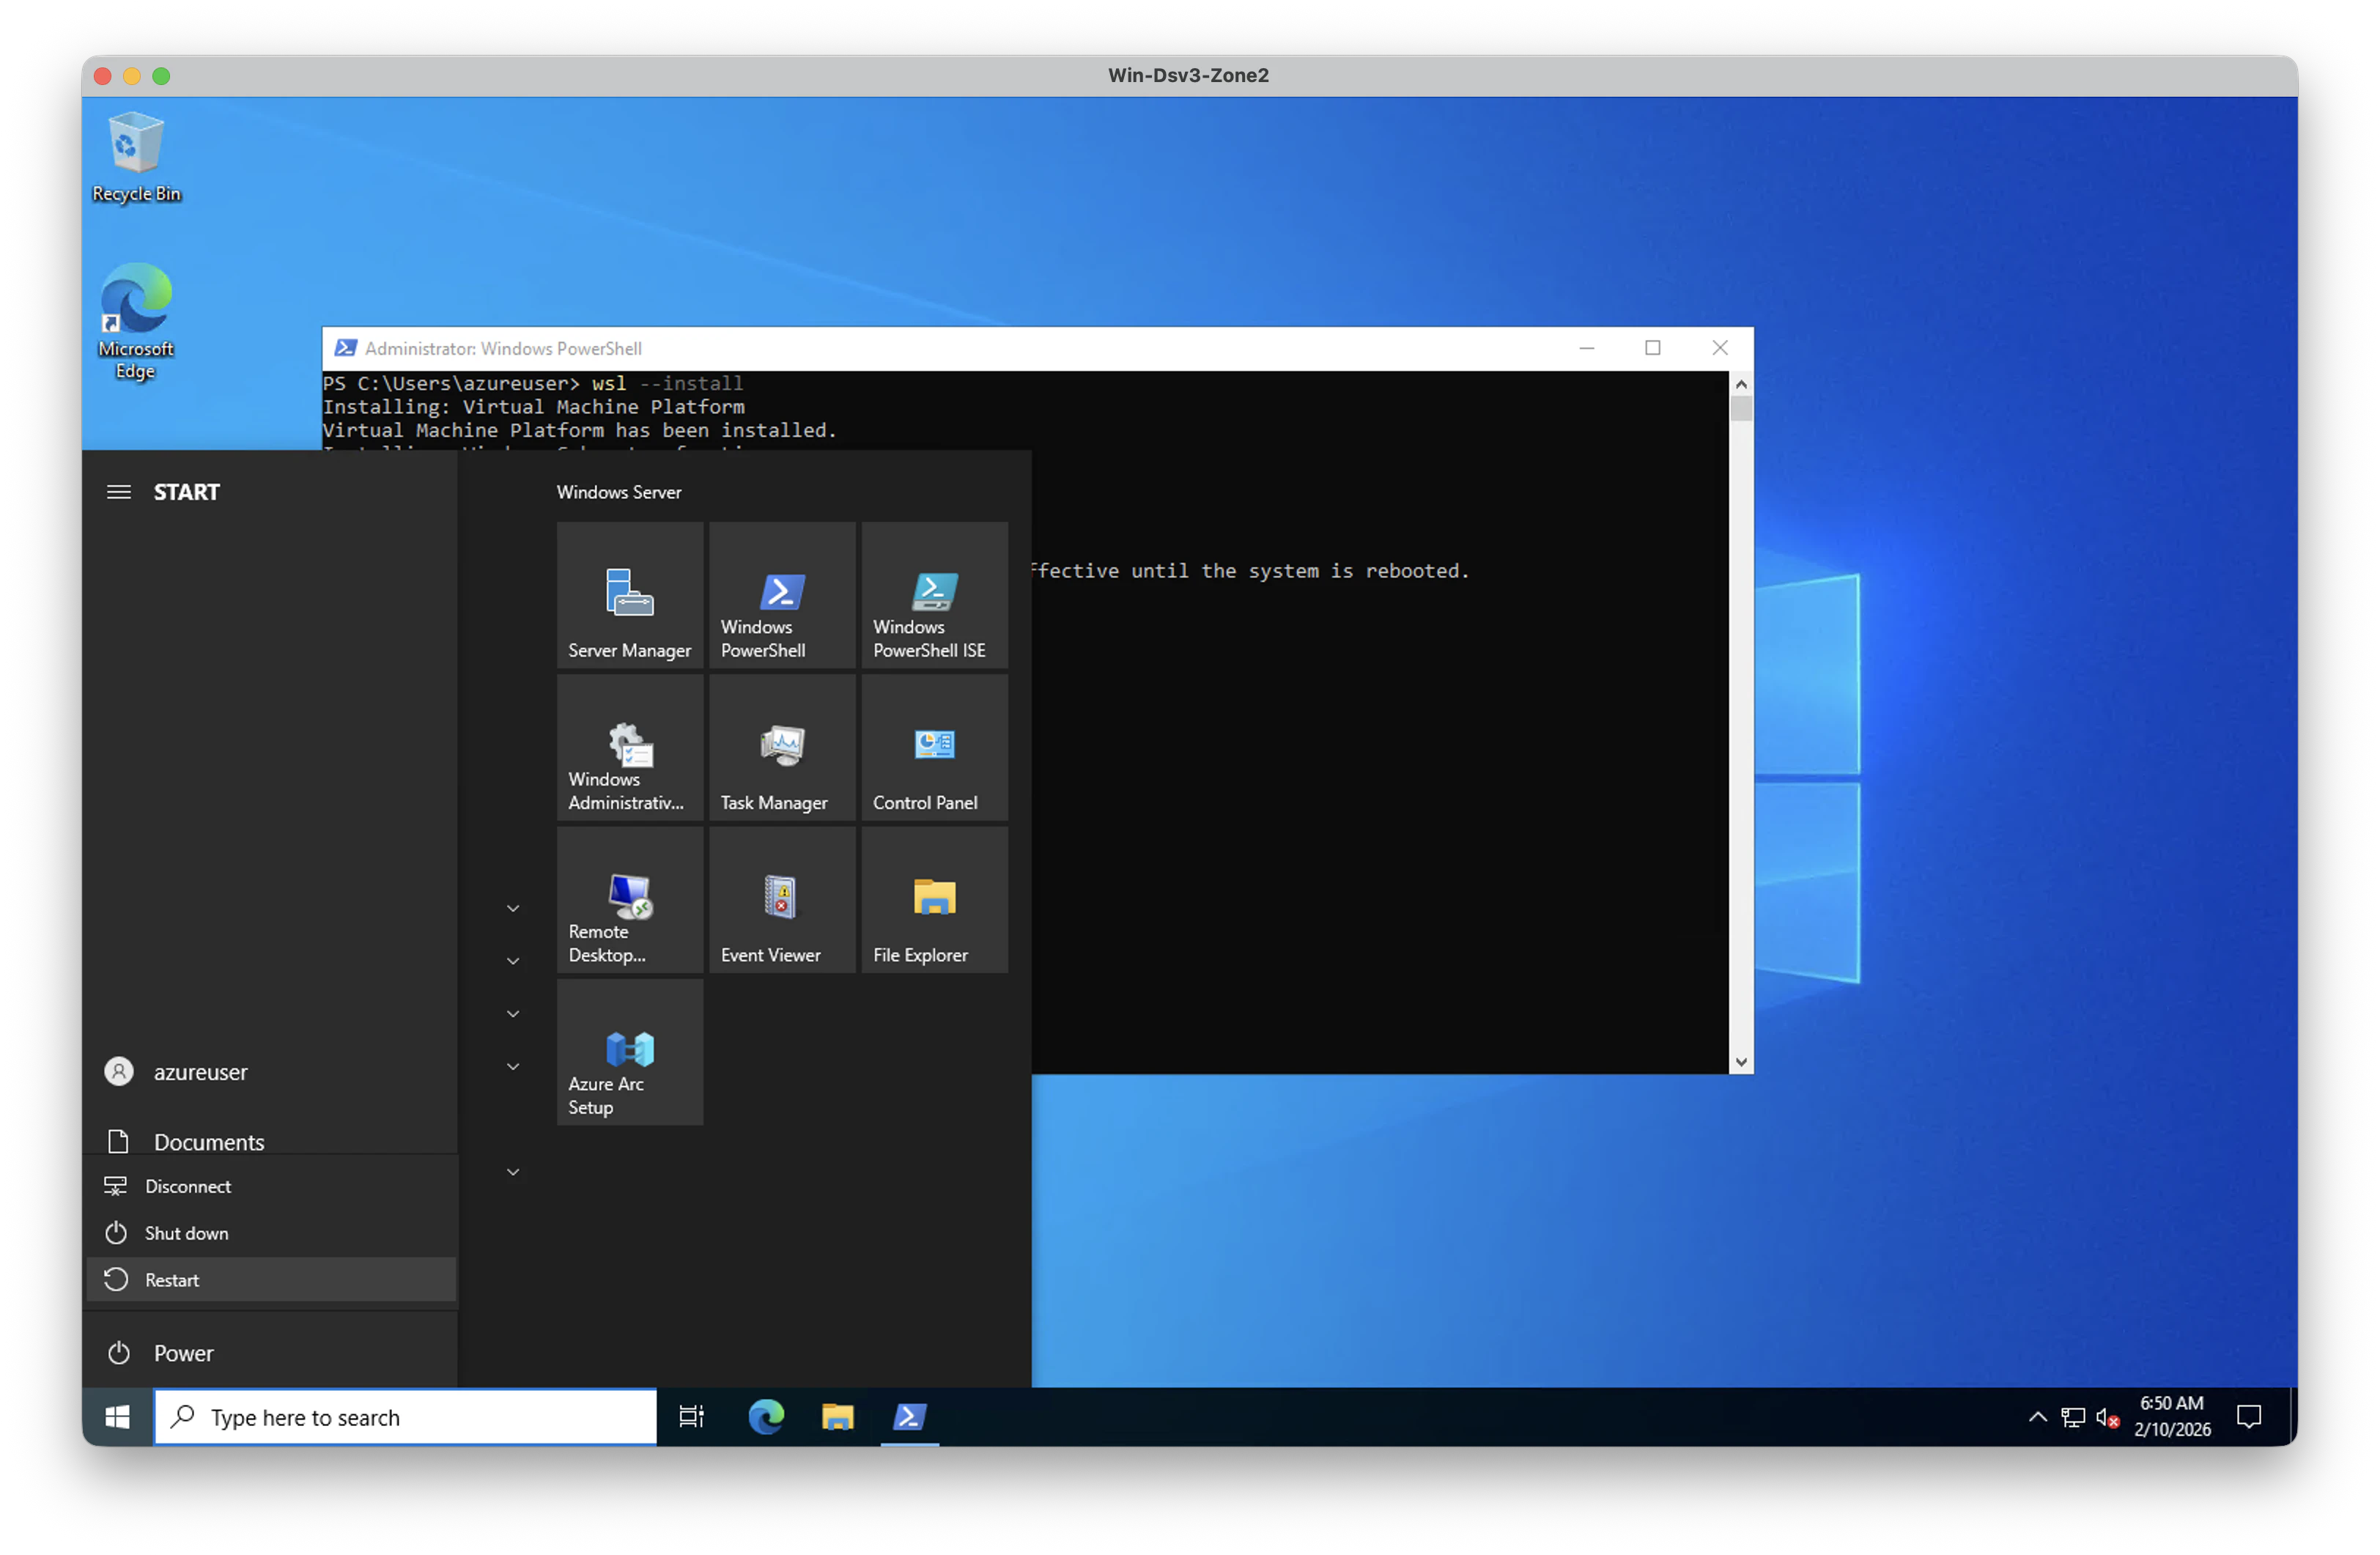
Installing: Virtual Machine Platform
Virtual Machine Platform has been installed.
Installing: Windows Subsystem for Linux
Windows Subsystem for Linux has been installed.
Downloading: Windows Subsystem for Linux
Installing: Windows Subsystem for Linux
Windows Subsystem for Linux has been installed.
The requested operation is successful. Changes will not be effective until the system is rebooted.
インストールが正常完了すると次の表示がされます。
The requested operation is successful. Changes will not be effective until the system is rebooted.
3) OS 再起動
wsl --install 実行後、上記で表示されているとおり system を reboot します。
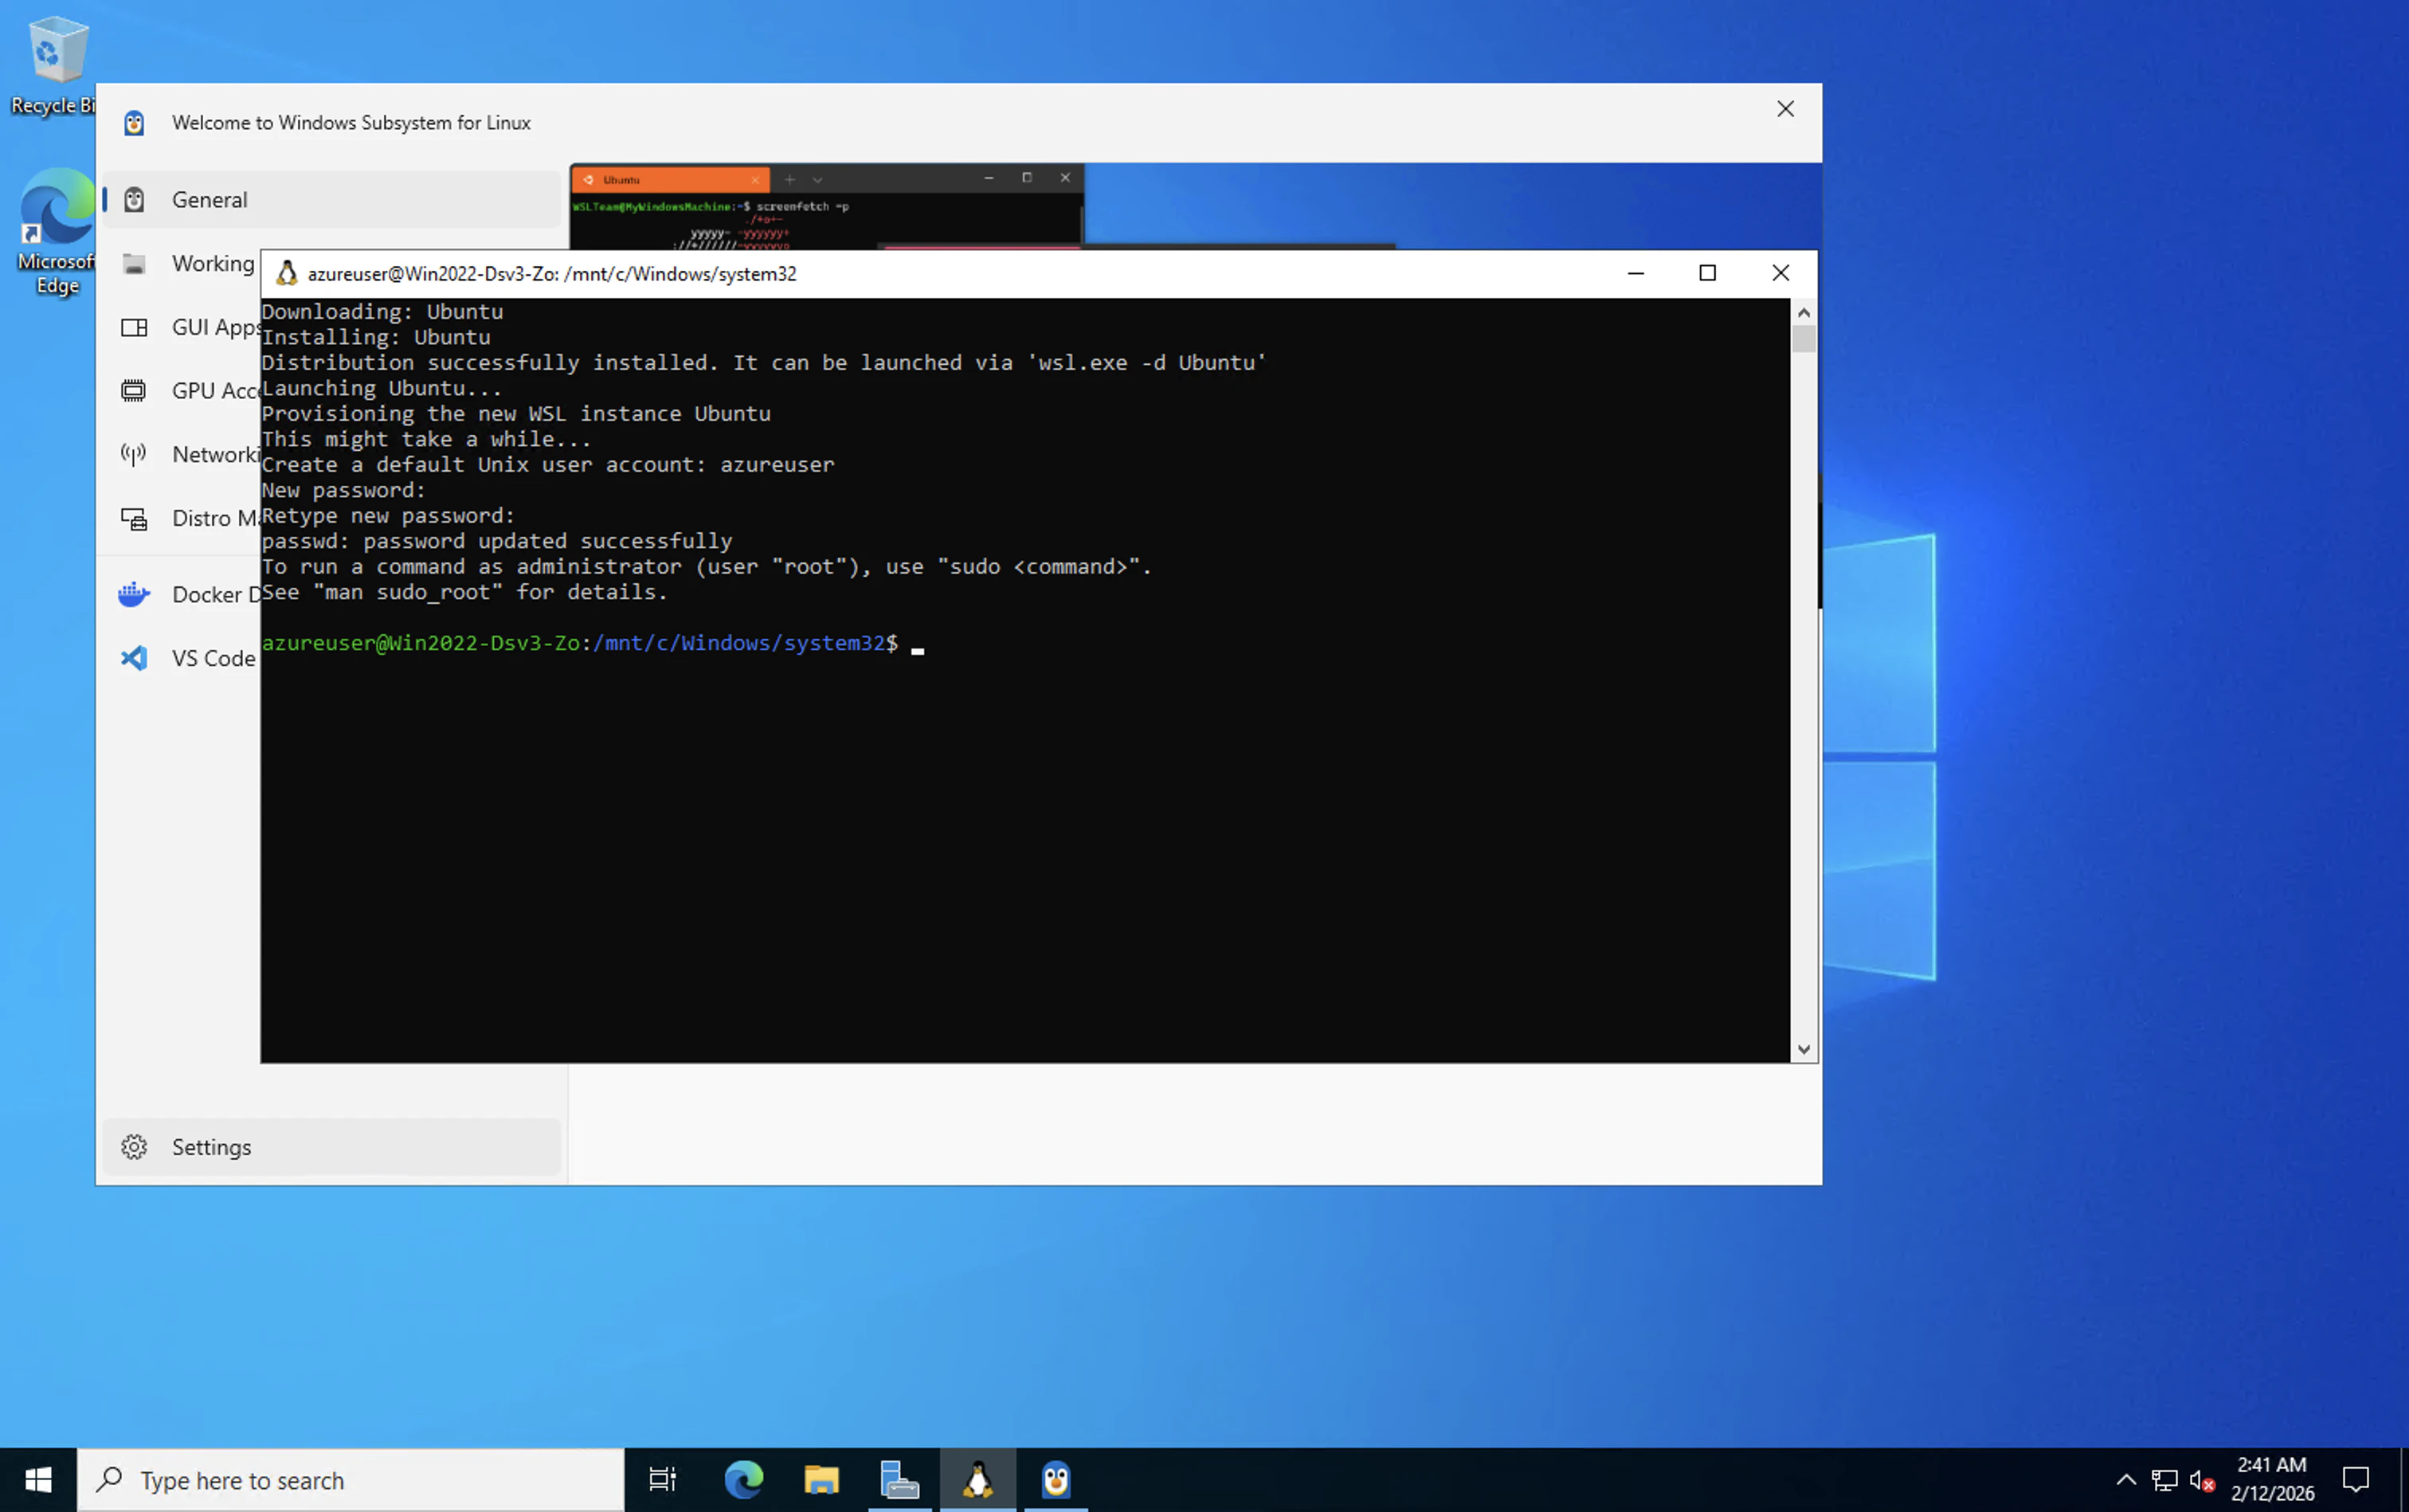
4) reboot後WSL自動格納Ubuntu Downloading & Installing
新しくインストールされた Linux ディストリビューションを初めて起動すると、コンソール ウィンドウが開き、ファイルが圧縮解除されてコンピューターに格納されるのを待つよう求められます。
Downloading: Ubuntu
Installing: Ubuntu
Distribution successfully installed. It can be launched via 'wsl.exe -d Ubuntu'
Launching Ubuntu...
Provisioning the new WSL instance Ubuntu
This might take a while...
Create a default Unix user account: azureuser
New password:
Retype new password:
passwd: password updated successfully
To run a command as administrator (user "root"), use "sudo <command>".
See "man sudo_root" for details.
azureuser@Windows:/mnt/c/Windows/system32$
■ netperf インストール
netperf をインストールします。
sudo apt update
sudo apt install -y linux-tools-common
sudo apt install -y netperf
Ubuntu以外はこちら参照して netperfをインストール
0) wsl 起動
~ を wsl と一緒に使用して、ユーザーのホーム ディレクトリから開始できます。 WSL コマンド プロンプト内で任意のディレクトリからホームに戻る場合は、cd ~ コマンドを使用できます。
PS C:\Users\azureuser> wsl ~
azureuser@Windows:~$ pwd
  /home/azureuser
1) apt update
アップデートが可能なパッケージのリストを更新して netperfインストールできるようにする。
azureuser@Windows:~$ sudo apt update
  [sudo] password for azureuser:
  Get:1 http://security.ubuntu.com/ubuntu noble-security InRelease [126 kB]
  Hit:2 http://archive.ubuntu.com/ubuntu noble InRelease
  Get:3 http://archive.ubuntu.com/ubuntu noble-updates InRelease [126 kB]
  Get:4 http://security.ubuntu.com/ubuntu noble-security/main amd64 Packages [1431 kB]
  Get:5 http://archive.ubuntu.com/ubuntu noble-backports InRelease [126 kB]
  Get:6 http://archive.ubuntu.com/ubuntu noble/universe amd64 Packages [15.0 MB]
  Get:7 http://security.ubuntu.com/ubuntu noble-security/main Translation-en [232 kB]
  Get:8 http://security.ubuntu.com/ubuntu noble-security/main amd64 Components [21.5 kB]
  Get:9 http://archive.ubuntu.com/ubuntu noble/universe Translation-en [5982 kB]
  Get:10 http://security.ubuntu.com/ubuntu noble-security/main amd64 c-n-f Metadata [9888 B]
  Get:11 http://archive.ubuntu.com/ubuntu noble/universe amd64 Components [3871 kB]
  Get:12 http://security.ubuntu.com/ubuntu noble-security/universe amd64 Packages [929 kB]
  Get:13 http://archive.ubuntu.com/ubuntu noble/universe amd64 c-n-f Metadata [301 kB]
  Get:14 http://archive.ubuntu.com/ubuntu noble/multiverse amd64 Packages [269 kB]
  Get:15 http://archive.ubuntu.com/ubuntu noble/multiverse Translation-en [118 kB]
  Get:16 http://archive.ubuntu.com/ubuntu noble/multiverse amd64 Components [35.0 kB]
  Get:17 http://archive.ubuntu.com/ubuntu noble/multiverse amd64 c-n-f Metadata [8328 B]
  Get:18 http://archive.ubuntu.com/ubuntu noble-updates/main amd64 Packages [1739 kB]
  Get:19 http://archive.ubuntu.com/ubuntu noble-updates/main Translation-en [324 kB]
  Get:20 http://security.ubuntu.com/ubuntu noble-security/universe Translation-en [212 kB]
  Get:21 http://archive.ubuntu.com/ubuntu noble-updates/main amd64 Components [174 kB]
  Get:22 http://archive.ubuntu.com/ubuntu noble-updates/main amd64 c-n-f Metadata [16.5 kB]
  Get:23 http://archive.ubuntu.com/ubuntu noble-updates/universe amd64 Packages [1528 kB]
  Get:24 http://archive.ubuntu.com/ubuntu noble-updates/universe Translation-en [313 kB]
  Get:25 http://archive.ubuntu.com/ubuntu noble-updates/universe amd64 Components [386 kB]
  Get:26 http://security.ubuntu.com/ubuntu noble-security/universe amd64 Components [74.2 kB]
  Get:27 http://archive.ubuntu.com/ubuntu noble-updates/universe amd64 c-n-f Metadata [31.9 kB]
  Get:28 http://archive.ubuntu.com/ubuntu noble-updates/restricted amd64 Packages [2582 kB]
  Get:29 http://archive.ubuntu.com/ubuntu noble-updates/restricted Translation-en [591 kB]
  Get:30 http://archive.ubuntu.com/ubuntu noble-updates/restricted amd64 Components [212 B]
  Get:31 http://archive.ubuntu.com/ubuntu noble-updates/restricted amd64 c-n-f Metadata [556 B]
  Get:32 http://archive.ubuntu.com/ubuntu noble-updates/multiverse amd64 Packages [32.1 kB]
  Get:33 http://archive.ubuntu.com/ubuntu noble-updates/multiverse Translation-en [6816 B]
  Get:34 http://security.ubuntu.com/ubuntu noble-security/universe amd64 c-n-f Metadata [19.9 kB]
  Get:35 http://archive.ubuntu.com/ubuntu noble-updates/multiverse amd64 Components [940 B]
  Get:36 http://archive.ubuntu.com/ubuntu noble-updates/multiverse amd64 c-n-f Metadata [496 B]
  Get:37 http://archive.ubuntu.com/ubuntu noble-backports/main amd64 Packages [40.4 kB]
  Get:38 http://archive.ubuntu.com/ubuntu noble-backports/main Translation-en [9208 B]
  Get:39 http://archive.ubuntu.com/ubuntu noble-backports/main amd64 Components [7300 B]
  Get:40 http://archive.ubuntu.com/ubuntu noble-backports/main amd64 c-n-f Metadata [368 B]
  Get:41 http://archive.ubuntu.com/ubuntu noble-backports/universe amd64 Packages [29.5 kB]
  Get:42 http://archive.ubuntu.com/ubuntu noble-backports/universe Translation-en [17.9 kB]
  Get:43 http://archive.ubuntu.com/ubuntu noble-backports/universe amd64 Components [10.5 kB]
  Get:44 http://security.ubuntu.com/ubuntu noble-security/restricted amd64 Packages [2411 kB]
  Get:45 http://archive.ubuntu.com/ubuntu noble-backports/universe amd64 c-n-f Metadata [1444 B]
  Get:46 http://archive.ubuntu.com/ubuntu noble-backports/restricted amd64 Components [216 B]
  Get:47 http://archive.ubuntu.com/ubuntu noble-backports/restricted amd64 c-n-f Metadata [116 B]
  Get:48 http://archive.ubuntu.com/ubuntu noble-backports/multiverse amd64 Components [212 B]
  Get:49 http://archive.ubuntu.com/ubuntu noble-backports/multiverse amd64 c-n-f Metadata [116 B]
  Get:50 http://security.ubuntu.com/ubuntu noble-security/restricted Translation-en [553 kB]
  Get:51 http://security.ubuntu.com/ubuntu noble-security/restricted amd64 Components [212 B]
  Get:52 http://security.ubuntu.com/ubuntu noble-security/restricted amd64 c-n-f Metadata [536 B]
  Get:53 http://security.ubuntu.com/ubuntu noble-security/multiverse amd64 Packages [28.8 kB]
  Get:54 http://security.ubuntu.com/ubuntu noble-security/multiverse Translation-en [6492 B]
  Get:55 http://security.ubuntu.com/ubuntu noble-security/multiverse amd64 Components [208 B]
  Get:56 http://security.ubuntu.com/ubuntu noble-security/multiverse amd64 c-n-f Metadata [396 B]
  Fetched 39.8 MB in 13s (3142 kB/s)
  Reading package lists... Done
  Building dependency tree... Done
  Reading state information... Done
  126 packages can be upgraded. Run 'apt list --upgradable' to see them.
azureuser@Windows:~$
2) linux-tools-commonインストール
このパッケージを導入すると、システムのタイマー精度を調査するための強力なツールが利用可能になります。
azureuser@Windows:~$ sudo apt install -y linux-tools-common
	[sudo] password for azureuser:
	Reading package lists... Done
	Building dependency tree... Done
	Reading state information... Done
	The following additional packages will be installed:
	  hwdata
	The following NEW packages will be installed:
	  hwdata linux-tools-common
	0 upgraded, 2 newly installed, 0 to remove and 128 not upgraded.
	Need to get 910 kB of archives.
	After this operation, 1064 kB of additional disk space will be used.
	Get:1 http://archive.ubuntu.com/ubuntu noble/main amd64 hwdata all 0.379-1 [29.1 kB]
	Get:2 http://archive.ubuntu.com/ubuntu noble-updates/main amd64 linux-tools-common all 6.8.0-100.100 [881 kB]
	Fetched 910 kB in 3s (329 kB/s)
	Selecting previously unselected package hwdata.
	(Reading database ... 40778 files and directories currently installed.)
	Preparing to unpack .../hwdata_0.379-1_all.deb ...
	Unpacking hwdata (0.379-1) ...
	Selecting previously unselected package linux-tools-common.
	Preparing to unpack .../linux-tools-common_6.8.0-100.100_all.deb ...
	Unpacking linux-tools-common (6.8.0-100.100) ...
	Setting up hwdata (0.379-1) ...
	Setting up linux-tools-common (6.8.0-100.100) ...
	Processing triggers for man-db (2.12.0-4build2) ...
3) netperfインストール
azureuser@Windows:~$ sudo apt install -y netperf
Reading package lists... Done
Building dependency tree... Done
Reading state information... Done
The following NEW packages will be installed:
  netperf
0 upgraded, 1 newly installed, 0 to remove and 126 not upgraded.
Need to get 540 kB of archives.
After this operation, 1108 kB of additional disk space will be used.
Get:1 http://archive.ubuntu.com/ubuntu noble/multiverse amd64 netperf amd64 2.7.0-0.1 [540 kB]
Fetched 540 kB in 2s (259 kB/s)
Selecting previously unselected package netperf.
(Reading database ... 40754 files and directories currently installed.)
Preparing to unpack .../netperf_2.7.0-0.1_amd64.deb ...
Unpacking netperf (2.7.0-0.1) ...
Setting up netperf (2.7.0-0.1) ...
Processing triggers for man-db (2.12.0-4build2) ...
■ netperf での TCP, UDP レイテンシ測定
今回 Windows と Linux間でnetperfを実行します。
Linuxへの netperfは次を参考にインストールします。
● Server(受信側)設定
1) Firewall設定
netserver の待受ポート(デフォルト 12865)です。
OS や Cloud の Firewall 設定で、Cleint と Server間で TCP/UDP の 12865 Port が 通るように設定しておきます。
2) netserver起動
netserverコマンドでClientからのnetperfを受信できるようにします。
[opc@Linux ~]$ sudo netserver
    Starting netserver with host 'IN(6)ADDR_ANY' port '12865' and family AF_UNSPEC
3) netserver起動確認
netserver が起動しているか ss -lntp | grep 12865 などで確認
[opc@Linux ~]$ sudo ss -lntp | grep 12865
	LISTEN 0      1024               *:12865            *:*    users:(("netserver",pid=6714,fd=3))
● Client(送信側)実行
・ TCP Latency
単位は 1μs (0.001ms)です。
azureuser@Windows:~$ netperf -H 10.0.0.10 -t TCP_RR -- -k MIN_LATENCY,MEAN_LATENCY,MAX_LATENCY
	MIGRATED TCP REQUEST/RESPONSE TEST from 0.0.0.0 (0.0.0.0) port 0 AF_INET to 10.0.0.10 () port 0 AF_INET : demo : first burst 0
	MIN_LATENCY=156
	MEAN_LATENCY=230.66
	MAX_LATENCY=4003
・ UDP Latency
単位は 1μs (0.001ms)です。
azureuser@Windows:~$ netperf -H 10.0.0.10 -t UDP_RR -- -k MIN_LATENCY,MEAN_LATENCY,MAX_LATENCY
	MIGRATED TCP REQUEST/RESPONSE TEST from 0.0.0.0 (0.0.0.0) port 0 AF_INET to 10.0.0.10 () port 0 AF_INET : demo : first burst 0
	MIN_LATENCY=157
	MEAN_LATENCY=228.19
	MAX_LATENCY=3429
■ WSL1 と WSL2 の比較検証と考察
WSL1 と WSL2 はアーキテクチャが異なるため、マイクロ秒(μs)オーダーのレイテンシ測定では結果が変わり得ます。本記事では netperf を用いて両者を比較します。
WSL 1 と WSL 2 の比較 より〜
WSL1とWSL2の主な違いは、WSL1がLinuxシステムコールをWindows APIに変換する方式なのに対し、WSL2は軽量仮想マシン(VM)上で完全なLinuxカーネルを実行する点にあり、これによりWSL2は高い互換性(Docker対応など)とLinuxファイルシステム内での高速なI/Oを実現しますが、Windowsファイルへのアクセスは遅くなり、ネットワークも独立したIPアドレスを持つなど、アーキテクチャが根本的に異なります。
※WSL2 は既定では NAT/vEthernet 構成だが、環境によっては mirrored networking を有効化して挙動が変わります。
RTT重視なら、WSL1 と WSL2 は「同じ精度」ではありません。
仮想NICを介さないWSL(= WSL1)の方が RTT 測定には明確に有利です。
| 項目 | WSL(WSL1) | WSL2 |
|---|---|---|
| 実装 | Windows カーネル直結 | 軽量VM(Hyper-V) |
| NIC | Windows TCP/IP を直接使用 | 仮想NIC(vEthernet) |
| RTT への影響 | 最小 | +0.1〜0.3ms 乗ることあり |
| RTTの揺れ | 少ない | 揺れやすい |
| μsオーダー測定 | 使える | 正直つらい |
| 内部構造 | netperf ↓ Windows TCP/IP(直結) ↓ 物理NIC |
netperf ↓ Linux TCP/IP ↓ 仮想NIC ↓ Hyper-V Switch ↓ Windows TCP/IP ↓ 物理NIC |
| どちらを選ぶべきか? | Windowsファイルへの高速アクセスが最重要で、Linuxの高度な機能が不要な場合(特定の古いツールなど) | ほとんどの開発ワークロード(Docker、データベース、npm installなど)で、高い互換性とファイルI/O性能が求められる場合に最適(現在はこちらが推奨されることが多い) |
● WSL2 から WSL1 へ変更
1) WSL のバージョン確認
次のコマンドを入力して、インストールされている Linux ディストリビューションを一覧表示し、WSL のバージョンが設定されていることを確認できます。
PS C:\Users\azureuser> wsl -l -v
	  NAME      STATE           VERSION
	* Ubuntu    Running         2
2) WSL2 へ変更
既定のバージョンを WSL 1 または WSL 2 に設定するには、次のコマンドを使用します。
PS C:\Users\azureuser> wsl --set-version Ubuntu 1
	Conversion in progress, this may take a few minutes.
	The operation completed successfully.
3) WSL のバージョン確認
PS C:\Users\azureuser> wsl -l -v
	  NAME      STATE           VERSION
	* Ubuntu    Stopped         1
4) おまけ: WSL のLinuxディストリビューション変更
Linux ディストリビューション (Ubuntu、OpenSUSE、Kali、Debian、Arch Linux ,CentOS など) をインストールして設定することができます。
wsl.exe --distribution <DistroName>
● WSL1とWSL2とのnetperf測定比較
WSL1とWSL2で実行し比較すると、
結果は、ほぼ “倍” の差で、MIN / MEAN / MAX 全部が揃って改善しました。
これは偶然でも誤差でもなく、構造差です。
仮想NICないため往復経路が最短なWSL1を使用することで計測が改善します。
● WSL2 で netperf実行
1) WSL Version確認
PS C:\Users\azureuser> wsl -l -v
  NAME      STATE           VERSION
* Ubuntu    Running         2
2) netperf実行
azureuser@Windows:~$ netperf -H 10.0.0.10 -t TCP_RR -- -k MIN_LATENCY,MEAN_LATENCY,MAX_LATENCY
	MIGRATED TCP REQUEST/RESPONSE TEST from 0.0.0.0 (0.0.0.0) port 0 AF_INET to 10.0.0.10 () port 0 AF_INET : demo : first burst 0
	MIN_LATENCY=174
	MEAN_LATENCY=236.77
	MAX_LATENCY=9155
● WSL1 で netperf実行
1) WSL Version変更
PS C:\Users\azureuser> wsl --set-version Ubuntu 1
	Conversion in progress, this may take a few minutes.
	The operation completed successfully.

PS C:\Users\azureuser> wsl -l -v
	  NAME      STATE           VERSION
	* Ubuntu    Stopped         1
2) netperf実行
PS C:\Users\azureuser> wsl
azureuser@Windows:~$ netperf -H 10.0.0.10 -t TCP_RR -- -k MIN_LATENCY,MEAN_LATENCY,MAX_LATENCY
	MIGRATED TCP REQUEST/RESPONSE TEST from 0.0.0.0 (0.0.0.0) port 0 AF_INET to 10.0.0.10 () port 0 AF_INET : demo : first burst 0
	get_transport_info: getsockopt: errno 92
	MIN_LATENCY=81
	MEAN_LATENCY=114.97
	MAX_LATENCY=3599
errno 92 について
get_transport_info: getsockopt: errno 92
これは WSL1 側で TCP_INFO の一部が未実装であることに起因し、RTT(MIN/MEAN/MAX)の値そのものには影響しません。
むしろ「WSL1 は Linux kernel を使っていない(変換レイヤ)」という構造の“らしさ”が出ています。
● まとめ(今回の比較結果)
同一 Windows 環境で WSL1 と WSL2 による netperf(TCP_RR) を比較すると、WSL1 は WSL2 に比べて MIN/MEAN が約半分になりました。
MAX_LATENCYから、
・ WSL2:9ms 超
・ WSL1:3.5ms
これは
・ 割り込み遅延
・ vCPU の待ち
・ Hyper-V スケジューラ起因の揺れ
が WSL2 側で発生している証拠です。
RTT を「平均」だけで見ると見落としがちですが、
MAX を見ると “仮想化ノイズ” が一発で分かる、良い結果となりました。
ということで、
同一Windows環境で WSL1 と WSL2 による netperf TCP_RR を比較したところ、
WSL1 は WSL2 に比べて MIN / MEAN RTT が約半分となった。
これは WSL2 が Hyper-V ベースの仮想NICを経由するのに対し、
WSL1 は Windows TCP/IP スタックへ直接接続される構造差によるものであり、
RTT 測定においては仮想化レイヤが結果を大きく左右することを示しています。
● 50回実行グラフから見えること(補足)
WSL2 と WLS1で netperf 50回実行したものをグラフ化してみました。
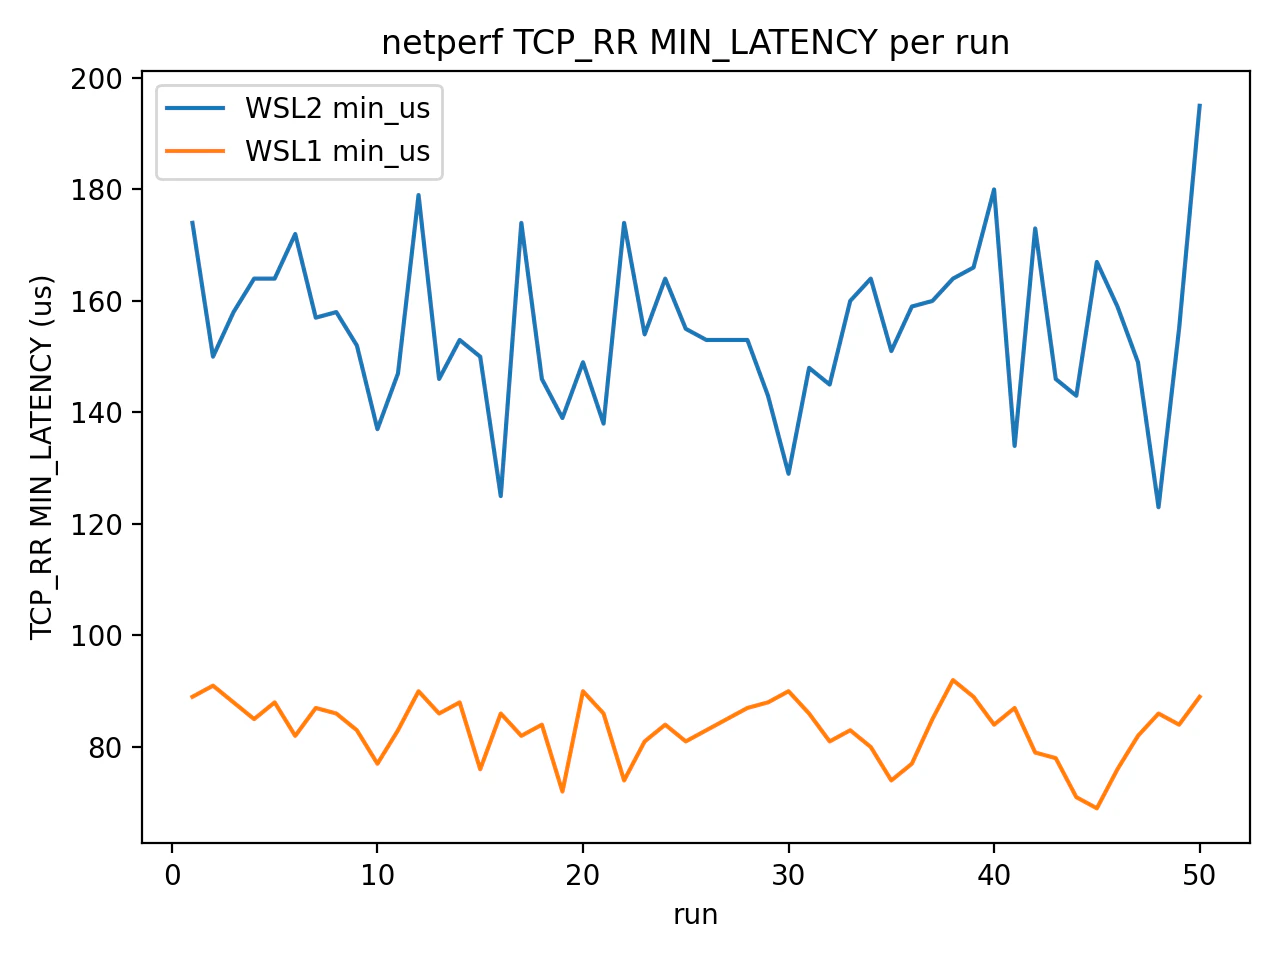
・ WSL2 min_us
- おおよそ 130〜180 µs の間で上下
- ところどころ鋭い上下動あり
・WSL1 min_us
- 70〜90 µs に綺麗に収束
- ベースラインが低く、レンジも狭い
- 👉 「理論下限(MIN)」が明確に違う
という傾向が見えます。これは
WSL1 の方がネットワーク経路が短いことを実測で証明できている状態です。
ということで、WSL1 が構造的に速いということを確認できました。
注意:WSL2 はネットワークモードで挙動が変わることがある
WSL2 は既定だと NAT ベースで、ホストとゲストが別 IP になりやすいです。一方で最近は mirrored networking mode のように構成を変えられます。
そのため、RTTの傾向は「WSL2=必ず遅い」と断定せず、自分の環境のネットワークモードを前提に比較するのが安全です。
■ 参考
・ Windows Subsystem for Linux (WSL)
・Windows Subsystem for Linux のドキュメント
・WSL を使用して Windows に Linux をインストールする方法
・WSL バージョンの比較
・ netperf
・Git: netperf
・The Netperf Homepage
・Netperf Manual
・【Linux】pingコマンドの使い方
・Oracle Linux Repositories
・クラウドでのネットワーク レイテンシの測定
・Interconnect を介したネットワークのスループットを計算する