SwiftのPickerViewに変わるPopupWindowによるリストセレクトを実現しようと考え作成してみました。下記の様なメニューからそれぞれのポップアップリストより選択エントリーするサンプルを参考サイトを元に作ってみました。

まずはダイアログ風のリスト表示選択例です。
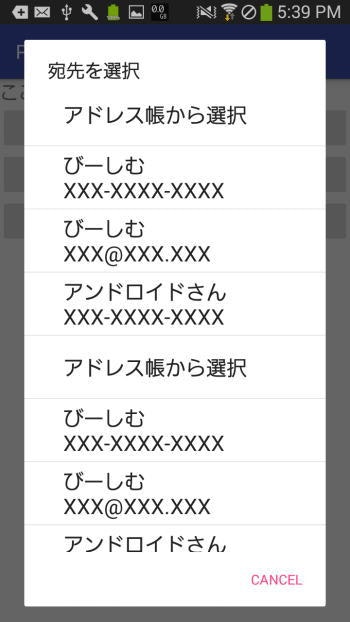
下記の様にPopupWindowにリスト表示し選択エントリーする。
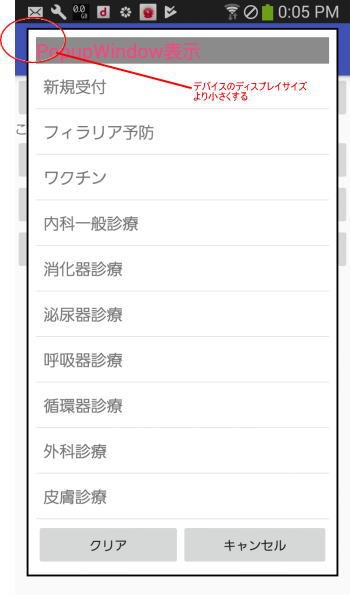
また下記例では折りたたみ可能なExpandableListViewによりリストの親子表示が可能になります。

ソースの例
レイアウト
activity_popup.xml
<LinearLayout xmlns:android="http://schemas.android.com/apk/res/android"
android:layout_width="match_parent"
android:layout_height="match_parent"
android:orientation="vertical" >
<TextView
    android:textSize="20dp"
    android:layout_width="match_parent"
    android:layout_height="wrap_content"
    android:text="ここにポップアップから入力データ"
    android:id="@+id/text1"/>
<Button
    android:id="@+id/button"
    android:layout_width="match_parent"
    android:layout_height="wrap_content"
    android:text="ダイアログ表示" />

<Button
    android:id="@+id/button1"
    android:layout_width="match_parent"
    android:layout_height="wrap_content"
    android:text="ポップアップリスト表示" />
<Button
    android:id="@+id/button2"
    android:layout_width="match_parent"
    android:layout_height="wrap_content"
    android:text="ポップアップExpandableListView" />
</LinearLayout>
上記レイアウトよりまずダイアログ表示部分
参考サイトhttp://blogs.wankuma.com/bsim/archive/2010/10/28/194314.aspx
private void showDialog()
{
// 親要素
List> groupData = new ArrayList>();
// 子要素
List>> childData = new ArrayList>>();
    // 値を設定
    for (int i = 0; i < 20; i++) {
        // 親要素の値を設定
        Map<String, String> curGroupMap = new HashMap<String, String>();
        curGroupMap.put(NAME, "Group " + i);
        groupData.add(curGroupMap);

        // 子要素の値を設定
        List<Map<String, String>> children = new ArrayList<Map<String, String>>();
        for (int j = 0; j < 15; j++) {
            Map<String, String> curChildMap = new HashMap<String, String>();
            curChildMap.put(NAME, "Child " + j);
            curChildMap.put(IS_EVEN, (j % 2 == 0) ? "This child is even" : "This child is odd");
            children.add(curChildMap);
        }
        childData.add(children);
    }
    final ArrayList<String> rows = new ArrayList<String>();
    rows.add("アドレス帳から選択");
    rows.add("びーしむ\nXXX-XXXX-XXXX");
    rows.add("びーしむ\nXXX@XXX.XXX");
    rows.add("アンドロイドさん\nXXX-XXXX-XXXX");
    rows.add("アドレス帳から選択");
    rows.add("びーしむ\nXXX-XXXX-XXXX");
    rows.add("びーしむ\nXXX@XXX.XXX");
    rows.add("アンドロイドさん\nXXX-XXXX-XXXX");
    rows.add("アドレス帳から選択");
    rows.add("びーしむ\nXXX-XXXX-XXXX");
    rows.add("びーしむ\nXXX@XXX.XXX");
    rows.add("アンドロイドさん\nXXX-XXXX-XXXX");
    rows.add("アドレス帳から選択");
    rows.add("びーしむ\nXXX-XXXX-XXXX");
    rows.add("びーしむ\nXXX@XXX.XXX");
    rows.add("アンドロイドさん\nXXX-XXXX-XXXX");

    //ExpandableListView lv = new ExpandableListView(this);

    final TextView textView = (TextView) findViewById(R.id.text1);


    ListView lv = new ListView(this);
    lv.setAdapter(new ArrayAdapter<String>(this, android.R.layout.simple_expandable_list_item_1, rows));
    //lv.setScrollingCacheEnabled(false);
    lv.setOnItemClickListener(new AdapterView.OnItemClickListener(){
        public void onItemClick(AdapterView<?> items, View view, int position, long id) {
            m_Dlg.dismiss();
            textView.setText(rows.get(position).toString());
            //Toast.makeText(PopupActivity.this, rows.get(position).toString(), Toast.LENGTH_LONG).show();

        }
    });

    // ダイアログを表示
    m_Dlg = new AlertDialog.Builder(this)
            .setTitle("宛先を選択")
            .setPositiveButton("Cancel", null)
            .setView(lv)
            .create();

    m_Dlg.show();
}
PopupWindowを利用し下記レイアウトにてListView表示する例
参考サイトhttp://qiita.com/nein37/items/cc4fe1dc4f9527f8dd59
private void showpopup(){
mPopupWindow = new PopupWindow(PopupActivity.this);
    // レイアウト設定
    View popupView = getLayoutInflater().inflate(R.layout.popup_layout, null);

    popupView.findViewById(R.id.close_button).setOnClickListener(new View.OnClickListener() {
        @Override
        public void onClick(View v) {
            if (mPopupWindow.isShowing()) {
                mPopupWindow.dismiss();
            }
        }
    });
    mPopupWindow.setContentView(popupView);

    // 背景設定
    mPopupWindow.setBackgroundDrawable(getResources().getDrawable(R.drawable.popup_background));

    // タップ時に他のViewでキャッチされないための設定
    mPopupWindow.setOutsideTouchable(true);
    mPopupWindow.setFocusable(true);

    //デバイスサイズを取得しpopupwindowサイズ設定する場合
    Display d = getWindowManager().getDefaultDisplay();
    Point p2 = new Point();
    // ②ナビゲーションバーを除く画面サイズを取得
    d.getSize(p2);

    mPopupWindow.setWidth(p2.x-50);
    mPopupWindow.setHeight(p2.y-100);

    // 画面中央に表示
    mPopupWindow.showAtLocation(popupView, Gravity.CENTER, 0, 10);

    final TextView textView = (TextView) findViewById(R.id.text1);

    ArrayAdapter<String> adapter = new ArrayAdapter<String>(this, android.R.layout.simple_list_item_1);
    // アイテムを追加します
    adapter.add("red");
   adapter.add("green");
   adapter.add("blue");

    ListView listView = (ListView) popupView.findViewById(R.id.listView1);
    // アダプターを設定します
    listView.setAdapter(adapter);
    // リストビューのアイテムがクリックされた時に呼び出されるコールバックリスナーを登録します
    listView.setOnItemClickListener(new AdapterView.OnItemClickListener() {
        @Override
        public void onItemClick(AdapterView<?> parent, View view,
                                int position, long id) {
            ListView listView = (ListView) parent;
            // クリックされたアイテムを取得します
            String item = (String) listView.getItemAtPosition(position);
            textView.setText(item.toString());
            //Toast.makeText(PopupActivity.this, item, Toast.LENGTH_LONG).show();
            if (mPopupWindow.isShowing()) {
                mPopupWindow.dismiss();
            }
        }
    });

}
さらにPopupWindowに折りたたみListViewを追加する例
private void showpopup_expand(){
Toast.makeText(PopupActivity.this, "mPopupExpandableListView", Toast.LENGTH_LONG).show();
    //json取得
    urlw = "http://www.a-lands.com/bunruijsoncnv.php";
    sendRequest();

    //http://qiita.com/t2low/items/8ac683c7ebf4b6dd1b41
    //上記サイトをカスタマイズ
    mPopupWindow = new PopupWindow(PopupActivity.this);
    // レイアウト設定
    View popupView = getLayoutInflater().inflate(R.layout.custom_listview, null);
    //マージンをViewに充てる
    //popupView.setPadding(50,50,50,50);

    popupView.findViewById(R.id.close_button).setOnClickListener(new View.OnClickListener() {
        @Override
        public void onClick(View v) {
            if (mPopupWindow.isShowing()) {
                mPopupWindow.dismiss();
            }
        }
    });
    mPopupWindow.setContentView(popupView);

    // 背景設定
    mPopupWindow.setBackgroundDrawable(getResources().getDrawable(R.drawable.popup_background));

    // タップ時に他のViewでキャッチされないための設定
    mPopupWindow.setOutsideTouchable(true);
    mPopupWindow.setFocusable(true);

    //http://appdevmem.blogspot.jp/2015/09/get-disp-size.html
    //デバイス ディスプレイサイズを取得しpopupwindowサイズ設定する場合
    Display d = getWindowManager().getDefaultDisplay();
    Point p2 = new Point();
    // ②ナビゲーションバーを除く画面サイズを取得
    d.getSize(p2);
    mPopupWindow.setWidth(p2.x-50);
    mPopupWindow.setHeight(p2.y-500);

    // 画面中央に表示
    mPopupWindow.showAtLocation(popupView, Gravity.CENTER, 0, 10);

    final TextView textView = (TextView) findViewById(R.id.text1);

    //http://dev.classmethod.jp/smartphone/basic-android-component-03-expandablelistview/
    //ExpandableListViewの使いかた
    // 親リスト
    ArrayList<HashMap<String, String>> groupData
            = new ArrayList<HashMap<String,String>>();
    // 子リスト
    ArrayList<ArrayList<HashMap<String, String>>> childData
            = new ArrayList<ArrayList<HashMap<String,String>>>();

    // 親リストに要素を追加
    HashMap<String, String> groupA = new HashMap<String, String>();
    groupA.put("group", "さる");
    HashMap<String, String> groupB = new HashMap<String, String>();
    groupB.put("group", "とり");

    groupData.add(groupA);
    groupData.add(groupB);

    // 子リストに要素を追加(1)
    ArrayList<HashMap<String, String>> childListA = new ArrayList<HashMap<String,String>>();
    HashMap<String, String> childAA = new HashMap<String, String>();
    childAA.put("group", "さる");
    childAA.put("name", "ニホンザル");
    HashMap<String, String> childAB = new HashMap<String, String>();
    childAB.put("group", "さる");
    childAB.put("name", "テナガザル");
    HashMap<String, String> childAC = new HashMap<String, String>();
    childAC.put("group", "さる");
    childAC.put("name", "メガネザル");

    childListA.add(childAA);
    childListA.add(childAB);
    childListA.add(childAC);
    childListA.add(childAA);
    childListA.add(childAB);
    childListA.add(childAC);

    childData.add(childListA);

    // 子リストに要素を追加(2)
    ArrayList<HashMap<String, String>> childListB = new ArrayList<HashMap<String,String>>();
    HashMap<String, String> childBA = new HashMap<String, String>();
    childBA.put("group", "とり");
    childBA.put("name", "ニワトリ");
    HashMap<String, String> childBB = new HashMap<String, String>();
    childBB.put("group", "とり");
    childBB.put("name", "スズメ");

    childListB.add(childBA);
    childListB.add(childBB);

    childData.add(childListB);
// // 親リスト、子リストを含んだAdapterを生成
// SimpleExpandableListAdapter adapter = new SimpleExpandableListAdapter(
// getApplicationContext(),
// groupData,
// android.R.layout.simple_expandable_list_item_1,
// new String[] {"group"},
// new int[] { android.R.id.text1 },
// childData,
// android.R.layout.simple_expandable_list_item_2,
// new String[] {"name", "group"},
// new int[] { android.R.id.text1, android.R.id.text2 });
    //上記サンプルを文字色サイズ設定にカスタマイズ
    SimpleExpandableListAdapter adapter = new SimpleExpandableListAdapter(
            getApplicationContext(),
            groupData,
            android.R.layout.simple_expandable_list_item_1,
            new String[] {"group"},
            new int[] {android.R.id.text1},
            childData,
            android.R.layout.simple_expandable_list_item_2,
            new String[] {"name", "group"},
            new int[] {android.R.id.text1, android.R.id.text2})
    {
        //
        @Override
        public View getChildView(int groupPosition, int childPosition, boolean isLastChild, View convertView, ViewGroup parent) {
            final View itemRenderer = super.getChildView(groupPosition, childPosition, isLastChild, convertView, parent);
            final TextView tv1 = (TextView)itemRenderer.findViewById(android.R.id.text1);
            final TextView tv2 = (TextView)itemRenderer.findViewById(android.R.id.text2);
            tv1.setTextColor(0xff000000); // 子リストのタイトルは黒に設定
            tv2.setTextColor(0xff0000ff); // 子リストのサブタイトルは青に設定
            tv1.setTextSize(15);
            tv1.setTextSize(20);
            return itemRenderer;
        }
        @Override
        public View getGroupView(int groupPosition, boolean isExpanded, View convertView, ViewGroup parent) {
            final View itemRenderer = super.getGroupView(groupPosition, isExpanded, convertView, parent);
            final TextView tv1 = (TextView)itemRenderer.findViewById(android.R.id.text1);
            tv1.setTextColor(0xff0000ff); // 親リストのタイトルは青に設定
            tv1.setTextSize(25);
            return itemRenderer;
        }
    };