はじめに
この記事について
Firebase Advent Calendar 2017 20日目の記事です。
昨日は @daikiojm さんの Firebase Realtime DatabaseとAngularでフォロー/フォロワー機能の構築をしてみた でした。
Realtime DatabaseやCloud Firestoreのスキーマ設計は、RDBとは違った考え方をしなければ行けないにも関わらず日本語の情報が十分でないように感じますので、少しでも知見が溜まっていのは有り難いですね!
本記事は @imaimiami さんの new FirebaseとReact NativeでiOS, Android向けチャットを5分で作る でRealtime Databaseを使っていたものを、Cloud Firestoreでやってみようという位置づけになります。
(以下、省略してFirestoreと記載します。)
5分では無理な理由
「5分で」の記事では firebase モジュールを使っていたのですが、本記事では react-native-firebase を導入するためです。
環境
{
  ...
  "dependencies": {
    "react": "16.0.0",
    "react-native": "0.51.0",
    "react-native-firebase": "^3.2.0",
    "react-native-gifted-chat": "^0.3.0"
  },
}
で確認済みです。
firebase vs react-native-firebase
Advent Calendar 2日目の @k2wanko さんの記事 React Native Firebaseについて #firebase #fjug でも触れられていますが、React NativeからFirebaseを使う際は、
- firebaseモジュール (WebSDK)
- react-native-firebaseモジュール
のどちらかのnpmモジュールを導入することになります。
ざっくりと、 firebase はJavaScript上のみで動くのに対し、 react-native-firebase はiOSおよびAndroidネイティブのSDKをReact Native用にラップしたものです。
READMEに対応表がありますが、 firebase からのFirestoreの使用はpartial supportとなっています。(2017年12月時点)
Firestoreがベータ版で登場した10月ころは、 react-native-firebase のみが対応となっていました。このようにバージョンアップ対応が早いのと、パフォーマンス面でも優れているらしいので、React NativeからFirebaseを使うときは、基本的に react-native-firebase を導入するといいでしょう。
Firebaseプロジェクトの設定
Firebaseプロジェクト作成
Firebaseコンソールからプロジェクトを追加します。
プロジェクト名などは適当に入力します。
iOSおよびAndroidアプリの登録
ダッシュボードから「iOSアプリにFirebaseを追加」もしくは「AndroidアプリにFirebaseを追加」をクリックし、アプリを登録します。
このとき、iOSの場合はバンドルID、Androidの場合はパッケージ名を入力します。
ステップ2以降はReact Nativeプロジェクト作成後に行うので、今はアプリの登録だけで大丈夫です。
Firestoreの有効化
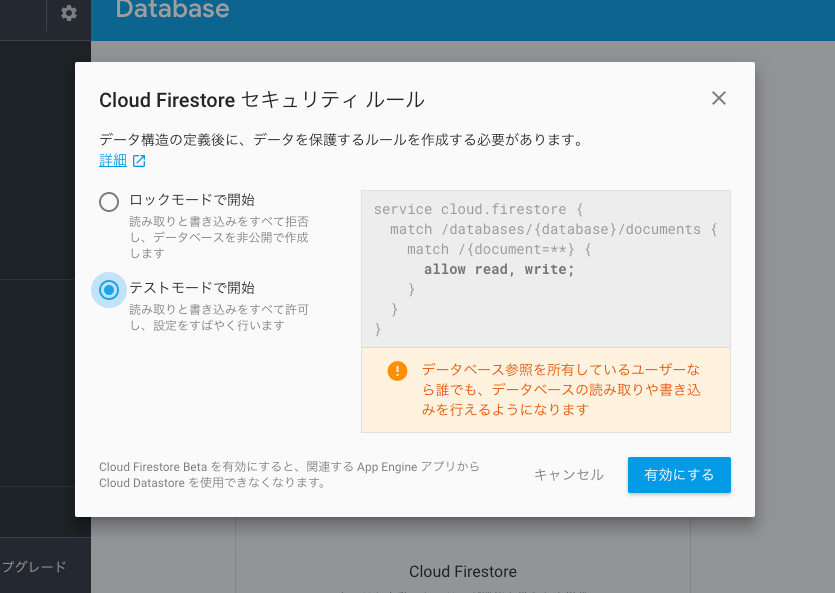
「Database」メニューから、「Firestoreベータ版を試してみる」をクリックします。
今回は簡単に試したいので、セキュリティルールは「テストモードで開始」を選択します。

React Nativeの初期設定
プロジェクトのinit
react-native-firebase はネイティブのSDKを使うため、Expo(create-react-native-app)は使えません。
$ react-native init [APP_NAME]
$ cd [APP_NAME]
react-native-firebaseの依存追加
以下のドキュメントに沿ってreact-native-firebaseモジュールを追加し、iOSおよびAndroidプロジェクトにFirebase SDKを追加していきます。
手順が多いので割愛します![]()
- React Native Firebase - Simple Firebase integration for React Native
- Firebase を iOS プロジェクトに追加する | Firebase (要CocoaPods)
- Android プロジェクトに Firebase を追加する | Firebase
このとき、Firebaseへの依存関係として、iOSのPodfileには
pod 'Firebase/Core'
pod 'Firebase/Firestore'
を、Androidのbuild.gradleには
compile "com.google.firebase:firebase-core:11.4.2"
compile "com.google.firebase:firebase-firestore:11.4.2"
を追加しておきます。
また、プロジェクト作成時のiOSのバンドルIDやAndroidのパッケージ名は適当なものになっているので、Firebaseプロジェクトで指定したものと一致するように変更が必要です。
react-native-gifted-chatの依存追加
react-native-gifted-chatを使うことでチャットUIがすぐに利用できます!
$ yarn add react-native-gifted-chat
React Nativeコードの実装
基本のチャット画面作成
いよいよJSXを触っていきます。
react-native-gifted-chatのExampleを参考に、App.jsに render と onSend を実装していきます。1
import React, { Component } from 'react';
import { GiftedChat } from 'react-native-gifted-chat';

export default class App extends Component {
  state = {
    messages: [],
  };

  /**
   * Sendボタンがタップされたときのイベント
   */
  onSend = (messages = []) => {
    // massagesをstateに渡す
    this.setState((previousState) => ({
      messages: GiftedChat.append(previousState.messages, messages),
    }));
  }

  render() {
    return (
      <GiftedChat
        messages={this.state.messages}
        onSend={this.onSend}
        user={{
          _id: 1,
          name: 'John Doe'
        }}
      />
    );
  }
}
これだけのコードでチャット画面が表示されます。
Firestoreとの連携を追加
今の状態ではアプリを閉じるとチャットが消えてしまいますので、messagesをFirestoreに保存するように変更していきます。
import React, { Component } from 'react';
import { GiftedChat } from 'react-native-gifted-chat';
import firebase from 'react-native-firebase';

export default class App extends Component {
  state = {
    messages: [],
  };

  componentDidMount() {
    // Firestoreの「messages」コレクションを参照
    this.ref = firebase.firestore().collection('messages');

    // refの更新時イベントにonCollectionUpdate登録
    this.unsubscribe = this.ref.onSnapshot(this.onCollectionUpdate);
  }

  componentWillunmount() {
    // onCollectionUpdateの登録解除
    this.unsubscribe();
  }

  /**
   * Sendボタンがタップされたときのイベント
   */
  onSend = (messages = []) => {
    // Firestoreのコレクションに追加
    messages.forEach((message) => {
      this.ref.add(message);
    });

    // onCollectionUpdateが呼ばれるので、ここではstateには渡さない
    //this.setState((previousState) => ({
    //  messages: GiftedChat.append(previousState.messages, messages),
    //}));
  }

  /**
   * Firestoreのコレクションが更新されたときのイベント
   */
  onCollectionUpdate = (querySnapshot) => {
    // docsのdataをmessagesとして取得
    const messages = querySnapshot.docs.map((doc) => {
      return doc.data();
    });

    // messagesをstateに渡す
    this.setState({ messages });
  }

  render() {
    return (
      <GiftedChat
        messages={this.state.messages}
        onSend={this.onSend}
        user={{
          _id: 1,
          name: 'John Doe'
        }}
      />
    );
  }
}
Firebaseコンソールで確認する
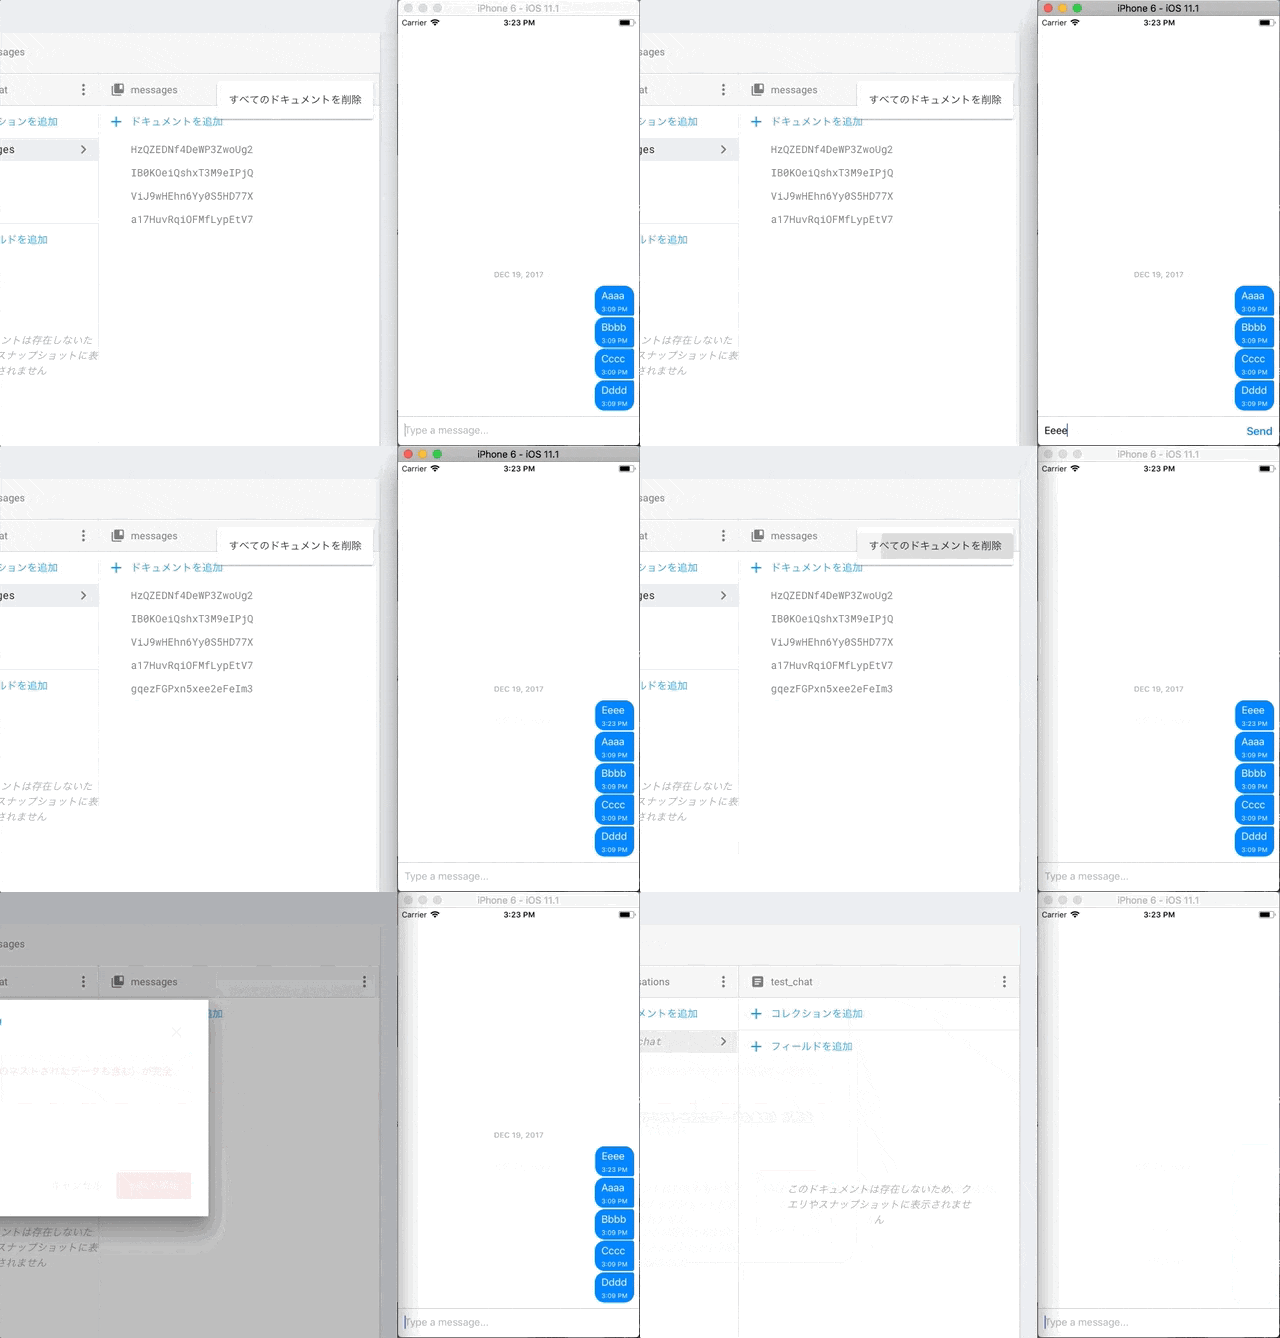
ここまでうまくできていれば、アプリ側で入力したメッセージがFirestoreに保存され、他の端末からも見れるようになっているはずです。
「すべてのドキュメントを削除」したときの**おおおお!**という感じを味わっていただきたいです。2

この先の実装方針
このままではドキュメントのIDがランダムで設定されるため、メッセージが正しい順番で表示されません。(上のスクリーンショットでも発生しています)
IDの頭にタイムスタンプをつけて時系列順になるようにするとコンソール上でも順番が一致するので、そのようにするのがよさそうです。
また、実際のチャットアプリでは、ユーザーの情報があったり複数のチャットルームが存在したりするので、それに応じてスキーマやセキュリティルールも変わってくると思います。
さいごに
先日、 Firebase Japan User Group の第1回meetupが開催されました!
Firebaseを使っていたり興味があるけど話せる相手が少ないという方は、ぜひSlackやmeetupにご参加ください。
-
Handling Events - React を参考に、public class field syntaxを使っています ↩
-
この画面では conversations -> test_chat -> messages というスキーマになっていて、掲載しているApp.jsとは若干表示が異なります ↩
