ラズパイでOpenVPNサーバたててみた
※本記事は【10回記念】高校生主催の新年LT大会の登壇資料です
ちょっと前に人生初ラズパイを買ったので、とりあえずOpenVPNサーバを立ててみました。
ついにラズパイを買ってしまった pic.twitter.com/bYrsdYe6tZ
— しんぶんぶん (@shinbunbun_) January 10, 2021
用意するもの
- Raspberry Pi 4 Model B
- もう一台何かしらのマシン
実装方法
この記事通りにやればすべて実装できます。神記事。
Ubuntu 20.04でOpenVPNサーバーをセットアップ・設定する方法
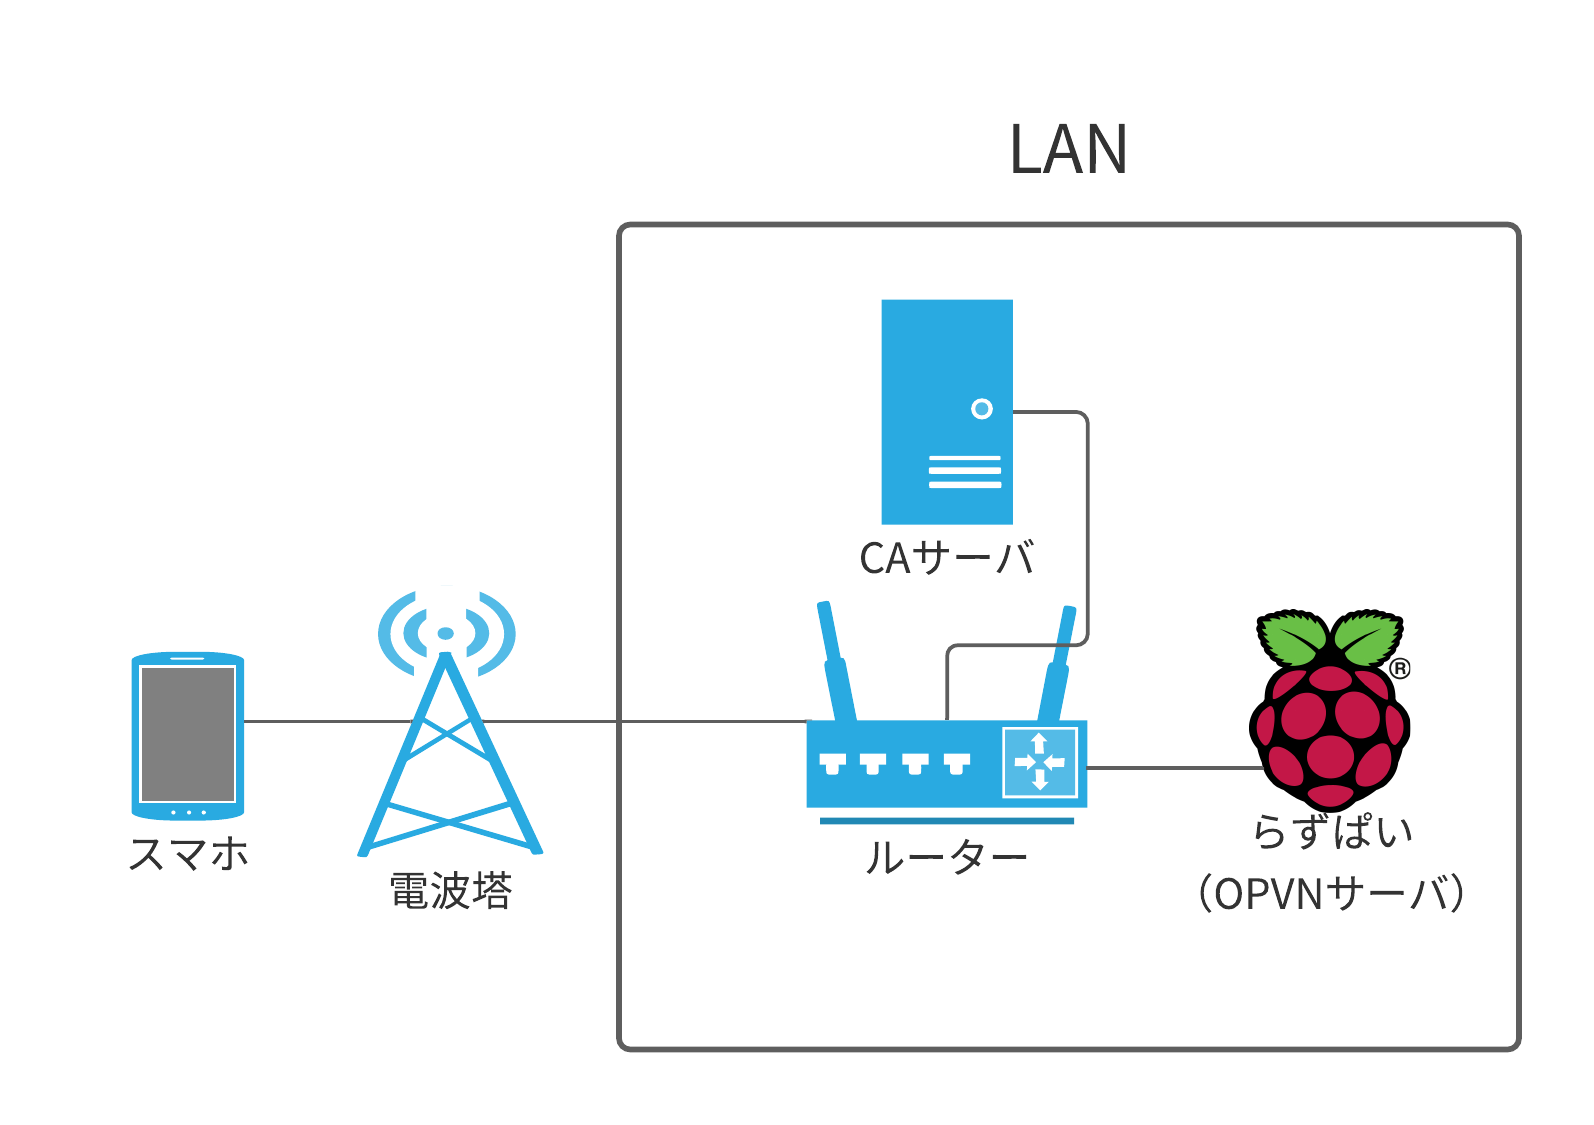
システム構成
かなり雑な図ですがこんな感じです。
OVPNサーバ(ラズパイ)とは別に認証局(CA)となるサーバを一台用意し、証明書認証を実装しました。
実装フロー解説
ここでは接続までの流れを解説します。
実装方法は実装方法に掲載している記事をご覧ください。
接続までのおおまかな流れは以下の通りです
- CA、VPNサーバを構築
- サーバ証明書を発行
- クライアント証明書を発行
- OVPNサーバ設定ファイルを作成
- クライアント設定ファイルを作成
- 設定ファイルをもとにクライアントがVPN接続
CA、VPNサーバを構築
構築するだけなので割愛。CAのルート証明書を、CAサーバからOVPNサーバに転送し、OVPNサーバにインストールする必要があります。
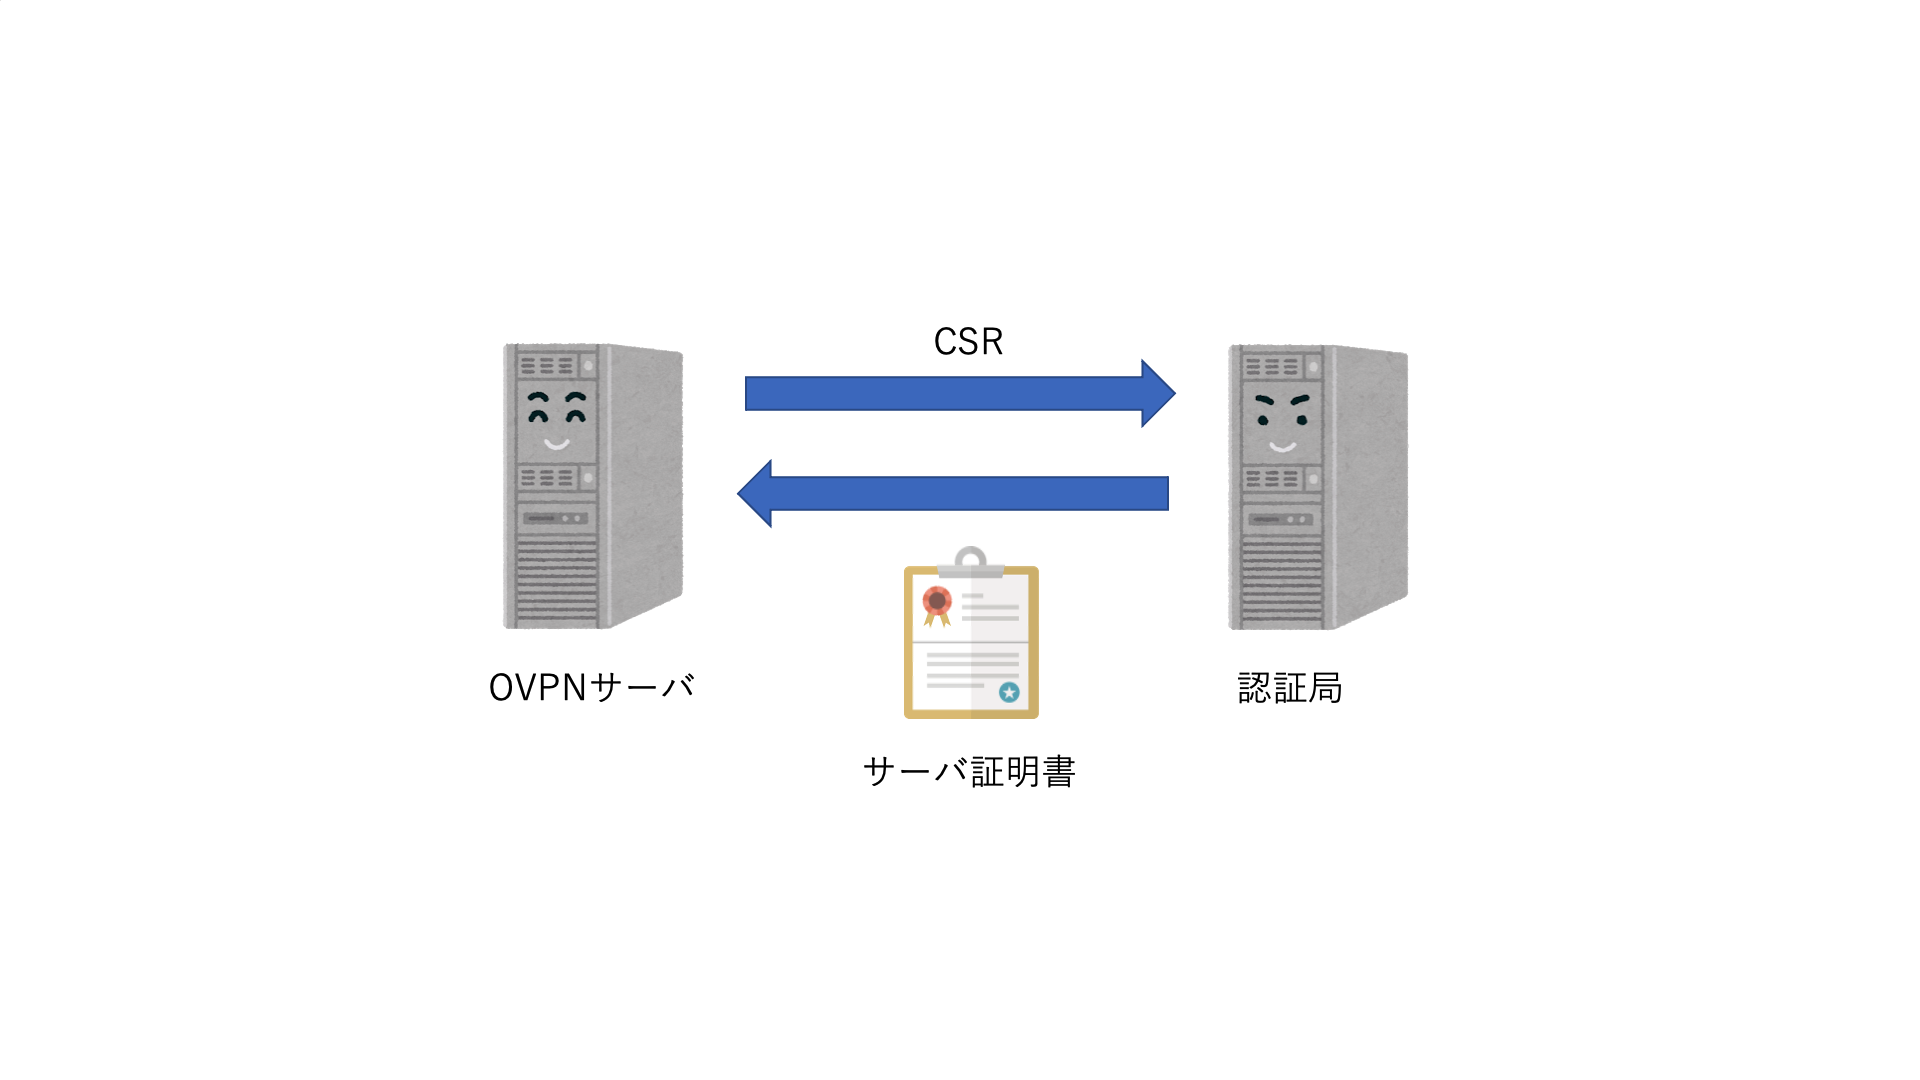
サーバ証明書を発行
最初に、OVPNサーバからCAに対して証明書署名要求(CSR)を発行します。
次に、それを受け取ったCAは、そのCSRをもとにサーバ証明書を発行し、OVPNサーバに返却します。
クライアント証明書を発行
※PKIでは、本来はsubject自身が鍵ペアを生成してCSRを送るのですが、今回の実装参考記事(実装方法)ではOVPNサーバが鍵ペア生成とCSRを行うように記載されているため、そのフローで解説します。
おそらく、OVPNサーバが登録局(RA)のような役割を果たしているものと考えればわかりやすいのではないかと思います。
クライアント証明書発行の手順は基本的にサーバ証明書を発行と同じで、OVPNサーバからCSRを発行して、それを受け取ったCAがクライアント証明書を発行します。
OVPNサーバ設定ファイルを作成
OVPNサーバに関する設定が記述されており、以下のような形式になっています。
(以下は設定ファイルの一例です)
# Which TCP/UDP port should OpenVPN listen on?
# If you want to run multiple OpenVPN instances
# on the same machine, use a different port
# number for each one.  You will need to
# open up this port on your firewall.
port 1194

# TCP or UDP server?
proto udp

# "dev tun" will create a routed IP tunnel,
# "dev tap" will create an ethernet tunnel.
# Use "dev tap0" if you are ethernet bridging
# and have precreated a tap0 virtual interface
# and bridged it with your ethernet interface.
# If you want to control access policies
# over the VPN, you must create firewall
# rules for the the TUN/TAP interface.
# On non-Windows systems, you can give
# an explicit unit number, such as tun0.
# On Windows, use "dev-node" for this.
# On most systems, the VPN will not function
# unless you partially or fully disable
# the firewall for the TUN/TAP interface.
dev tun

# SSL/TLS root certificate (ca), certificate
# (cert), and private key (key).  Each client
# and the server must have their own cert and
# key file.  The server and all clients will
# use the same ca file.
#
# See the "easy-rsa" directory for a series
# of scripts for generating RSA certificates
# and private keys.  Remember to use
# a unique Common Name for the server
# and each of the client certificates.
#
# Any X509 key management system can be used.
# OpenVPN can also use a PKCS #12 formatted key file
# (see "pkcs12" directive in man page).
ca ca.crt
cert server.crt
key server.key  # This file should be kept secret

# Diffie hellman parameters.
# Generate your own with:
#   openssl dhparam -out dh2048.pem 2048
dh none

# Configure server mode and supply a VPN subnet
# for OpenVPN to draw client addresses from.
# The server will take 10.8.0.1 for itself,
# the rest will be made available to clients.
# Each client will be able to reach the server
# on 10.8.0.1. Comment this line out if you are
# ethernet bridging. See the man page for more info.
server 10.8.0.0 255.255.255.0

# Maintain a record of client <-> virtual IP address
# associations in this file.  If OpenVPN goes down or
# is restarted, reconnecting clients can be assigned
# the same virtual IP address from the pool that was
# previously assigned.
ifconfig-pool-persist /var/log/openvpn/ipp.txt

# If enabled, this directive will configure
# all clients to redirect their default
# network gateway through the VPN, causing
# all IP traffic such as web browsing and
# and DNS lookups to go through the VPN
# (The OpenVPN server machine may need to NAT
# or bridge the TUN/TAP interface to the internet
# in order for this to work properly).
push "redirect-gateway def1 bypass-dhcp"

# Certain Windows-specific network settings
# can be pushed to clients, such as DNS
# or WINS server addresses.  CAVEAT:
# http://openvpn.net/faq.html#dhcpcaveats
# The addresses below refer to the public
# DNS servers provided by opendns.com.
push "dhcp-option DNS 208.67.222.222"
push "dhcp-option DNS 208.67.220.220"

# The keepalive directive causes ping-like
# messages to be sent back and forth over
# the link so that each side knows when
# the other side has gone down.
# Ping every 10 seconds, assume that remote
# peer is down if no ping received during
# a 120 second time period.
keepalive 10 120

# For extra security beyond that provided
# by SSL/TLS, create an "HMAC firewall"
# to help block DoS attacks and UDP port flooding.
#
# Generate with:
#   openvpn --genkey --secret ta.key
#
# The server and each client must have
# a copy of this key.
# The second parameter should be '0'
# on the server and '1' on the clients.
;tls-auth ta.key 0 # This file is secret
tls-crypt ta.key

# Select a cryptographic cipher.
# This config item must be copied to
# the client config file as well.
# Note that v2.4 client/server will automatically
# negotiate AES-256-GCM in TLS mode.
# See also the ncp-cipher option in the manpage
;cipher AES-256-CBC
cipher AES-256-GCM

# It's a good idea to reduce the OpenVPN
# daemon's privileges after initialization.
#
# You can uncomment this out on
# non-Windows systems.
user nobody
group nogroup

# The persist options will try to avoid
# accessing certain resources on restart
# that may no longer be accessible because
# of the privilege downgrade.
persist-key
persist-tun

# Output a short status file showing
# current connections, truncated
# and rewritten every minute.
status /var/log/openvpn/openvpn-status.log

# Set the appropriate level of log
# file verbosity.
#
# 0 is silent, except for fatal errors
# 4 is reasonable for general usage
# 5 and 6 can help to debug connection problems
# 9 is extremely verbose
verb 3

# Notify the client that when the server restarts so it
# can automatically reconnect.
explicit-exit-notify 1

auth SHA256
詳しい説明は各プロパティの上に記述されているため、ここでは簡単に解説します。
port 1194
通信に使用するポートを指定します。
proto udp
TCPかUDPか選択します。
dev tun
tunを使うかtapを使うかを選択します。
どちらも仮想ネットワークデバイスとして使われますが、TAPはデータリンク層(イーサネットデバイス)をシミュレートし、TUNはネットワーク層をシミュレートします。
Ethernetブリッジを使用するなどデータリンク層の操作をする必要がある場合はTAPを選択します。
ca ca.crt
cert server.crt
key server.key
CAの証明書、サーバ証明書、サーバ証明書の秘密鍵を指定します。
dh none
Diffie Hellman鍵交換を使用する場合はパラメータを設定します。noneを指定すると楕円曲線Diffie-Hellman鍵共有だけが使われるらしいです。
server 10.8.0.0 255.255.255.0
クライアントに割り当てられる仮想IPアドレスの範囲を指定します。
ifconfig-pool-persist /var/log/openvpn/ipp.txt
クライアントと仮想IPアドレスの関連付けが記録されています。
push "redirect-gateway def1 bypass-dhcp"
クライアントのすべてのIPトラフィックがVPNを経由するようになります。
push "dhcp-option DNS 208.67.222.222"
push "dhcp-option DNS 208.67.220.220"
DNS問い合わせをVPN経由で行わせることができます。
この例では、Cisco Umbrellaに接続して問い合わせを行うようになっています。
keepalive 10 120
接続中、定期的にpingを送ることで死活監視を行います。
この設定では、10秒ごとにpingを送信して120秒以内に返ってこなかった場合は接続が切れているものと判断します。
tls-crypt ta.key
DOS攻撃やUDPポートフォワーディングを防ぐためのHMACファイアウォールを設定します。
整合性の検証を行うためのすべてのSSL/TLSハンドシェイクパケットにHMAC署名が追加され、正しいHMAC署名を有していないUDPパケットは、その後の処理は行われずに破棄されます。
オプションで署名用の共有静的鍵を指定します。
cipher AES-256-GCM
TLSの暗号方式を指定します。
user nobody
group nogroup
OpenVPNサーバーデーモンの実行ユーザー、グループを選択できます。
ルート権限なしでも実行できるようになっています。
persist-key
persist-tun
OpenVPNサーバは再起動時にルート権限を持ち合わせないため、keyの読み込みやtunデバイスを開けなくなってしまいます。
それを回避するためのオプションです。
status /var/log/openvpn/openvpn-status.log
現在のコネクションについて記録されているファイルです。
毎分ごとに内容が更新されます。
verb 3
0~9の間でログの細かさを設定できます。
explicit-exit-notify 1
サーバーが再起動したときにクライアントへ通知して、自動的に再接続できます。
auth SHA256
ハッシュ関数にSHA256を使用します
クライアント設定ファイルを作成
クライアント設定ファイルは以下のようになっています。
# Specify that we are a client and that we
# will be pulling certain config file directives
# from the server.
client

# Use the same setting as you are using on
# the server.
# On most systems, the VPN will not function
# unless you partially or fully disable
# the firewall for the TUN/TAP interface.
dev tun

# Are we connecting to a TCP or
# UDP server?  Use the same setting as
# on the server.
proto udp

# The hostname/IP and port of the server.
# You can have multiple remote entries
# to load balance between the servers.
remote XXX.XXX.XXX.XXX 1194

# Keep trying indefinitely to resolve the
# host name of the OpenVPN server.  Very useful
# on machines which are not permanently connected
# to the internet such as laptops.
resolv-retry infinite

# Most clients don't need to bind to
# a specific local port number.
nobind

# Downgrade privileges after initialization (non-Windows only)
user nobody
group nogroup

# Try to preserve some state across restarts.
persist-key
persist-tun

# Verify server certificate by checking that the
# certicate has the correct key usage set.
# This is an important precaution to protect against
# a potential attack discussed here:
#  http://openvpn.net/howto.html#mitm
#
# To use this feature, you will need to generate
# your server certificates with the keyUsage set to
#   digitalSignature, keyEncipherment
# and the extendedKeyUsage to
#   serverAuth
# EasyRSA can do this for you.
remote-cert-tls server

# Select a cryptographic cipher.
# If the cipher option is used on the server
# then you must also specify it here.
# Note that v2.4 client/server will automatically
# negotiate AES-256-GCM in TLS mode.
# See also the ncp-cipher option in the manpage
cipher AES-256-GCM

# Set log file verbosity.
verb 3

auth SHA256

key-direction 1

<ca>
-----BEGIN CERTIFICATE-----
XXXXXXXXXXXXXXXXXXXXXXXXXXXXXXXXXXXXXXXXXXXXXXXXXXXXXXXXXXXXXXXX
XXXXXXXXXXXXXXXXXXXXXXXXXXXXXXXXXXXXXXXXXXXXXXXXXXXXXXXXXXXXXXXX
XXXXXXXXXXXXXXXXXXXXXXXXXXXXXXXXXXXXXXXXXXXXXXXXXXXXXXXXXXXXXXXX
XXXXXXXXXXXXXXXXXXXXXXXXXXXXXXXXXXXXXXXXXXXXXXXXXXXXXXXXXXXXXXXX
XXXXXXXXXXXXXXXXXXXXXXXXXXXXXXXXXXXXXXXXXXXXXXXXXXXXXXXXXXXXXXXX
XXXXXXXXXXXXXXXXXXXXXXXXXXXXXXXXXXXXXXXXXXXXXXXXXXXXXXXXXXXXXXXX
XXXXXXXXXXXXXXXXXXXXXXXXXXXXXXXXXXXXXXXXXXXXXXXXXXXXXXXXXXXXXXXX
XXXXXXXXXXXXXXXXXXXXXXXXXXXXXXXXXXXXXXXXXXXXXXXXXXXXXXXXXXXXXXXX
XXXXXXXXXXXXXXXXXXXXXXXXXXXXXXXXXXXXXXXXXXXXXXXXXXXXXXXXXXXXXXXX
XXXXXXXXXXXXXXXXXXXXXXXXXXXXXXXXXXXXXXXXXXXXXXXXXXXXXXXXXXXXXXXX
XXXXXXXXXXXXXXXXXXXXXXXXXXXXXXXXXXXXXXXXXXXX
-----END CERTIFICATE-----
</ca>
<cert>
Certificate:
    Data:
        Version: 3 (0x2)
        Serial Number:
            XX:XX:XX:XX:XX:XX:XX:XX:XX:XX:XX:XX:XX:XX:XX:XX
        Signature Algorithm: ecdsa-with-SHA512
        Issuer: CN=Easy-RSA CA
        Validity
            Not Before: Jan 12 02:08:38 2021 GMT
            Not After : Apr 17 02:08:38 2023 GMT
        Subject: CN=macbookpro
        Subject Public Key Info:
            Public Key Algorithm: id-ecPublicKey
                Public-Key: (384 bit)
                pub:
                    XX:XX:XX:XX:XX:XX:XX:XX:XX:XX:XX:XX:XX:XX:XX:
                    XX:XX:XX:XX:XX:XX:XX:XX:XX:XX:XX:XX:XX:XX:XX:
                    XX:XX:XX:XX:XX:XX:XX:XX:XX:XX:XX:XX:XX:XX:XX:
                    XX:XX:XX:XX:XX:XX:XX:XX:XX:XX:XX:XX:XX:XX:XX:
                    XX:XX:XX:XX:XX:XX:XX:XX:XX:XX:XX:XX:XX:XX:XX:
                    XX:XX:XX:XX:XX:XX:XX:XX:XX:XX:XX:XX:XX:XX:XX:
                    XX:XX:XX:XX:XX:XX:XX
                ASN1 OID: secp384r1
                NIST CURVE: P-384
        X509v3 extensions:
            X509v3 Basic Constraints:
                CA:FALSE
            X509v3 Subject Key Identifier:
                XX:XX:XX:XX:XX:XX:XX:XX:XX:XX:XX:XX:XX:XX:XX:XX:XX:XX:XX:XX
            X509v3 Authority Key Identifier:
                keyid:XX:XX:XX:XX:XX:XX:XX:XX:XX:XX:XX:XX:XX:XX:XX:XX:XX:XX:XX:XX
                DirName:/CN=Easy-RSA CA
                serial:XX:XX:XX:XX:XX:XX:XX:XX:XX:XX:XX:XX:XX:XX:XX:XX:XX:XX:XX:XX

            X509v3 Extended Key Usage:
                TLS Web Client Authentication
            X509v3 Key Usage:
                Digital Signature
    Signature Algorithm: ecdsa-with-SHA512
         XX:XX:XX:XX:XX:XX:XX:XX:XX:XX:XX:XX:XX:XX:XX:XX:XX:XX:
         XX:XX:XX:XX:XX:XX:XX:XX:XX:XX:XX:XX:XX:XX:XX:XX:XX:XX:
         XX:XX:XX:XX:XX:XX:XX:XX:XX:XX:XX:XX:XX:XX:XX:XX:XX:XX:
         XX:XX:XX:XX:XX:XX:XX:XX:XX:XX:XX:XX:XX:XX:XX:XX:XX:XX:
         XX:XX:XX:XX:XX:XX:XX:XX:XX:XX:XX:XX:XX:XX:XX:XX:XX:XX:
         XX:XX:XX:XX:XX:XX:XX:XX:XX:XX:XX:XX:XX:XX:XX:XX:XX:XX:
         XX:XX:XX:XX:XX:XX:XX:XX:XX:XX:XX:XX:XX:XX
-----BEGIN CERTIFICATE-----
XXXXXXXXXXXXXXXXXXXXXXXXXXXXXXXXXXXXXXXXXXXXXXXXXXXXXXXXXXXXXXXX
XXXXXXXXXXXXXXXXXXXXXXXXXXXXXXXXXXXXXXXXXXXXXXXXXXXXXXXXXXXXXXXX
XXXXXXXXXXXXXXXXXXXXXXXXXXXXXXXXXXXXXXXXXXXXXXXXXXXXXXXXXXXXXXXX
XXXXXXXXXXXXXXXXXXXXXXXXXXXXXXXXXXXXXXXXXXXXXXXXXXXXXXXXXXXXXXXX
XXXXXXXXXXXXXXXXXXXXXXXXXXXXXXXXXXXXXXXXXXXXXXXXXXXXXXXXXXXXXXXX
XXXXXXXXXXXXXXXXXXXXXXXXXXXXXXXXXXXXXXXXXXXXXXXXXXXXXXXXXXXXXXXX
XXXXXXXXXXXXXXXXXXXXXXXXXXXXXXXXXXXXXXXXXXXXXXXXXXXXXXXXXXXXXXXX
XXXXXXXXXXXXXXXXXXXXXXXXXXXXXXXXXXXXXXXXXXXXXXXXXXXXXXXXXXXXXXXX
XXXXXXXXXXXXXXXXXXXXXXXXXXXXXXXXXXXXXXXXXXXXXXXXXXXXXXXXXXXXXXXX
XXXXXXXXXXXXXXXXXXXXXXXXXXXXXXXXXXXXXXXXXXXXXXXXXXXXXXXXXXXXXXXX
XXXXXXXXXXXXXXXXXXXXXXXXXXXXXXXXXXXXXXXXXXXXXXXXXXXXXXXXXXXXXXXX
-----END CERTIFICATE-----
</cert>
<key>
-----BEGIN PRIVATE KEY-----
XXXXXXXXXXXXXXXXXXXXXXXXXXXXXXXXXXXXXXXXXXXXXXXXXXXXXXXXXXXXXXXX
XXXXXXXXXXXXXXXXXXXXXXXXXXXXXXXXXXXXXXXXXXXXXXXXXXXXXXXXXXXXXXXX
XXXXXXXXXXXXXXXXXXXXXXXXXXXXXXXXXXXXXXXXXXXXXXXXXXXXXXXXXXXXXXXX
XXXXXXXXXXXXXXXXXXXXXXXXXXXXXXXXXXXXXXXXXXXXXXXXXXXXXXXX
-----END PRIVATE KEY-----
</key>
<tls-crypt>
#
# 2048 bit OpenVPN static key
#
-----BEGIN OpenVPN Static key V1-----
XXXXXXXXXXXXXXXXXXXXXXXXXXXXXXXX
XXXXXXXXXXXXXXXXXXXXXXXXXXXXXXXX
XXXXXXXXXXXXXXXXXXXXXXXXXXXXXXXX
XXXXXXXXXXXXXXXXXXXXXXXXXXXXXXXX
XXXXXXXXXXXXXXXXXXXXXXXXXXXXXXXX
XXXXXXXXXXXXXXXXXXXXXXXXXXXXXXXX
XXXXXXXXXXXXXXXXXXXXXXXXXXXXXXXX
XXXXXXXXXXXXXXXXXXXXXXXXXXXXXXXX
XXXXXXXXXXXXXXXXXXXXXXXXXXXXXXXX
XXXXXXXXXXXXXXXXXXXXXXXXXXXXXXXX
XXXXXXXXXXXXXXXXXXXXXXXXXXXXXXXX
XXXXXXXXXXXXXXXXXXXXXXXXXXXXXXXX
XXXXXXXXXXXXXXXXXXXXXXXXXXXXXXXX
XXXXXXXXXXXXXXXXXXXXXXXXXXXXXXXX
XXXXXXXXXXXXXXXXXXXXXXXXXXXXXXXX
-----END OpenVPN Static key V1-----
</tls-crypt>
こちらも各オプションを簡単に説明します。
client
client設定ファイルであると言う宣言です。
dev tun
proto udp
サーバ設定ファイルと同じになります
remote XXX.XXX.XXX.XXX 1194
接続先OVPNサーバのIPアドレスとポート番号です。(DDNSドメインなどを指定することも可能です)
resolv-retry infinite
OpenVPNサーバのホスト名を解決するために無限に試行し続けます。
nobind
特定のローカルポート番号を設定する必要がない場合はこのオプションをつけます。
user nobody
group nogroup
persist-key
persist-tun
サーバー設定ファイルと同じです。
remote-cert-tls server
MITM対策のためにサーバ証明書を強制的に検証させることできます。
cipher AES-256-GCM
verb 3
auth SHA256
サーバー設定ファイルと同じです。
key-direction 1
TLS認証のクライアントとして認識させるために必要な設定。
<ca>内の記述
CAの証明書です。
<cert>内の記述
バージョン、シリアル番号、署名アルゴリズムなど、クライアント証明書の情報が入っています。
<key>内の記述
クライアント秘密鍵が入っています。
<tls-crypt>内記述
HMACによるTLS認証に使う共通鍵が入っています。
設定ファイルをもとにクライアントがVPN接続
上で作ったクライアント設定ファイルを安全な手段でクライアント端末へ転送し、OpenVPNクライアントアプリやTunnelblickで接続すれば接続完了です。
技術的な接続フローは以下の記事に掲載されている図がめちゃめちゃわかりやすかったです。
ポートフォワーディング
一般家庭でOpenVPNサーバを実装してWAN側からアクセスするには、ルーターのポートフォワーディングを行う必要があります。
機器によって設定方法は変わりますが、ルーターの1194番ポートを開けてラズパイにポートフォワーディングする必要があります。
DDNS
一般家庭の場合、IPアドレスが動的に変わってしまうことがあります。
そのため、DDNSなどのサービスを使うと便利かもしれません。