本記事では、PythonでWebスクレイピングをして、PR TIMESのリリース記事を取得するコードをご紹介します。
PR TIMESは様々なプレスリリース・ニュースリリース記事を掲載しているWebメディアです。
毎日数多くのリリース記事が発表されており、検索キーワードでリリース記事を絞り込むこともできます。
本記事のコードはGoogle Colab上で実行することを想定しています。
Google ColabはWebブラウザ上でPythonコードを実行できるサービスです。
注意事項
Webスクレイピングについての注意事項は以下の記事が参考になります。
とても良くまとまっていますので、ぜひご一読ください。
法的な問題が関わって来ますので、スクレイピングする際には留意ください。
(お約束ではありますが、本記事は悪質な行為を助長するための記事ではありません。
あくまでもプログラミングやスクレイピング技術の共有を目的として公開しています。)
技術要素
- Python3.6
- Selenium Web Driver (Chrome Driver)
- BeautifulSoup4
- Google Colab
ソースコード
以下よりスクレイピングをするためのソースコードを記載して行きます。
今回PR TIMESでスクレイピングする操作は以下の通りです。
- PR TIMESのトップページを開く
- 検索キーワードを入力して検索する
- 検索結果から記事詳細ページを開く
- 記事詳細から情報を抽出する
- 一覧のページング(もっと見るを押下)
準備
Google Colab(以下、Colab)は専用の仮想環境を立ち上げてコードを実行します。
今回のコードで必要となるパッケージは、仮想環境上のミドルウェアには含まれていないため、
先にインストールしておく必要があります。
Colabに新規コードを作成し、以下のコードを貼り付け、実行してください。
!apt-get update
!apt install chromium-chromedriver
!cp /usr/lib/chromium-browser/chromedriver /usr/bin
!pip install selenium
順に解説して行きます。
まず、Linux OSに含まれるパッケージのアップデートを行います。
パッケージを追加するための事前準備として既存パッケージを最新化しておきます。
!apt-get update
次にSeleniumで使用するChrome Driveをインストールします。
apt installコマンドでインストールを行うと、/usr/lib/chromium-browser配下に
Chrome Driveの本体が格納されます。
このままだと実行できないので、/usr/binに本体をコピーします。
!apt install chromium-chromedriver
!cp /usr/lib/chromium-browser/chromedriver /usr/bin
pipはPythonのパッケージをインストールするためのコマンドです。
Seleniumパッケージをインストールします。
!pip install selenium
プレーンなコード
オブジェクト指向を用いないプレーンなコードを掲載します。
そこまで長くはないので、こちらのコードだけでも読めるかと思います。
後述していますが、折角なのでオブジェクト志向的に部品化したコードも掲載しました。
そちらの方が見通しは良くなっていますので、処理の大枠の流れはつかみやすいかと思います。
from selenium import webdriver
from selenium.webdriver.chrome.options import Options
from selenium.webdriver.common.keys import Keys
from urllib import request
from bs4 import BeautifulSoup
from urllib.parse import urljoin
import datetime
import time
import requests

#############
## 以下、実行前に変更する
#############
# いつからの分を取得するか指定する(開始日付 YYYY-MM-DD)
START_DT_STR = '2020-12-01'
# 検索キーワード
SEARCH_WORD = '検索キーワード'
############

start_dt = datetime.datetime.strptime(START_DT_STR, '%Y-%m-%d')

# webdriveの設定
options = webdriver.ChromeOptions()
options.add_argument('--headless')
options.add_argument('--no-sandbox')
options.add_argument('--disable-dev-shm-usage')

# webdriverを起動
driver = webdriver.Chrome('chromedriver',options=options)

# PR TIMESのトップページを開く
target_url = 'https://prtimes.jp/'
driver.get(target_url)

# 検索欄をクリックする
driver.find_element_by_xpath("/html/body/header/div/div[4]/div/input").click()
# 検索バーにキーワードを入れ、クリックする
kensaku = driver.find_element_by_xpath("/html/body/header/div/div[4]/div/input")
kensaku.send_keys(SEARCH_WORD)
kensaku.send_keys(Keys.ENTER)

cnt = 0
while True:
  #記事数を出力(進捗確認用)
  print(len(driver.find_elements_by_xpath('/html/body/main/section/section/div/article')))

  #もっとみるを押す
  try:
    driver.find_element_by_xpath("/html/body/main/section/section/div/div/a").click()
  except:
    break

  html = driver.page_source
  soup = BeautifulSoup(html, "html.parser")

  #記事URLを取得(40件ずつ処理)
  articles = soup.find_all(class_='list-article__link')[cnt*40:]

  #記事情報を格納する配列
  records = []

  #終了フラグ
  eof_flag = False

  #記事ごとの情報を取得
  for article in articles:
    article_time = article.find(class_='list-article__time')
    #print(article_time)

    #記事公開日時をdatetime表記に変換
    try:
      str_to_dt = datetime.datetime.strptime(article_time.get('datetime'), '%Y-%m-%dT%H:%M:%S%z')
    except:
      try:
        article_time_cvt = article_time.get('datetime').replace('+09:00', '+0900')
        str_to_dt = datetime.datetime.strptime(article_time_cvt, '%Y-%m-%dT%H:%M:%S%z')
      except:
        str_to_dt = datetime.datetime.strptime(article_time.text, '%Y年%m月%d日 %H時%M分')
    article_time_dt = datetime.datetime(str_to_dt.year, str_to_dt.month, str_to_dt.day, str_to_dt.hour, str_to_dt.minute)

    #開始日付より前であれば終了(記事は最新日付の順でソートされているため)
    if article_time_dt < start_dt:
      eof_flag = True
      break

    relative_href = article["href"]
    url = urljoin(target_url, relative_href)
    #print(url)

    #URLを1記事ずつ開く
    r = requests.get(url)
    html = r.text
    soup = BeautifulSoup(html, "html.parser")

    #記事タイトル
    title = soup.select_one("#main > div.content > article > div > header > h1").text
    #記事サブタイトル
    sub_title_elem = soup.select_one("#main > div.content > article > div > header > h2")
    if sub_title_elem:
      sub_title = sub_title_elem.text
    else:
      sub_title = ""

    #会社名
    company = soup.select_one("#main > div.content > article > div > header > div.information-release > div > a").text
    #記事公開日
    published = soup.select_one("#main > div.content > article > div > header > div.information-release > time").text
    #記事本文
    content = soup.select_one('#main > div.content > article > div > div.rbody').text

    #配列に記事の情報を追加
    records.append({
        'url': url,
        'title': title,
        'sub_title': sub_title,
        'content': content,
        'company': company,
        'published': published
    })

  if records:
    #print('DBへの登録処理など')
    pass

  #終了フラグがTrueになっている時はループを抜ける
  if eof_flag:
    break

  #2秒間待つ
  time.sleep(2)
  cnt += 1
部品化したコード
見通しを良くするために部品化したコードも掲載しておきます。
※クラス定義の部分は別枠に抜粋しましたので、実行する際には「クラス定義」の部分に差し込んでください。
from selenium import webdriver
from selenium.webdriver.chrome.options import Options
from selenium.webdriver.common.keys import Keys
from urllib import request
from bs4 import BeautifulSoup
from urllib.parse import urljoin
import datetime
import time
import requests

#############
## 以下、実行前に変更する
#############
# いつからの分を取得するか指定する(開始日付 YYYY-MM-DD)
START_DT_STR = '2020-12-01'
# 検索キーワード
SEARCH_WORD = '検索キーワード'
############

#############
## 定数定義
#############
# PR TIMESのURLプレフィックス
PRTIMES_URL = 'https://prtimes.jp/'

#############
## クラス定義
#############
# ※後述の「クラス定義」に記載

#############
## メイン処理
#############
# 開始日付
start_dt = datetime.datetime.strptime(START_DT_STR, '%Y-%m-%d')

# driverを取得(検索キーワードで検索済みの状態)
driver_factory = PRTimesWebdriverFactory(PRTIMES_URL)
driver = driver_factory.create(SEARCH_WORD)

page_operator = PageOperator(driver)

cnt = 0

while True:
  #記事数を出力(進捗確認用)
  print(page_operator.get_article_length())

  #もっとみるを押す
  if page_operator.more() == False:
    break

  #記事URLを取得(40件ずつ処理)
  articles = page_operator.parse().get_articles(cnt)

  #記事情報を格納する配列
  records = []
  #終了フラグ
  eof_flag = False

  #記事ごとの情報を取得
  for article in articles:
    article_operator = ArticleOperator(PRTIMES_URL, article)

    #記事の日付を取得
    article_dt = article_operator.get_article_date()
    #開始日付より前であれば終了(記事は最新日付の順でソートされているため)
    if article_dt < start_dt:
      eof_flag = True
      break

    #記事詳細の情報を取得
    article_info = article_operator.get_detail_info()
    #配列に記事の情報を追加
    records.append(article_info)

  #追加する記事があれば処理
  if records:
    #print('DBへの登録処理など')
    #print(records)
    print('取得記事数:', len(records))
    pass

  #終了フラグがTrueになっている時はループを抜ける
  if eof_flag:
    break

  #2秒間待つ
  time.sleep(2)
  cnt += 1
ここより「クラス定義」の部分の内容を記載します。
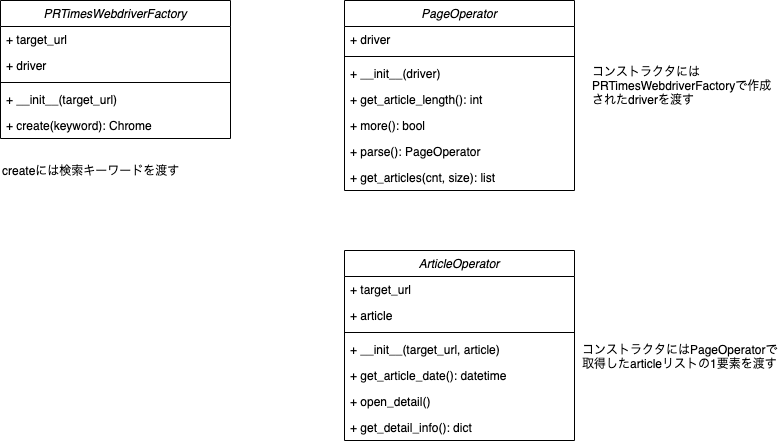
作成したクラスは以下の3つです。
-
PRTimesWebdriverFactory
PR TIMESのページ操作をするためのdriverを作成するためのファクトリクラスです。
検索キーワードで検索し、そのdriverを返却します。 -
PageOperator
検索結果ページを操作するためのクラスです。
ページ内の記事を取得、記事を追加で読み込む、といった機能を持たせています。 -
ArticleOperator
詳細記事ページを操作するためのクラスです。
ページを開き、詳細記事内の情報を取得、といった機能を持たせています。
class PRTimesWebdriverFactory:
  """PR TIMES用のdriverを取得
  """
  def __init__(self, target_url):
    """コンストラクタ

    :param target_url: PR TIMESのURL
    :type target_url: string
    """
    options = webdriver.ChromeOptions()
    options.add_argument('--headless')
    options.add_argument('--no-sandbox')
    options.add_argument('--disable-dev-shm-usage')

    driver = webdriver.Chrome('chromedriver',options=options)

    self.target_url = target_url
    driver.get(target_url)

    self.driver = driver

  def create(self, keyword):
    """driverを作成して返却

    :param keyword: 検索キーワード
    :type keyword: string
    :return: driverオブジェクト
    :rtype: driver: selenium.webdriver.Chrome
    """
    driver = self.driver

    #検索欄をクリックする
    driver.find_element_by_xpath("/html/body/header/div/div[4]/div/input").click()
    #検索バーにキーワードを入れ、クリックする
    kensaku = driver.find_element_by_xpath("/html/body/header/div/div[4]/div/input")
    kensaku.send_keys(SEARCH_WORD)
    kensaku.send_keys(Keys.ENTER)

    return driver

class PageOperator:
  """ページ操作クラス
  """
  def __init__(self, driver):
    """コンストラクタ

    :param driver: driverオブジェクト
    :type driver: selenium.webdriver.Chrome
    """
    self.driver = driver

  def get_article_length(self):
    """ページ内の記事数を取得
    """
    driver = self.driver

    return len(driver.find_elements_by_xpath('/html/body/main/section/section/div/article'))

  def more(self):
    """もっと見る
    """
    driver = self.driver

    try:
      driver.find_element_by_xpath("/html/body/main/section/section/div/div/a").click()
      return True
    except:
      return False

  def parse(self):
    """現在ページをパース
    """
    driver = self.driver

    html = driver.page_source
    self.soup = BeautifulSoup(html, "html.parser")

    # チェーンメソッドのためのリターン
    return self

  def get_articles(self, cnt, size=40):
    """ページ内の記事を取得

    :param cnt: ページ数
    :type cnt: int
    :param size: ページあたりの記事数
    :type size: int, optional, defaults to 40
    :return ページ内の記事要素の配列
    :rtype list
    """
    soup = self.soup

    articles = soup.find_all(class_='list-article__link')[cnt*size:]
    #print(len(articles))
    return articles

class ArticleOperator:
  """記事操作クラス
  """
  def __init__(self, target_url, article):
    """コンストラクタ

    :param target_url: PR TIMESのURL
    :type target_url: string
    :param article: 記事要素
    :type bs4.element.Tag
    """
    self.target_url = target_url
    self.article = article

  def get_article_date(self):
    """記事公開日を取得

    :return 記事公開日
    :rtype datetime.datetime
    """
    article = self.article

    article_time = article.find(class_='list-article__time')
    #記事公開日時をdatetime表記に変換
    try:
      str_to_dt = datetime.datetime.strptime(article_time.get('datetime'), '%Y-%m-%dT%H:%M:%S%z')
    except:
      try:
        article_time_cvt = article_time.get('datetime').replace('+09:00', '+0900')
        str_to_dt = datetime.datetime.strptime(article_time_cvt, '%Y-%m-%dT%H:%M:%S%z')
      except:
        str_to_dt = datetime.datetime.strptime(article_time.text, '%Y年%m月%d日 %H時%M分')
    article_dt = datetime.datetime(str_to_dt.year, str_to_dt.month, str_to_dt.day, str_to_dt.hour, str_to_dt.minute)
    #print(article_dt)
    return article_dt

  def open_detail(self):
    """詳細ページを開く
    """
    article = self.article

    relative_href = article["href"]
    url = urljoin(self.target_url, relative_href)
    #print(url)

    #詳細ページを開く
    r = requests.get(url)
    html = r.text
    soup = BeautifulSoup(html, "html.parser")

    self.soup = soup

  def get_detail_info(self):
    """詳細ページの情報を取得

    :return 詳細ページの情報オブジェクト
    :rtype dict
    """
    self.open_detail()

    soup = self.soup

    # 記事タイトル
    title = soup.select_one("#main > div.content > article > div > header > h1").text
    # 記事サブタイトル
    sub_title_elem = soup.select_one("#main > div.content > article > div > header > h2")
    if sub_title_elem:
      sub_title = sub_title_elem.text
    else:
      sub_title = ""

    # 会社名
    company = soup.select_one("#main > div.content > article > div > header > div.information-release > div > a").text
    # 記事公開日
    published = soup.select_one("#main > div.content > article > div > header > div.information-release > time").text
    # 記事本文
    content = soup.select_one('#main > div.content > article > div > div.rbody').text

    # 記事情報のdictを返却
    return {
        'url': url,
        'title': title,
        'sub_title': sub_title,
        'content': content,
        'company': company,
        'published': published
    }
まとめ
PythonでPR TIMESの記事をスクレイピングするコードをご紹介しました。
ページ表示、入力、クリックなど、基本的な操作は盛り込んでありますので、
他のサイトにも応用できるコードになっています。
読んでいただいて、ありがとうございました。
===

弊社は業務効率化・自動化など、仕組みで解決するお手伝いをさせていただいております。
お仕事のご依頼はコチラ↓までお願いいたします。
株式会社シクミヤ
note: Visionary Base編集部
Twitter: @shikumiya_hata