はじめに
ネイティブアプリ(iOS)の技術検証で
react-native-firebaseのテンプレートとFirebaseCloudMessaging(以下FCM)を使用し、
リモートPush通知(画像のアプリを閉じた状態での通知)を実装したので、簡単な手順と注意点をご紹介します。

Push通知に関する情報はたくさんあるのですが、古くて登録画面のUIが異なっていたり、
バージョン依存で動かなかったり、iOSのreact-native-firebaseの記事が少なかったので参考になれば幸いです。
対象読者
- ReactNativeでiOSアプリを作成してみたい人
- Firebaseを初めて触る人
- FCMを初めて触る人
使用バージョン
- XCode 11.3.1
- "react": "16.11.0"
- "@react-native-firebase/app": "^6.4.0"
- "@react-native-firebase/messaging": "^6.4.0"
手順
1.開発用証明書/ApplePushNotifications service証明書/keyの作成
2.@react-native-firebase/temlateでデモプロジェクトを作成とSDKの追加
3.Firebaseプロジェクトの新規作成
4.FirebaseプロジェクトにiOSアプリを追加する
5.XCodeにGoogleService-info.plistファイルを追加する
6.APNs keyをFMCに登録
7.SDKの追加とPush通知許諾/リモートPush通知の実装
8.デバイストークンを取得
9.FCMからテストメッセージを配信
1.開発用証明書/ApplePushNotifications service証明書/keyの作成
まずXCodeでiOSアプリを扱うにはAppleの証明書が必要となります。
AppleDeveloperProgramから作成をします。
この手順については下記の記事にとても丁寧にまとめてあり、読みながら進めました。
今回はPush通知の実現に重きを置くため、証明書周りはこちらを参考に進めてみたください。
プッシュ通知に必要な証明書の作り方2020(@natsumoさん)
2.@react-native-firebase/temlateでデモプロジェクトを作成とSDKの追加
- 下記コマンドでテンプレートアプリを作成
npx react-native init --template @react-native-firebase/template testPushNotification
- react-native-firebaseをインストール
yarn add @react-native-firebase/app
- react-native-firebase/messagingをインストール
yarn add @react-native-firebase/messaging
- Podfileに下記を追加
target 'testPushNotification' do
  # Pods for testPushNotification
  pod 'FBLazyVector', :path => "../node_modules/react-native/Libraries/FBLazyVector"

  ##省略

  pod 'Firebase' ##追加
  pod 'Firebase/Messaging' ##追加

  target 'testPushNotificationTests' do
    inherit! :complete
    # Pods for testing
  end
- iosディレクトリでPodfileをインストール
cd ios
pod install //iOSディレクトリで実行

//podコマンドが実行できない場合は下記でcocoapodsをインストール
sudo gem install cocoapods
※インストールし直してうまく行かない場合などは
rm -rf Podsをしてpod install し直すと上手くいく場合がありました。
- XCodeでプロジェクトを開いてみる
open プロジェクト名.xcworkspace
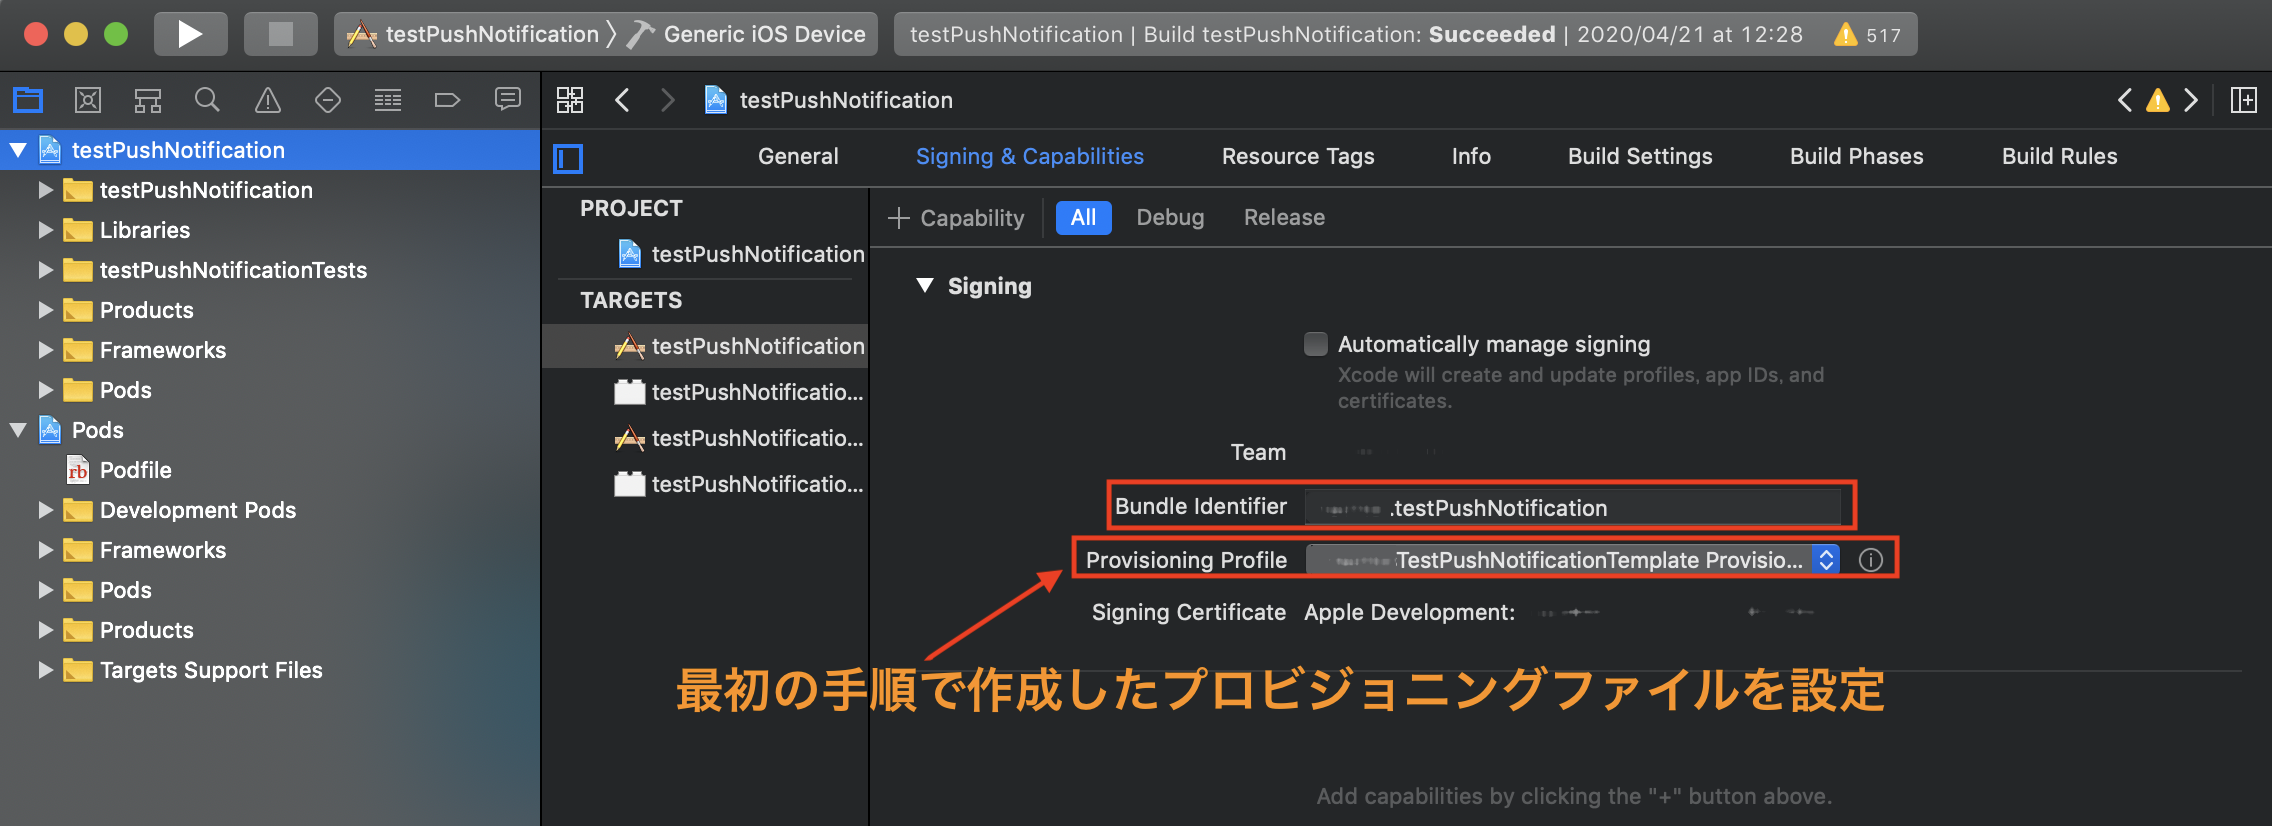
- XCodeのBundle Identifierに注意
XCodeに入力するBundle Identifierは証明書の登録、後ほどFirebaseで登録するものと合わせましょう
任意のユニークな文字列である必要があります(ex:hoge.testPushNotification)
過去に使用したものだとAppleの証明書を新規作成する場合に重複エラーで作成できません。
Provisioning Fileは最初に作成したものを設定します
3.Firebaseプロジェクトの新規作成
Firebase公式サイト
上記のFirebaseのコンソール上でプロジェクトを作成します。
Googleアカウントでログインが可能です。
- コンソールへ移動します

- プロジェクトの追加を選択します

- プロジェクト名を付けます

- アナリティクスの設定(今回は使用しないのでOFF)

「プロジェクトの作成」をクリックすれば完了です。
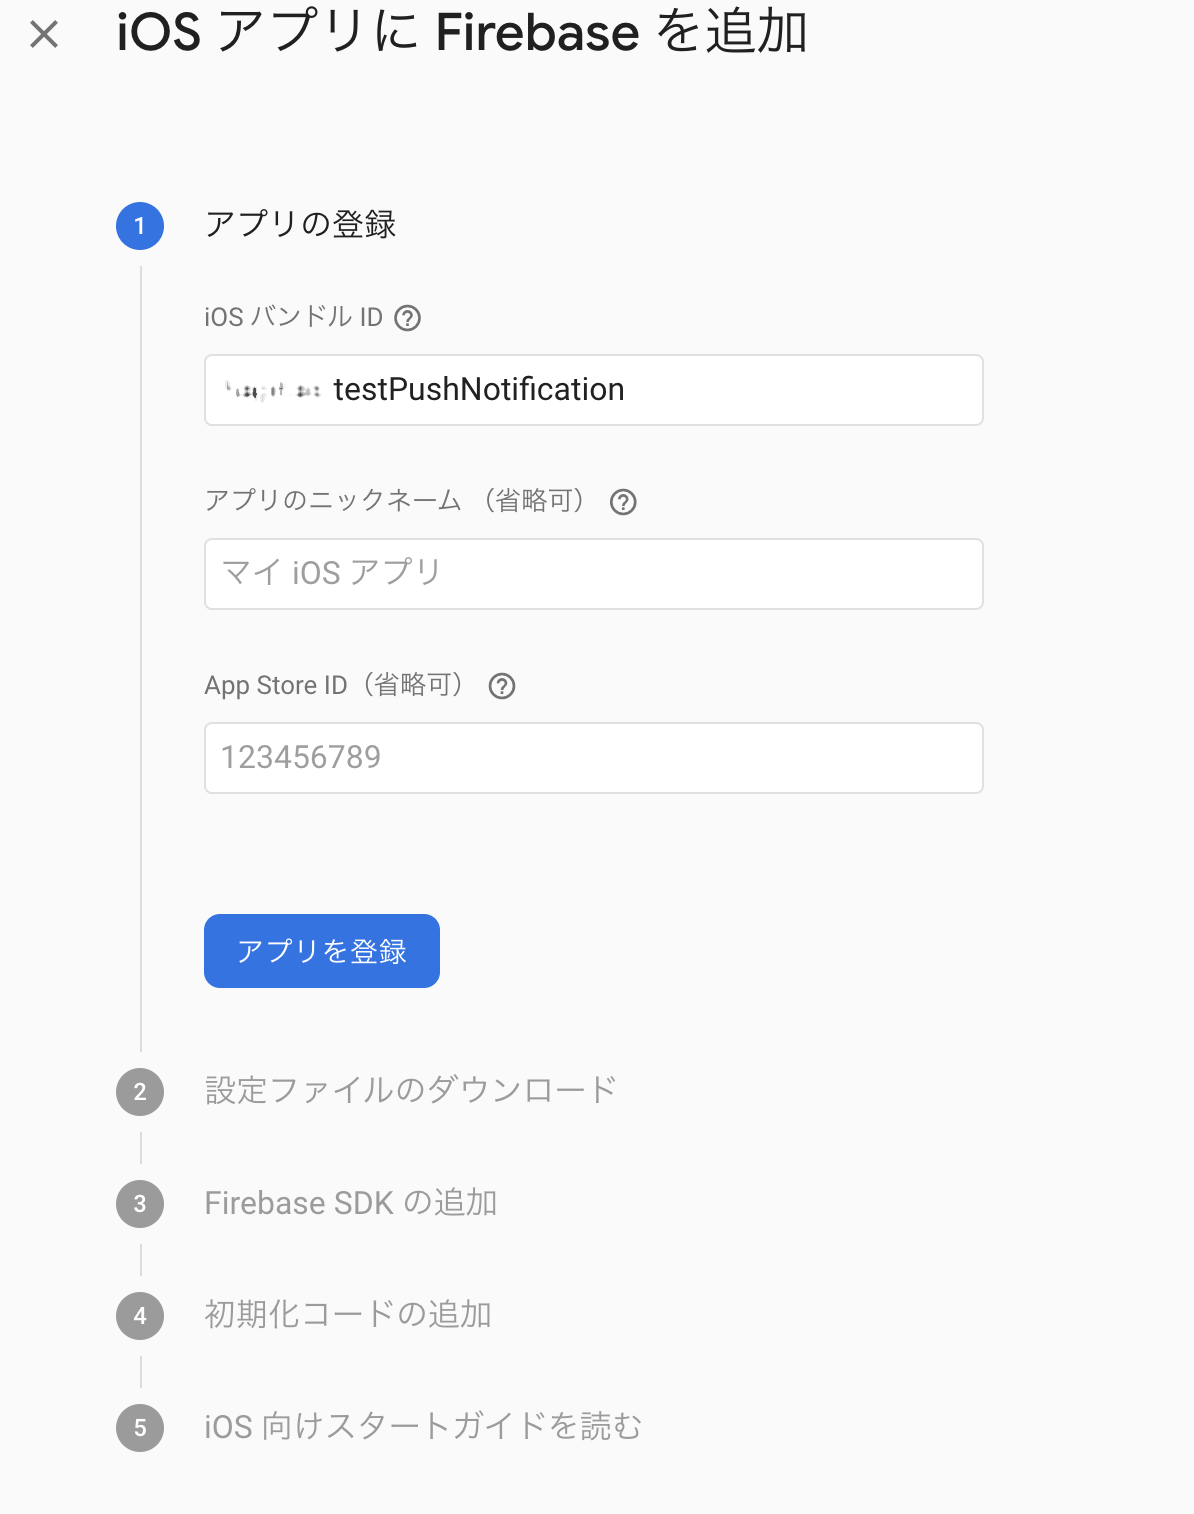
4.FirebaseプロジェクトにiOSアプリを追加する
- 作成したプロジェクトのトップ画面から「iOS」を選択します。

- iOSバンドルIDを登録
※先述のXCodeのBundle Identifierと同じものを登録します。
※登録後に変更ができないので、XCodeと異なるものを登録した場合はiOSアプリの追加作業をやり直す必要があります。
その他の項目は今回は不要です。
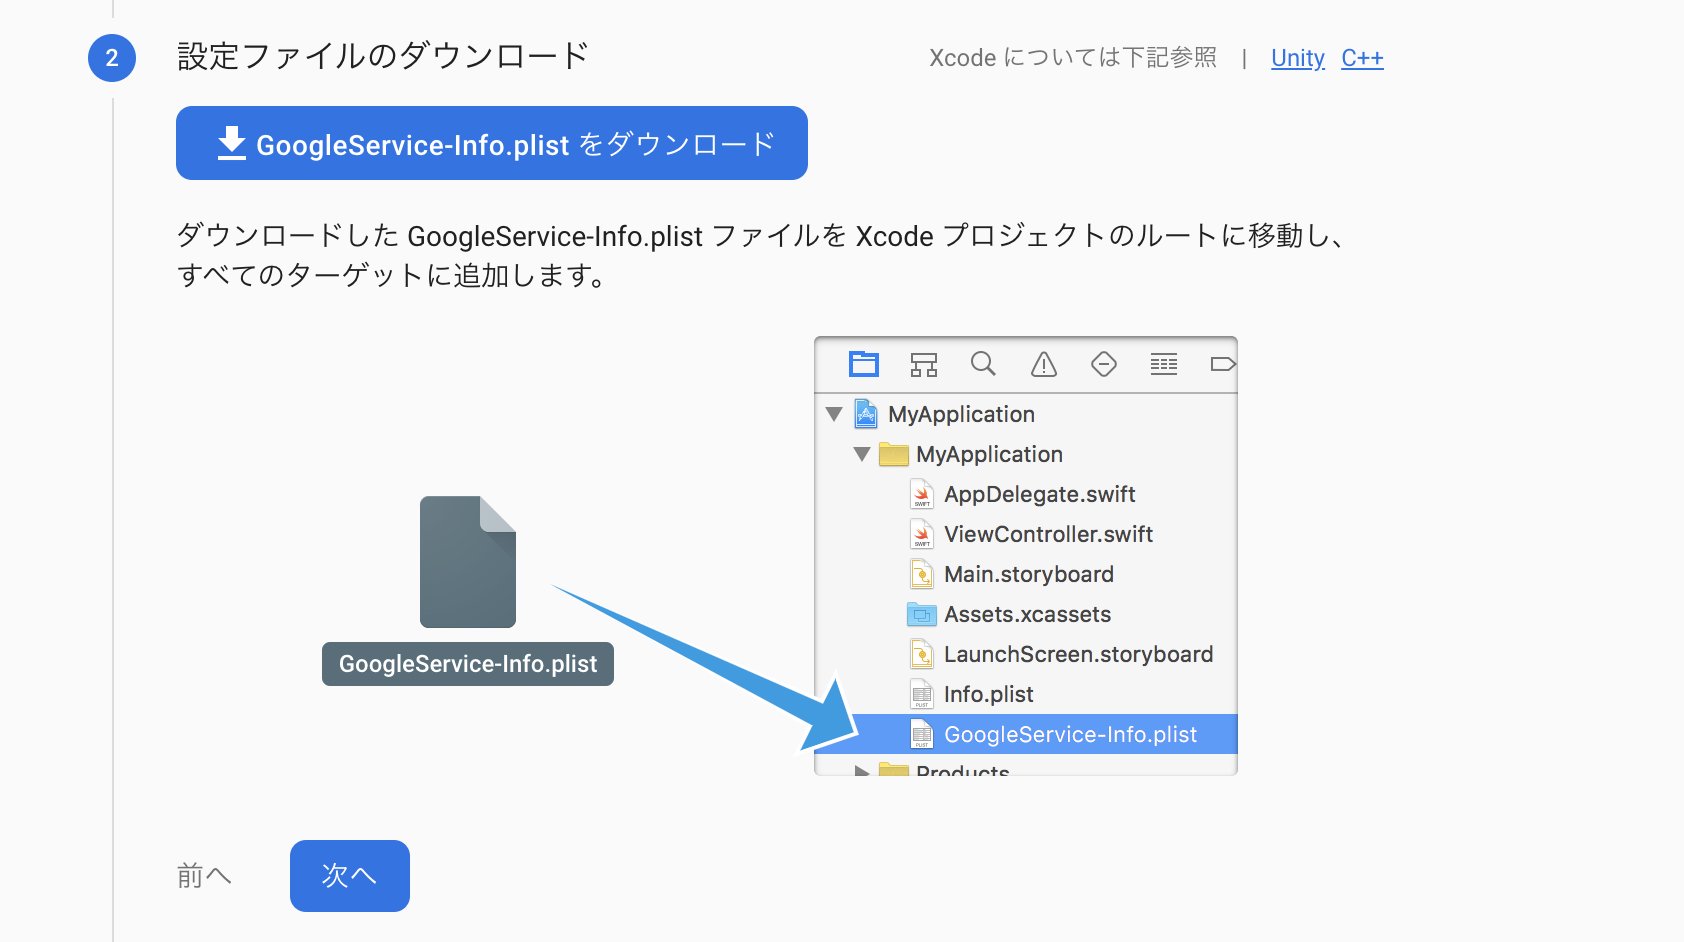
- GoogleService-info.plistをダウンロード
※XCodeへの登録の説明がありますが、あとで説明するのでダウンロードすればOKです。
※これ以降の設定は別途作業するので「3.Firebase SDKの追加」以降は最後まで飛ばして、追加を完了させてOKです。
- 完了するとコンソールのトップ画面にiOSアプリが追加されます。

5.XCodeにGoogleService-info.plistファイルを追加する
- 先ほどダウンロードした
GoogleService-info.plistをXCodeのルート配下の
プロジェクト名のディレクトリ配下に追加します(ドラッグ&ドロップで追加可能)。

6.APNs証明書をFCMに登録
最初の手順で作成したAPNsの証明書をFCMに登録します。
- Firebaseプロジェクトに追加したiOSアプリの設定を開きます。

ー Settingsの「Cloud Messaging」に移動します。

- iOSアプリの設定で開発用証明書(p12)をアップロードします。

※本記事の手順に沿って作業すると証明書のパスワードは入れなくてOKです。
※たまに証明書が認識されない時がありますが、アップロードモーダルを一旦閉じてやり直すと認証される場合がありました。
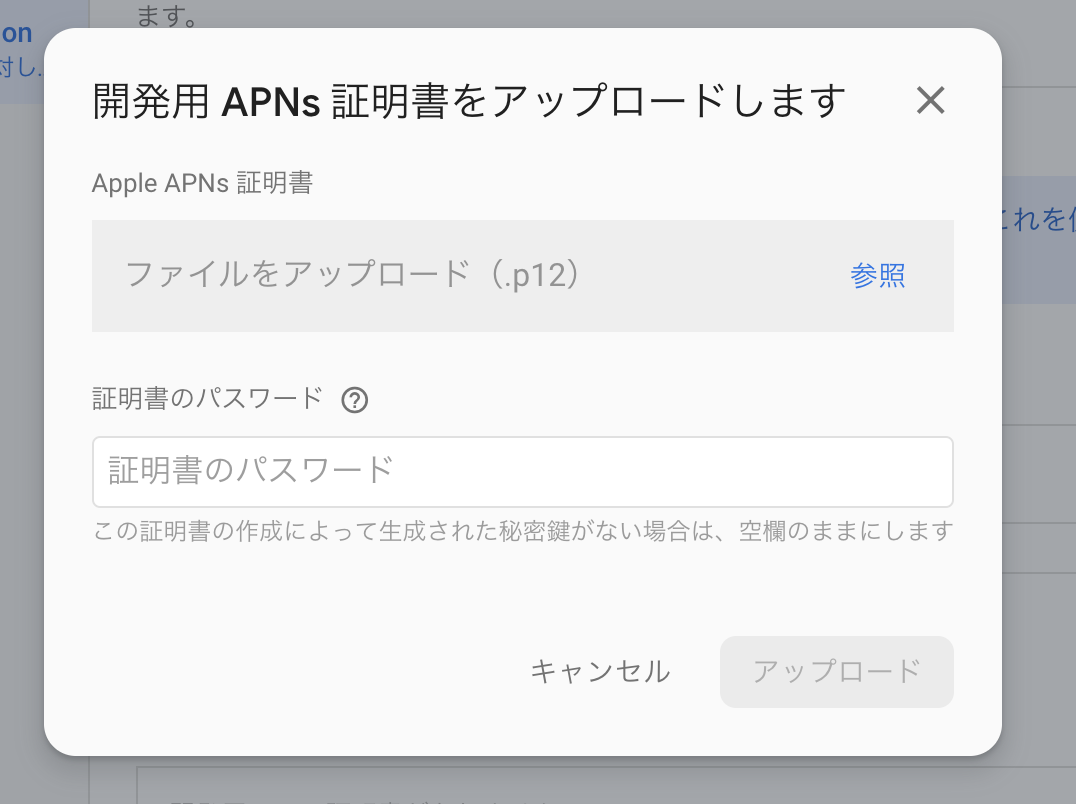
これでFCMへのAPNs証明書の登録は終了です。
7..SDKの追加とPush通知許諾とリモートPush通知の実装
iOSのAppDelegate(アプリの起動/停止時)の設定ファイルに以下のコードを追記します。
以下全てAppDelegate.m内
- iOS側でFirebaseのインポート
//ファイルの上部に#import <Firebase.h>を追加
# import "AppDelegate.h"
# import <Firebase.h> //追加
# import <React/RCTBridge.h>
# import <React/RCTBundleURLProvider.h>
# import <React/RCTRootView.h>
- Firebaseの初期化コードの追加
@implementation AppDelegate

- (BOOL)application:(UIApplication *)application didFinishLaunchingWithOptions:(NSDictionary *)launchOptions
{

# if DEBUG
  InitializeFlipper(application);
# endif

//省略......

  //追加する
  // Use Firebase library to configure APIs
  [FIRApp configure];
  return YES;
}
- [FIRApp configure]に続けて、下記のアプリ起動時の通知許可の設定を追加。
これを設定することでアプリ起動時に通知許諾ダイアログが出るようになり、
iPhoneの設定画面の通知で通知のON/OFFや表示についての設定ができるようになります。
@implementation AppDelegate

- (BOOL)application:(UIApplication *)application didFinishLaunchingWithOptions:(NSDictionary *)launchOptions
{

# if DEBUG
  InitializeFlipper(application);
# endif

//省略......

  // Use Firebase library to configure APIs
  [FIRApp configure];

 //追加する
 if ([UNUserNotificationCenter class] != nil) {
  // iOS 10 or later
  // For iOS 10 display notification (sent via APNS)
  [UNUserNotificationCenter currentNotificationCenter].delegate = self;
  UNAuthorizationOptions authOptions = UNAuthorizationOptionAlert |
      UNAuthorizationOptionSound | UNAuthorizationOptionBadge;
  [[UNUserNotificationCenter currentNotificationCenter]
      requestAuthorizationWithOptions:authOptions
      completionHandler:^(BOOL granted, NSError * _Nullable error) {
        // ...
      }];
 } else {
  // iOS 10 notifications aren't available; fall back to iOS 8-9 notifications.
  UIUserNotificationType allNotificationTypes =
  (UIUserNotificationTypeSound | UIUserNotificationTypeAlert | UIUserNotificationTypeBadge);
  UIUserNotificationSettings *settings =
  [UIUserNotificationSettings settingsForTypes:allNotificationTypes categories:nil];
  [application registerUserNotificationSettings:settings];
}
 [application registerForRemoteNotifications];

  return YES;
}
- react-native-firebaseを利用してデバイストークンの取得/push通知の検知や表示の実装をします。
各処理の詳細については公式Docをご参照ください。
https://rnfirebase.io/messaging/notifications
App.js内に記述
import React, {Component} from 'react';
import {Platform, StyleSheet, Text, View, Alert} from 'react-native';
import firebase from '@react-native-firebase/app';
import messaging from '@react-native-firebase/messaging';

export default class App extends Component {
  state = {
    deviceToken: null,
  };

  componentDidMount() {
    this.init();
  }

  componentWillUnmount() {
    this.listenerRemovingFunctions &&
      this.listenerRemovingFunctions.forEach((remove) => remove());
  }

  init = async () => {
    const enabled = await firebase.messaging().hasPermission();
    if (enabled) {
      this.initFcm();
    } else {
      try {
        await firebase.messaging().requestPermission();
        this.initFcm();
      } catch (e) {
        console.log(e);
      }
    }
  };

  initFcm = async () => {
    const deviceToken = await messaging().getToken();
    console.log(`deviceToken:${deviceToken}`);
    this.setState({deviceToken});
    this.listenerRemovingFunctions = [
      messaging().onTokenRefresh(this.onFcmTokenRefresh),
      messaging().onNotification(this.handleNotification('onNotification')),
      messaging().onNotificationOpened(
        this.handleNotification('onNotificationOpened'),
      ),
      messaging().onNotificationDisplayed(
        this.handleNotification('onNotificationDisplayed'),
      ),
      messaging().onMessage(this.onMessage),
    ];
    const notificationOpen = await messaging().getInitialNotification();
    if (notificationOpen) {
      this.handleNotification('initial')(notificationOpen);
    }
    const channel = new firebase.notifications.Android.Channel(
      'local',
      'local notification',
      firebase.notifications.Android.Importance.Max,
    );
    await messaging().android.createChannel(channel);
  };

  onFcmTokenRefresh = (deviceToken) => {
    this.setState({deviceToken});
  };

  onMessage = (message) => {
    Alert.alert('MESSAGE', JSON.stringify(message));
    this.setState({notificationType: 'message'});
  };

  handleNotification = (type) => {
    return (notification) => {
      console.log(type, notification);
      if (type === 'onNotification') {
        if (Platform.OS === 'android') {
          const localNotification = notification.android
            .setChannelId('local')
            .android.setSmallIcon('ic_stat_ic_notification')
            .android.setColor('#1A73E8')
            .android.setPriority(firebase.notifications.Android.Priority.High);
          messaging().displayNotification(localNotification);
        } else if (Platform.OS === 'ios') {
          messaging().displayNotification(notification);
        }
      }
      Alert.alert('NOTIFICATION', type);
      this.setState({notificationType: type});
    };
  };

  render() {
    const {deviceToken, notificationType} = this.state;
    return (
      <View style={styles.container}>
        {deviceToken && <Text>deviceToken: {deviceToken}</Text>}
        {deviceToken && <Text>Template iOS Push Nitification</Text>}
        {notificationType && <Text>{notificationType}</Text>}
      </View>
    );
  }
}

const styles = StyleSheet.create({
  container: {
    flex: 1,
    justifyContent: 'center',
    alignItems: 'center',
    backgroundColor: '#F5FCFF',
  },
});
- ここで回XCodeでビルドすると通知許可のダイアログが出ます。
ビルドの前にXCodeで下記の設定を追加します。
[Setting & Capability]→[capability]→[Background Models]と[Push Notifications]を追加→Background Modelsの[Remote Notifications]にチェック


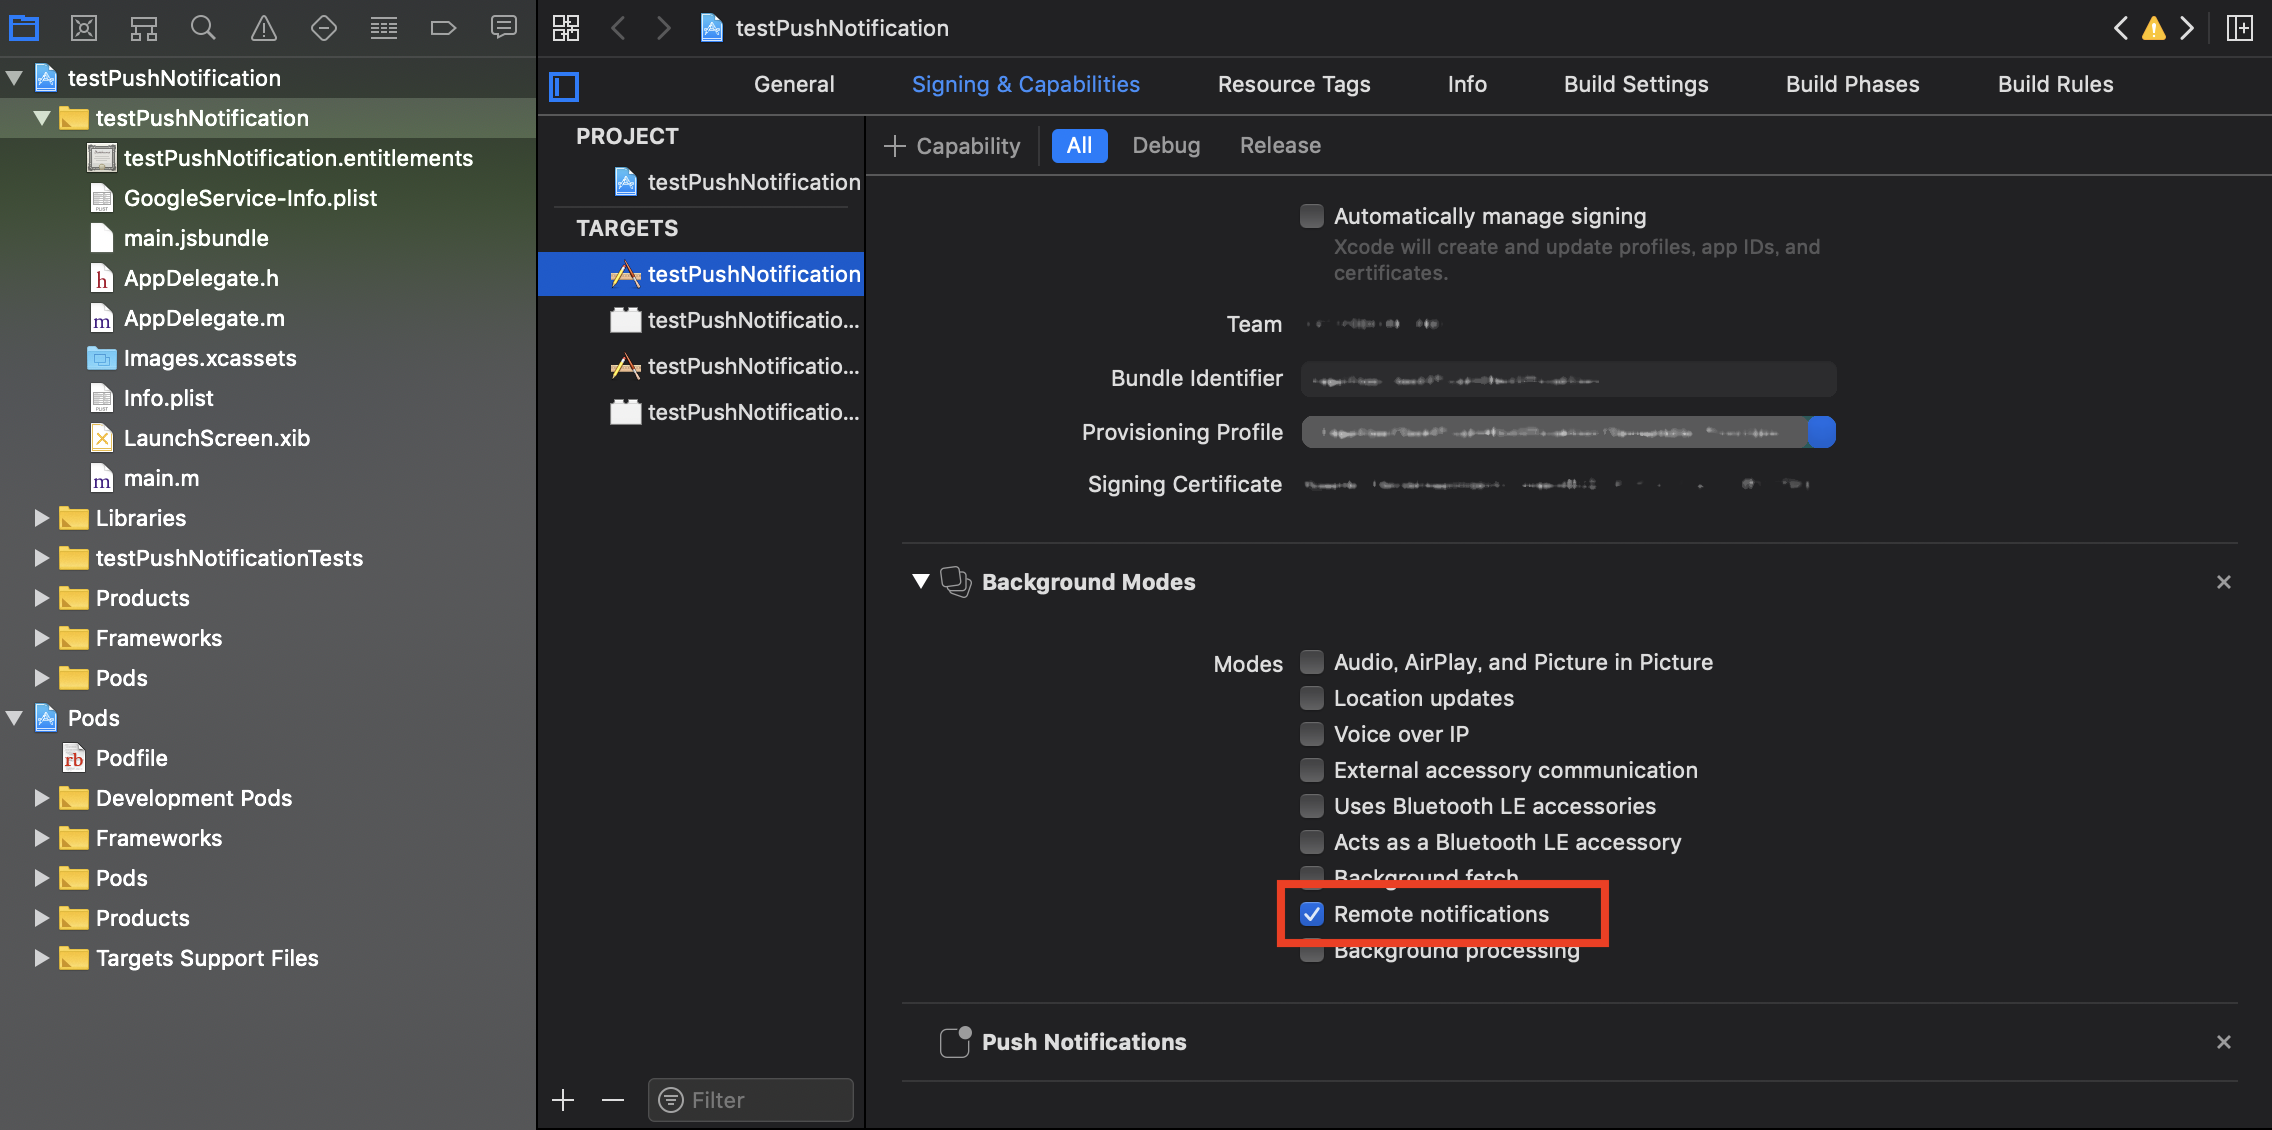
XCodeで端末を指定して▷でビルド(実機でビルドしてください)。

後ほど通知を受け取るのでAllowで通知の許可をします。
※ビルドして初回の起動のみしか表示されないので、再度出したい場合はアプリを削除して再ビルド。

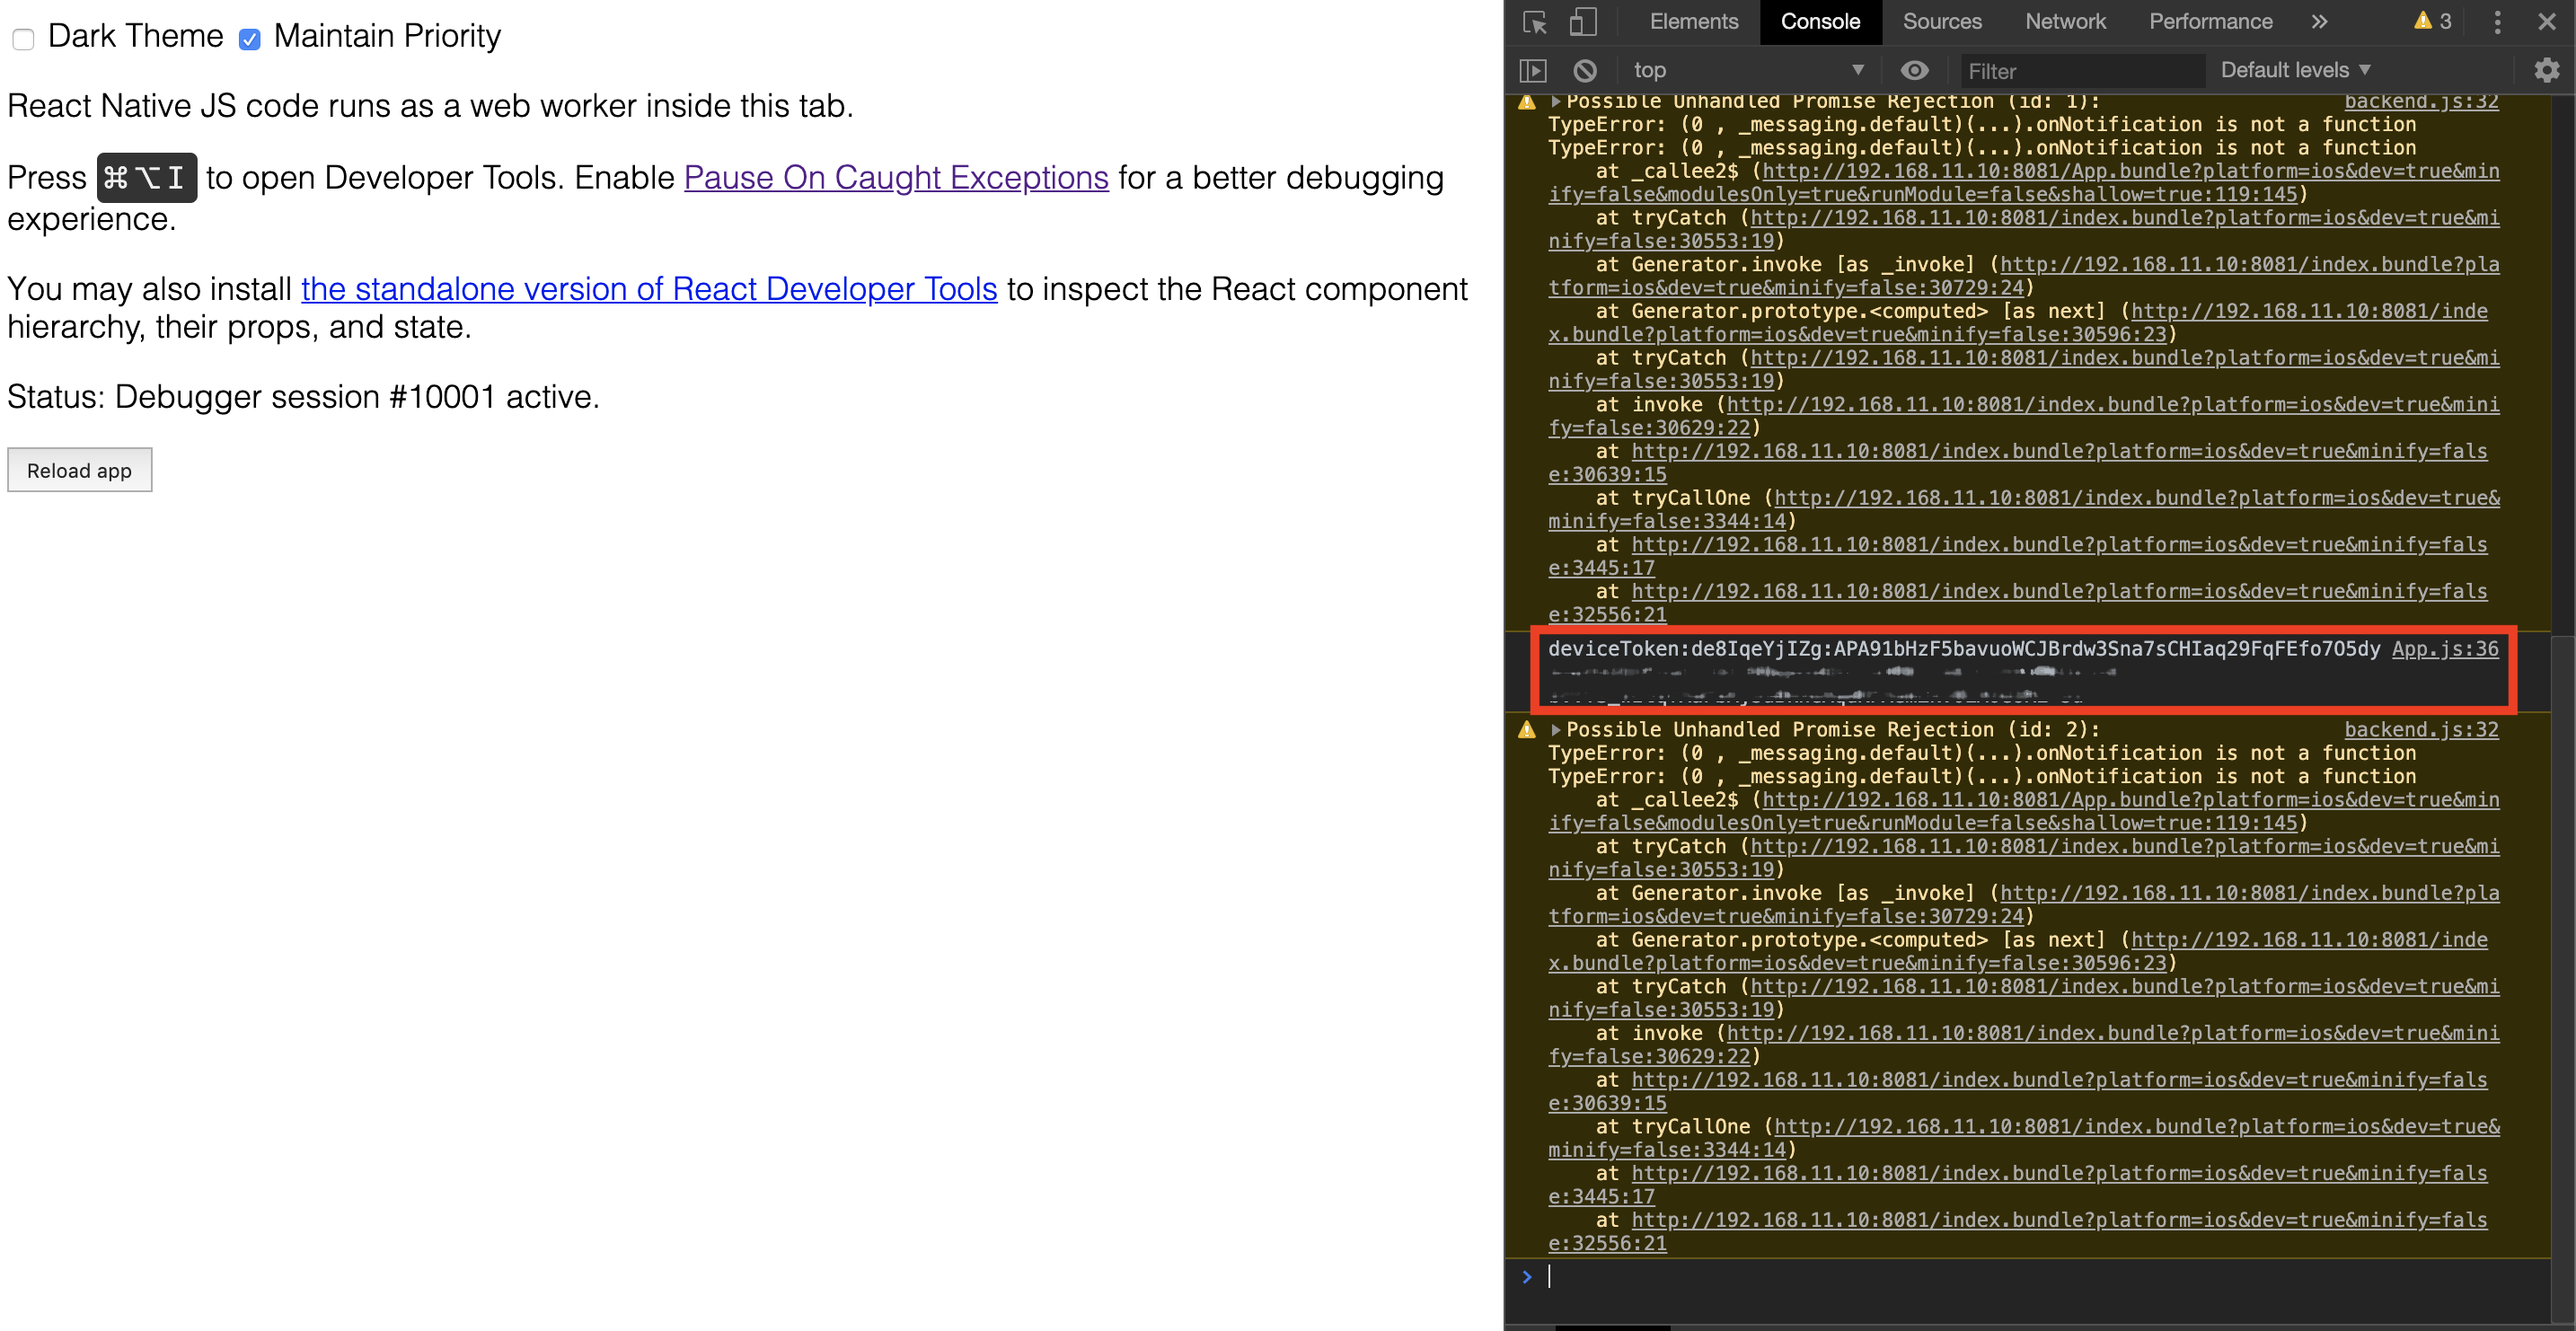
8.デバイストークンを取得
正常に動作すると、ビルドした端末にデバイストークンが表示されます。
これをFCMに登録します。

このデバイストークンはコピペができない状態です。
-
端末からRemote DebugをしてChrome検証ツールのconsoleから取得します。
(前のステップで実装したコードにconsole.logでdeviceTokenを表示するようにしてあります。) -
PCに接続したままお手持ちのiPhoneを強く2回以上振ってください(ぶつけて壊さないように注意)。
端末に下記の画面が表示されるので「Debug」を選択。

- PCのブラウザにデバッグ用の画面が表示されるので、
Chromeの検証ツールを開いてconsoleからdeveiceTokenをコピーします。
このトークンを用いてFCMからPush通知のテストメッセージを配信します。
9.FCMからテストメッセージを配信
-
デバイストークンが取得できたら、アプリを閉じる。
-
Firebaseのプロジェクトに移動。
-
左のメニューバーから「Cloud Messaging」を選択。

- 「Send your first message」を選択。

- 配信したい内容を入力し、「テストメッセージを送信」

- 取得したデバイストークンを登録し、メッセージを送信


- 端末でPush通知を受けとることができました!!!
<img width="300" src="https://qiita-image-store.s3.ap-northeast-1.amazonaws.com/0/530688/14e019f0-6798-bf89-9fb7-fdeca9f30a2d.png")
">

最後に
本記事の実装では、アプリを閉じた状態でのみPush通知を受信できます。
実装例を元に公式ドキュメント記載のメソッドやオプションを使用することでアプリを開いた状態での受信や、通知をタップした時の挙動を制御できるようなので、色々いじって見ると楽しいと思います。
通知許可のタイミングの制御なども試したいです。
長くなりましたが、最後まで読んで頂きありがとうございます。
どなたかのご参考になれば幸いです。