こんにちは、Slack の公式 SDK 開発と日本の Developer Relations を担当している瀬良 (@seratch) と申します ![]()
この記事は Slack の次世代プラットフォーム機能を少しずつ試しながら、ゆっくりと理解していくシリーズの記事です。
「次世代プラットフォーム機能って何?」という方は、以下の記事で詳しく解説しましたので、まずはそちらをお読みください。
今回の記事では、メッセージ内にボタンを含めるようにして、それがクリックされたときにインタラクションを開始するコード例をご紹介します。
プロジェクトを作成
いつものようにブランクプロジェクトを作成してゼロからコードを足していきましょう。slack create コマンドを実行して、選択肢から「Blank Project」を選択してください。作成したプロジェクトの構成は以下の通りです。
$ tree
.
├── LICENSE
├── README.md
├── assets
│   └── default_new_app_icon.png
├── deno.jsonc
├── import_map.json
├── manifest.ts
└── slack.json
この記事では二つの例をご紹介します。
- 標準ファンクションの SendMessage が提供する
interactive_blocksのクリックイベントを処理する - すべてカスタムのファンクションの中でクリックイベントを処理する
標準ファンクションの SendMessage の interactive_blocks を処理する
まず一つ目は SendMessage が提供するインタラクションブロックである interactive_blocks を使った例です。よくあるシンプルな Yes/No のようなボタン操作であれば、標準ファンクションで簡単に投稿することができます。ただ、そのクリックイベントの処理は、何らかのカスタムのファンクションで対応が必要です。
まず、ワークフローの実装を見てみましょう。workflow.ts として以下の内容を保存してください。
// -------------------------
// ワークフロー定義
// -------------------------
import { DefineWorkflow, Schema } from "deno-slack-sdk/mod.ts";
export const workflow = DefineWorkflow({
  callback_id: "demo-workflow",
  title: "Demo Workflow",
  input_parameters: {
    properties: {
      channel_id: { type: Schema.slack.types.channel_id },
      user_id: { type: Schema.slack.types.user_id },
    },
    required: ["channel_id", "user_id"],
  },
});

// 標準ファンクションが提供する interactive_blocks を使ってインタラクションを開始
const sendMessageStep = workflow.addStep(Schema.slack.functions.SendMessage, {
  channel_id: workflow.inputs.channel_id,
  message: `Do you approve <@${workflow.inputs.user_id}>'s time off request?`,
  interactive_blocks: [
    {
      "type": "actions",
      "block_id": "approve-deny-buttons",
      "elements": [
        {
          type: "button",
          action_id: "approve",
          text: { type: "plain_text", text: "Approve" },
          style: "primary",
        },
        {
          type: "button",
          action_id: "deny",
          text: { type: "plain_text", text: "Deny" },
          style: "danger",
        },
      ],
    },
  ],
});

// インタラクションの処理を担当するカスタムのファンクション
import { def as handleInteractiveBlocks } from "./handle_interactive_blocks.ts";
workflow.addStep(handleInteractiveBlocks, {
  action: sendMessageStep.outputs.action,
  interactivity: sendMessageStep.outputs.interactivity,
  messageLink: sendMessageStep.outputs.message_link,
  messageTs: sendMessageStep.outputs.message_ts,
});

// -------------------------
// トリガー定義
// -------------------------
import { Trigger } from "deno-slack-api/types.ts";

// リンクトリガー
const trigger: Trigger<typeof workflow.definition> = {
  type: "shortcut",
  name: "Interaction Demo Trigger",
  workflow: `#/workflows/${workflow.definition.callback_id}`,
  inputs: {
    // クリックしたチャンネルの ID が設定される
    channel_id: { value: "{{data.channel_id}}" },
    // クリックしたユーザーの ID が設定される
    user_id: { value: "{{data.user_id}}" },
  },
};

// トリガーの作成には `slack triggers create --trigger-def [ファイルパス]` を実行する
// Trigger 形の定義オブジェクトを export default さえしていれば
// そのソースファイルを使用できる
export default trigger;
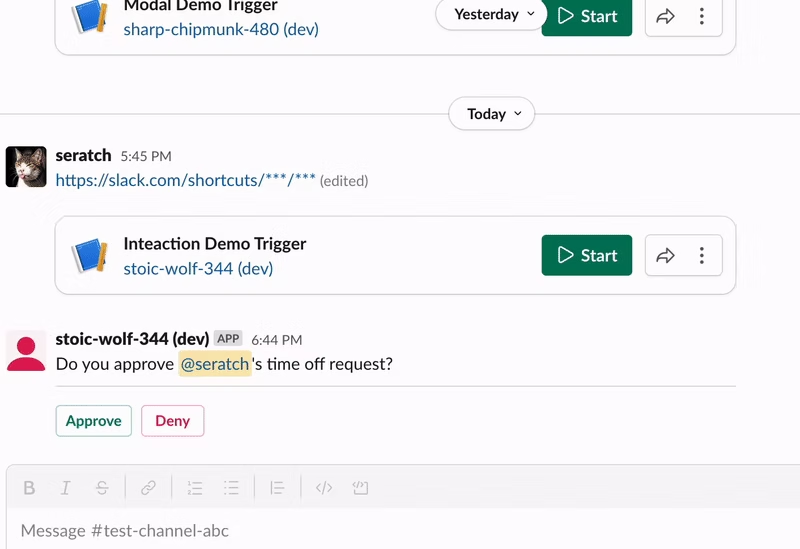
このワークフローは実行すると、以下のようなメッセージを投稿します。
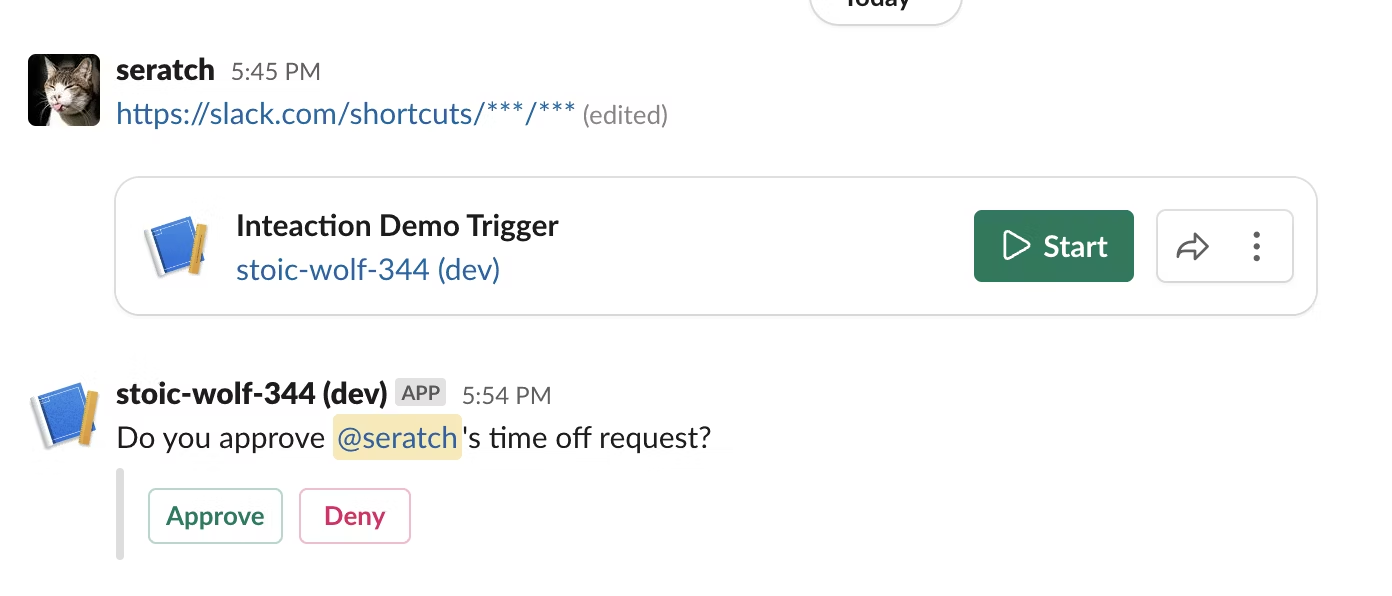
interactive_blocks のところに Block Kit のブロックを配置すると、message のすぐ下にそれらが表示される感じになります。もし、もっと柔軟なメッセージレイアウトを表現したい場合は、この SendMessage の message + interactive_blocks ではなく、自前のファンクションの中で chat.postMessage API を使うことになります。その例は後ほどご紹介します。
さて、上のワークフローは handle_interactive_blocks.ts が存在しないために、まだコンパイルが通っていないと思います。このファンクションは以下の内容で保存してください。
import { DefineFunction, Schema, SlackFunction } from "deno-slack-sdk/mod.ts";

export const def = DefineFunction({
  callback_id: "handle_interactive_blocks",
  title: "Handle button clicks in interactive_blocks",
  source_file: "handle_interactive_blocks.ts",
  input_parameters: {
    // interactive_blocks から受け取る値
    properties: {
      action: { type: Schema.types.object },
      interactivity: { type: Schema.slack.types.interactivity },
      messageLink: { type: Schema.types.string },
      messageTs: { type: Schema.types.string },
    },
    required: ["action", "interactivity"],
  },
  output_parameters: { properties: {}, required: [] },
});

export default SlackFunction(
  def,
  // ワークフロー実行時の実行関数
  async ({ inputs, client }) => {
    if (inputs.action.action_id === "deny") {
      // Deny の場合だけモーダルを開く
      const response = await client.views.open({
        interactivity_pointer: inputs.interactivity.interactivity_pointer,
        view: buildNewModalView(),
      });
      if (response.error) {
        const error = `Failed to open a modal due to ${response.error}`;
        return { error };
      }
      return { completed: false };
    }
    return { completed: true, outputs: {} };
  },
)
  // モーダル上のボタンクリックに反応するハンドラー
  .addBlockActionsHandler("clear-inputs", async ({ body, client }) => {
    const response = await client.views.update({
      interactivity_pointer: body.interactivity.interactivity_pointer,
      view_id: body.view.id,
      view: buildNewModalView(),
    });
    if (response.error) {
      const error = `Failed to update a modal due to ${response.error}`;
      return { error };
    }
    return { completed: false };
  })
  // Deny で開いたモーダルのデータ送信を受け付けるハンドラー
  .addViewSubmissionHandler(
    ["deny-reason-submission"],
    ({ view }) => {
      const values = view.state.values;
      const reason = String(Object.values(values)[0]["deny-reason"].value);
      if (reason.length <= 5) {
        console.log(reason);
        const errors: Record<string, string> = {};
        const blockId = Object.keys(values)[0];
        errors[blockId] = "The reason must be 5 characters or longer";
        return { response_action: "errors", errors };
      }
      return {};
    },
  )
  // Deny で開いたモーダルが閉じられたときのハンドラー
  .addViewClosedHandler(
    ["deny-reason-submission", "deny-reason-confirmation"],
    ({ view }) => {
      console.log(JSON.stringify(view, null, 2));
    },
  );

// 初期状態のモーダルビューを返す
function buildNewModalView() {
  return {
    "type": "modal",
    "callback_id": "deny-reason-submission",
    "title": { "type": "plain_text", "text": "Reason for the denial" },
    "notify_on_close": true,
    "submit": { "type": "plain_text", "text": "Confirm" },
    "blocks": [
      {
        "type": "input",
        // 確実にモーダルビューを更新するために block_id を毎回違うものにする
        "block_id": crypto.randomUUID(),
        "label": { "type": "plain_text", "text": "Reason" },
        "element": {
          "type": "plain_text_input",
          "action_id": "deny-reason",
          "multiline": true,
          "placeholder": {
            "type": "plain_text",
            "text": "Share the reason why you denied the request in detail",
          },
        },
      },
      {
        "type": "actions",
        "block_id": "clear",
        "elements": [
          {
            type: "button",
            action_id: "clear-inputs",
            text: { type: "plain_text", text: "Clear all the inputs" },
            style: "danger",
          },
        ],
      },
    ],
  };
}
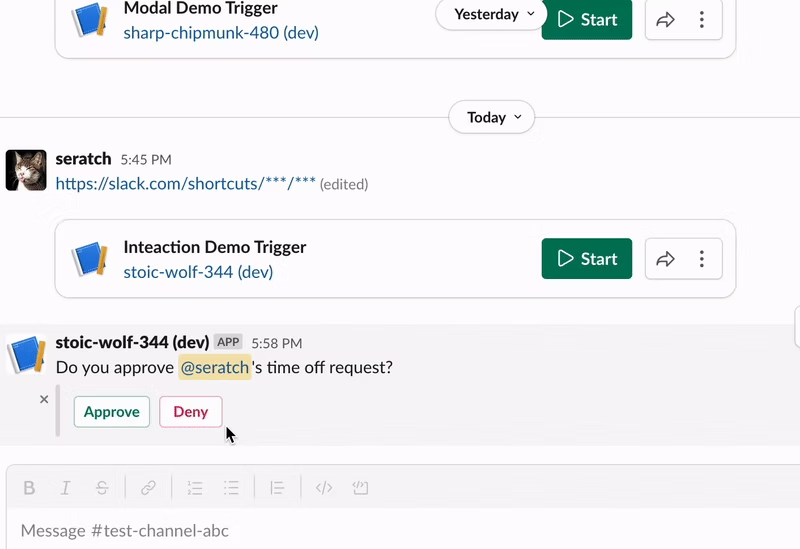
少し長いコードですが、以下のアニメーションのような処理を実装しています。まず、Approve ボタンが押されたときは、単にボタンが表示されていた interactive_blocks の部分を書き換えるだけです。
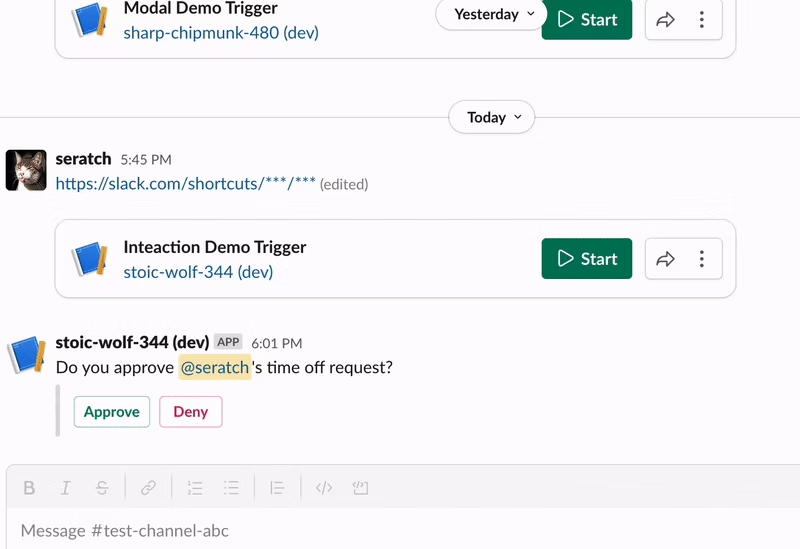
一方で Deny ボタンが押されたときは、それだけでなく理由を問うモーダルを表示します。そのモーダルには桁数チェックや、入力内容のクリアボタンも付いています。
このように、シンプルなクリックイベントの受付からのインタラクション開始程度であれば、十分に活用できる一方、あまり細かいカスタマイズはできません。
次は、すべて自前のファンクションで実装した例をご紹介します。
自前のファンクションで自由に Block Kit を使う
新しく以下の内容で post_interactive_message.ts というファンクションを追加してください。どのように動作するかは後ほど解説します。
import { DefineFunction, Schema, SlackFunction } from "deno-slack-sdk/mod.ts";

export const def = DefineFunction({
  callback_id: "post_interactive_message",
  title: "Post a message with interactive blocks",
  source_file: "post_interactive_message.ts",
  input_parameters: {
    properties: {
      user_id: { type: Schema.slack.types.user_id },
      channel_id: { type: Schema.slack.types.channel_id },
    },
    required: ["user_id", "channel_id"],
  },
  output_parameters: { properties: {}, required: [] },
});

export default SlackFunction(
  def,
  // ワークフロー実行時の実行関数
  async ({ inputs, client }) => {
    const text = `Do you approve <@${inputs.user_id}>'s time off request?`;
    const blocks = [
      {
        type: "section",
        text: { type: "mrkdwn", text },
      },
      { type: "divider" },
      {
        type: "actions",
        block_id: "approve-deny-buttons",
        elements: [
          {
            type: "button",
            action_id: "approve",
            text: { type: "plain_text", text: "Approve" },
            style: "primary",
          },
          {
            type: "button",
            action_id: "deny",
            text: { type: "plain_text", text: "Deny" },
            style: "danger",
          },
        ],
      },
    ];
    const response = await client.chat.postMessage({
      channel: inputs.channel_id,
      text,
      blocks,
    });
    if (response.error) {
      console.log(JSON.stringify(response, null, 2));
      const error = `Failed to post a message due to ${response.error}`;
      return { error };
    }
    return { completed: false };
  },
)
  // Approve ボタンが押されたときのハンドラー
  .addBlockActionsHandler("approve", async ({ body, client, inputs }) => {
    const text = "Thank you for approving the request!";
    const response = await client.chat.update({
      channel: inputs.channel_id,
      ts: body.container.message_ts,
      text,
      blocks: [{ type: "section", text: { type: "mrkdwn", text } }],
    });
    if (response.error) {
      const error = `Failed to update the message due to ${response.error}`;
      return { error };
    }
    return { completed: true, outputs: {} };
  })
  // Deny ボタンが押されたときのハンドラー
  .addBlockActionsHandler("deny", async ({ body, client, inputs }) => {
    const text =
      "OK, we need more information... Could you share the reason for denial?";
    const messageResponse = await client.chat.update({
      channel: inputs.channel_id,
      ts: body.container.message_ts,
      text,
      blocks: [{ type: "section", text: { type: "mrkdwn", text } }],
    });
    if (messageResponse.error) {
      const error =
        `Failed to update the message due to ${messageResponse.error}`;
      return { error };
    }
    const modalResponse = await client.views.open({
      interactivity_pointer: body.interactivity.interactivity_pointer,
      view: buildNewModalView(),
    });
    if (modalResponse.error) {
      const error = `Failed to open a modal due to ${modalResponse.error}`;
      return { error };
    }
    return { completed: false };
  })
  // モーダル上のボタンクリックに反応するハンドラー
  .addBlockActionsHandler("clear-inputs", async ({ body, client }) => {
    const response = await client.views.update({
      interactivity_pointer: body.interactivity.interactivity_pointer,
      view_id: body.view.id,
      view: buildNewModalView(),
    });
    if (response.error) {
      const error = `Failed to update a modal due to ${response.error}`;
      return { error };
    }
    return { completed: false };
  })
  // Deny で開いたモーダルのデータ送信を受け付けるハンドラー
  .addViewSubmissionHandler(
    ["deny-reason-submission"],
    ({ view }) => {
      const values = view.state.values;
      const reason = String(Object.values(values)[0]["deny-reason"].value);
      if (reason.length <= 5) {
        console.log(reason);
        const errors: Record<string, string> = {};
        const blockId = Object.keys(values)[0];
        errors[blockId] = "The reason must be 5 characters or longer";
        return { response_action: "errors", errors };
      }
      return {};
    },
  )
  // Deny で開いたモーダルが閉じられたときのハンドラー
  .addViewClosedHandler(
    ["deny-reason-submission", "deny-reason-confirmation"],
    ({ view }) => {
      console.log(JSON.stringify(view, null, 2));
    },
  );

// 初期状態のモーダルビューを返す
function buildNewModalView() {
  return {
    "type": "modal",
    "callback_id": "deny-reason-submission",
    "title": { "type": "plain_text", "text": "Reason for the denial" },
    "notify_on_close": true,
    "submit": { "type": "plain_text", "text": "Confirm" },
    "blocks": [
      {
        "type": "input",
        // 確実にモーダルビューを更新するために block_id を毎回違うものにする
        "block_id": crypto.randomUUID(),
        "label": { "type": "plain_text", "text": "Reason" },
        "element": {
          "type": "plain_text_input",
          "action_id": "deny-reason",
          "multiline": true,
          "placeholder": {
            "type": "plain_text",
            "text": "Share the reason why you denied the request in detail",
          },
        },
      },
      {
        "type": "actions",
        "block_id": "clear",
        "elements": [
          {
            type: "button",
            action_id: "clear-inputs",
            text: { type: "plain_text", text: "Clear all the inputs" },
            style: "danger",
          },
        ],
      },
    ],
  };
}
そして、先ほどのワークフローから SendMessage とその後続のファンクションを削除して、この新しいファンクションだけを追加します。
// -------------------------
// ワークフロー定義
// -------------------------
import { DefineWorkflow, Schema } from "deno-slack-sdk/mod.ts";
export const workflow = DefineWorkflow({
  callback_id: "demo-workflow",
  title: "Demo Workflow",
  input_parameters: {
    properties: {
      channel_id: { type: Schema.slack.types.channel_id },
      user_id: { type: Schema.slack.types.user_id },
    },
    required: ["channel_id", "user_id"],
  },
});

import { def as postInteractiveMessage } from "./post_interactive_message.ts";
workflow.addStep(postInteractiveMessage, {
  user_id: workflow.inputs.user_id,
  channel_id: workflow.inputs.channel_id,
});
この状態でリンクトリガーをクリックすると、以下のようなほぼ同じですが、完全に Block Kit をコントロールしたメッセージが表示されます。そして Approve をクリックすると、先ほどとは異なり、メッセージの書き換えも完全に制御できています。
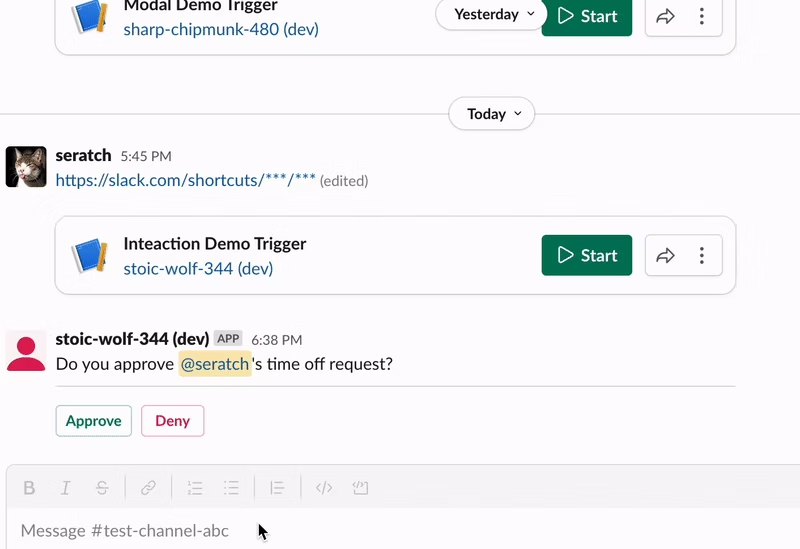
このメッセージの書き換えは、エラー処理を除いたシンプルな実装だと以下のようなコードとなります。
  // Approve ボタンが押されたときのハンドラー
  .addBlockActionsHandler("approve", async ({ body, client, inputs }) => {
    const text = "Thank you for approving the request!";
    await client.chat.update({
      channel: inputs.channel_id,
      ts: body.container.message_ts,
      text,
      blocks: [{ type: "section", text: { type: "mrkdwn", text } }],
    });
    return { completed: true, outputs: {} };
  })
一方、Deny ボタンが押されたときの制御も先ほどと同様モーダルを開くことをしつつ、元メッセージの書き換えは完全に制御することができています。
こちらも同様に、エラー処理を除いたシンプルな実装は以下のような形になります。モーダルを開くための interactivity は inputs ではなく body から取得することが可能です。
  // Deny ボタンが押されたときのハンドラー
  .addBlockActionsHandler("deny", async ({ body, client, inputs }) => {
    const text =
      "OK, we need more information... Could you share the reason for denial?";
    await client.chat.update({
      channel: inputs.channel_id,
      ts: body.container.message_ts,
      text,
      blocks: [{ type: "section", text: { type: "mrkdwn", text } }],
    });
    await client.views.open({
      interactivity_pointer: body.interactivity.interactivity_pointer,
      view: buildNewModalView(),
    });
    // モーダルでインタラクションが続くので completed: false にする
    return { completed: false };
  })
このように少しコツはありますが、Block Kit のインタラクションについて制御の方法をご存知の方であれば、そのままの知識で処理を実装することができるでしょう。
Block Kit の見た目の調整には、Block Kit Builder が大変便利ですので、ぜひ利用してみてください。
終わりに
いかがだったでしょうか?
一点、注意点としては、この記事投稿時点ではエフェメラルメッセージでのインタラクションやプライベートチャンネルでの用途には対応していないため、利用シーンはまだ限られるかもしれません。正式リリース時にはプライベートチャンネルの制約は解消する予定ですので、今しばらくお待ちください。
以下の英語のドキュメントもあわせて参考にしてみてください。
それでは!