こんにちは、Slack の公式 SDK 開発と日本の Developer Relations を担当している瀬良 (@seratch) と申します ![]()
この記事は Slack の次世代プラットフォーム機能を少しずつ試しながら、ゆっくりと理解していくシリーズの記事です。
「次世代プラットフォーム機能って何?」という方は、以下の記事で詳しく解説しましたので、まずはそちらをお読みください。
この記事では、イベントトリガー(Event Trigger)の使い方をご紹介します。イベントトリガーは様々な種類がありますが、今回はチャンネルに新しいメッセージが投稿されたときに発生する "message_posted" イベントを使ってワークフローを起動してみましょう。
ブランクプロジェクトを作成
いつものようにブランクプロジェクトを作成してゼロからコードを足していきましょう。slack create コマンドを実行して、選択肢から「Blank Project」を選択してください。作成したプロジェクトの構成は以下の通りです。
$ tree
.
├── LICENSE
├── README.md
├── assets
│   └── default_new_app_icon.png
├── deno.jsonc
├── import_map.json
├── manifest.ts
└── slack.json
今回はトリガーがメインの記事ですので、ワークフローは非常にシンプルなものにしましょう。
ソースコードでトリガーを作る
以下の内容を example.ts として保存してください。
// -------------------------
// ワークフロー定義
// -------------------------
import { DefineWorkflow, Schema } from "deno-slack-sdk/mod.ts";

export const workflow = DefineWorkflow({
  callback_id: "example-workflow",
  title: "Example Workflow",
  input_parameters: {
    properties: {
      channel_id: { type: Schema.slack.types.channel_id },
      channel_type: { type: Schema.types.string },
      user_id: { type: Schema.slack.types.user_id },
      text: { type: Schema.types.string },
      message_ts: { type: Schema.types.string },
      thread_ts: { type: Schema.types.string },
    },
    required: [
      "channel_id",
      "channel_type",
      "user_id",
      "text",
      "message_ts",
      "thread_ts",
    ],
  },
});

workflow.addStep(Schema.slack.functions.SendMessage, {
  channel_id: workflow.inputs.channel_id,
  message: `Hey <@${workflow.inputs.user_id}>, what's up?`,
});

// -------------------------
// トリガー定義
// -------------------------
import { Trigger } from "deno-slack-api/types.ts";

const trigger: Trigger<typeof workflow.definition> = {
  type: "event",
  name: "Trigger the example workflow",
  workflow: `#/workflows/${workflow.definition.callback_id}`,
  event: {
    event_type: "slack#/events/message_posted",
    channel_ids: ["C04FB5UF1C2"], // TODO: このリストを実際のチャンネル ID に書き換える
    // この filter は何もしていないが、必須項目なので省略はできない
    filter: {
      version: 1,
      root: { statement: "1 == 1" },
    },
  },
  inputs: {
    channel_id: { value: "{{data.channel_id}}" },
    channel_type: { value: "{{data.channel_type}}" },
    user_id: { value: "{{data.user_id}}" },
    text: { value: "{{data.text}}" },
    message_ts: { value: "{{data.message_ts}}" },
    thread_ts: { value: "{{data.thread_ts}}" },
  },
};

export default trigger;
channel_ids の箇所は書き換えが必要です。以下の記事の手順を参考に、正しいチャンネルの ID を指定してください。
そして manifest.ts にこのワークフローを追加します。
import { Manifest } from "deno-slack-sdk/mod.ts";
import { workflow as ExampleWorkflow } from "./example.ts";

export default Manifest({
  name: "distracted-bison-253",
  description: "Example workflow",
  icon: "assets/default_new_app_icon.png",
  workflows: [ExampleWorkflow],
  outgoingDomains: [],
  botScopes: [
    "commands", // 最低限一つの bot scope が必要
    "chat:write", // メッセージを投稿するための基本的な権限
    "chat:write.public", // public channel に参加することなくメッセージを投稿する権限
    "channels:history", // message_posted event trigger のために必要
  ],
});
なお、この記事執筆時点でこの次世代プラットフォームはまだベータ版の段階で、イベントトリガーはパブリックチャンネルしかサポートしておりません。正式リリース前にこの記事を読まれている方は、パブリックチャンネルでお試しください。
ということで、今回は特にコードの変更は必要なく、ワークフロー実行の準備が完了しました。
slack triggers create --trigger-def ./example.ts を実行します。選択肢から (dev) という接尾辞がついている方を選択してください。
$ slack triggers create --trigger-def ./example.ts
? Choose an app  seratch (dev)  T03E*****
   distracted-bison-253 (dev) A04FNE*****

⚡ Trigger created
   Trigger ID:   Ft04EJ8*****
   Trigger Type: event
   Trigger Name: Trigger the example workflow
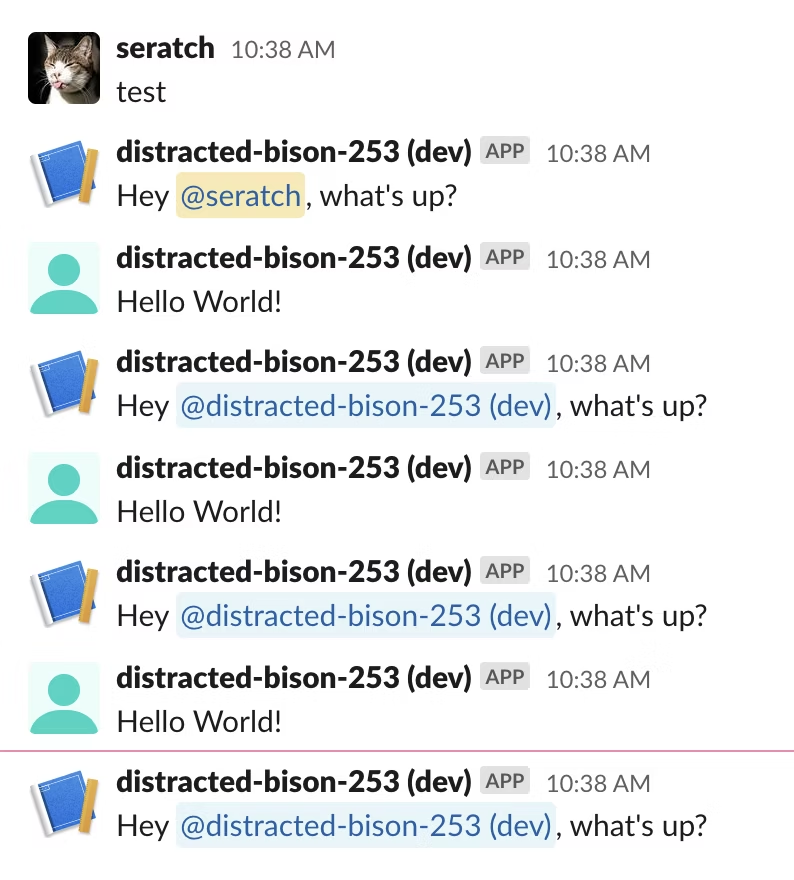
トリガーが作成されたら、早速 slack run を実行してアプリがイベントを受けられるようにしましょう。そして、指定したチャンネルで何かメッセージを投稿してみてください。以下のように返信が投稿されれば成功です。

また、slack run を実行したターミナルには、以下のように Example Workflow の実行ログが出力されているはずです。
$ slack run
? Choose a workspace  seratch  T03E94MJU
   distracted-bison-253 A04FACHPQ5R

Updating dev app install for workspace "Acme Corp"

⚠️  Outgoing domains
   No allowed outgoing domains are configured
   If your function makes network requests, you will need to allow the outgoing domains
   Learn more about upcoming changes to outgoing domains: https://api.slack.com/future/changelog
✨  seratch of Acme Corp
Connected, awaiting events

2022-12-15 15:34:10 [info] [Fn04FCVD67J8] (Trace=Tr04FDSES528) Function execution started for workflow function 'Example Workflow'
2022-12-15 15:34:10 [info] [Wf04FP576X3K] (Trace=Tr04FB9KDXV1) Execution started for workflow 'Example Workflow'
2022-12-15 15:34:11 [info] [Wf04FP576X3K] (Trace=Tr04FB9KDXV1) Executing workflow step 1 of 1
2022-12-15 15:34:12 [info] [Fn0102] (Trace=Tr04FB9KDXV1) Function execution started for builtin function 'Send a message'
2022-12-15 15:34:13 [info] [Fn0102] (Trace=Tr04FB9KDXV1) Function execution completed for function 'Send a message'
2022-12-15 15:34:14 [info] [Wf04FP576X3K] (Trace=Tr04FB9KDXV1) Execution completed for workflow step 'Send a message'
2022-12-15 15:34:14 [info] [Fn04FCVD67J8] (Trace=Tr04FDSES528) Function execution completed for function 'Example Workflow'
2022-12-15 15:34:15 [info] [Wf04FP576X3K] (Trace=Tr04FB9KDXV1) Execution completed for workflow 'Example Workflow'
無限ループに陥らないよう制御する
上のように、標準の SendMessage を使っている分には何も問題ないのですが、以下で実装したような自前のファンクションの中でシンプルに chat.postMessage API を呼び出すものをワークフローに追加すると、
自ワークフローの中のファンクションが投稿したメッセージにまた message_posted イベントトリガーが反応してしまい、無限ループに陥ってしまいます。この挙動の違いは大変不便ではあるのですが、すでに開発チームには認識されている挙動であり、(少なくともこの記事投稿時点では)将来においても変更される予定はありません。

(なお、上のスクリーンショットで、ボットのアイコンが統一されていないのは、こちらに書きました通り、この記事投稿時点で開発版アプリのみで発生する既知のバグです)
これを防ぐためには以下の二つの方法が考えられますが、
- ファンクションの中で投稿するかどうかを判断する
- トリガーの
filter.root.statementにボットの user_id を埋め込む
・・・この記事投稿時点で後者の方法はまだうまく実装できない段階となっております。。対応が可能となりましたら、この記事も更新いたします ![]()
ファンクションの中で投稿するかどうかを判断する
この対応方法は、ワークフローの実行自体はスキップせずに(というか、この記事時点ではできません・・ ![]() )、ファンクションの中で反応するかどうかを決めるという方法です。以下の記事の
)、ファンクションの中で反応するかどうかを決めるという方法です。以下の記事の my_send_message.ts を、
そのままワークフローに追加すると無限ループになりますが、そのコードを以下のように書き換えるとそれを抑止することができます(差分がわかりやすいよう元々あったログ出力部分やコメントは全て削除してあります)。
やっていることはシンプルで skip_user_id として渡された message_posted イベントを発生させた投稿者の user_id と、このワークフロー実行で払い出されているボットトークンに紐づく user_id を比較しています。
import { DefineFunction, Schema, SlackFunction } from "deno-slack-sdk/mod.ts";

export const def = DefineFunction({
  callback_id: "my-send-message",
  title: "My SendMessage",
  source_file: "my_send_message.ts",
  input_parameters: {
    properties: {
      channel_id: { type: Schema.slack.types.channel_id },
      message: { type: Schema.types.string },
      // これを追加
      skip_user_id: { type: Schema.slack.types.user_id },
    },
    required: ["channel_id", "message", "skip_user_id"],
  },
  output_parameters: {
    properties: { ts: { type: Schema.types.string } },
    required: [],
  },
});

import { SlackAPI } from "deno-slack-api/mod.ts";

export default SlackFunction(def, async ({
  inputs,
  token,
}) => {
  const client = SlackAPI(token);
  const authTestResult = await client.auth.test({});
  // スキップ対象の場合はメッセージを送信せず終了
  if (authTestResult.user_id === inputs.skip_user_id) {
    return { outputs: {} };
  }
  const newMessage = await client.chat.postMessage({
    channel: inputs.channel_id,
    text: inputs.message,
  });
  return { outputs: { ts: newMessage.ts } };
});
このファンクションをワークフローに追加するときは、以下のように skip_user_id を設定します。
import { def as MySendMessage } from "./my_send_message.ts";
workflow.addStep(MySendMessage, {
  channel_id: workflow.inputs.channel_id,
  message: "Hello World!",
  // message_posted の投稿者 user_id を渡す
  skip_user_id: workflow.inputs.user_id,
});
多くの場合は、これで事足りるのではないかと思います。
ただ、繰り返しとなりますが、ワークフローの実行自体は行われますので、同じワークフロー内の他のファンクションでも重複実行を防ぐ制御は必要となるでしょう。
上のような skip_user_id のチェックを複数のファンクションで繰り返したくない場合は、それのチェックをするだけのファンクションを作って、その結果を使い回すとよいかもしれません。
例えば check_self_event.ts という新しいファンクションを作って、
import { DefineFunction, Schema, SlackFunction } from "deno-slack-sdk/mod.ts";

export const def = DefineFunction({
  callback_id: "check-self-event",
  title: "Check if this is a self event",
  source_file: "check_self_event.ts",
  input_parameters: {
    properties: { event_user_id: { type: Schema.slack.types.user_id } },
    required: ["event_user_id"],
  },
  output_parameters: {
    properties: { is_self_event: { type: Schema.types.boolean } },
    required: ["is_self_event"],
  },
});

import { SlackAPI } from "deno-slack-api/mod.ts";

export default SlackFunction(def, async ({
  inputs,
  token,
}) => {
  const client = SlackAPI(token);
  const authTestResult = await client.auth.test({});
  if (authTestResult.error) {
    const error = `Failed to verify the given token: ${authTestResult.error}`;
    return { error };
  }
  return {
    outputs: {
      is_self_event: authTestResult.user_id === inputs.event_user_id,
    },
  };
});
それに対応するよう my_send_message.ts も書き換えた上で、
import { DefineFunction, Schema, SlackFunction } from "deno-slack-sdk/mod.ts";

export const def = DefineFunction({
  callback_id: "my-send-message",
  title: "My SendMessage",
  source_file: "my_send_message.ts",
  input_parameters: {
    properties: {
      channel_id: { type: Schema.slack.types.channel_id },
      message: { type: Schema.types.string },
      // これを追加
      is_self_event: { type: Schema.types.boolean },
    },
    required: ["channel_id", "message", "is_self_event"],
  },
  output_parameters: {
    properties: { ts: { type: Schema.types.string } },
    required: [],
  },
});

import { SlackAPI } from "deno-slack-api/mod.ts";

export default SlackFunction(def, async ({
  inputs,
  token,
}) => {
  const client = SlackAPI(token);
  // スキップ対象の場合はメッセージを送信せず終了
  if (inputs.is_self_event) {
    return { outputs: {} };
  }
  const newMessage = await client.chat.postMessage({
    channel: inputs.channel_id,
    text: inputs.message,
  });
  return { outputs: { ts: newMessage.ts } };
});
さらに、ワークフローにこの二つを適切に設定します。
import { def as CheckSelfEvent } from "./check_self_event.ts";
const checkSelfEventStep = workflow.addStep(CheckSelfEvent, {
  event_user_id: workflow.inputs.user_id,
});

import { def as MySendMessage } from "./my_send_message.ts";
workflow.addStep(MySendMessage, {
  channel_id: workflow.inputs.channel_id,
  message: "Hello World!",
  is_self_event: checkSelfEventStep.outputs.is_self_event,
});
値やファンクションのネーミングはともかく、このような処理で対応することができることはご理解いただけたのではないかと思います。
また、この記事投稿時点ではリリース時期未定ではあるのですが、将来的にはプラットフォーム側で条件分岐もできるようになる予定です。それがリリースされた暁には、この手の処理分岐もより簡単にできるようになるかもしれません。
より高度なワークフローを実装するために
より高度なことをしたい場合、もう少し工夫が必要となりますので、簡単にいくつかのポイントを解説しておきます。
チャンネル内のより詳細な情報を取得する
チャンネルベースのイベントトリガーの例をご紹介した以下の記事でも触れましたが、
旧来のイベント APIとは異なり、次世代プラットフォームのイベントトリガーは、必ずしもアプリのボットユーザーがそのチャンネルのメンバーであることを要求しません。
上記のような chat:write.public scope を使って、パブリックチャンネルへの参加なしにメッセージを投稿するということは簡単にできますが、チャンネル内・スレッド内の前後の文脈を踏まえて処理したいという場合は、conversations.history API や conversations.replies API や reactions.get API を利用することになるでしょう。
その場合は、ワークフローの中で、アプリのボットユーザーをそのチャンネルに conversations.join API を使って参加させる必要があるでしょう。
終わりに
いかがだったでしょうか?チャットボット的なアプリを作りたい場合には必須となるトリガーの利用方法をご紹介しました。
現在利用可能なイベントトリガーの一覧については以下のページをご参照ください。
それでは!