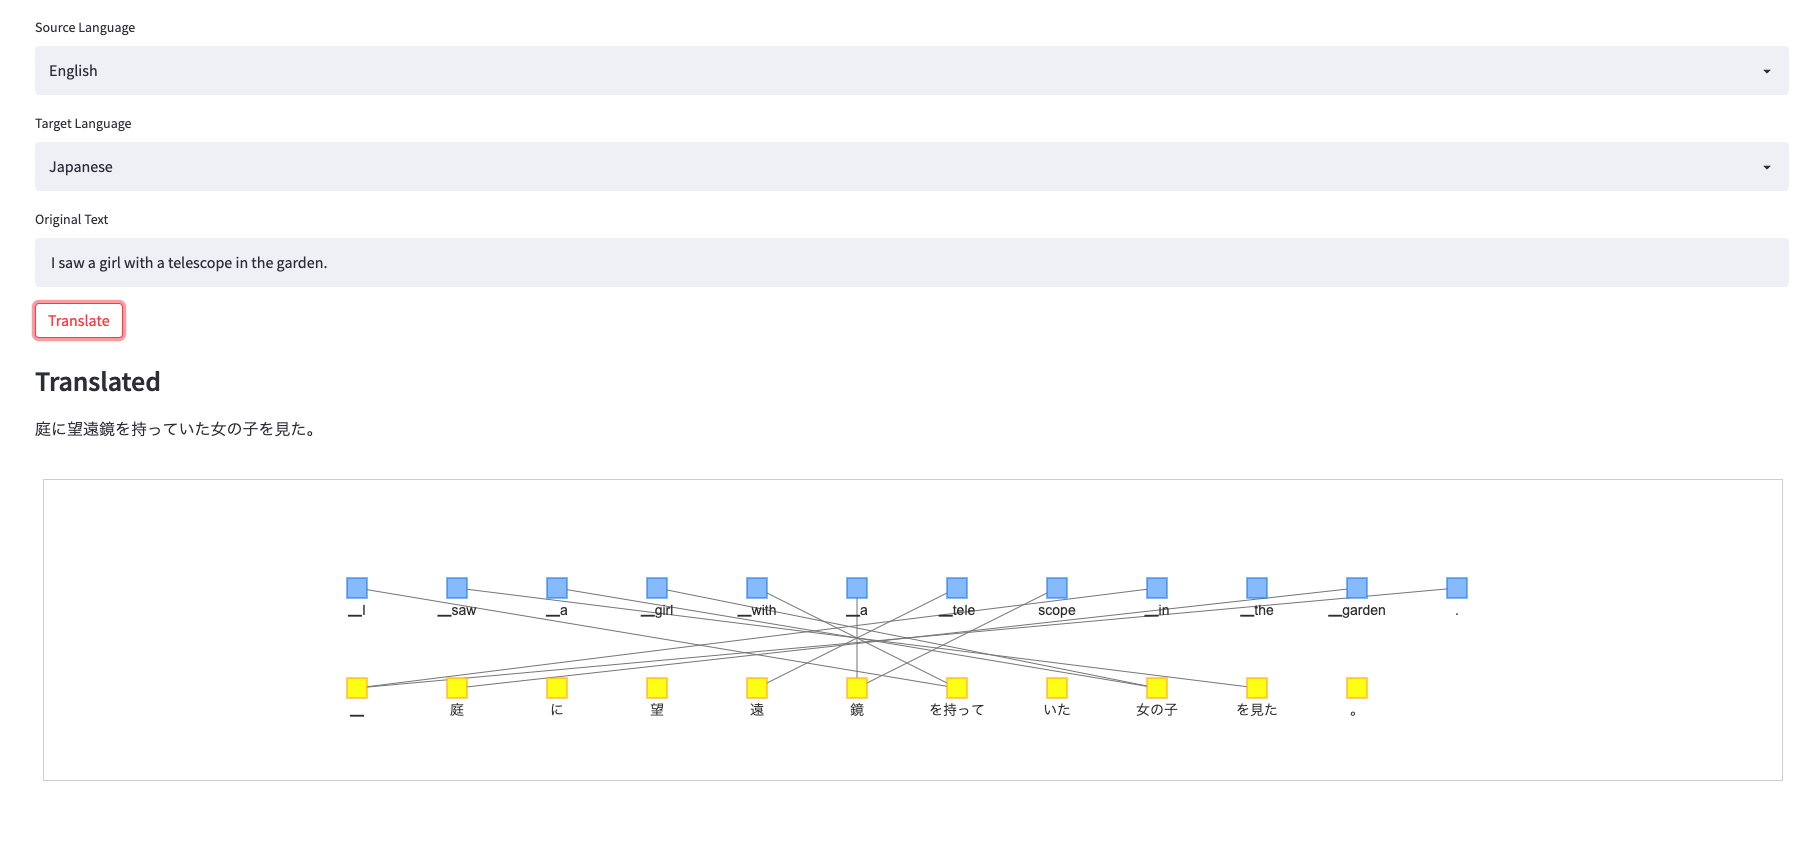
できたもの
入力を英語の**"I saw a girl with a telescope in the garden"**という文にして、いろんな言語で翻訳を試してみます。
日本語から別の言語に翻訳することもできます。
実装
- python 3.6.5
使用したライブラリは以下の通りです。
- transformers (翻訳)
- pyvis (単語の対応のネットワーク図作成)
- streamlit (入出力をwebアプリ化)
翻訳時の語の並び替えとアテンション
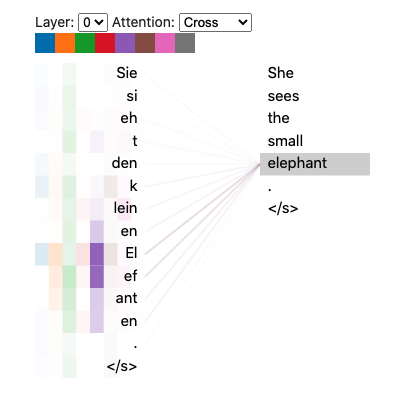
翻訳元と翻訳先の語の対応を調べるために、翻訳モデル(Transformer)のアテンションの重みを使用しています。
このbertvizというモジュールを用いると、Transformerのアテンションの重みを可視化することができます。
bertvizでアテンションを可視化した以下の図を見てみると、翻訳先の語から見ると、その語に対応する翻訳元の語に大きな重みがつきやすいようです。
今回はこの重みの一番大きな部分を翻訳間で対応した語とみなして、可視化するものを作りました。
翻訳モデル
今回はhuggingfaceの多言語翻訳モデルのmbart-large-50-many-to-many-mmtを使用しました。
The model can translate directly between any pair of 50 languages.
とのことで、50ヶ国語を翻訳元、そして翻訳先の言語に指定することができます。
基本的な使い方として、以下のようにtokenizerに翻訳元言語のsrc_langと翻訳先の言語lang_code_to_idを指定することで、翻訳結果を出力することができます。
from transformers import MBartForConditionalGeneration, MBart50TokenizerFast

article_hi = "संयुक्त राष्ट्र के प्रमुख का कहना है कि सीरिया में कोई सैन्य समाधान नहीं है"
article_ar = "الأمين العام للأمم المتحدة يقول إنه لا يوجد حل عسكري في سوريا."

model = MBartForConditionalGeneration.from_pretrained("facebook/mbart-large-50-many-to-many-mmt")
tokenizer = MBart50TokenizerFast.from_pretrained("facebook/mbart-large-50-many-to-many-mmt")

# 英日翻訳
src_text = 'I saw a girl with a telescope in the garden.'

tokenizer.src_lang = "en_JA"
encoded_en = tokenizer(src_text, return_tensors="pt")
generated_tokens = model.generate(**encoded_en, forced_bos_token_id=tokenizer.lang_code_to_id["ja_XX"])
tokenizer.batch_decode(generated_tokens, skip_special_tokens=True)
#=> ['私は庭で望遠鏡を持つ女の子を見た。']
modelとtokenizerをロードする関数を定義した後、Translationモデルの中で翻訳元と翻訳前のトークンごとのアテンションの対応から、語順の変化を推測しています。
def load_model():
    return MBartForConditionalGeneration.from_pretrained("facebook/mbart-large-50-many-to-many-mmt")

def load_tokenizer():
    return MBart50TokenizerFast.from_pretrained("facebook/mbart-large-50-many-to-many-mmt", use_fast=False)

class Translation():
    def __init__(self, src_lang, dest_lang):
        self.model = load_model()
        self.tokenizer = load_tokenizer()
        self.tokenizer.src_lang = src_lang
        self.dest_lang = dest_lang

    def process(self, src_text):
        encoded = self.tokenizer(src_text, return_tensors="pt")
        generated_tokens = self.model.generate(**encoded, forced_bos_token_id=self.tokenizer.lang_code_to_id[self.dest_lang])
        generated_texts = self.tokenizer.batch_decode(generated_tokens, skip_special_tokens=True)
        self.dest_text = generated_texts[0]

        encoder_input_ids = self.tokenizer(src_text, return_tensors="pt").input_ids
        decoder_input_ids = self.tokenizer(self.dest_text, return_tensors="pt").input_ids

        self.outputs = self.model(input_ids=encoder_input_ids, decoder_input_ids=decoder_input_ids, output_attentions=True)

        self.encoder_text = self.tokenizer.convert_ids_to_tokens(encoder_input_ids[0])
        self.decoder_text = self.tokenizer.convert_ids_to_tokens(decoder_input_ids[0])

        # 最終層のアテンションの平均を取る
        mean_cross_attentions = tuple([torch.mean(self.outputs.cross_attentions[0], 1, True)])

        # アテンションの中で一番大きな値を持っているトークンの組み合わせのみを抽出して、それを翻訳元と翻訳先の並び替えとする
        self.positions = [int(i) for i in torch.argmax(mean_cross_attentions[0], dim=2).flatten()]
このモデルを使って、翻訳結果や翻訳時のアテンションから推測した語順の対応を取得します。
translation = Translation("en_JA")
translation.process("I saw a girl with a telescope.")

print(translation.encoder_text)
#=> ['<unk>', '▁I', '▁saw', '▁a', '▁girl', '▁with', '▁a', '▁tele', 'scope', '.', '</s>']

print(translation.decoder_text)
#=> ['<unk>', '▁私は', '、', '望', '遠', '鏡', 'を持つ', '女の子', 'を見た', '。', '</s>']

print(translation.positions)
#=> [ 0,  1,  9,  8,  5,  6,  8,  4,  2,  3, 11, 11]
可視化
トークンをノード、翻訳元と翻訳先のトークンの対応をエッジとしてネットワーク図として描画します。
from pyvis.network import Network

class TranslationNetwork():
    def __init__(self, network):
        self.network = network
        self.n_nodes = 0
        self.n_src_nodes = 0
        self.n_dest_nodes = 0

    def add_nodes(self, words, group):
        if group == "src":
            self.n_src_nodes = len(words)
            group_i = 0
            hidden_nodes_i = [0, self.n_src_nodes-1]
        elif group == "dest":
            self.n_dest_nodes = len(words)
            group_i = 1
            hidden_nodes_i = [0, self.n_dest_nodes-1]

        # <unk>タグや</s>タグを除いています
        self.hidden_edges_i = [0, self.n_src_nodes-1, self.n_src_nodes, self.n_src_nodes+self.n_dest_nodes-1]

        size = 10
        x_margin, y_margin = 100, 100
        for i, word in enumerate(words):
            hidden = i in hidden_nodes_i
            self.network.add_node(self.n_nodes, shape="square", label=word, group=f"{group}", x=i*x_margin, y=group_i*y_margin, size=size, physics=False, hidden=hidden)
            self.n_nodes += 1

    def add_edges(self, positions):
        for i, position in enumerate(positions):
            j = self.n_src_nodes + position
            hidden = i in self.hidden_edges_i or j in self.hidden_edges_i
            self.network.add_edge(i, j, color="gray", hidden=hidden)
Translationモデルで得た結果を使いながら、次のようにネットワークを構成していくと、
tn = TranslationNetwork(Network(width="100%", height="300px"))
tn.add_nodes(translation.encoder_text, group="src") # translation.encoder_textは翻訳元の単語のリスト
tn.add_nodes(translation.decoder_text, group="dest")  # translation.encoder_textは翻訳結果の単語のリスト
tn.add_edges(translation.positions) # 語順の対応

tn.network.show("translation.html") # ファイルに出力
このような表示のHTMLが出力されます。
入力フォーム作成
streamlitを利用してテキストの入力から結果の出力までをインタフェース化します。
最終的に以下のコマンドでwebブラウザが立ち上がり、インタフェースが起動します。
streamlit run https://raw.githubusercontent.com/sentencebird/translation-word-order/main/app.py
#できたものにあるようなページが表示されます。
#おわりに
今回は語順の対応の可視化を目的としていましたが、2文間の語順の並び替えの距離を計ることができるので、ある言語間の文法的な距離を定量的に計るというのもできるのかなと思ったりしています


