はじめに
玉手箱の空欄推測問題を解いてみたのGUI編です.問題の値を入力し,結果を表示するためのインターフェースを作っていきます.
概観
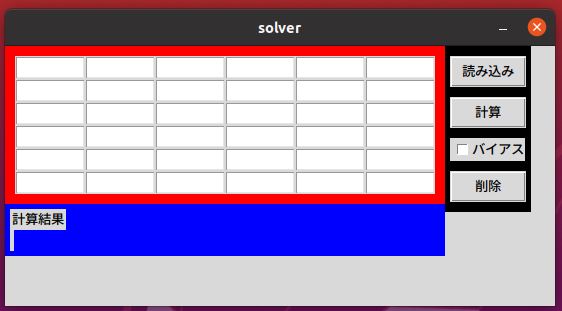
完成予想図としては下のような感じになります.

実装にあたってPythonだとTkinterというライブラリがよさげだったので,それを使うことにしました.
前準備
まず,はじめにウインドウを作ります.これはほぼおまじないなので,定型文通りに作っています.
import tkinter as tk

root = tk.Tk()
root.title('solver') # ウインドウのタイトル
root.geometry('550x260') # ウィンドウの大きさ
root.resizable(width=False, height=False) # ウインドウの大きさを固定
ここで設定するrootがGUIの各パーツの階層構造において一番根元の部分になります.ここからどんどん広げていきます.
位置構成
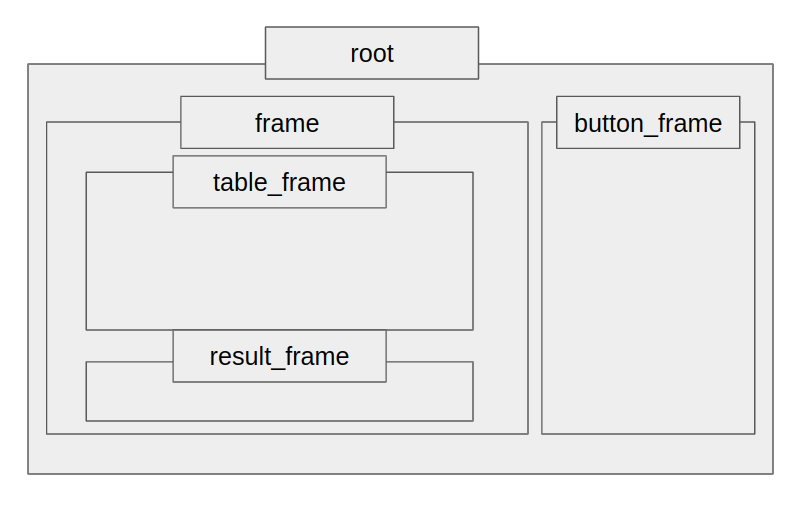
ここからボタンやテキストボックスなどのパーツを配置していくわけですが,ただ単純にパーツを追加していくとパーツの管理が面倒くさかったり,理想通りの配置ができなかったりします.そこで,tkinterのFrameを使っていきます.このFrameはパーツを階層構造をもったまとまりごとに管理できるようにするものです.
今回の実装でのFrameの階層構造は下の図のような感じです.

完成したものをFrameごとに色分けするとこんな感じです.

では,Frameを定義していきます.
frame = tk.Frame(self.root)
table_frame = tk.Frame(frame, padx=10, pady=10)
button_frame = tk.Frame(self.root, padx=5, pady=5)
result_frame = tk.Frame(frame, padx=5, pady=5)

# 各フレーム内のパーツの定義

frame.pack(anchor=tk.NW, side=tk.LEFT)
table_frame.pack(anchor=tk.NW, side=tk.TOP)
result_frame.pack(anchor=tk.W, side=tk.TOP, fill=tk.X)
button_frame.pack(anchor=tk.NW, side=tk.LEFT)
基本的にtkinterではFrameや各パーツを定義する際に,親となるFrameやパーツを引数として与えて,そこに配置することをプログラム側に伝えます.anchorでそれぞれのFrameをどちらに寄せるか,sideで寄せたものをどちらの方向に並べていくかを指定します.次は,ここで定義したフレームにパーツをいろいろ入れていきます.
ちなみにtkinterではframeや各パーツを定義した後,pack()やgrid()を使って配置しないと反映されません.配置はpack()を呼び出した順番にされるので,それも考慮する必要があります.
入力部分
値を入力する部分のテキストボックスです.これはtk.Entryで作れます.格子状に配置するために,作ったテキストボックスをgrid()で配置しています.
# テキストボックス作成
textboxes = [
	[tk.Entry(table_frame, width=8) for _ in range(6)]
	for _ in range(6)
]
# 配置
for i in range(6):
	for j in range(6):
		textboxes[i][j].grid(row=i, column=j)
これらのテキストボックスにはset()やget()メソッドを使って値の入力および取得ができます.
ボタン
ボタン部分の定義です.textにボタンに表示させる文字列,commandに押されたときに実行される関数を指定できます.複数の関数を割り当てたい場合はlambda形式のものを使います.
use_bias = tk.BooleanVar()
load_table_button = tk.Button(button_frame, width=6, text='読み込み', command=table_reader.read_table)
calculate_button = tk.Button(button_frame, width=6, text='計算', command=lambda:[self.read_table(), solver.solve()])
bias_checkbox = tk.Checkbutton(button_frame, width=6, variable=use_bias, text="バイアス")
delete_button = tk.Button(button_frame, width=6, text='削除', command=delete_textbox_value)

load_table_button.pack(anchor=tk.W, pady=5)
calculate_button.pack(anchor=tk.W, pady=5)
bias_checkbox.pack(anchor=tk.W, pady=5)
delete_button.pack(anchor=tk.W, pady=5)
ボタン処理
ボタン処理の実行のうち読み込みと計算に割り当てたものは別のパートで解説するので,今回は削除ボタンに割り当てられたものを解説します.押されるとテキストボックスに入力されていた値が全て削除されるという処理です.これにはtk.Entryに備わっているdelete()メソッドを使っています.とてもシンプルです.
def delete_textbox_value():
		for i in range(6):
			for j in range(6):
				textboxes[i][j].delete(0, tk.END)
結果出力部分
最後に結果の出力部分です.テキスト表示部分にはtk.Label()を使います.引数のtextに文字列を与えることで固定の文字列をtextvariableにtk.StringVar()を与えることで,あとで編集可能な文字列を表示することができます.結果の表示は長くなる可能性があるので,justifyで左寄せにしています.
title_label = tk.Label(result_frame, text="計算結果")
self.result_text = tk.StringVar()
result_output_label = tk.Label(result_frame, textvariable=result_text, justify='left')

title_label.pack(anchor=tk.NW)
result_output_label.pack(anchor=tk.NW)
プログラム全体
一部解説していない機能もありますが,GUI部分の実装全体は以下のようになります.全体をクラスとしてまとめてしまいました.
class Frontend:
	TABLE_SIZE = (6, 6)
	def __init__(self):
		self.create_root()
		self.table_reader = TableReader(self)
		self.solver = Solver(self)
		self.create_components()
		self.table = []

	def create_root(self):
		self.root = tk.Tk()
		self.root.title('solver')
		self.root.geometry('550x260')
		self.root.resizable(width=False, height=False)

	def create_components(self):
		frame = tk.Frame(self.root)

		# table inputs
		table_frame = tk.Frame(frame, padx=10, pady=10)
		self.textboxes = [
			[tk.Entry(table_frame, width=8) for _ in range(self.TABLE_SIZE[1])]
			for _ in range(self.TABLE_SIZE[0])
		]
		for i in range(self.TABLE_SIZE[0]):
			for j in range(self.TABLE_SIZE[1]):
				self.textboxes[i][j].grid(row=i, column=j)

		# button inputs
		self.use_bias = tk.BooleanVar()
		button_frame = tk.Frame(self.root, padx=5, pady=5)
		load_table_button = tk.Button(button_frame, width=6, text='読み込み', command=self.table_reader.read_table)
		calculate_button = tk.Button(button_frame, width=6, text='計算', command=lambda:[self.read_table(), self.solver.solve()])
		bias_checkbox = tk.Checkbutton(button_frame, width=6, variable=self.use_bias, text="バイアス")
		delete_button = tk.Button(button_frame, width=6, text='削除', command=self.delete_textbox_value)

		load_table_button.pack(anchor=tk.W, pady=5)
		calculate_button.pack(anchor=tk.W, pady=5)
		bias_checkbox.pack(anchor=tk.W, pady=5)
		delete_button.pack(anchor=tk.W, pady=5)

		# result outputs
		result_frame = tk.Frame(frame, padx=5, pady=5)
		title_label = tk.Label(result_frame, text="計算結果")
		self.result_text = tk.StringVar()
		result_output_label = tk.Label(result_frame, textvariable=self.result_text, justify='left')

		title_label.pack(anchor=tk.NW)
		result_output_label.pack(anchor=tk.NW)

		frame.pack(anchor=tk.NW, side=tk.LEFT)
		table_frame.pack(anchor=tk.NW, side=tk.TOP)
		result_frame.pack(anchor=tk.W, side=tk.TOP, fill=tk.X)
		button_frame.pack(anchor=tk.NW, side=tk.LEFT)

	def run(self):
		self.root.mainloop()

	def delete_textbox_value(self):
		for i in range(self.TABLE_SIZE[0]):
			for j in range(self.TABLE_SIZE[1]):
				self.textboxes[i][j].delete(0, tk.END)

	def update_table(self, table):
		self.delete_textbox_value()

		for i in range(len(table)):
			if i >= self.TABLE_SIZE[0]:
				break

			for j in range(len(table[i])):
				if j >= self.TABLE_SIZE[1]:
					break

				if table[i][j] is np.nan:
					self.textboxes[i][j].insert(tk.END, '?')
				else:
					self.textboxes[i][j].insert(tk.END, table[i][j])

	def read_table(self):
		self.table = []
		for i in range(self.TABLE_SIZE[0]):
			row = []
			for j in range(self.TABLE_SIZE[1]):
				value = self.textboxes[i][j].get()
				if is_float(value):
					row.append(float(value))
				elif value == '?':
					row.append(np.nan)
				else:
					continue

			if len(row) > 0:
				self.table.append(row)

	def set_result_str(self, result_str):
		self.result_text.set(result_str)
おわりに
見た目がかなり簡素.
玉手箱の空欄推測問題をPythonで解いてみた
玉手箱の空欄推測問題をPythonで解いてみた 〜GUI編(Tkinter)〜
玉手箱の空欄推測問題をPythonで解いてみた 〜文字認識編(pyocr)〜
玉手箱の空欄推測問題をPythonで解いてみた 〜ソルバー編〜