今回の内容
前回(その1)で、開発環境の構築、およびアプリケーションの雛形の作成、XEMハーベスト確認のためのコンポーネント追加まで完了しました。今回は、追加したコンポーネントの実装を行います。
- 以前作成したXEM(NEM)ハーベストの停止をServerlessに自動検知&通知するの検知機能をコンポーネントとして乗せる。
- cookieにハーベストのステータス確認に必要な情報を保持する。(Nanoウォレットの認証を行って確認するよりも楽になる、はず。)
とりあえず動くものを作るの優先で進めており、より正しい or スマートな実装は後回しにしています。特に(※残課題)マークのある部分は素人目線でも見てもまずいところだと思いますので、真似しないほうが良いと考えます。
harvest-check.componentから利用するservice,classの作成
classの作成
アプリケーション内で利用するデータの型を定義しておきます。
export class User {
    id: number;
    name: string;
    remoteAddress: string;
    remoteNode: string;
}
ハーベストのステータスチェックに必須なのは、remoteAddressとremoteNodeだけですが、念の為ユーザ管理上必要になりそうなものも入れておきます。
export class AccountStatus {
 status: string;
 remoteStatus: string;
}
状態確認した結果を格納しておくためのclassも準備しておきます。
harvest用サービスの作成
Angular全体の設計思想をまだきちんと理解できていませんが、コンポーネント間で使い回すデータや処理ロジックを載せたりするのはServiceのように見受けられるため、実際にハーベストのステータスを取得する処理を行うサービスを作成してみます。(DI?)
#今回は複数のコンポーネントを後回しにしているため、コンポーネント自体に実装しても、さほど変わらないかも?
以下のようにCLIを利用してサービスを追加します。
> ng generate service harvest
  create src/app/harvest.service.spec.ts (380 bytes)
  create src/app/harvest.service.ts (113 bytes)
app.module.tsにも設定が追加されているはずです。
providers: [HarvestService, CookieService ],
続けて、以下のようにharvest.service.tsを実装してみました。
import { Injectable } from '@angular/core';
import { HttpClient, HttpHeaders } from '@angular/common/http';
import { User }         from './user';
import { AccountStatus }         from './accountStatus';
import { Observable } from 'rxjs/Observable';
import { of } from 'rxjs/observable/of';
import { catchError, map, tap } from 'rxjs/operators';

@Injectable()
export class HarvestService { constructor(private http: HttpClient,) {}


    getAccountStatus (remoteNode:string, remoteAddress:string) : Observable<AccountStatus[]> {
    let requestUrl= 'http://' + remoteNode + ':7890/account/status?address=' + remoteAddress;
    return this.http.get<AccountStatus[]>(requestUrl)
    .pipe(
      catchError(this.handleError('getAccountStatus', []))
    );
  }

	private handleError<T> (operation = 'operation', result?: T) {
		return (error: any): Observable<T> => {
			console.error(error);
			//this.log(`${operation} failed: ${error.message}`);
			return of(result as T);
		};
	}

}
やりたいことは委任ハーベストを依頼しているremoteNodeに対して、ハーベスト用のアドレスをパラメータに入れてHTTPリクエストを送信し、結果を受け取ることです。
Observableをの仕様がイマイチ理解できておらず、Heroチュートリアルのマネをした形になっていますが、返ってくるAccountStatusは配列ではなく単品なので、(レスポンスを受け取ったあとで利用する際に)おかしなこととになっております。
恐らく、より正しい実装がありそうですが、後ほど記載する誤魔化し実装で問題を回避することで、一旦このまま進めます。(※残課題)
harvest-checkコンポーネントの実装
さて、いよいよ本体の実装を行います。
ユーザからのデータ入力を受け付ける
XEMの委任ハーベスト用アドレスと、委任先のリモートノードの情報を入力してもらうためのフォームを作成します。
  <div>
    <label>Remote XEM Addres:
      <input [(ngModel)]="user.remoteAddress" placeholder="NXXXXXXXXXXXXXXXXXXXX" />
    </label>
  </div>
  <div>
    <label>Remote Node(Hostname or IP address):
      <input [(ngModel)]="user.remoteNode" placeholder="xxx.xxx.xxx.xxx" />
    </label>
  </div>
  <button (click)="getAccountStatus()">Update</button>
本来ここでは、双方向バインディングの宣言**"[(ngModel)]"**は不要かもしれないと思いつつ、チュートリアルでせっかく覚えたので無理やり使い、入力されたものをステータスの確認結果と一緒に再表示します。
ついでに情報を入力した後、更新(再度、ステータスを確認するためのメソッドを呼ぶためのボタンを追加しておきます。
初期化処理
インポート部分は後ほど記載するとして、初期化処理の部分を以下のようにしました。
export class HarvestCheckComponent implements OnInit {
  @Input() accountStatus: AccountStatus;
  constructor(
    private harvestService: HarvestService,
    private cookieService: CookieService
  ) { }

  user: User = {
    id: null,
    name: '',
    remoteAddress: '',
    remoteNode: ''
  };

  ngOnInit(): void {
    //get cookies data
    this.user.remoteAddress = this.cookieService.get('user.remoteAddress');
    this.user.remoteNode = this.cookieService.get('user.remoteNode');

    //call function, same as update button
    this.getAccountStatus();
  }
....
userも@Inputで宣言しようとしたのですが、クラス内のメンバとして宣言しないとデータが上手く保持できず、、、@Inputの正しい理解が必要そうです。(※残課題)
constructor内では、既に作成済みのHarvestServiceと、CookieServiceを初期化しています。後者は、一度入力して貰ったXEMのremoteAddressとremoteNodeは変更しない限り有効なため、クッキーに無期限で保持して追うためのものです。使い方は、別記事(Angular 5でcookieを利用する)にメモしておきましたのでご参考まで。
ngOnInitでは、クッキーに保持されている値を読み込み、Updateボタンが押されたときと同様にステータスチェックを行うファンクションを呼び出します。SPAを前にも利用していれば、ページを開いただけでハーベストの確認が行える用にするためです。
HarvestServiceの呼び出し
Updateボタンを押したり、ページを開いた際に呼ばれるファンクションです。
  getAccountStatus(): void {
    this.harvestService.getAccountStatus(this.user.remoteNode, this.user.remoteAddress)
      .subscribe(data => {
        //response data image {"cosignatories":[],"cosignatoryOf":[],"status":"LOCKED","remoteStatus":"ACTIVE"}

        //set cookies
        this.cookieService.set('user.remoteAddress', this.user.remoteAddress);
        this.cookieService.set('user.remoteNode', this.user.remoteNode);

        this.accountStatus = JSON.parse(JSON.stringify(data));

        console.log('this.accountStatus: ' + JSON.stringify(this.accountStatus));

      });
  }
this.harvestService.getAccountStatusで呼び出した結果をsubscribe受け取っているのですが、返ってくるresponseの方は宣言(AccountStatus[])と異なる型(AccountStatus)です。そもそも宣言の仕方がまずいのですが、一旦、以下のように無理やり変換しています。消えたらまずいstatusとremoteStatusは幸いstring型なので、とりあえず。。。追って真面目にお勉強を。(※残課題)
this.accountStatus = JSON.parse(JSON.stringify(data));
また、呼び出される度にクッキーの値を保存しています。
this.cookieService.set('user.remoteAddress', this.user.remoteAddress);
this.cookieService.set('user.remoteNode', this.user.remoteNode);
ステータス確認結果の表示
再びHTMLへ追記します。
  <div *ngIf="accountStatus.status;else UnknownContent">
    <div *ngIf="accountStatus.status == 'UNLOCKED';then UnlockedContent;else LockedContent">
    </div>
  </div>
</div>

<ng-template #UnlockedContent>
  <h3>Status is {{accountStatus.status}}</h3>
  <h3>Remote XEM Address: {{user.remoteAddress}}</h3>
  <h3>Remote Node: {{user.remoteNode}}</h3>
</ng-template>
<ng-template #LockedContent>
  <h3>Status is {{accountStatus.status}}</h3>
  <h3>Remote XEM Address: {{user.remoteAddress}}</h3>
  <h3>Remote Node: {{user.remoteNode}}</h3>
</ng-template>
<ng-template #UnknownContent>
    <h3>---Status is unknown</h3>
    <h3>Remote XEM Address: {{user.remoteAddress}}</h3>
    <h3>Remote Node: {{user.remoteNode}}</h3>
</ng-template>
ステータスのチェック結果(UNLOCKED/LOCKED/その他)で表示内容を切り替えたいため、*ngIfを利用してみました。
getAccountStatus()が何らかの理由(アドレスが間違っていたり、リモートのノードに到達できなかったり、など)で失敗した場合には、accountStatus.statusはundefinedとなるため、#UnknownContentを表示します。成功した場合には、UNLOCKED/LOCKEDになるため、3種類のng-templateを準備して表示することにしました。
画像の表示
ステータスのチェック結果に応じて、画像を切り替えて表示するようにしたいと思います。
- ~\app01\src\assets\imgに画像ファイルを追加。
- HTMLのng-templateを修正
<ng-template #UnlockedContent>
  <h3>Status is {{accountStatus.status}}</h3>
  <img #OK [ngStyle]="UNLOCK_Position$ | async"
  class="OK" src="../../assets/img/animal_quiz_neko_maru.png"  width="200">
  <h3>Remote XEM Address: {{user.remoteAddress}}</h3>
  <h3>Remote Node: {{user.remoteNode}}</h3>
</ng-template>
<ng-template #LockedContent>
  <h3>Status is {{accountStatus.status}}</h3>
  <img #NG [ngStyle]="UNLOCK_Position$ | async"
  class="NG" src="../../assets/img/animal_quiz_neko_batsu.png"  width="200">
  <h3>Remote XEM Address: {{user.remoteAddress}}</h3>
  <h3>Remote Node: {{user.remoteNode}}</h3>
</ng-template>
<ng-template #UnknownContent>
    <h3>Status is Unknown</h3>
    <img #Question [ngStyle]="UNLOCK_Position$ | async"
    class="Question" src="../../assets/img/mark_question.png"  width="200">
    <h3>Remote XEM Address: {{user.remoteAddress}}</h3>
    <h3>Remote Node: {{user.remoteNode}}</h3>
</ng-template>
あまりスマートではない気がしますが、とりあえずimgタグを入れてみます。
現在の状態
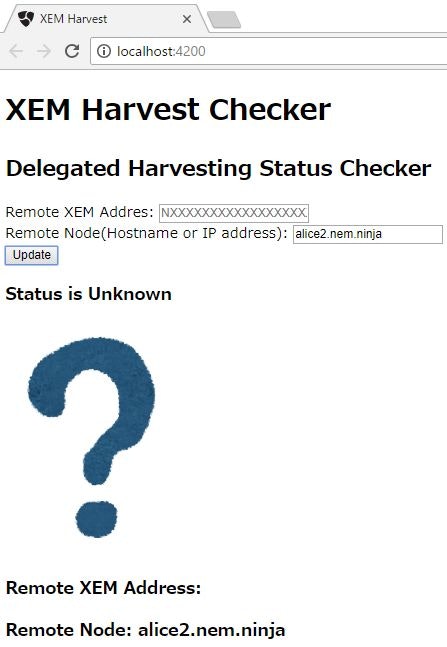
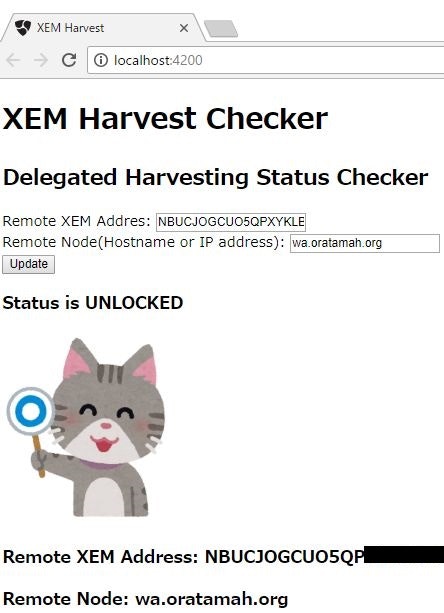
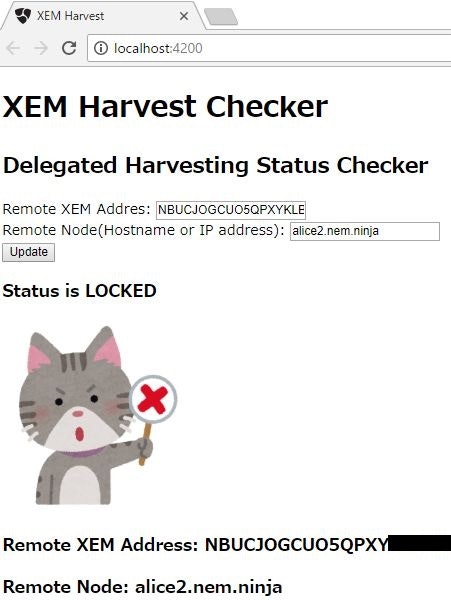
以下のように表示されるようになりました。
■ 初回アクセス(クッキーが空) or 入力値の不足などでステータスチェックが失敗 の場合
■ 正常にハーベストが行われている場合
■ ハーベストが停止中 or 委任先以外のremoteNodeを指定している場合
画像では分かりませんが、Remote XEM AddressとRemote Nodeのフォームの値を変更すると、リアクティブに下部のそれぞれの表示も変わります(機能的なメリットは無し、単純に双方向バインディングの動作を確認するのみ)。
今回はここまでです。やっている内容はチュートリアルに毛が生えた程度でたいしたことはできていませんが、写経から一歩出て(残課題は後回しですが)少しずつ分かってきたような気がします。
ところで、数ヶ月前ほどはハーベストが無効にならなくなっているような気がします。たまたま選んだリモートノードが安定しているだけでしょうか。
フロントエンド初心者がAngular5でSPA(XEMハーベスト確認)を作成(その1)
フロントエンド初心者がAngular5でSPA(XEMハーベスト確認)を作成(その2)
フロントエンド初心者がAngular5でSPA(XEMハーベスト確認)を作成(その3)