概要
OpenWeatherMap APIを用いてユーザーが登録した住所から、週間天気予報を表示する機能を実装した時のことを備忘録として記録します。
環境
・ruby '2.5.7'
・rails '5.2.3'
前提
・OpenWeatherMapのAPIキーを取得済であること
・投稿モデル(ここではDatespotモデル)に都道府県名が登録されるカラムがあること
※筆者は、jp_prefectureで都道府県名の登録ができるようにしています。
【参考】
・OpenWeatherMapのAPIキーを取得する手順
【Rails】OpenWeatherMapを用いて、登録住所の天気予報を、日本語で表示する方法
過程
0.完成形のコード
まずは、完成形のコードを示します。詳細を順に解説していきます。
<div class="weather">
  <h3 class="weather__title">天気予報</h3>
  <div id="weather"></div>
</div>
<script type="text/javascript">
$(function () {

  // 緯度経度を取得
  const latlon_url = 'https://api.openweathermap.org/geo/1.0/direct?q=<%= @datespot.prefecture.name %>&appid=<%= ENV['OPEN_WEATHER_MAP_API']%>';

  $.ajax({
    url: latlon_url,
    dataType: "json",
    type: 'GET',
  })
  .done(function (latlon) {
    const lat = latlon[0].lat
    const lon = latlon[0].lon

    // 天気予報を取得
    const weather_url = 'https://api.openweathermap.org/data/2.5/onecall?lat=' + lat + '&lon=' + lon + '&exclude=current,minutely,hourly,alerts&units=metric&appid=<%= ENV['OPEN_WEATHER_MAP_API']%>';

    $.ajax({
        url: weather_url,
        dataType: 'json',
        type: 'GET',
      })
      .done(function (weather) {
        let insertHTML = '';

        for (let i = 0; i <= 6; i = i + 1) {
          insertHTML += buildHTML(weather, i);
        }
        $('#weather').html(insertHTML);
      })
      .fail(function (weather) {
        alert('天気予報の取得に失敗しました');
      });
  })
});

// 日本語で表示
function buildHTML(weather, i) {
  //日付、時間を取得(Dateがミリ秒なので1000倍が必要)
  const date = new Date(weather.daily[i].dt * 1000);
  //UTCとの時差を無くす(日本は-9時間のため9を足す)
  date.setHours(date.getHours() + 9);
  //月を取得。getMonth()は0~11を返すため1を足すことによって1月~12月を返すように設定
  const month = date.getMonth() + 1;
  //曜日の日本語化のため、配列を用意する
  const Week = new Array('(日)', '(月)', '(火)', '(水)', '(木)', '(金)', '(土)');
  //月+日+曜日をdayに代入。getDay()は0~6を返すためWeek配列内のインデックスに対応した文字列を取得
  const day = month + '/' + date.getDate() + Week[date.getDay()];
  //天気のアイコンを取得
  const icon = weather.daily[i].weather[0].icon;

  const html =
    '<div class="weather__content--report">' +
      '<img src="https://openweathermap.org/img/w/' + icon + '.png">' +
      '<span class="weather__content--report-date">' + day + "</span>" +
      '<div class="weather__content--report-temp-max">' + '最高:' + Math.round(weather.daily[i].temp.max) + "℃</div>" +
      '<span class="weather__content--report-temp-min">' + '最低:' + Math.floor(weather.daily[i].temp.min) + "℃</span>" +
    '</div>';
  return html
}
</script>
1.天気予報を表示するビューを作成
天気予報を表示するビューを作成します。
<div class="weather">
  <h3 class="weather__title">天気予報</h3>
  <div id="weather"></div>
</div>
(省略)
ここでは、<div id="weather"></div> に天気予報を表示させます。
その他のdivタグ、hタグ、class名は適宜設定してください。
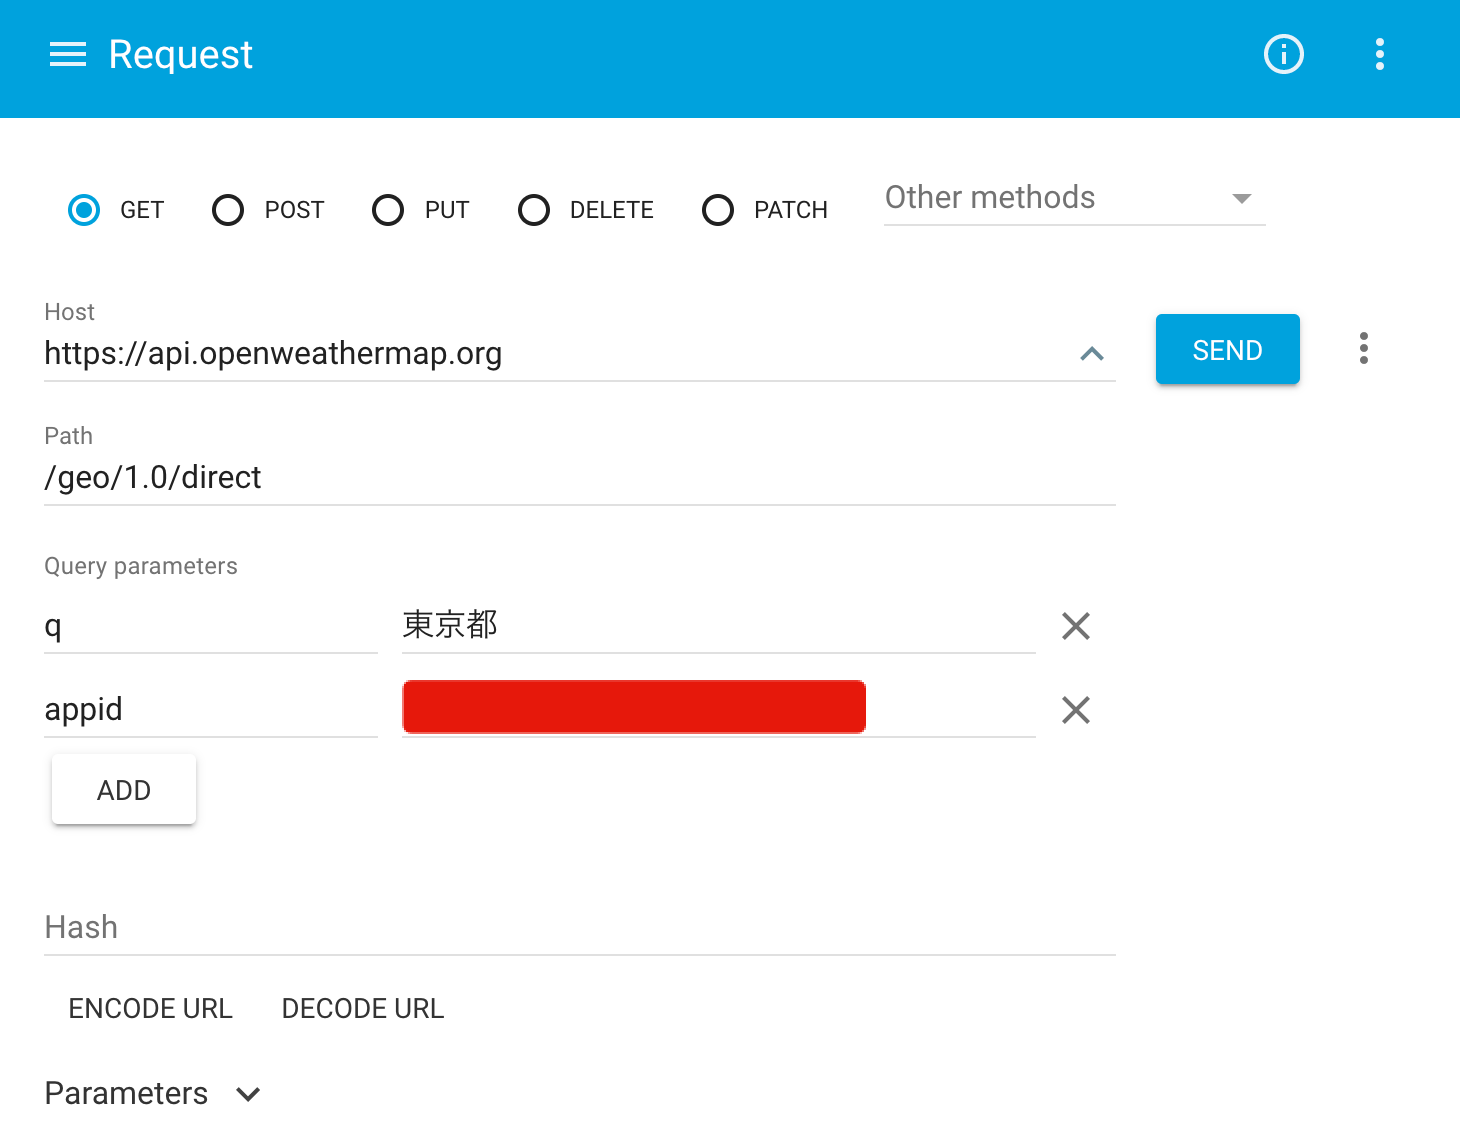
2.緯度経度の取得
まずは、登録された都道府県名から緯度経度を取得します。
この時、Geocoding APIのDirect geocodingで都道府県名を緯度経度に変換します。
ちなみに、このGeocoding APIは無料で使用することができます。
(省略)
<script type="text/javascript">
$(function () {

  // 緯度経度を取得
  const latlon_url = 'https://api.openweathermap.org/geo/1.0/direct?q=<%= @datespot.prefecture.name %>&appid=<%= ENV['OPEN_WEATHER_MAP_API']%>';

  $.ajax({
    url: latlon_url,
    dataType: "json",
    type: 'GET',
  })
  .done(function (latlon) {
    const lat = latlon[0].lat
    const lon = latlon[0].lon
(省略)
  })
});
</script>
まずは、以下のコードでAPI callをします。
// 緯度経度を取得
const latlon_url = 'https://api.openweathermap.org/geo/1.0/direct?q=<%= @datespot.prefecture.name %>&appid=<%= ENV['OPEN_WEATHER_MAP_API']%>';
パラメータqには、都市名を入れる必要がありますので、<%= @datespot.prefecture.name %>で都道府県名を入れています。
パラメータappidには、APIキーを入れる必要がありますので、取得したAPIキーを入れてください。
ちなみに、取得したAPIキーは、不正利用を防ぐためにも環境変数に入れておきましょう。
そしたら、次はAjaxでAPIから情報を取得します。
  $.ajax({
    url: latlon_url,
    dataType: "json",
    type: 'GET',
  })
  .done(function (latlon) {
    const lat = latlon[0].lat
    const lon = latlon[0].lon
  })
今回はjson形式で情報を取得するため、このように記述します。
function(latlon)としているため、取得した情報は引数latlonに入っています。
そこから、緯度と経度を取得したいので、緯度latlon[0].latと経度latlon[0].lonで値を取得しています。
ちなみに、実際にどのような情報が取得できるのかを確認するためには、Chrome拡張のAdvanced REST Clientが便利です。
これを用いて、欲しい情報が取得できているか確認してみましょう。
3.週間天気予報の取得
取得した緯度経度から、週間天気予報を取得します。
One Call APIに入っているDaily forecast for 7 daysから週間天気予報を取得します。
ちなみに、このOne Call APIも無料で使用することができます。
$.ajax({
  url: latlon_url,
  dataType: "json",
  type: 'GET',
})
.done(function (latlon) {
  const lat = latlon[0].lat
  const lon = latlon[0].lon

  // 天気予報を取得
  const weather_url = 'https://api.openweathermap.org/data/2.5/onecall?lat=' + lat + '&lon=' + lon + '&exclude=current,minutely,hourly,alerts&units=metric&appid=<%= ENV['OPEN_WEATHER_MAP_API']%>';

  $.ajax({
      url: weather_url,
      dataType: 'json',
      type: 'GET',
    })
    .done(function (weather) {
      let insertHTML = '';

      for (let i = 0; i <= 6; i = i + 1) {
        insertHTML += buildHTML(weather, i);
      }
      $('#weather').html(insertHTML);
    })
    .fail(function (weather) {
      alert('天気予報の取得に失敗しました');
    });
})
まずは、以下のコードでAPI callをします。
// 天気予報を取得
const weather_url = 'https://api.openweathermap.org/data/2.5/onecall?lat=' + lat + '&lon=' + lon + '&exclude=current,minutely,hourly,alerts&units=metric&appid=<%= ENV['OPEN_WEATHER_MAP_API']%>';
パラメータlat,lonには、緯度・経度を入れる必要がありますので、先ほど取得した値を入れます。
パラメータexcludeは、API応答から気象データの一部を除外できます。ここでは、forecast for 7 days以外の情報は不要なので、除外の指定をしています。
パラメータunitsは、このAPIの気温の単位はデフォルトだと華氏(°F)になっているため、units=metricを追記することで、摂氏(°C)に変更しています。
パラメータappidには、同様に取得したAPIキーを入れてください。
そしたら、AjaxでAPIから情報を取得します。
$.ajax({
  url: weather_url,
  dataType: 'json',
  type: 'GET',
})
.done(function (weather) {
  let insertHTML = '';

  for (let i = 0; i <= 6; i = i + 1) {
    insertHTML += buildHTML(weather, i);
  }
  $('#weather').html(insertHTML);
})
.fail(function (weather) {
  alert('天気予報の取得に失敗しました');
});
配列dailyに7日間の天気予報の情報が順番に入っているため、繰り返しforを使ってweather.daily[i]とすることで順番にデータを取得できます。
あとは、「1.天気予報を表示するビューを作成」で用意した<div id="weather"></div> をjsのhtmlメソッドで中身を書き換えることで天気予報を表示できます。
実際に表示させる部分については、次の項目で解説しています。
ちなみに、AjaxでAPIから情報を取得できなかった場合は、天気予報の取得に失敗しましたという警告が表示されるようにしています。
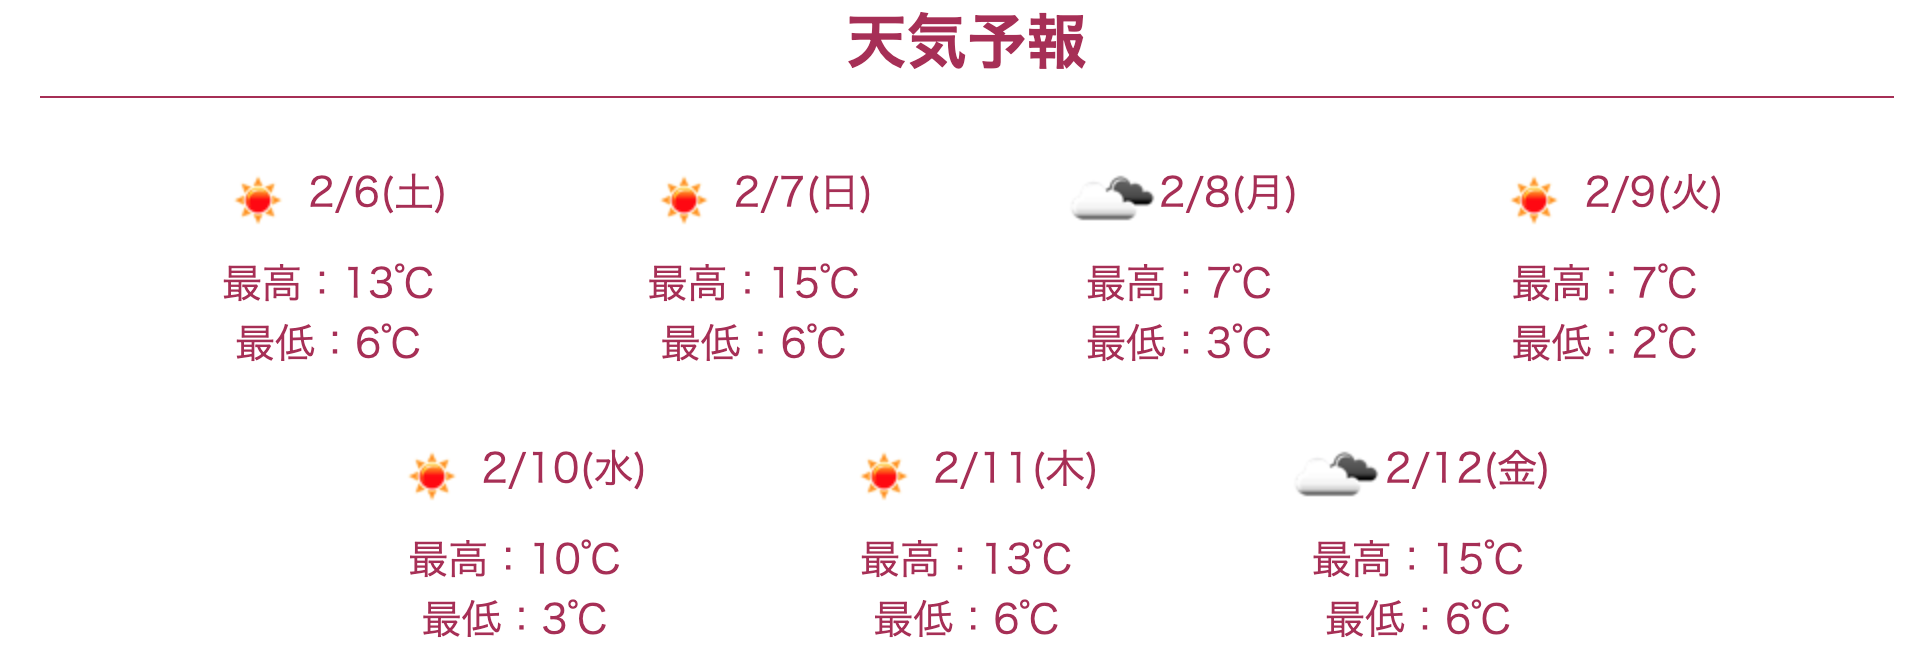
4.週間天気予報の表示
最後に、取得したデータをもとに週間天気予報の表示させます。
// 日本語で表示
function buildHTML(weather, i) {
  //日付、時間を取得(Dateがミリ秒なので1000倍が必要)
  const date = new Date(weather.daily[i].dt * 1000);
  //UTCとの時差を無くす(日本は-9時間のため9を足す)
  date.setHours(date.getHours() + 9);
  //月を取得。getMonth()は0~11を返すため1を足すことによって1月~12月を返すように設定
  const month = date.getMonth() + 1;
  //曜日の日本語化のため、配列を用意する
  const Week = new Array('(日)', '(月)', '(火)', '(水)', '(木)', '(金)', '(土)');
  //月+日+曜日をdayに代入。getDay()は0~6を返すためWeek配列内のインデックスに対応した文字列を取得
  const day = month + '/' + date.getDate() + Week[date.getDay()];
  //天気のアイコンを取得
  const icon = weather.daily[i].weather[0].icon;

  const html =
    '<div class="weather__content--report">' +
      '<img src="https://openweathermap.org/img/w/' + icon + '.png">' +
      '<span class="weather__content--report-date">' + day + "</span>" +
      '<div class="weather__content--report-temp-max">' + '最高:' + Math.round(weather.daily[i].temp.max) + "℃</div>" +
      '<span class="weather__content--report-temp-min">' + '最低:' + Math.floor(weather.daily[i].temp.min) + "℃</span>" +
    '</div>';
  return html
}
このように、表示させる天気予報のHTMLは関数buildHTMLの中で組み立てています。
まずは、weather.daily[i].dtで、UNIX時間を取得しています。
JavaScriptのDateオブジェクトはミリ秒なので、1000倍する必要があります。
また、Dateオブジェクトは協定世界時 (UTC) になっているので、date.setHours(date.getHours() + 9);で日本時間に直しています。
さらに、OpenWeatherMapでは、http://openweathermap.org/img/w/04n.pngのような形式でアイコンが用意してあるので、これを利用してアイコンを表示しています。
こちらについても、Advanced REST Clientを参考にしながら欲しい情報を取得してみましょう。
結果
これで、週間天気予報が表示できました!
参考
【Rails/JS】無料API「OpenWeatherMap」で天気予報を表示する
MDN Web Docs > Date