TypeScriptでAdobeのAfterEffectsを操作する機会があったので復習も兼ねて書きます。
ソースは下記にあるので何らかの参考になれば幸いです。
https://github.com/satoyan/after-effects-with-typescript
環境
- OS - Windows10, WSL
- エディタ - VSCode
- NodeJS - v8.9.4 ※特に意味なし
- AfterEffects2018
package.sjon
最低限以下のものをインストールしておく。
- types-for-adobe: PhotoshopやAfterEffects等で使用する型の型定義一式がある
- parcel: コンパイルしたソースをバンドルしてくれるもの。Webpackですらもう面倒になってきた人に超おすすめ
  "devDependencies": {
    "parcel-bundler": "~1.6.1",
    "types-for-adobe": "github:pravdomil/types-for-adobe",
    "typescript": "~2.7.2"
  }
tsconfig.json
tsconfig.jsonはこんな感じでしょうか。
ありきたりですが、ソースはsrc, 出力先はdistにしています。
重要なのは、
- target: es3
- noLib: true
にする、ってことろでしょうか。
ExtendScript自体はes3レベルなのと、アプリのオブジェクトなどは実際のJSのソースがあるわけではないので noLibをtrueにしておかないとコンパイルでコケてしまいします。
{
  "compilerOptions": {
    /* Basic Options */
    "target": "es3",                          /* Specify ECMAScript target version: 'ES3' (default), 'ES5', 'ES2015', 'ES2016', 'ES2017','ES2018' or 'ESNEXT'. */
    "module": "commonjs",                     /* Specify module code generation: 'none', 'commonjs', 'amd', 'system', 'umd', 'es2015', or 'ESNext'. */
    "noLib": true,
    "outDir": "./dist",                        /* Redirect output structure to the directory. */
    "rootDir": "./src",                       /* Specify the root directory of input files. Use to control the output directory structure with --outDir. */

    /* Strict Type-Checking Options */
    "strict": false,                           /* Enable all strict type-checking options. */
    "esModuleInterop": true                   /* Enables emit interoperability between CommonJS and ES Modules via creation of namespace objects for all imports. Implies 'allowSyntheticDefaultImports'. */
 }
}
とりあえず アラートを出してみる
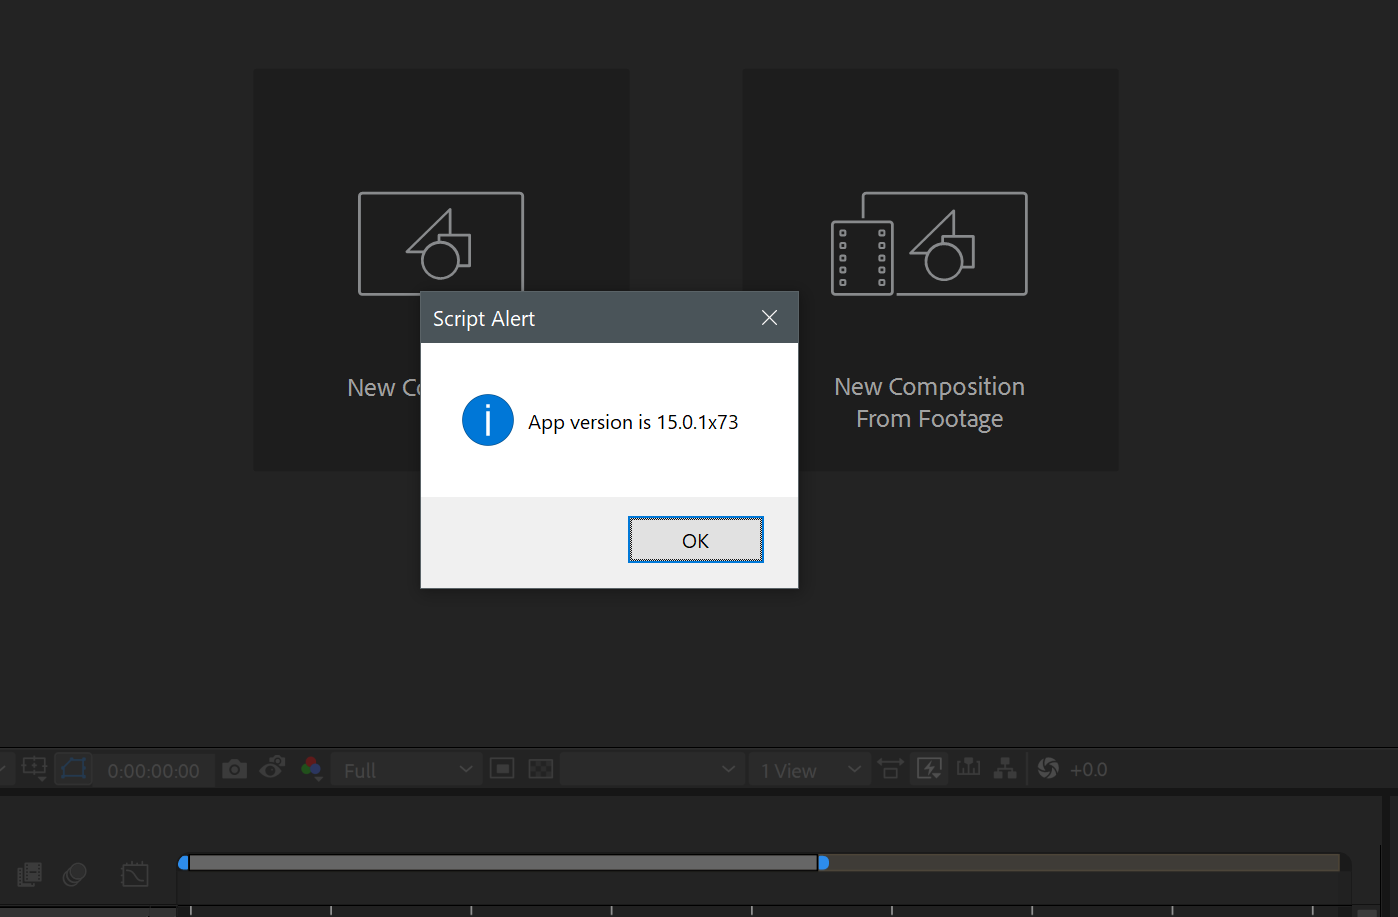
とりあえず、AfterEffectsのビルド名をアラートで出してみたいと思います。
コードはこんな感じになります。ちゃんとコード補完が効くのがわかるかと思います。
/// <reference types="types-for-adobe/AfterEffects/2018" />

class Main {
    showBuildname() {
        alert(`App version is ${app.buildName}`);
    }
}

const main = new Main();
main.showBuildname();
parcelでコンパイル&バンドル
まだファイルは1つしかありませんが、このあとunderscore(諸事情でlodashではありません)などの外部ライブラリを使ったり、自身でもモジュールを書いたりすることになると思うので、やはり何らかのバンドルする仕組みは必要になってくると思います。従来であればWebpackを使っていましたが、毎度毎度初回に設定ファイルを書くのが面倒ということと、なにやら最近勢いがあるparcelなるものを使ってみようと思います。
$ ./nodo_modules/.bin/parcel watch src/app.ts
parcelはデフォルトで簡易HTTPサーバーを起動するので、watch オプションを付けてバンドルだけするようにしています。
dist配下に app.js, app.map ができました。
以降はファイルに変更があるたびに自動的に差分コンパイル&バンドルが実行されます。しかもWebpackに比べてエラく爆速です。
AfterEffects起動タスクを書いてみる
スクリプトの起動方法については、標準的な方法と取れば、AfterEffectsのメニューからスクリプトを読み込んで実行、と言うかたちになりますが、実際の開発でトライ&エラーの過程でそんなこといちいちやってられないと思いますので、VSCodeのタスクを定義してしまいます。
{
    // See https://go.microsoft.com/fwlink/?LinkId=733558
    // for the documentation about the tasks.json format
    "version": "2.0.0",
    "tasks": [
        {
            "label": "Run App script",
            "type": "shell",
            "command": "/mnt/c/Program\\ Files/Adobe/Adobe\\ After\\ Effects\\ CC\\ 2018/Support\\ Files/AfterFX.exe",
            "args": [
                "-r",
                "\"${workspaceFolder}\\dist\\app.js\""
            ],
            "problemMatcher": [],
        }
    ]
}
私はVSCodeのターミナルとして、WSL(旧BashOnWindows)を使用しているため、AfterEffectsのパスが /mnt/c... とかになっていますがこの辺は適宜自分の環境に合わせて書き直してください。
もしくは、同じくVSCodeのエクステンションで、AE Script Runner と言うものがあります。そちらはVSCodeで今現在開いているスクリプトをAfterEffectsで実行するための拡張機能です。今回の場合はparcelで dist/app.js ファイルに必ずバンドルされて、実際にはこのファイルしか実行しないので、どこからでもAfterEffectsで実行できるようにタスクを定義しています。
実行するとこんな感じでアラートが表示されるかと思います。
ES5にしたい
ExtendScirptはes3レベルなので、es5で追加された配列への便利なメソッドとか使えないものが結構あります。これについては、ExtendScript用のextendscript-es5-shim-tsで解決できました。 es5-shimではないので注意してください。
package.jsonに "extendscript-es5-shim-ts": "~0.0.1" を追記して、npm install を実行します。
  "devDependencies": {
    "parcel-bundler": "~1.6.1",
    "types-for-adobe": "github:pravdomil/types-for-adobe",
    "typescript": "~2.7.2",
    "extendscript-es5-shim-ts": "~0.0.1" // <ー 追加
  },
src/app.tsファイル内で、Array.forEachを使ってみます。
"extendscript-es5-shim-ts"をインポートするのを忘れないでください。
/// <reference types="types-for-adobe/AfterEffects/2018" />

import "extendscript-es5-shim-ts";

class Main {
    showBuildname() {
        [1, 2, 3].forEach((x) => {
            alert(`App version is ${app.buildName}( ${x} )`);
        });
    }
}

const main = new Main();
main.showBuildname();
underscoreを使ってみる
必要ないかもしれませんが、あると何かと便利なので追加してみます。
lodash はObject.definePropertyとかの問題で無理でした、、、。
  "devDependencies": {
    "parcel-bundler": "~1.6.1",
    "types-for-adobe": "github:pravdomil/types-for-adobe",
    "typescript": "~2.7.2",
    "extendscript-es5-shim-ts": "~0.0.1",
    "underscore": "~1.8.3",         // <- New!!
    "@types/underscore": "1.8.7"    // <- New!!
  },
npm install を実行してから、src/app.ts で underscoreを使ってみます。
/// <reference types="types-for-adobe/AfterEffects/2018" />

import "extendscript-es5-shim-ts";
import _ from "underscore";

class Main {
    showBuildname() {
        _.times(3, (x) => {
            alert(`App version is ${app.buildName}( ${x} )`);
        });
    }
}

const main = new Main();
main.showBuildname();
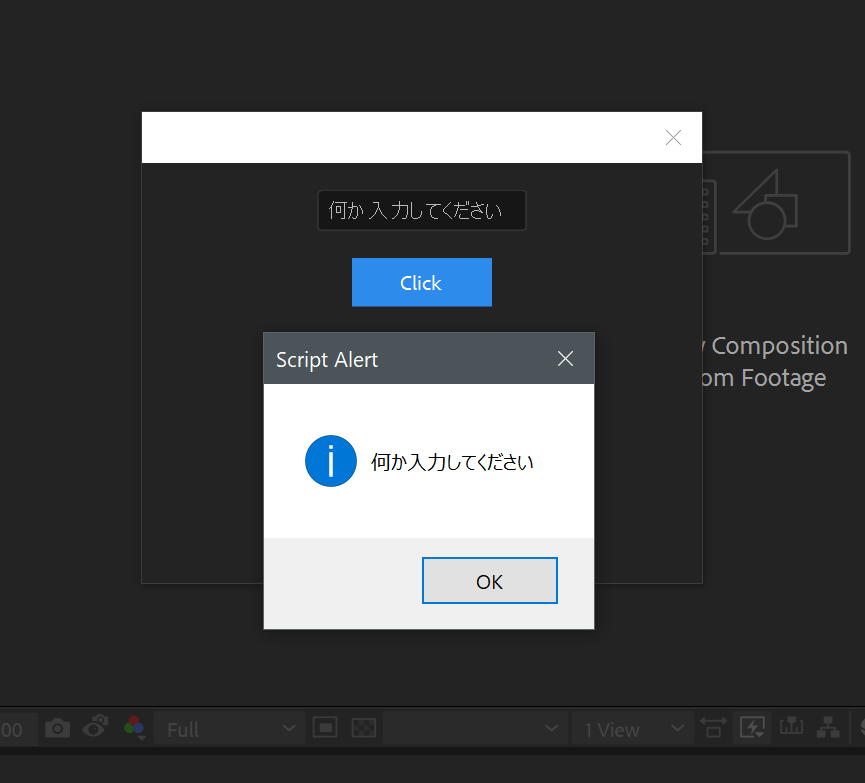
UI部品を使ってみる
一応他のAfterEffects、というかExtendScriptのライブラリも使ったコードとして、テキストボックスとボタンあたりをやってみます。
export class UISample {
    dialog: Window;
    button: Button;
    textbox: EditText;

    constructor() {
        this.dialog = new Window("dialog");
        this.dialog.size = [320, 240];

        this.textbox = this.dialog.add("edittext", undefined, "何か入力してください");
        this.button = this.dialog.add("button", undefined, "Click");
    }

    show() {
        this.dialog.show();
    }
}
/// <reference types="types-for-adobe/AfterEffects/2018" />

import "extendscript-es5-shim-ts";
import _ from "underscore";
import { UISample } from "./ui_sample";

class Main {
    showSample() {
        const sample = new UISample();
        sample.button.onClick = () => {
            alert(sample.textbox.text);
        }
        sample.show();
    }
}

const main = new Main();
main.showSample();
まとめ
こんな感じでTypeScriptとparcelを使えば、ExtendScriptアプリもスッキリ書けそうです。
私自身はAdobe製品は全くド素人なので、もっとこうすればいいよ的なことがありましたらコメントください!