コンソールでポチポチして作成してもよかったのですが、
今後の学習のためterraformでやってみました。

terraformって何ぞ?
- インフラの構築/変更/バージョン管理ツール
- AWSだったり、AzureだったりVMWareだったりを1つのコマンドから操作して
サーバを作成したり削除したり、VPCを作ったりとかができます。
事前準備
- AWSのアクセスキーを作成してダウンロードしておきます。
- キーペアを作成してダウンロードしておきます。
- AWSのコンソールでWindows Server 2012 R2のamiのidをメモっておきます。
- terraformを以下からダウンロードして解凍したのちPATHを通します。
コマンドプロンプトで出てくればOKです。 (※筆者はWin10を使用)
https://www.terraform.io/downloads.html
tfファイル作成
設定ファイルを作成します。以下を参考にしました。
https://www.terraform.io/docs/providers/aws/d/instance.html
https://github.com/dhoer/terraform_examples
変数宣言用
※ほんとうは.tfvarsファイルに記載して実行時にコマンド引数で渡すのが正しいよう?
https://qiita.com/ringo/items/3af1735cd833fb80da75
var.tf
variable aws_access_key {
  default = "xxxx"
}

variable aws_secret_key {
  default = "xxxx"
}
variable "admin_password" {
  default = "xxxx"
}

variable "key_name" {
  default = "xxxx"
}
ファイアウォールの設定変更してるけどセキュリティグループがdefaultだから意味ないはず笑
winserver.tf
provider "aws" {
  access_key = "${var.aws_access_key}"
  secret_key = "${var.aws_secret_key}"
  region     = "us-east-2"
}

resource "aws_instance" "example" {

  connection {
    type     = "winrm"
    user     = "Administrator"
    password = "${var.admin_password}"
    # set from default of 5m to 10m to avoid winrm timeout
    timeout  = "10m"
  }

  ami           = "ami-02446e67"
  instance_type = "t2.small"
  key_name = "${var.key_name}"
  monitoring    = true
  tags {
        Name = "sid_ad_fumidai"
  }
  security_groups = ["default"]
  user_data = <<EOF
<script>
  winrm quickconfig -q & winrm set winrm/config @{MaxTimeoutms="1800000"} & winrm set winrm/config/service @{AllowUnencrypted="true"} & winrm set winrm/config/service/auth @{Basic="true"}
</script>
<powershell>
  netsh advfirewall firewall add rule name="WinRM in" protocol=TCP dir=in profile=any localport=5985 remoteip=any localip=any action=allow
  # Set Administrator password
  $admin = [adsi]("WinNT://./administrator, user")
  $admin.psbase.invoke("SetPassword", "${var.admin_password}")
</powershell>
EOF

}
実行
まず初期化(init)します。
AWS用のprovider、プラグインがダウンロードされます。
C:\terraform>terraform init

Initializing provider plugins...
- Checking for available provider plugins on https://releases.hashicorp.com...
- Downloading plugin for provider "aws" (1.9.0)...

The following providers do not have any version constraints in configuration,
so the latest version was installed.

To prevent automatic upgrades to new major versions that may contain breaking
changes, it is recommended to add version = "..." constraints to the
corresponding provider blocks in configuration, with the constraint strings
suggested below.

* provider.aws: version = "~> 1.9"

Terraform has been successfully initialized!

You may now begin working with Terraform. Try running "terraform plan" to see
any changes that are required for your infrastructure. All Terraform commands
should now work.

If you ever set or change modules or backend configuration for Terraform,
rerun this command to reinitialize your working directory. If you forget, other
commands will detect it and remind you to do so if necessary.

C:\terraform>
計画実行(plan)
パラメータと書式チェックを行うとともにや変更実施個所を示します。
今回だとEC2の作成という構成変更が加えられるので、
1か所の変更が実施されるよということを示してくれます。
C:\terraform>terraform plan
Refreshing Terraform state in-memory prior to plan...
The refreshed state will be used to calculate this plan, but will not be
persisted to local or remote state storage.


------------------------------------------------------------------------

An execution plan has been generated and is shown below.
Resource actions are indicated with the following symbols:
  + create

Terraform will perform the following actions:

  + aws_instance.example
      id:                           <computed>
      ami:                          "ami-02446e67"
      associate_public_ip_address:  <computed>
      availability_zone:            <computed>
      ebs_block_device.#:           <computed>
      ephemeral_block_device.#:     <computed>
      instance_state:               <computed>
      instance_type:                "t2.small"
      ipv6_address_count:           <computed>
      ipv6_addresses.#:             <computed>
      key_name:                     "win"
      monitoring:                   "true"
      network_interface.#:          <computed>
      network_interface_id:         <computed>
      placement_group:              <computed>
      primary_network_interface_id: <computed>
      private_dns:                  <computed>
      private_ip:                   <computed>
      public_dns:                   <computed>
      public_ip:                    <computed>
      root_block_device.#:          <computed>
      security_groups.#:            "1"
      security_groups.3814588639:   "default"
      source_dest_check:            "true"
      subnet_id:                    <computed>
      tags.%:                       "1"
      tags.Name:                    "test_fumidai"
      tenancy:                      <computed>
      user_data:                    "dbce82ede52988c3164b7dc675f489c987ae1e5c"
      volume_tags.%:                <computed>
      vpc_security_group_ids.#:     <computed>


Plan: 1 to add, 0 to change, 0 to destroy.

------------------------------------------------------------------------

Note: You didn't specify an "-out" parameter to save this plan, so Terraform
can't guarantee that exactly these actions will be performed if
"terraform apply" is subsequently run.


C:\terraform>
適用(apply)
実際に実行してサーバを構築します。
C:\terraform>terraform apply

An execution plan has been generated and is shown below.
Resource actions are indicated with the following symbols:
  + create

Terraform will perform the following actions:

  + aws_instance.example
      id:                           <computed>
      ami:                          "ami-02446e67"
      associate_public_ip_address:  <computed>
      availability_zone:            <computed>
      ebs_block_device.#:           <computed>
      ephemeral_block_device.#:     <computed>
      instance_state:               <computed>
      instance_type:                "t2.micro"
      ipv6_address_count:           <computed>
      ipv6_addresses.#:             <computed>
      key_name:                     <computed>
      monitoring:                   "true"
      network_interface.#:          <computed>
      network_interface_id:         <computed>
      placement_group:              <computed>
      primary_network_interface_id: <computed>
      private_dns:                  <computed>
      private_ip:                   <computed>
      public_dns:                   <computed>
      public_ip:                    <computed>
      root_block_device.#:          <computed>
      security_groups.#:            "1"
      security_groups.3814588639:   "default"
      source_dest_check:            "true"
      subnet_id:                    <computed>
      tags.%:                       "1"
      tags.Name:                    "test_fumidai"
      tenancy:                      <computed>
      user_data:                    "dbce82ede52988c3164b7dc675f489c987ae1e5c"
      volume_tags.%:                <computed>
      vpc_security_group_ids.#:     <computed>


Plan: 1 to add, 0 to change, 0 to destroy.

Do you want to perform these actions?
  Terraform will perform the actions described above.
  Only 'yes' will be accepted to approve.

  Enter a value: yes

aws_instance.example: Creating...
  ami:                          "" => "ami-02446e67"
  associate_public_ip_address:  "" => "<computed>"
  availability_zone:            "" => "<computed>"
  ebs_block_device.#:           "" => "<computed>"
  ephemeral_block_device.#:     "" => "<computed>"
  instance_state:               "" => "<computed>"
  instance_type:                "" => "t2.micro"
  ipv6_address_count:           "" => "<computed>"
  ipv6_addresses.#:             "" => "<computed>"
  key_name:                     "" => "<computed>"
  monitoring:                   "" => "true"
  network_interface.#:          "" => "<computed>"
  network_interface_id:         "" => "<computed>"
  placement_group:              "" => "<computed>"
  primary_network_interface_id: "" => "<computed>"
  private_dns:                  "" => "<computed>"
  private_ip:                   "" => "<computed>"
  public_dns:                   "" => "<computed>"
  public_ip:                    "" => "<computed>"
  root_block_device.#:          "" => "<computed>"
  security_groups.#:            "" => "1"
  security_groups.3814588639:   "" => "default"
  source_dest_check:            "" => "true"
  subnet_id:                    "" => "<computed>"
  tags.%:                       "" => "1"
  tags.Name:                    "" => "test_fumidai"
  tenancy:                      "" => "<computed>"
  user_data:                    "" => "dbce82ede52988c3164b7dc675f489c987ae1e5c"
  volume_tags.%:                "" => "<computed>"
  vpc_security_group_ids.#:     "" => "<computed>"
aws_instance.example: Still creating... (10s elapsed)
aws_instance.example: Still creating... (20s elapsed)
aws_instance.example: Creation complete after 29s (ID: i-04892c671626a2f87)

Apply complete! Resources: 1 added, 0 changed, 0 destroyed.

C:\terraform>
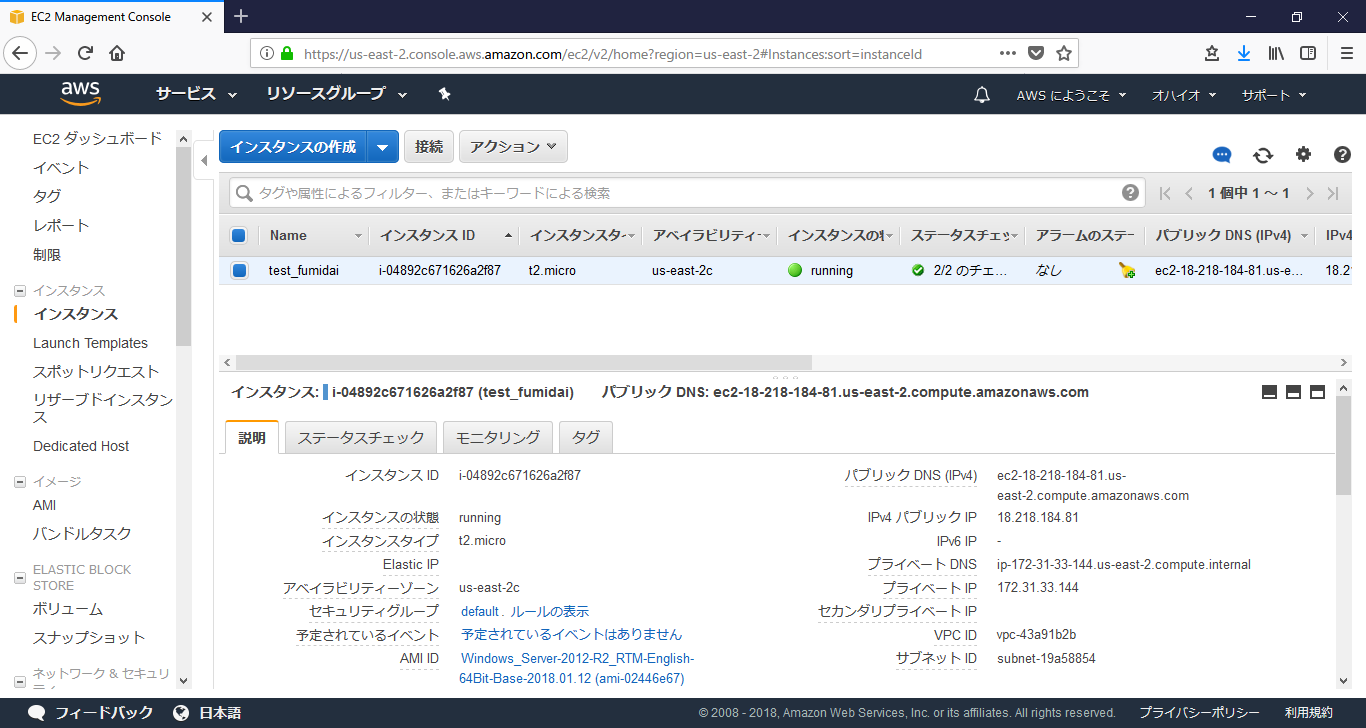
コンソールで確認するとWindows Serverが出来ました。