この記事は?
- この記事は「Google Cloud Platform Advent Calendar 2020」5日目の記事です。
- Terraform初心者がGithuActionsとTerraformを利用して、GCEインスタンスの作成を目指します。
- 超長文でごめんなさい。
- GCPもTerraformも知ってるよ!!って方は、Github Actionsの設定以降から読んでいただければと思います。
- GithubActionsのサンプルコード
きっかけ
- 会社でCircleCIとTerraformを利用してAWS/GCPの構築、管理をしています。
- 個人環境で使うなら、CircleCI部分をGithub Actionsへ置き換えてしまおう。
- CircleCIも無料枠あるけれど、Githubだけで完結できるし。
ゴール設定
- TerraformでGCEのデプロイ→Slackへ通知ができるようになるまでが一旦のゴール。
- 目指すイメージ
- 1.ローカルでTerraformファイル編集して、ローカルのdevelopブランチへコミット。
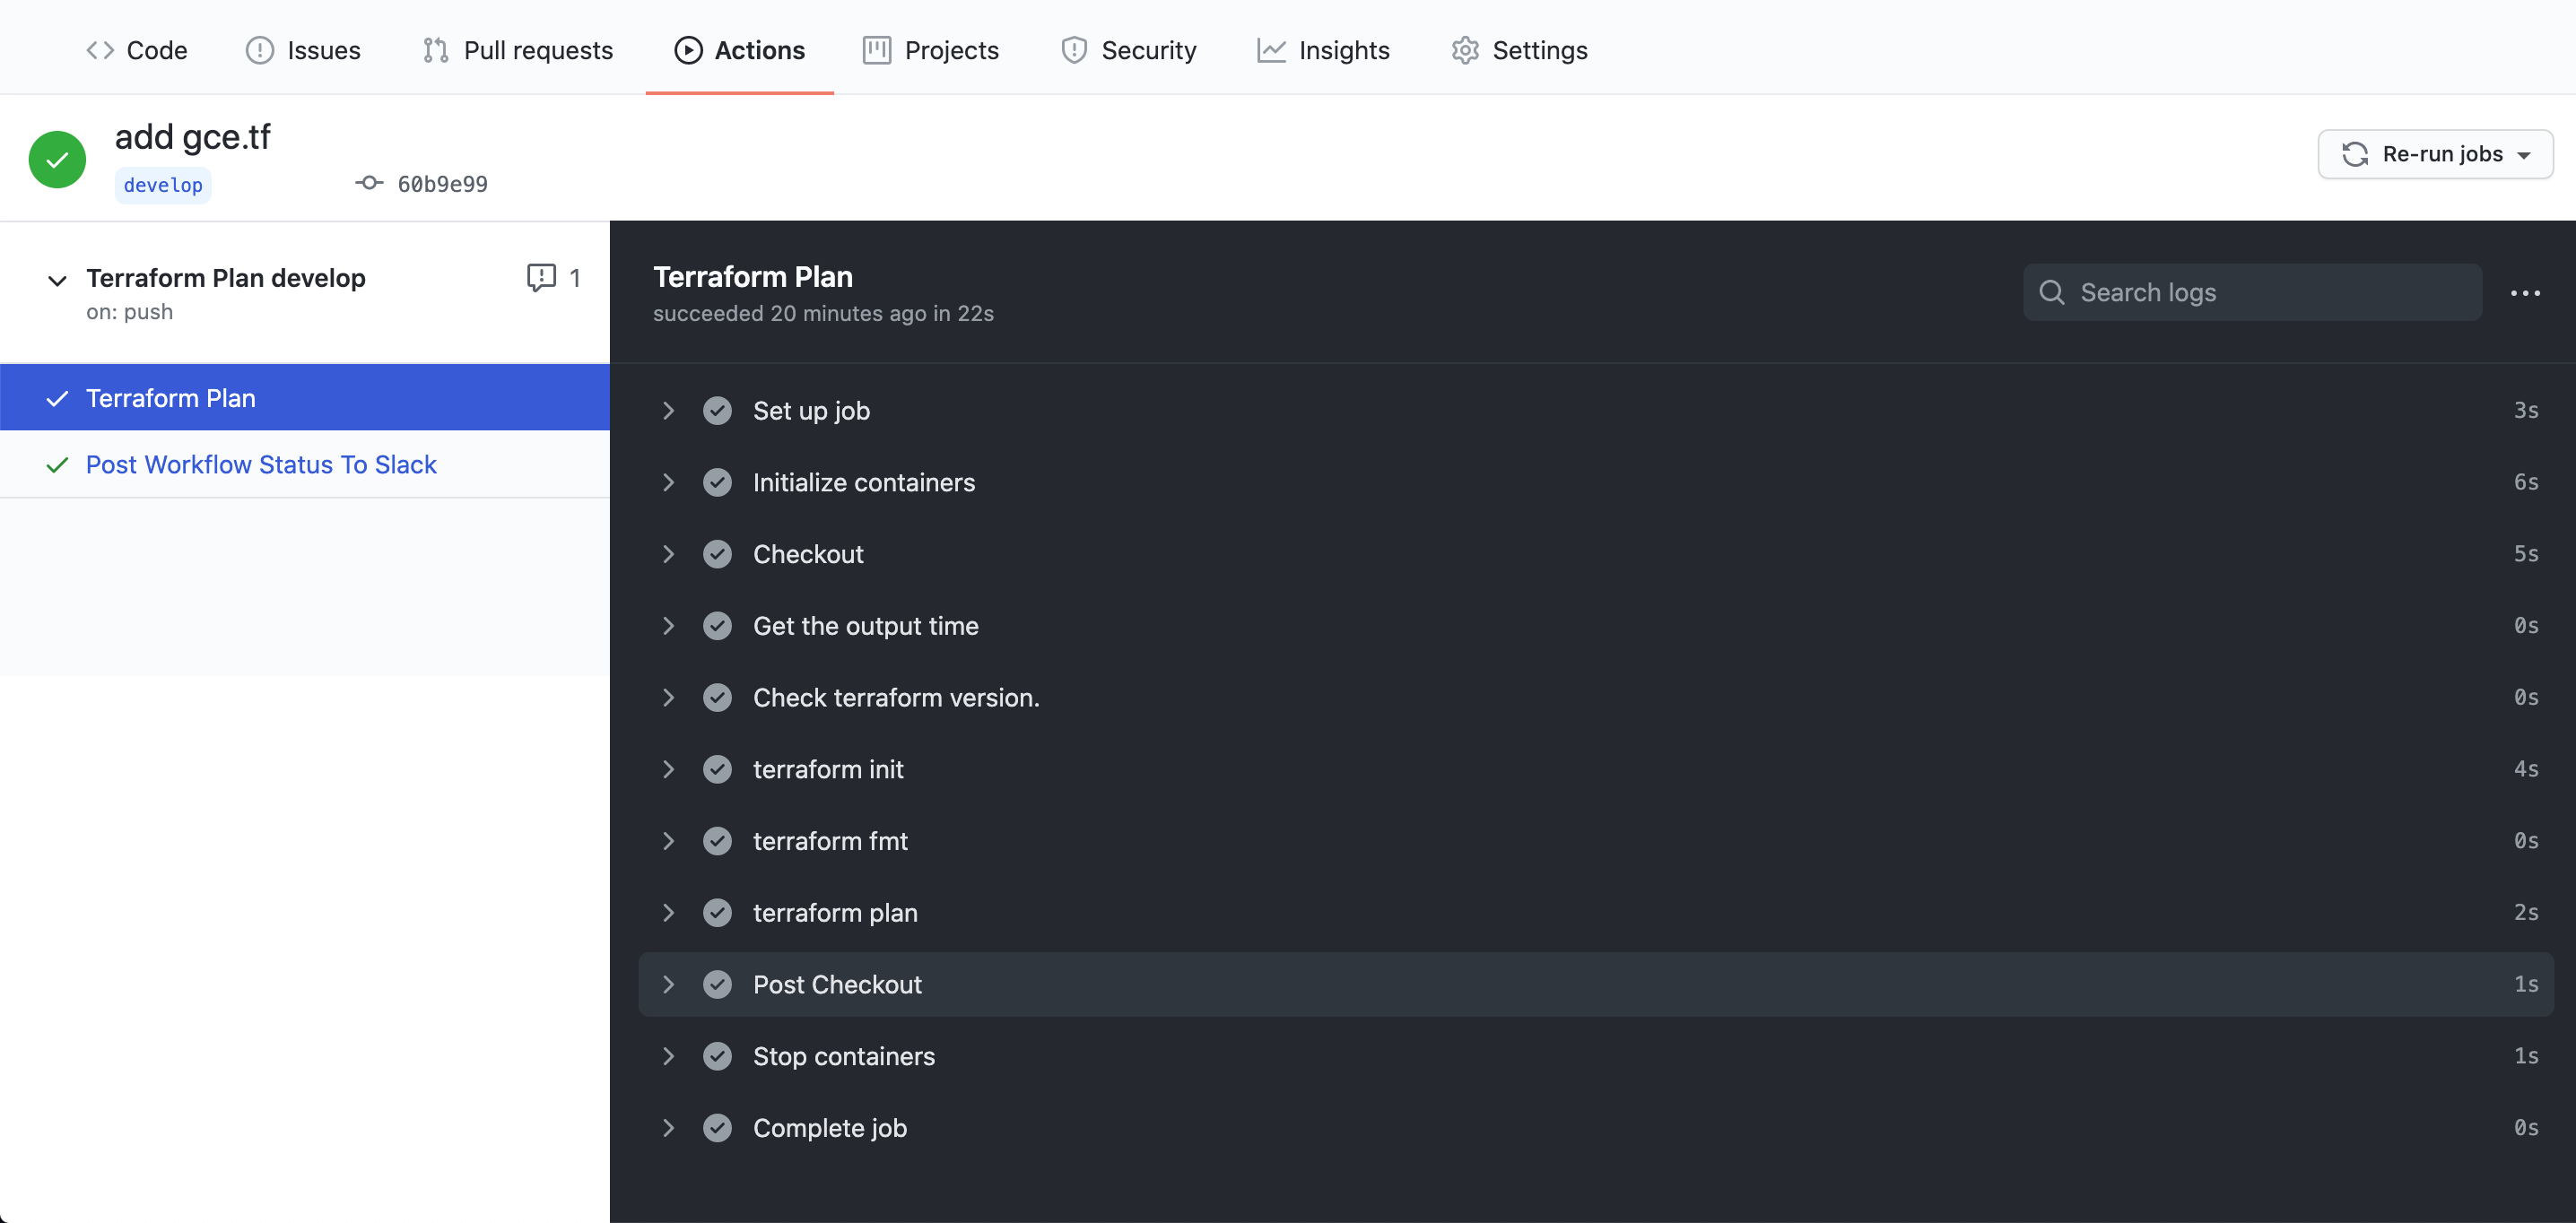
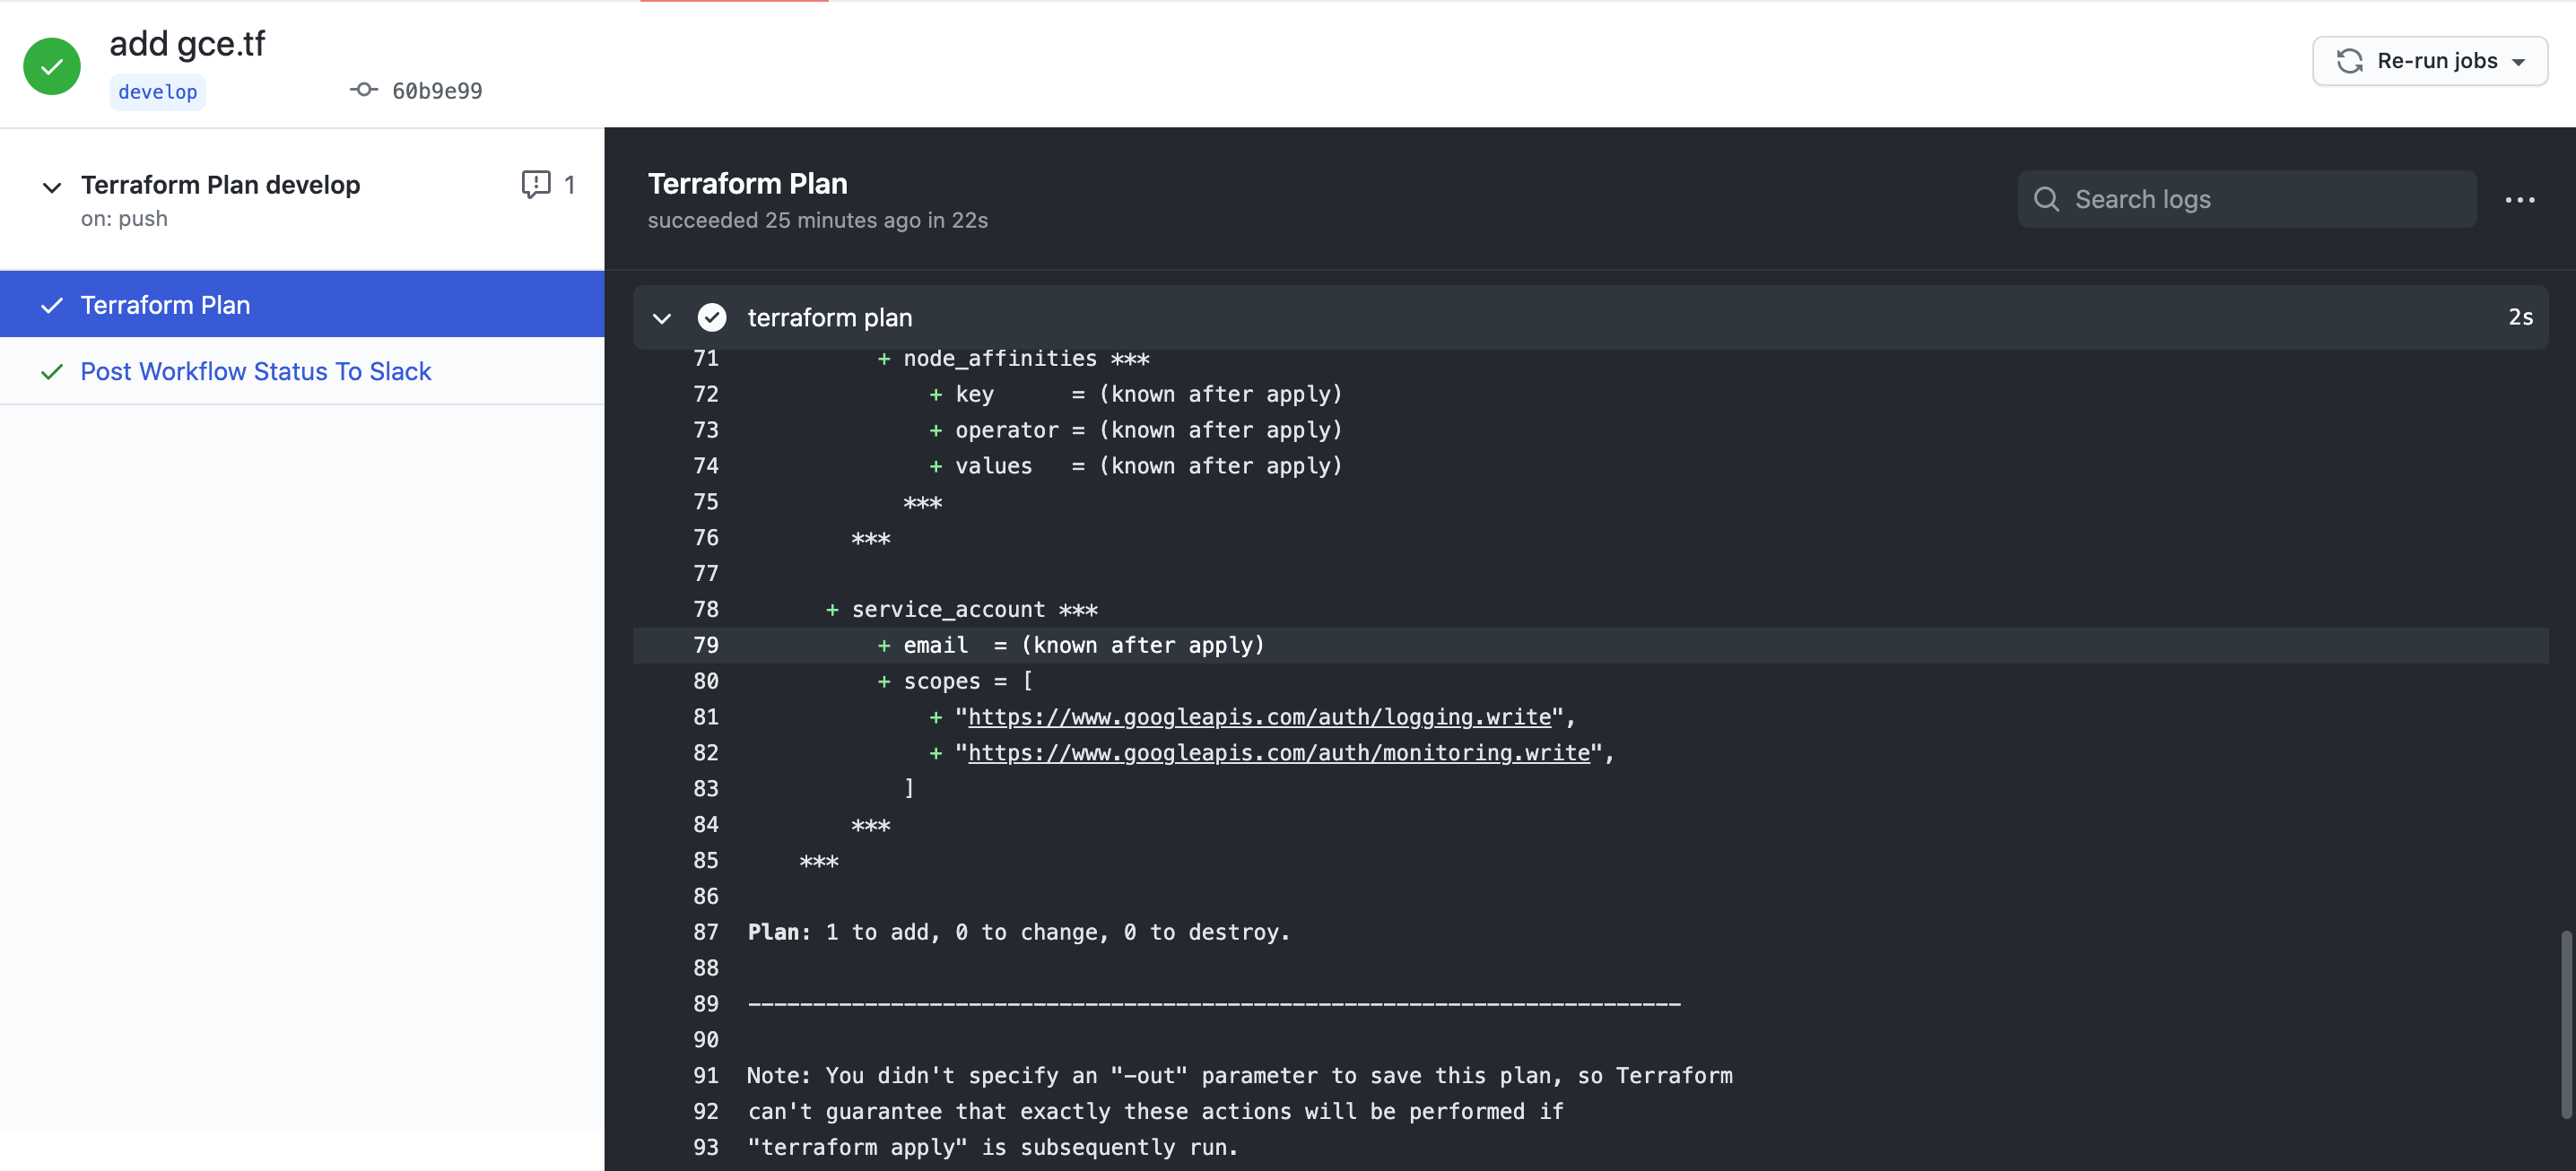
- 2.GitHubへプッシュ(developブランチ)→GitHubAcctionsでterraform plan。
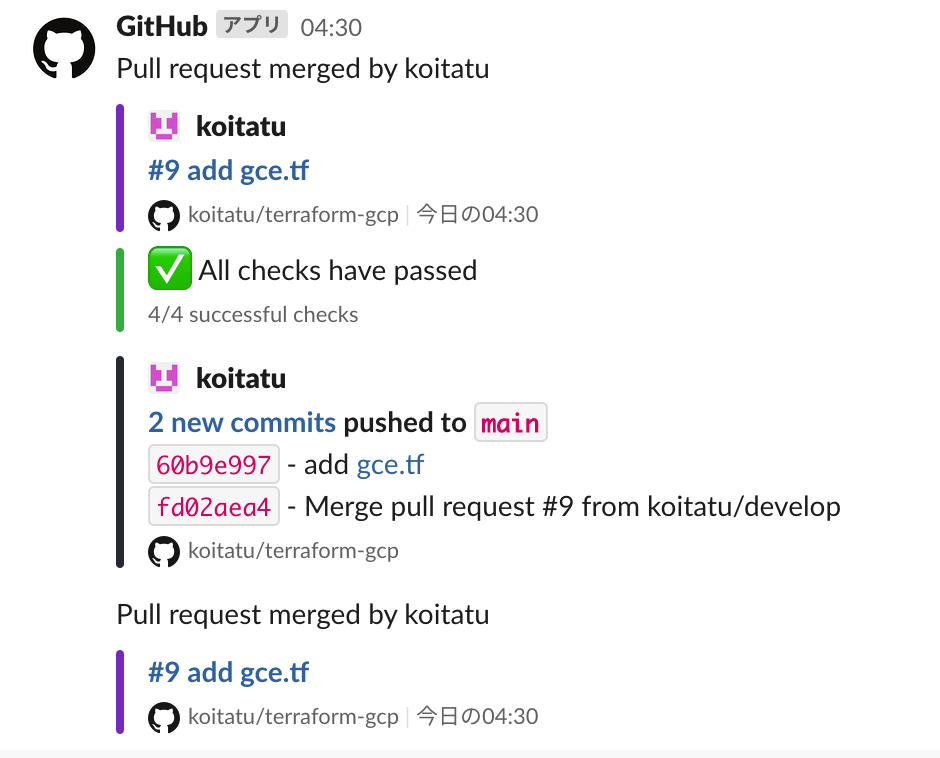
- SlackにGithub Actionsの通知が届く。
- 3.書式チェック等問題なければ、PullRequest出してmainブランチへマージ。(ここは手動。)
- mainへの直接コミット時には発火させない。
- そもそもmainブランチへの直接コミットは禁止しておけという話。
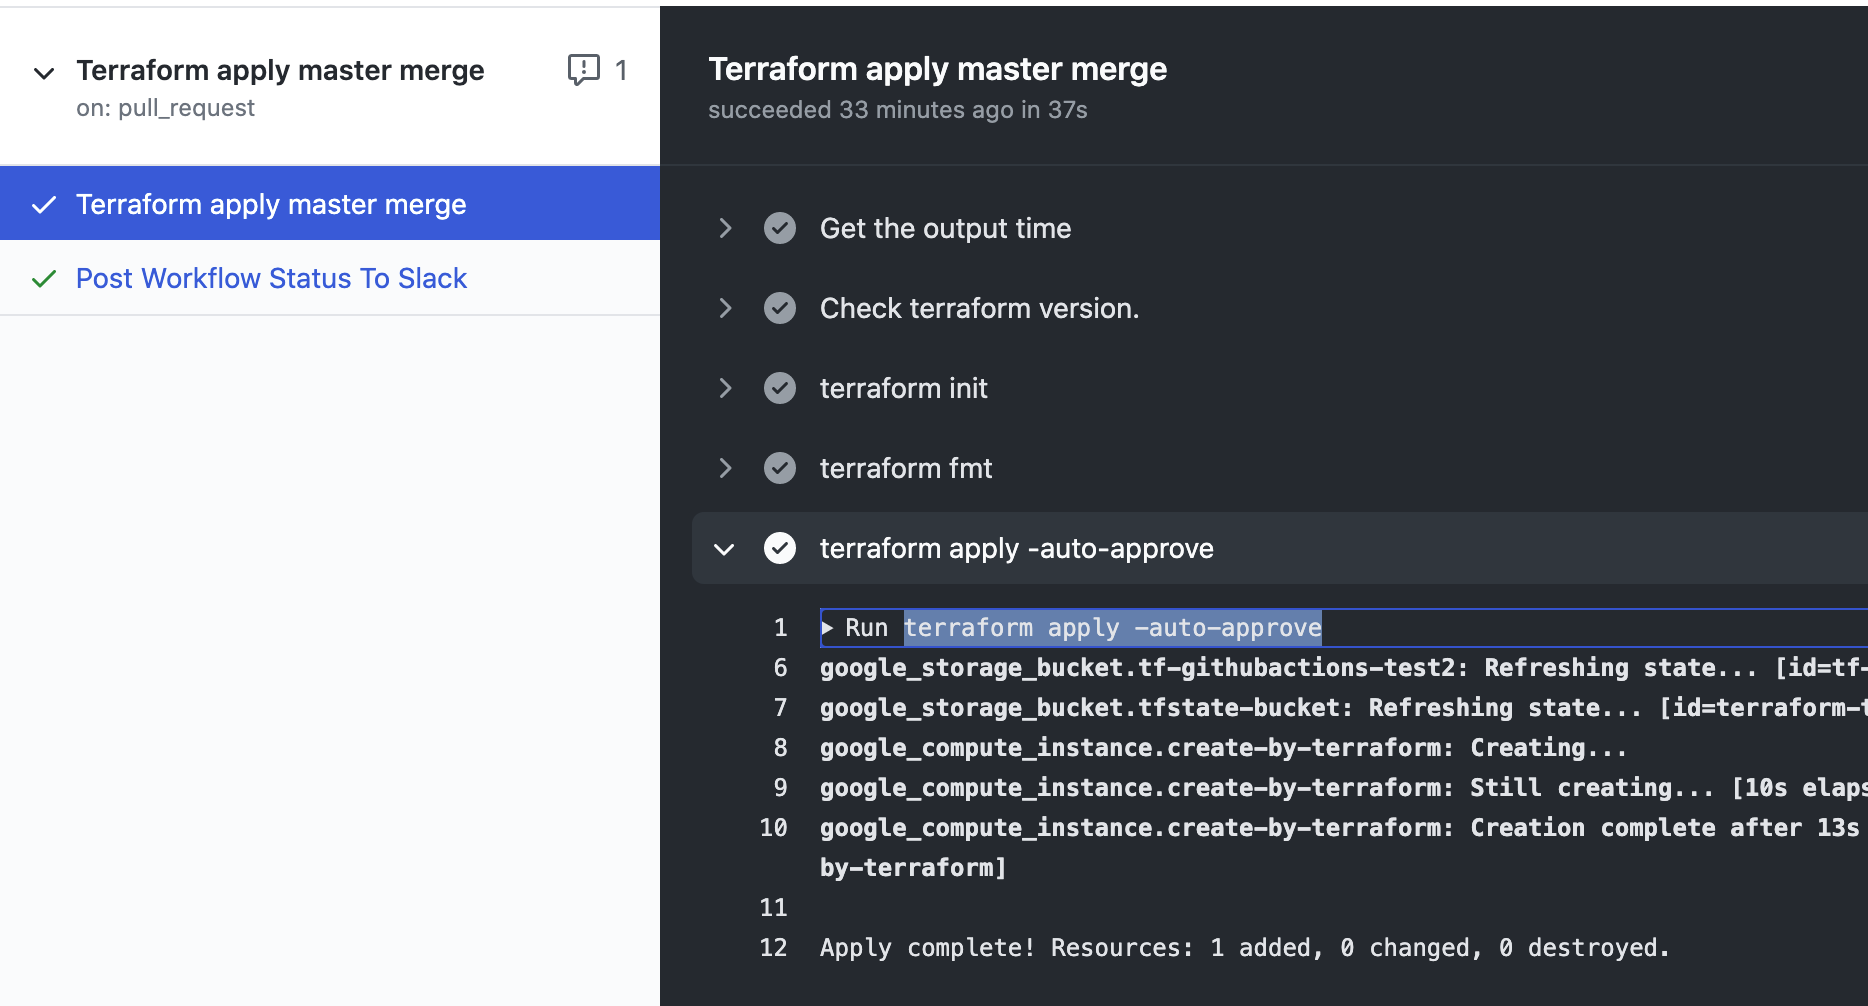
- Github Actionsでterraform applyして、リソース作成。
- SlackにGithub Actionsの通知が届く。
- mainへの直接コミット時には発火させない。
- イメージ図
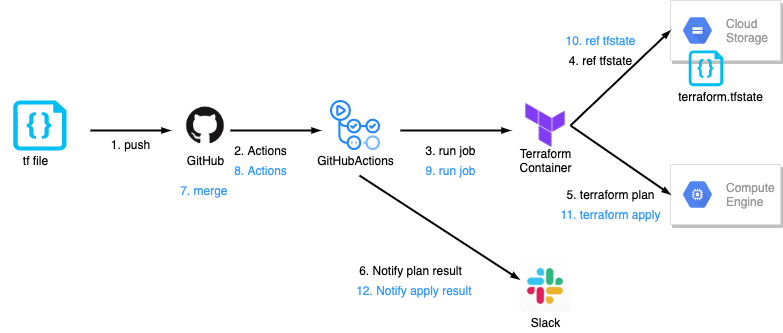
- 目指すイメージ
いきなりまとめ
- GitHubActionsの設定自体は思っていたより簡単でした。
- Terraformの実行用に、GOOGLE_CREDENTIALSというSecretsの名称を指定する必要がある、っていうあたりが一番ハマりました。
- GitHubActionsの発火→実行まで(Queueの時間)が意外と長い?
- 無料枠だから?
- Push後、一服しても良さげ。
- Terraformファイルの編集とGitHubへのプッシュ、マージだけでGCPリソース作成ができるのはやっぱり楽ですね!
- Slack通知していれば、チームメンバーへの共有やレビューも楽です。
- GitHubだけで完結できるのは、有り難い限りです。
動作確認環境
- macOS Catalina 10.15.7(19H2)
やること/必要なもの
- GitHubアカウント
- 個人開発/検証ならFreeで十分かと思います。
- GCPアカウント開設
- Billing設定とか済んでいてプロジェクトオーナ権限に近しい権限があること。(プロジェクト編集者でもいけそう。)
- Google Cloud SDK
- 動作確認用に。
- GCSの権限足りない…?とか諸々の確認に使用します。
- 本記事では、APIの有効化と、サービスアカウントの作成にも利用します。
- 動作確認用に。
- 必要なGCPサービスのAPIの有効化
- GCPのサービスアカウントの作成とキーファイルの生成
- terraform(tfenv)インストール
- インストールと動作確認
- 後でterraform.tfstateを置くためのバケットを作成します。
- 最終的にはGithub Actions経由でterraformを実行しますが、不具合切り分け等で一旦ローカルで動かすこともあると思うので、入れておいて損はありません。
- terraformのコンテナのバージョン上がった場合とか。
- というかよく上がります。
- terraformのコンテナのバージョン上がった場合とか。
- インストールと動作確認
- terraform.tfstateの配置/参照先をローカルから、GCSへ変更。
- GitHubActionsの設定。
- GitHubActions経由でのterraform実行。
作業詳細
GitHubアカウント開設
- ここでは割愛します。
GCPアカウント開設
- ここでは割愛します。
google-cloud-sdkインストール
正道
Homebrewしたい人向け
- こちらの方の記事がわかり易いです。
google-cloud-sdkセットアップ
公式手順
簡易手順
-
- GCPにSDK(CLI)でログインします。
gcloud auth login
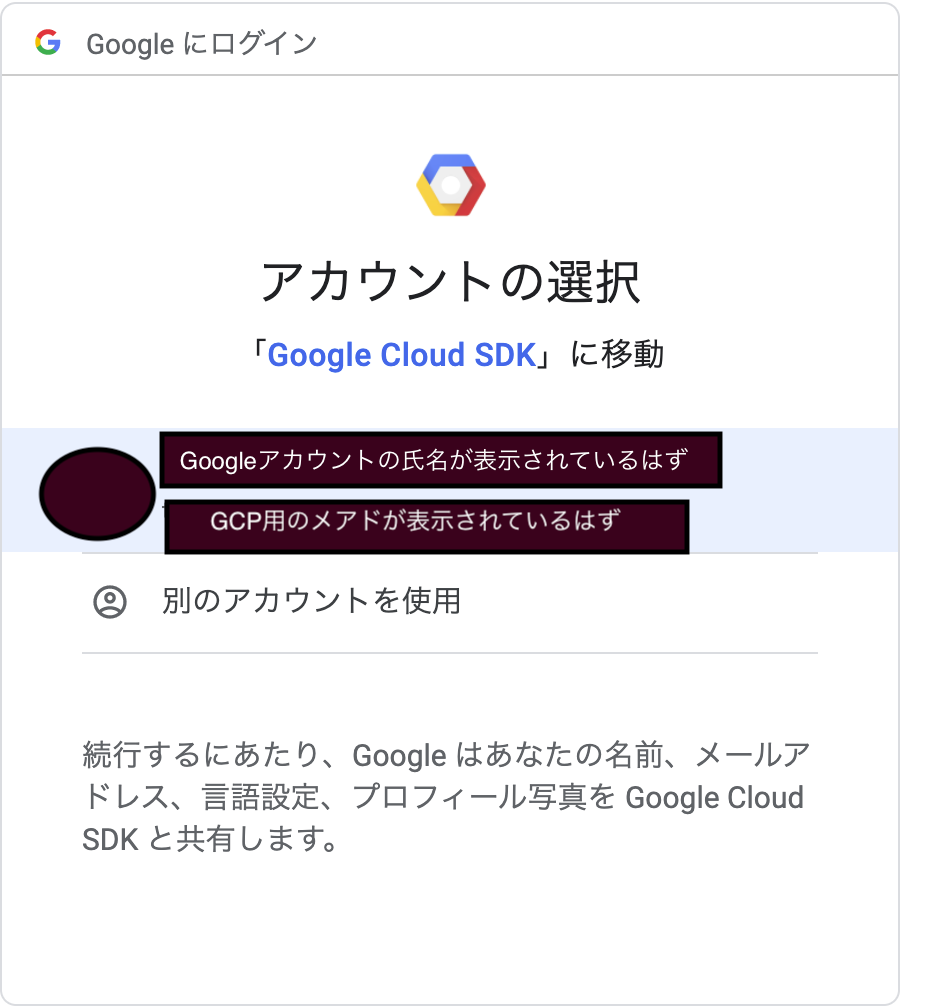
- 2. 手順1で出力されたURLをブラウザで開くと、GCPへGoogleIDでのログインを求められます。
-
- なにはともあれログインします。
- 4.
Google Cloud SDK に以下を許可します:と聞かれるので、内容をさらっと確認して許可します。 -
- Google Cloud SDK 認証の完了という画面に遷移すれば、CLIからの認証は成功です。
-
-
$ gcloud config set project <PROJECT_ID>でデフォルトプロジェクトをセットします。
-
-
-
gsutil lsでも叩いて動作確認しておきましょう。
-
必要なGCPサービスのAPIの有効化。
- 動作確認ついでに必要なサービスのAPIを有効化しておきましょう。
- ここではIAMと、GCSとGCEのAPIを有効化しています。
$ gcloud services enable iam.googleapis.com
$ gcloud services enable storage-component.googleapis.com
$ gcloud services enable compute.googleapis.com
GCPのサービスアカウントの作成とキーファイルの生成
- 公式手順
-
[サービス アカウントの作成] (https://cloud.google.com/docs/authentication/production#create_service_account)
- コンソールから作成する場合は上記を参照してください。
-
サービスアカウントとは
-
GCP の IAM をおさらいしようより引用。
- 人以外が使うアカウントとして、サービスアカウントがあります。こちらは例えば GCP のAPI を VM instance などから利用する場合に必要になってきます。
- というわけで、プログラム等からAPIを叩く場合に利用する専用アカウントのようですね。大変分かりやすい記事でした!
-
GCP の IAM をおさらいしようより引用。
-
CLIでやるとこんな感じです。
-
<PROJECT_ID>はご自身で利用するGCPのPROJECT_IDへ置き換えてください。
# サービス アカウントを作成します。ここでは、`terraform-serviceaccount`という名称で作成しています。
$ gcloud iam service-accounts create terraform-serviceaccount --display-name "for terraform"

# サービス アカウントに権限を付与します。
$ gcloud projects add-iam-policy-binding <PROJECT_ID> --member serviceAccount:terraform-serviceaccount@<PROJECT_ID>.iam.gserviceaccount.com --role roles/editor

# キーファイルの生成を行います。FILE_NAME はキーファイルの名前に置き換えてください。
## ここでは、ユーザホーム直下にgcp_terraform_account.jsonというファイル名で作成しています。
$ gcloud iam service-accounts keys create ~/gcp_terraform_account.json --iam-account terraform-serviceaccount@<PROJECT_ID>.iam.gserviceaccount.com
terraformインストール
-
公式手順が簡潔且つ、分かりやすいので、こちらを参照ください。(LinuxやWindowsの方は特に。)
- Mac向けの抜粋。
- これだけです。
$ brew tap hashicorp/tap$ brew install hashicorp/tap/terraform
- Version切り替え困るのでtfenvでバージョン切り替えたい人はこちら。(おすすめ)
$ brew install tfenv$ tfenv install latest
terraformの動作確認
tfファイルの作成
ここでは動作確認を兼ねて、tfstatfile作成用のGCSのバケットを作成します。
(後でtfstatfileの管理をローカルからGCSでの管理へ変更します。)
- 1.動作確認用のディレクトリを作成して移動します。
$ mkdir ~/terraform-test
$ cd ~/terraform-test
- 2.環境変数にCredentialファイルを設定します。
-
サービスアカウントの作成とキーファイルの生成の箇所で作成したjosnファイルを利用します。
-
$ export GOOGLE_CLOUD_KEYFILE_JSON=~/gcp_terraform_account.json
$ export GOOGLE_APPLICATION_CREDENTIALS=$GOOGLE_CLOUD_KEYFILE_JSON
- 3.vim等でtfファイルを作成します。
- 例によって
<PROJECT_ID>はご利用のものに置き換えてください。
- 例によって
terraform-setting.tf
terraform {
  required_version = ">=0.12.14"
}

## project ##
provider "google" {
  project = "<PROJECT_ID>"
  region  = "asia-northeast1"
}

variable "location" {
  type = "string"
  default = "asia-northeast1"
}

## GCS for terraform.tfstate  ##
resource "google_storage_bucket" "tfstate-bucket" {
  name          = "terraform-tfstate-<PROJECT_ID>" #GCSのバケット名は全世界でユニークである必要があるので、ここでは適当にPROJECT_IDをSuffixとして付与します。
  location      = "asia-northeast1"
  storage_class = "REGIONAL"

  labels = {
    terraform = "true"
    app = "terraform"
    env = "test"
  }
}
-
-
terraform fmtを実行して、ファイルをtf形式としてフォーマットします。
-
# terraform-setting.tfがtf形式として認識されたようです。
$ terraform fmt
terraform-setting.tf
$
- 5.
terraform initを実行します。- 初回のみ必要なプラグインがインストールされます。
Initializing the backend...

Initializing provider plugins...
- Finding latest version of hashicorp/google...
- Installing hashicorp/google v3.49.0...
- Installed hashicorp/google v3.49.0 (signed by HashiCorp)

The following providers do not have any version constraints in configuration,
so the latest version was installed.

To prevent automatic upgrades to new major versions that may contain breaking
changes, we recommend adding version constraints in a required_providers block
in your configuration, with the constraint strings suggested below.

* hashicorp/google: version = "~> 3.49.0"

Terraform has been successfully initialized!

You may now begin working with Terraform. Try running "terraform plan" to see
any changes that are required for your infrastructure. All Terraform commands
should now work.

If you ever set or change modules or backend configuration for Terraform,
rerun this command to reinitialize your working directory. If you forget, other
commands will detect it and remind you to do so if necessary.
- 6.
terraform planを実行します。-
terraform applyの実行前に何が起きるか(何が作成されるのか、変更されるのか、削除されるのか)確認します。 - 今回は更地のGCPプロジェクトにGCSを新規作成なのでサラッと確認して、次へ進みます。
-
$ terraform init

Initializing the backend...
Do you want to copy existing state to the new backend?
  Pre-existing state was found while migrating the previous "local" backend to the
  newly configured "gcs" backend. No existing state was found in the newly
  configured "gcs" backend. Do you want to copy this state to the new "gcs"
  backend? Enter "yes" to copy and "no" to start with an empty state.

  Enter a value: yes


Successfully configured the backend "gcs"! Terraform will automatically
use this backend unless the backend configuration changes.

Initializing provider plugins...
- Using previously-installed hashicorp/google v3.49.0

The following providers do not have any version constraints in configuration,
so the latest version was installed.

To prevent automatic upgrades to new major versions that may contain breaking
changes, we recommend adding version constraints in a required_providers block
in your configuration, with the constraint strings suggested below.

* hashicorp/google: version = "~> 3.49.0"

Terraform has been successfully initialized!

You may now begin working with Terraform. Try running "terraform plan" to see
any changes that are required for your infrastructure. All Terraform commands
should now work.

If you ever set or change modules or backend configuration for Terraform,
rerun this command to reinitialize your working directory. If you forget, other
commands will detect it and remind you to do so if necessary.
koizumitatsuyanoMacBook-Pro:terraform-gcp koizumitatsuya$
koizumitatsuyanoMacBook-Pro:terraform-test koizumitatsuya$ terraform plan
Refreshing Terraform state in-memory prior to plan...
The refreshed state will be used to calculate this plan, but will not be
persisted to local or remote state storage.


------------------------------------------------------------------------

An execution plan has been generated and is shown below.
Resource actions are indicated with the following symbols:
  + create

Terraform will perform the following actions:

  # google_storage_bucket.tfstate-bucket will be created
  + resource "google_storage_bucket" "tfstate-bucket" {
      + bucket_policy_only          = (known after apply)
      + force_destroy               = false
      + id                          = (known after apply)
      + labels                      = {
          + "app"       = "terraform"
          + "env"       = "test"
          + "terraform" = "true"
        }
      + location                    = "ASIA-NORTHEAST1"
      + name                        = "terraform-tfstate-<PROJECT_ID>-test" #私の場合既に同名のバケットがあったので、末尾に-testとつけています。
      + project                     = (known after apply)
      + self_link                   = (known after apply)
      + storage_class               = "REGIONAL"
      + uniform_bucket_level_access = (known after apply)
      + url                         = (known after apply)
    }

Plan: 1 to add, 0 to change, 0 to destroy.

Warning: Quoted type constraints are deprecated

  on terraform-setting.tf line 12, in variable "location":
  12:   type    = "string"

Terraform 0.11 and earlier required type constraints to be given in quotes,
but that form is now deprecated and will be removed in a future version of
Terraform. To silence this warning, remove the quotes around "string".


------------------------------------------------------------------------

Note: You didn't specify an "-out" parameter to save this plan, so Terraform
can't guarantee that exactly these actions will be performed if
"terraform apply" is subsequently run.

koizumitatsuyanoMacBook-Pro:terraform-test koizumitatsuya$
-
-
terraform apply -auto-approveを実行し、GCSリソースを作成します。
-
$ terraform apply -auto-approve
google_storage_bucket.tfstate-bucket: Creating...
google_storage_bucket.tfstate-bucket: Creation complete after 2s [id=terraform-tfstate-t2-koizumi-test]

Warning: Quoted type constraints are deprecated

  on terraform-setting.tf line 12, in variable "location":
  12:   type    = "string"

Terraform 0.11 and earlier required type constraints to be given in quotes,
but that form is now deprecated and will be removed in a future version of
Terraform. To silence this warning, remove the quotes around "string".


Apply complete! Resources: 1 added, 0 changed, 0 destroyed.
$
- 8.
gsutil lsでバケットが作成されたことを確認できれば、terraformの動作確認は完了です。
$ gsutil ls |egrep test
gs://terraform-tfstate-<PROJECT_ID>-test/
$
terraform.tfstateの配置/参照先をローカルから、GCSへ変更。
-
- 先程作成した、terraform-setting.tfに一部追記し、terraform.tfstateの配置/参照先をローカルから、GCSへ変更します。
terraform-setting.tf
terraform {
  required_version = ">=0.12.14"
  # 追記ここから #
  backend "gcs" {
    bucket  = "terraform-tfstate-<PROJECT_ID>" #先程terraform applyで作成したGCSバケット名を記載します。
  }
  # 追記ここまで #
}
- 2.
backend "gcs" ...を追記後、terraform initを行います。- 途中の質問にyesと答えると、自動でterraform.tfstateをGCSのバケットに移行してくれます。
- これやらないと差分が出て結構ハマります。
- 途中の質問にyesと答えると、自動でterraform.tfstateをGCSのバケットに移行してくれます。
$ mv terraform.tfstate /var/tmp/
$ terraform init
Initializing the backend...
Do you want to migrate all workspaces to "gcs"?
  Both the existing "local" backend and the newly configured "gcs" backend
  support workspaces. When migrating between backends, Terraform will copy
  all workspaces (with the same names). THIS WILL OVERWRITE any conflicting
  states in the destination.

  Terraform initialization doesn't currently migrate only select workspaces.
  If you want to migrate a select number of workspaces, you must manually
  pull and push those states.

  If you answer "yes", Terraform will migrate all states. If you answer
  "no", Terraform will abort.

  Enter a value: yes #ここでyesと答えると、GCS上に

Successfully configured the backend "gcs"! Terraform will automatically
use this backend unless the backend configuration changes.
- terraform planを実行して問題ないことを確認します。
- ここまで来てようやく、GitHubActions経由でterraformを実行する下準備が整いました。
$ terraform plan
Refreshing Terraform state in-memory prior to plan...
The refreshed state will be used to calculate this plan, but will not be
persisted to local or remote state storage.

google_storage_bucket.tfstate-bucket: Refreshing state... [id=terraform-tfstate-<PROJECT_ID>]

------------------------------------------------------------------------

No changes. Infrastructure is up-to-date.

This means that Terraform did not detect any differences between your
configuration and real physical resources that exist. As a result, no
actions need to be performed.
(中略)
$
GitHubActions設定
- 以下にサンプルコードを置いておきます。
- https://github.com/koitatu/github-actions-sample-template-for-gcp-terraform
- 基本README.mdの通り、以下3つの対応で行けるはずです。
-
-
..githubディレクトリを.githubへリネームして配置
-
-
- GitHubのリポジトリ側で、Secretsを2つ設定します。
- GOOGLE_CREDENTIALS
- GCPのサービスアカウントのキーファイルを設定します。
- この記事の例では
gcp_terraform_account.jsonの中身を貼り付けて設定します。
- この記事の例では
- GCPのサービスアカウントのキーファイルを設定します。
- SLACK_WEBHOOK_URL
- SlackのIncommingWebHookのURLを貼り付けて設定します。
-
- なぜTerraform Cloudを利用していないのか。
- コード読んでいただくとわかるのですが、DockerHubにある、hashicorp/terraform:lightのイメージを利用しています。
- これ以上SaaSのアカウントを増やしたくないからという、どうしようもない理由です。
- 今回は面倒なので、先程作成したterraform-setting.tfと同じリポジトリに置いています。
GitHubActions経由でTerraform実行。
- 1.[Terraform公式] (https://registry.terraform.io/providers/hashicorp/google/latest/docs/resources/compute_instance)を参考にTFファイルを作成します。
- 今回は先程作成したterraform-setting.tfと同じリポジトリに置いています。
gce.tf
  resource "google_compute_instance" "create-by-terraform" {
	name         = "create-by-terraform"
	machine_type = "e2-micro"
	zone         = "asia-northeast1-a"
	tags = ["terraform-test"]

	boot_disk {
	  initialize_params {
		size  = 10
		type  = "pd-standard"
		image = "debian-cloud/debian-10"
	  }
	}

	network_interface {
	  network       = "default"
          access_config {
        // Ephemeral IP
        }
	}

	service_account  {
	  scopes = ["logging-write", "monitoring-write"]
	}
  }
- 2.developブランチへプッシュします。
- 3.GitHubActionsでterraform plan+ Slack通知が実行されます。
- 4.developブランチ→mainブランチへマージします。
- 5.GitHubActionsでterraform + Slack通知が実行されます。
- 6.GCPコンソールを見に行くと…無事インスタンスが作成されていますね…!

これでTerraformファイルの編集と、GitHubへのプッシュ、マージだけで、GCPのリソース作成ができるようになりました。とっても楽ですね!
記事長いので、後日分割して再掲しますね。
ここまでご覧いただき、ありがとうございました。
