追記:最新版のphoenix1.3とElmについてはこちらの方を参照してください。
ElmからPhoenix v1.3のRest APIを叩いてみる - Qiita
Elmのバックエンドとして、Phoenixを使いたいと思いました。そのためにElixirやPhoenixを少し勉強しました。今回はその出発点になる知識をメモっておきたいと思います。以下のサイトを参考にしました。
Phoenix and Elm, a real use case (pt. 1) - Code, Love & Boards
Setting up Elm with Phoenix – Brandon Richey – Medium
今回は単にPhoenixのフロントエンドとしてelmの単純な画面を表示するだけのプログラムを作ります。まず以下の手順でElmとElixir、Phoenixのインストールを行っていると仮定します。
Elm開発環境について - Qiita
CentOS7にErlangとElixir、Phoenixをインストールしてみる - Qiita
Phoenixでは、Brunchを使って、静的なアセットをビルドしています。Elmコードはbrunchに従ってコンパイルされ、ロードされます。幸いなことに、ElmコードをコンパイルするためのBrunch pluginであるelm-brunchが利用できます。さっそくプロジェクトを構築していきましょう。
Phoenixのプロジェクトを作成します
mix phoenix.new phoenix_elm_test
elm-brunchをインストールします
cd phoenix_elm_test
npm install --save-dev elm-brunch
brunch-config.jsを編集します。2か所の追加が必要です(追加1と追加2)。
exports.config = {
  // See http://brunch.io/#documentation for docs.
  files: {
    javascripts: {
      joinTo: "js/app.js"
    },
    stylesheets: {
      joinTo: "css/app.css",
      order: {
        after: ["web/static/css/app.css"] // concat app.css last
      }
    },
    templates: {
      joinTo: "js/app.js"
    }
  },

  conventions: {
    assets: /^(web\/static\/assets)/
  },

  // Phoenix paths configuration
  paths: {
    // Dependencies and current project directories to watch
    watched: [
      "web/static",
      "test/static",
//-------------追加1
      "web/elm"
//-------------
    ],
    // Where to compile files to
    public: "priv/static"
  },

  // Configure your plugins
  plugins: {
//-------------追加2
    elmBrunch: {
      elmFolder: "web/elm",
      mainModules: ["Main.elm"],
      outputFolder: "../static/vendor"
    },
//-------------
    babel: {
      // Do not use ES6 compiler in vendor code
      ignore: [/web\/static\/vendor/]
    }
  },

  modules: {
    autoRequire: {
      "js/app.js": ["web/static/js/app"]
    }
  },

  npm: {
    enabled: true
  }
};
特に追加2のoutputFolderに注目してください。一般的にvendorフォルダはBrunchによってこれ以上変換(コンパイル)されないファイルの置き場所で、そこのファイルは全て、appプログラムの前にロードされ、連結されるという決まりのようです。以下で見るようにjs/app.jsからVendor/Main.js(Elmのコンパイル結果)を参照していますが、特にNotFoundエラーも出さずに、Elm.Mainモジュールを利用できます。
http://brunch.io/docs/config
http://brunch.io/docs/concepts
次にweb/elmディレクトリを作成しcdして、Elmコードに必要なパッケージをインストールします。今回のElmコードにはelm-lang/htmlだけでokです。
mkdir web/elm
cd web/elm
elm-package install elm-lang/html
# elm-package install elm-lang/http
# elm-package install simonh1000/elm-jwt
次にweb/elm/Main.elmを作成します。
module Main exposing (..)

import Html exposing (Html, text)

main : Html msg
main =
  text "こんちわ、Elmさん!"
次にweb/templates/page/index.html.eexを編集して、先頭に以下の行を追加します。
<div id="elm-container"></div>
最後にweb/static/js/app.jsを編集して、末尾に以下の2行を追加します。Elm.Mainは当然 web/static/vendor/Main.jsを参照していますが、前述の通り、特に明示的なimportなどは必要ないようです。
const elmDiv = document.querySelector("#elm-container")
const elmApp = Elm.Main.embed(elmDiv)
編集が終了したので、プロジェクトのトップに戻り、以下のコマンドを打ちプロジェクトを立ち上げます。
mix ecto.create
mix phx.server
Phoenix起動時にElmコードがコンパイルされた旨のメッセージが確認できます。
[info] Running PhoenixElmTest.Endpoint with Cowboy using http://0.0.0.0:4000
Elm compile: Main.elm, in web/elm, to ../static/vendor/main.js
10:16:47 - info: compiling
10:16:50 - info: compiled 66 files into 2 files, copied 3 in 10.3 sec
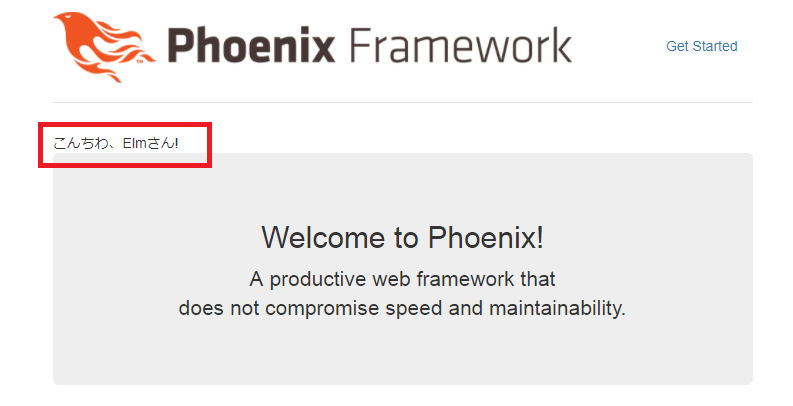
ブラウザからアクセスするとElmコードの出力が確認できます。
http://www.xxxx.jp:4000/
以下は画面キャプチャーです。
これで、Phoenixプロジェクトの中でElmが使えるようになりました。Webアプリの骨格を成すものができた感じで、うれしいです。
