プラグインと今回の構成について
まずは、以下の図を頭に入れておきます。Microsoftが掲げるCopilot stack × Pluginsの概要図です
以下記事がとても参考になります。

続いて、プラグインについてもう少し深掘りします。
以下のOpenAI公式ドキュメントにプラグインの詳細な仕様が記載されています。
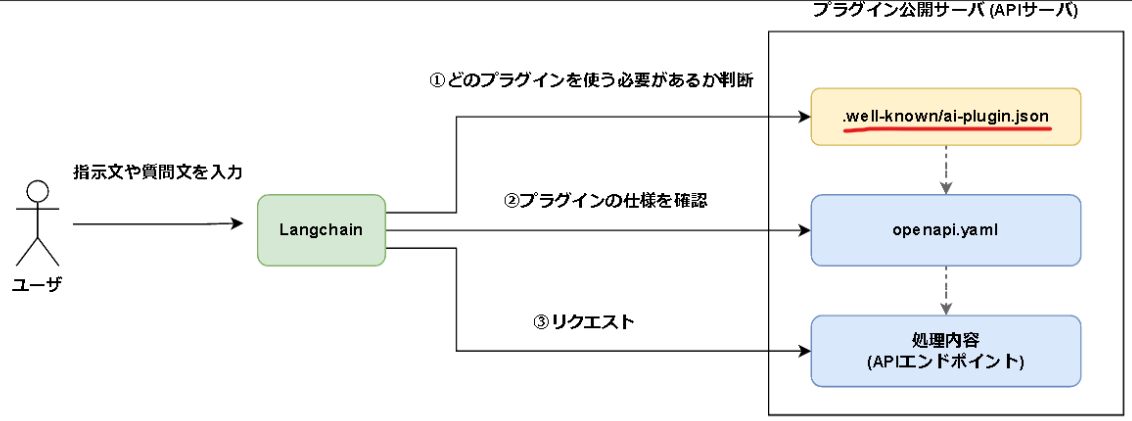
上記ドキュメントの構成を図にすると以下のようになるかと思います。
(私の中のイメージであり、実際の処理の流れや構成とは異なる可能性があります。)

ここで、
- プラグイン公開サーバ内の構成 → ChatGPT規格のプラグイン
と呼ぶことにします。
さきほどの図に照らし合わせると以下のようになりますね。
プラグインをGPT-4から呼出し可能になる。といった内容を赤線で示しました。

プラグインの下にAIオーケストレーションというコンポーネントがいますね。
矢印の繋がりを見るとプラグインとつながっているので、ChatGPT規格のプラグインを呼出し可能ということが分かります。
つまり、何が言いたいの?ってことですが、
「 ChatGPT規格のプラグインを開発すれば様々なコンポーネントから呼出し可能になるよ 」ということです。
ここまでの前置きを踏まえ、本記事は以下に取り組みその内容をまとめています。
- ChatGPT規格のプラグイン開発
- AIオーケストレーションにLangchainを使ってプラグイン呼出し
図にすると以下のようになります。(プラグイン呼出し元がLangchainになっただけです。)

プラグイン開発の手順
① API構築
② OpenAPIのドキュメント作成 (openapi.yamlの作成)
③ プラグインのメタデータ作成 (.well-known/ai-plugin.jsonの作成)
公式ドキュメントでは以下のように記述されています。
①Build an API
②Document the API in the OpenAPI yaml or JSON format
③Create a JSON manifest file that will define relevant metadata for the plugin
以上をまとめると、やることは3つです。
「 openapi.yamlを書く → APIサーバを立てる → ai-plugin.jsonを書く 」
(openapi.yaml=APIの設計書という位置付けとし、①と②の順序が逆転しています)
①② API構築 & OpenAPIのドキュメント作成

まずはopenapi.yamlを作成します。openaiとopenapiがややこしいですが、openapiの仕様に従いyamlファイルを作成します。
infoセクションのdescriptionは大切です。ここをみてChatGPTがプラグインの利用判断を行うためです。
When a query is run in ChatGPT, it will look at the description that is defined in the info section to determine if the plugin is relevant for the user query.
openapi: 3.0.1
info:
  title: TODO Plugin
  # ChatGPTはdescriptionを見てどのプラグインを使用するか判断するのでここ大事。
  description: A plugin that allows the user to create and manage a TODO list using ChatGPT.
  version: 'v1'
servers:
  - url: http://localhost:5000
paths:
  /todos:
    get:
      operationId: getTodos
      summary: Get the list of todos
      responses:
        '200':
          description: OK
          content:
            application/json:
              schema:
                $ref: '#/components/schemas/getTodoResponse'

components:
  schemas:
    getTodoResponse:
      type: object
      properties:
        todos:
          type: array
          items:
            type: string
          description: The list of todos
プレビューしてみます。よさそうですね。

では、上記のopenapi.yamlの仕様に従ってAPIサーバを構築します。
まずはレスポンスの型・形式をPythonファイルとして出力しておきます。具体的にはopenapi.yamlのスキーマセクションの内容をdatamodel-code-generatorを使用してPythonファイルとして出力しておきます。
datamodel-codegen --input openapi.yaml --input-file-type openapi --output schemas.py
以下のように、今回使用するレスポンスに該当するクラスが出来上がります。
class GetTodoResponse(BaseModel):
    todos: Optional[List[str]] = Field(None, description='The list of todos')
このクラスを使用しつつ、FlaskでAPIサーバを構築します。
from flask import Flask
from flask_restful import Resource, Api
from flask_cors import CORS

# アプリケーション設定
app = Flask(__name__)
CORS(app)
api = Api(app)


# リクエスト・レスポンスのスキーマ定義
from schemas import (
    GetTodoResponse
)


# エンドポイントの定義
class Todos(Resource):
    def get(self):
        todos = ['todo1', 'todo2', 'todo3']

        return GetTodoResponse(todos=todos).dict()


# エンドポイントの追加
api.add_resource(Todos, '/todos')


# サーバー起動
if __name__ == '__main__':
    app.run(debug=True)
では、サーバを起動しリクエストを投げて動作確認してみます。
python app.py

/todosにGETリクエストを投げ、TODOリストが返ってきています。よさそうですね。
③ プラグインのメタデータ作成
この手順で行っていくことは主に2つです。
-
.well-known/ai-plugin.jsonの作成 - APIサーバの修正 (
app.py)
まずは、.well-known/ai-plugin.jsonを作成します。
これはプラグインの詳細情報を記載したJSONファイルといったイメージです。
公式ドキュメントにフィールド一覧が記載されています。
| FIELD | TYPE | DESCRIPTION / OPTIONS | REQUIRED |
|---|---|---|---|
| schema_version | String | マニフェストファイルのバージョン | ✅ |
| name_for_model | String | モデルに提供する名前(スペースは不可、英数字のみ)。最大50文字。 | ✅ |
| name_for_human | String | ユーザに提供する名前。最大20文字。 | ✅ |
| description_for_model | String | モデルに提供するプラグインの説明。最大8,000文字。 | ✅ |
| description_for_human | String | ユーザに提供するプラグインの説明。最大100文字。 | ✅ |
| auth | ManifestAuth | 認証スキーマ。ユーザ認証を行う場合に使用 | ✅ |
| api | Object | APIの仕様 | ✅ |
| logo_url | String | ロゴを取得するためのURL。推奨サイズ: 512 x 512。透過背景がサポート。GIFは非サポート。 | ✅ |
| contact_email | String | 連絡先メールアドレス | ✅ |
| legal_info_url | String | ユーザーがプラグイン情報を表示するためのリダイレクトURL | ✅ |
| HttpAuthorizationType | HttpAuthorizationType | "bearer"または"basic" | ✅ |
| ManifestAuthType | ManifestAuthType | 'none' or 'user_http' or 'service_http' or 'oauth' | |
| interface BaseManifestAuth | BaseManifestAuth | type: ManifestAuthType; instructions: string; | |
| ManifestNoAuth | ManifestNoAuth | 認証不要:BaseManifestAuth & { type: 'none', } | |
| ManifestAuth | ManifestAuth | ManifestNoAuth、ManifestServiceHttpAuth、ManifestUserHttpAuth、ManifestOAuthAuth |
ひとまず公式ドキュメント通りのJSONファイルを作成しておきます。URLをFlaskに合わせてlocalhost:5000としています。
{
    "schema_version": "v1",
    "name_for_human": "TODO List",
    "name_for_model": "todo",
    "description_for_human": "Manage your TODO list. You can add, remove and view your TODOs.",
    "description_for_model": "Help the user with managing a TODO list. You can add, remove and view your TODOs.",
    "auth": {
        "type": "none"
    },
    "api": {
        "type": "openapi",
        "url": "http://localhost:5000/openapi.yaml"
    },
    "logo_url": "http://localhost:5000/logo.png",
    "contact_email": "support@example.com",
    "legal_info_url": "http://www.example.com/legal"
}
続いて、app.pyを編集します。プラグイン公開を行う際に以下のリクエストが飛びます。
-
/.well-known/ai-plugin.jsonにリクエストを行い、プラグインの詳細情報をロードする -
/openapi.yamlにリクエストを行い、OpenAPI仕様をロードする -
/logo.pngにリクエストを行い、ロゴに使用する写真をロードする (ChatGPTから呼出す際に必要?)
これらに対応できるようにapp.pyを修正します。
今回、AIオーケストレーションとしてLangchainからプラグインを呼び出します。
Langchaingのソースコードを見てみると、/logo.pngへのリクエストは存在しなかったため省いています。
おそらく、ChatGPTのプラグインとして公開する際は/logo.pngのリクエストを処理可能な状態にしておく必要があります。
(要調査)
やっていることとしては、該当ファイルを読み込んで返すだけですね。
import os
import yaml
from flask import Flask, jsonify, request, Response
from flask_restful import Resource, Api
from flask_cors import CORS

# アプリケーション設定
app = Flask(__name__)
CORS(app)
api = Api(app)


# リクエスト・レスポンスのスキーマ定義
from schemas import (
    GetTodoResponse
)


@app.route("/.well-known/ai-plugin.json")
def plugin_manifest():
    with open("./.well-known/ai-plugin.json") as f:
        text = f.read()
        return Response(text, content_type="application/json")


@app.route('/openapi.yaml')
def serve_openapi_yaml():
    with open(os.path.join(os.path.dirname(__file__), 'openapi.yaml'), 'r') as f:
        yaml_data = f.read()
    yaml_data = yaml.load(yaml_data, Loader=yaml.FullLoader)
    return jsonify(yaml_data)


# エンドポイントの定義
class Todos(Resource):
    def get(self):
        todos = ['todo1', 'todo2', 'todo3']

        return GetTodoResponse(todos=todos).dict()


# エンドポイントの追加
api.add_resource(Todos, '/todos')


# サーバー起動
if __name__ == '__main__':
    app.run(debug=True)
Langchainから呼び出してみる
まず、使用する基盤モデルをセットアップします。
今回はAzure OpenAIを使用しています。
- モデル名: gpt-35-turbo
- バージョン:0613
# 基盤モデルのセットアップ
openai.api_type = "azure"
openai.api_version = os.getenv("AZURE_OPENAI_API_VERSION")

llm = ChatOpenAI(
    model_name=os.getenv("AZURE_OPENAI_DEPLOYMENT_NAME"),
    openai_api_key=os.getenv("AZURE_OPENAI_API_KEY"),
    openai_api_base=os.getenv("AZURE_OPENAI_ENDPOINT"),
    model_kwargs={
        'deployment_id': os.getenv("AZURE_OPENAI_DEPLOYMENT_NAME")
    },
    temperature=0,
)
次に、ツールをロードします。ツールは、Langchainエージェントに装備する機能というイメージです。
ここでは、2つのツールをロードしています。
- requests: Pythonのrequestsモジュールを使ってHTTPリクエストを行うためのツール
- AIPluginTool: ChatGPT規格のプラグインをロードしてLangchain上で使用するためのツール
# HTTPリクエストを行うためのツールをロード
tools = load_tools(["requests"])

# プラグインのロード
plugin_url = "http://localhost:5000/.well-known/ai-plugin.json"
tools.append(AIPluginTool.from_plugin_url(plugin_url))
AIPluginTool内で、プラグイン仕様の取得とOpenAPI仕様の取得が行われます。
そのため、上記コードを実行するとプラグイン公開サーバ側にリクエストが届きます。

では、エージェントをセットアップした後、指示文を投げてみます。
- エージェントタイプ: ZERO_SHOT_REACT_DESCRIPTION
# エージェントのセットアップ
agent_chain = initialize_agent(
    tools=tools,
    llm=llm,
    agent=AgentType.ZERO_SHOT_REACT_DESCRIPTION,
    vebose=True,
)

# エージェント実行
result = agent_chain.run("現在のtodoを表示して")
print(result)
結果は以下のようになりました。イイ感じですね。
The current TODO list is:
- todo1
- todo2
- todo3
ちゃんとリクエストが届いていることも確認できました。

ベストプラクティス
公式ドキュメントを読むと、
.well-known/ai-plugin.jsonに記載するdescription_for_modelについてベストプラクティスがまとめられていました。
「 してほしくないこと 」が多めに記載されていました。
ChatGPTの振る舞いを制御しようとしない
Your descriptions should not attempt to control the mood, personality, or exact responses of ChatGPT. ChatGPT is designed to write appropriate responses to plugins.
ダメな例:
ユーザーが自分の todo リストを見たいと要求した場合は、必ず「あなたの todo リストを見つけることができました! [x] 個の todo があります: [ここに todo をリストします]。
ご希望であれば、さらに todo を追加できます!」と常に応答してください。
ユーザの要求がない場合、プラグインの使用を推奨しない
Your descriptions should not encourage ChatGPT to use the plugin when the user hasn’t asked for your plugin’s particular category of service.
ダメな例:
ユーザーが何らかの種類のタスクや計画について言及するたびに、TODO プラグインを使用して ToDo リストに何かを追加したいかどうかを尋ねます。
プラグイン使用のトリガーを指定しない
Your descriptions should not prescribe specific triggers for ChatGPT to use the plugin. ChatGPT is designed to use your plugin automatically when appropriate.
ダメな例:
ユーザーがタスクについて言及したら、「これを TODO リストに追加しますか? 続行するには『はい』と言ってください。」と応答します。
プラグインの返り値は自然言語ではなく生データにする
Plugin API responses should return raw data instead of natural language responses unless it’s necessary. ChatGPT will provide its own natural language response using the returned data.
ダメな例:
あなたのtodoリストを見つけることができました! やるべきことは 2 つあります。食料品の買い出しと犬の散歩です。 ご希望であれば、さらに Todo を追加できます。
いい例:
{ "todos": [ "get groceries", "walk the dog" ] }
あとがき
今回、記事にはGETのみで試したケースをまとめました。
「TODOリストにアイテムを追加する」といった処理を行うPOSTリクエストを足して同じように実行してみると、うまく動作しませんでした。
具体的には、「TODOを表示した後、'Qiitaを書く'をTODOに追加して」という指示を送ると、
POSTリクエストしてくれなかったり、エンドポイントを間違えたりしていました。
対応策としては、以下2つが考えられるでしょうか?
- Langchainのツールのプロンプトをチューニングする
- gpt-4を使って試してみる
ただ今回の入門により大体の処理の流れをつかめたので、Fucntion callingを活用して自前実装してみようかと思います。Function callingを使えばプロンプトチューニングの負担が減りますしね。
Azure OpenAIでもサポートされたようなので次回はそれをまとめます。
また、今回のソースコードをGithubに置いています。随時アップデートしていきます。