この記事について
前回に引き続きVContainerの説明をしていきます。
今回はLifetimeScopeの親子関係を制御する方法を紹介します。
親子関係を通して依存関係の範囲を階層構造で管理できます。
目次ページ: VContainer入門
親子関係を試してみる
とりあえず使ってみます。
サンプルとしてLogger、Calculatorクラスと、その2つに依存するCalculatorTestクラスを用意します。
using UnityEngine;
using VContainer;
using VContainer.Unity;

// 先頭に[Logger]を付けてログ出力するクラス
public sealed class Logger
{
    public void Log(string message) => Debug.Log("[Logger] " + message);
}

// 足し算するだけのクラス
public sealed class Calculator
{
    public int Add(int a, int b) => a + b;
}

// LoggerとCalculatorに依存するクラス
public sealed class CalculatorTest : IInitializable
{
    private Logger logger;
    private Calculator calculator;

    [Inject]
    public CalculatorTest(Logger logger, Calculator calculator)
    {
        this.logger = logger;
        this.calculator = calculator;
    }

    // クラスがインスタンス化された直後に呼ばれる
    public void Initialize()
    {
        Calculate(1, 2);
    }

    private void Calculate(int a, int b)
    {
        int result = calculator.Add(a, b);
        logger.Log($"{a} + {b} = {result}");
    }
}
このCalculatorTestの依存関係を解決するために、次のParentLifetimeScopeとChildLifetimeScopeを用意します。
public class ParentLifetimeScope : LifetimeScope
{
    protected override void Configure(IContainerBuilder builder)
    {
        builder.Register<Logger>(Lifetime.Singleton);
    }
}
public class ChildLifetimeScope : LifetimeScope
{
    protected override void Configure(IContainerBuilder builder)
    {
        builder.Register<Calculator>(Lifetime.Singleton);
        builder.RegisterEntryPoint<CalculatorTest>();
    }
}
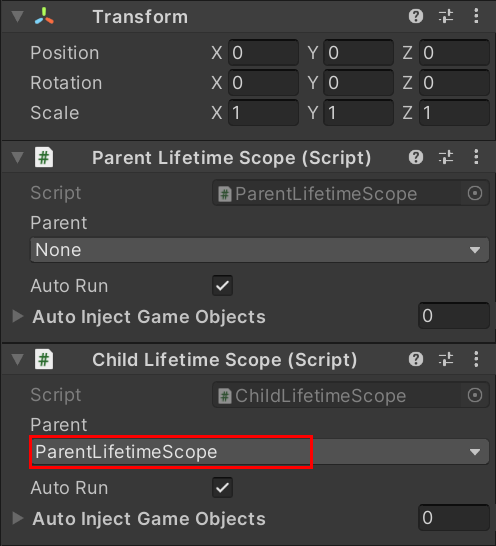
実際の親子関係はインスペクタ上で設定できます。
下の画像のようにParentLifetimeScopeとChildLifetimeScopeを配置して、ChildLifetimeScopeのParentの部分にParentLifetimeScopeを設定します。
実行すると「1 + 2 = 3」と表示されてCalculatorTestが生成されていることを確認できます。
親のLifetimeScopeの探索
インスペクタのParentで指定すると、ロード中のシーン全体からそのLifetimeScopeを探索します。
なのでParentのLifetimeScopeはシーンのどこかに配置しておく必要があります。
親子関係があるLifetimeScopeの依存性解決
LifetimeScopeの親子関係は依存解決の順番に影響します。
具体的には、子のLifetimeScopeから親に向かって見つかるまで順番に探索されます。
例えば、先ほどのCalculatorTestの場合はCalculatorとLoggerに依存しています。
CalculatorはChildLifetimeScopeの中でRegisterされているのが見つかります。
LoggerはChildLifetimeScopeの中では見つからないので、親のParentLifetimeScopeでRegisterされているのが見つかります。
もし一番上の親まで見つからなければ例外が発生します。
RootLifetimeScope
全てのLifetimeScopeの親となる、ルートのLifetimeScopeを設定できます。
次の手順で設定できます。
- Unityメニューの「Assets > Create > VContainer > VContainer Settings」でVContainerSettingsを作る
- 空のPrefabを作る
- PrefabにルートにしたいLifetimeScopeをアタッチする
- 作成したPrefabをVContainerSettingsのRootLifetimeScopeに設定する
親子関係を設定する
インスペクタのParentに設定する以外でも親子関係を設定できます。
LifetimeScopeのスクリプトで親を設定する
LifetimeScopeのAwakeでparentReference.Objectに親LifetimeScopeを直接設定できます。
public class ChildLifetimeScope : LifetimeScope
{
    protected override void Awake()
    {
        var parentLifetimeScope = gameObject.AddComponent<ParentLifetimeScope>();

        // 親にしたいLifetimeScopeを渡す
        parentReference.Object = parentLifetimeScope;

        // 必ずbase.Awake()を呼び出す
        base.Awake();
    }
}
親を設定してLifetimeScopeを生成する
LifetimeScope.EnqueueParentを使うと、これから生成するLifetimeScopeの親を設定できます。
var parentLifetimeScope = gameObject.AddComponent<ParentLifetimeScope>();

using (LifetimeScope.EnqueueParent(parentLifetimeScope))
{
    // ここで生成されたLifetimeScopeの親はparentLifetimeScopeになる
    gameObject.AddComponent<ChildLifetimeScope>();
}
ここではChildLifetimeScopeの親をparentLifetimeScopeにするのに使っています。
より実践的な使い道としては、usingのブロックの中でシーン読み込みやPrefab生成をすれば、そのシーンやPrefabの中の全てのLifetimeScopeの親を設定できます。
ただしLifetimeScope.EnqueueParentのネストは対応されていません。
LifetimeScope.EnqueueParentの中でLifetimeScope.EnqueueParentを使おうとするとおかしな動作になります。
親を設定してPrefabを生成する
CreateChildFromPrefabを使うと、親を設定してPrefabを生成できます。
public sealed class TestMonoBehaviour : MonoBehaviour, ITestMonoBehaviour
{
    [SerializeField] private LifetimeScope prefab;

    public void Start()
    {
        var parentLifetimeScope = gameObject.AddComponent<ParentLifetimeScope>();

        LifetimeScope childLifetimeScope = parentLifetimeScope.CreateChildFromPrefab(prefab);
    }
}
CreateChildFromPrefabの引数にはPrefab内のLifetimeScopeを渡します。
渡したLifetimeScopeの親が設定された上でそのPrefabが生成されます。
Lifetime.SingletonとLifetime.Scoped
Registerするときに指定するLifetime.Singleton/Scoped/Transientについて説明します。
protected override void Configure(IContainerBuilder builder)
{
    builder.Register<A>(Lifetime.Transient);
    builder.Register<B>(Lifetime.Singleton);
    builder.Register<C>(Lifetime.Scoped);
}
Lifetime.TransientはResolveするたびに毎回新しいインスタンスが生成されます。
Lifetime.ScopedはLifetimeScopeごとに別々のインスタンスが生成され、その中だけで使い回されます。
つまりLifetimeScopeの親子関係があるときは、親と子で別のインスタンスが生成されます。
Lifetime.Singletonは親子間でも同じインスタンスが使い回されます。

