はじめに
前回はVPC Peeringについてまとめましたが、今回はSite-to-Site VPNを使い、オンプレミスの環境とVPN接続を行ってみようと思います。
Site-to-Site VPNとは
前回まとめたVPC PeeringはAWS環境のVPC同士を接続するサービスでしたが、Site-to-Site VPNは主にオンプレミスのネットワーク機器とIPsec VPNで接続を行う、LAN間接続のサービスとなります。
Site-to-Site VPNで接続を行った場合、相手側ネットワーク機器が1台構成であった場合でも、冗長化のため、VPNトンネルが2本作成され、また、デフォルトでは相手側ネットワークとのルーティングのやり取りはBGPという動的ルーティングプロトコルでやり取りが行われます。
相手側ネットワーク機器1台と繋ぐ一番シンプルな構成でも上記の通りかなり複雑な構成となりますが、AWSがサンプルファイルを提供しているベンダ、プラットフォームの機器を使用しているようであれば、Site-to-Site VPNを設定した際に、必要な定義・設定コマンドが記載されたコンフィグファイルをダウンロードすることができるので、比較的簡単に設定が行えるかと思います。
逆に、AWSからサンプルファイルが提供されていないベンダ、プラットフォームの機器を使用していたり、BGPが使用できない機器を使用しているような場合は、VPNのパラメータを個別に設定したり、ルーティングも静的ルーティングで設定したりしないといけなくなったりと、ハードルがかなり上がります。
以下、Site-to-Site VPNを利用する上で、相手側ネットワーク機器側に必要な要件。
AWS側で行うSite-to-Site VPNの設定を行う前にいくつかSite-to-Site VPN特有の内容を覚える必要があるため、以下より解説していきます。
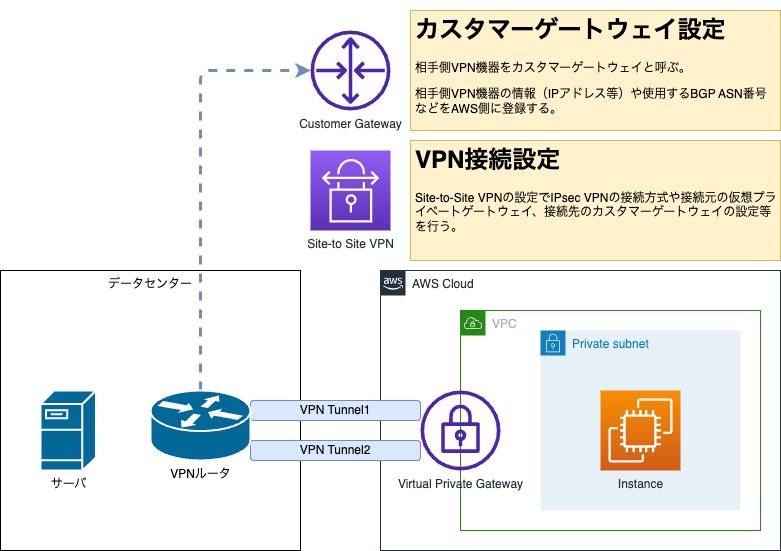
仮想プライベートゲートウェイ
オンプレミスのネットワーク機器とIPsec VPN接続を行うゲートウェイとなります。
オンプレミスのネットワークと接続したいVPCをアタッチして使用するため、オンプレミスのネットワークと接続したいVPCが複数存在する場合は、VPC分、仮想プライベートゲートウェイ(VPG)が必要となります。
カスタマーゲートウェイ
オンプレミス側でVPN接続を行うネットワーク機器を「カスタマーゲートウェイ」と呼びます。
カスタマーゲートウェイの設定で、相手側ネットワークのIPアドレスや使用するBGPのASN情報を登録して、Site-to-Site VPNの設定を行う際に対向先ネットワーク機器の情報として使用します。
今回の接続構成
Site-to-Site VPNによるVPN接続を試してみるため、今回は以下のような構成としました。
※前回作成しているVPC-Aを使い回すような構成。
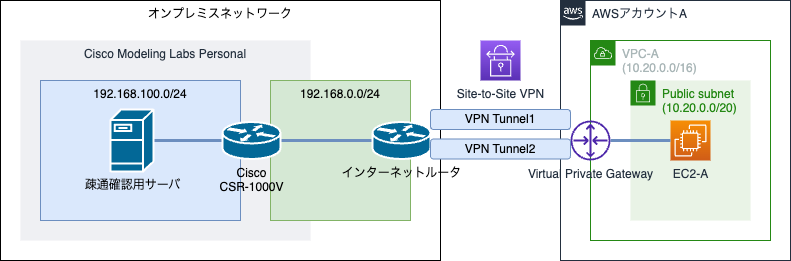
試すと言ってもSite-to-Site VPNで接続できる物理ルータは持っていないため、有料の製品ですがCisco社のルータやスイッチを仮想的に動作させてネットワークを構築できるCisco Modeling Labs Personal(以下CML)という製品を使って、CML上で作成した仮想VPNルータと接続してみようと思います。
CMLについて気になる方は以前の記事で15回にわたり紹介しているので、以下を参照してもらえればと思います。
Site-to-Site VPNの接続設定
以下より「AWS側の設定」、「オンプレミスネットワーク側の設定」と分けて、実際にSite-to-Site VPNの設定を行っていきます。
AWS側の設定
AWS側のSite-to-Site VPNの設定は、AWS側のゲートウェイとなる「仮想プライベートゲートウェイ」の設定、対向先ネットワーク情報を登録する「カスタマーゲートウェイ」の設定、IPsec VPNの定義などVPNの接続情報を設定する「Site-to-Site VPN接続」の設定の3つとなるため、それぞれ順番に設定していきます。
仮想プライベートゲートウェイの設定
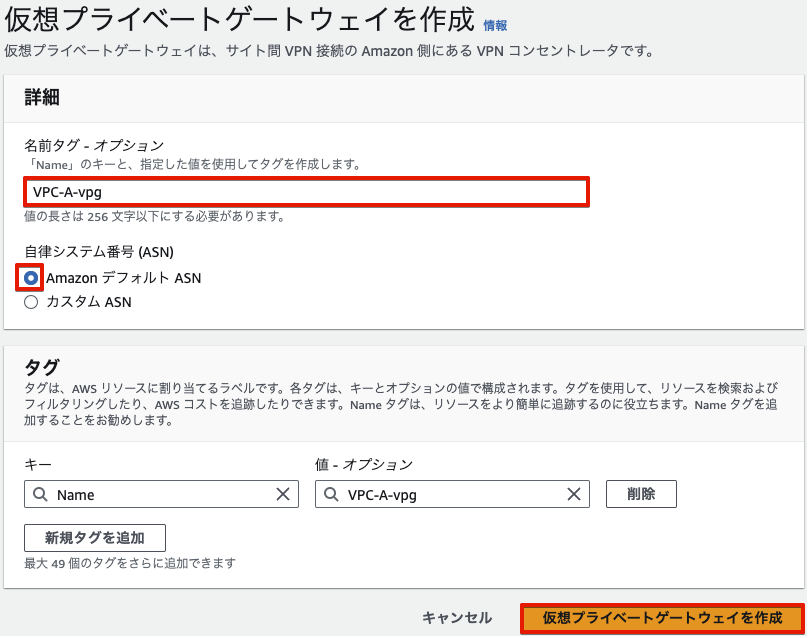
仮想プライベートゲートウェイの作成は、「VPCダッシュボード」から「仮想プライベートネットワーク(VPN)」→「仮想プライベートゲートウェイ」より「仮想プライベートゲートウェイを作成」で作成していきます。
設定自体は簡単で、名前とBGPで使用する自律システム番号というASNを、自分で付与したい場合は設定するだけです。
今回は以下のように名前を「VPC-A-vpg」、ASNを「Amazon デフォルト ASN」としました。
作成後、「仮想プライベートゲートウェイ」の「アクション」→「VPCへアタッチ」で、前回作成した「VPC-A」にアタッチしておきます。

カスタマーゲートウェイの設定
「VPCダッシュボード」から「仮想プライベートネットワーク(VPN)」→「カスタマーゲートウェイ」より「カスタマーゲートウェイを作成」で相手側ネットワークの情報を登録します。
証明書は今回は使用しないので、相手側のグローバルアドレス(上記接続構成で言うとインターネットルータのインターネット側に割り振られているIPアドレス)の指定と任意の名前を指定、BGPのASNはデフォルトで65000が割り振られるので今回はそのまま使用します。

Site-to-Site VPN接続の設定
「VPCダッシュボード」から「仮想プライベートネットワーク(VPN)」→「Site-to-Site VPN接続」より「VPN接続を作成する」でIPsec VPNの設定を行っていきます。
ゲートウェイの指定等、必須となる項目以外はデフォルトのままでも設定できますが、古い形式の暗号化アルゴリズムでも接続できる設定となるため、気になる方は調整しましょう。
今回はテスト目的なので以下のように設定しました。
| 項目 | 設定 | 備考 |
|---|---|---|
| 名前タグ | CSR-1000V-vpn | 任意の名前を指定 |
| ターゲットゲートウェイのタイプ | 仮想プライベートゲートウェイ | 今回はVPGを指定 |
| 仮想プライベートゲートウェイ | ※先程作成したVPGを指定 | |
| カスタマーゲートウェイ | 既存 | 予め作成済みのため、既存を指定 |
| カスタマーゲートウェイID | ※先程作成したカスタマーゲートウェイを指定 | |
| ルーティングオプション | 動的(BGPが必要) | AWS推奨となる動的を指定 |
| ローカルIPv4ネットワークCIDR | 空欄(0.0.0.0/0) | デフォルトのままとする |
| リモートIPv4ネットワークCIDR | 空欄(0.0.0.0/0) | デフォルトのままとする |
| トンネル1オプション | デフォルトのまま | 今回はデフォルトのままとする |
| トンネル2オプション | デフォルトのまま | 今回はデフォルトのままとする |
| タグ | デフォルトのまま | 今回はデフォルトのままとする |
設定しようとすれば細かく設定できますが、カスタマイズする際の注意点について簡単に説明します。
ローカル・リモートIPv4ネットワークCIDR
IPsec VPNには大きく分けて「ルートモード」と「ポリシーモード」という設定方法があります。
「ルートモード」は仮想トンネルインタフェースを作成してルーティングで転送するルートベースの方法となり、「ポリシーモード」は暗号化する送信元・送信先セグメントを指定して、合致する通信のみ暗号化して転送するポリシーベースの方法です。
今回はCisco機器に対して設定を行いますが、後述の設定ファイルサンプルで記載されている内容はルートモードでの設定となります。

ローカル・リモートIPv4ネットワークCIDRについての詳細が見つけられなかったので予想となりますが、おそらくローカル・リモートIPv4ネットワークCIDRでデフォルト(0.0.0.0/0)以外の設定を行った場合、ポリシーモードで設定しないと接続できないと思われます。
AWSがサンプルコンフィグを提供している機器によってはポリシーモードしか対応していない機器もあると思われるので、ベンダーによってはローカル・リモートIPv4ネットワークCIDRを指定することもできるかと思われますが、今回設定しているCiscoのCSRでは仮想トンネルインタフェースに対してポリシー設定ができないのでおそらくローカル・リモートIPv4ネットワークCIDRを指定することができないこと注意してください。
もしトンネルを通過する通信を制限したいようであれば、ローカル・リモートIPv4ネットワークCIDRで制限するのではなく、ネットワークACLやセキュリティグループで制限するようにしましょう。
トンネルの詳細オプション
「トンネルの詳細オプションを編集する」にチェックすると、トンネル生成する際に使用する暗号化アルゴリズムやIKEバージョンを制限することができます。
デフォルトではikev1でもikev2でも接続することができたり、暗号化アルゴリズムも、現在では推奨されていないAES128などでも接続できるようになっているため、できれば古い暗号化形式では接続できないように制限したほうが良いでしょう。
ダウンロードした設定の編集
作成した「Site-to-Site VPN接続」の設定を選択して、「設定をダウンロードする」を選択すると、ベンダーやプラットフォーム等のプルダウンメニューが表示されます。
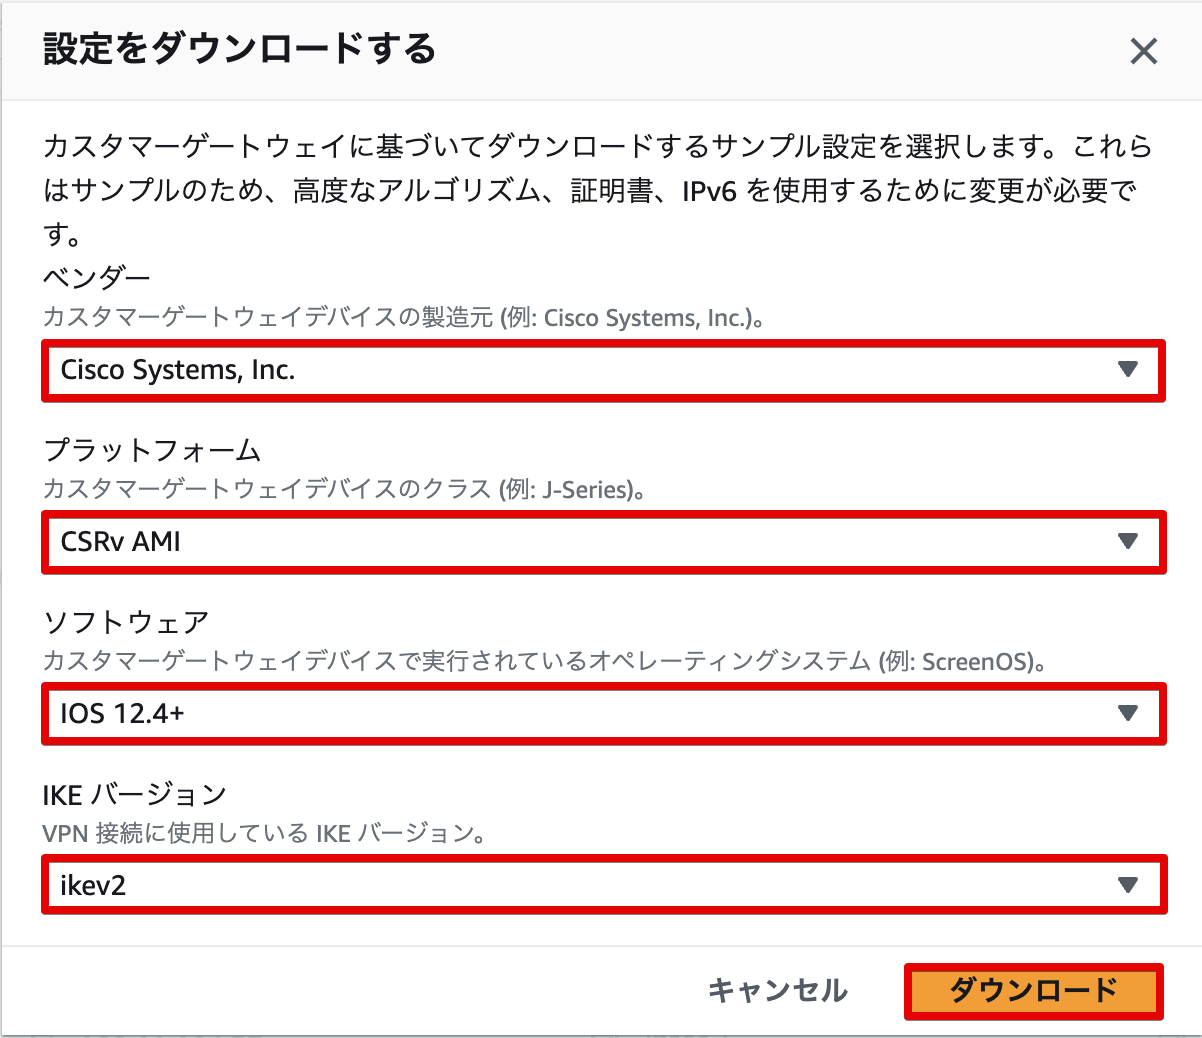
相手側ネットワーク機器のベンダー、バージョンに近いものを選択してダウンロードすることで、今まで設定した内容やAWS側のIPアドレスが埋め込まれたサンプルファイルをダウンロードできます。
一部マスクしていますが、以下ダウンロードできるサンプルファイルです。
ダウンロード設定ファイルサンプル(展開してください)
! Amazon Web Services
! Virtual Private Cloud

! AWS utilizes unique identifiers to manipulate the configuration of
! a VPN Connection. Each VPN Connection is assigned an identifier and is
! associated with two other identifiers, namely the
! Customer Gateway Identifier and Virtual Private Gateway Identifier.
!
! Your VPN Connection ID 		  : vpn-0e904c7db86e92c2a
! Your Virtual Private Gateway ID         : vgw-0f311166a0333ff93
! Your Customer Gateway ID		  : cgw-09703a7e27af32443
!
!
! This configuration consists of two tunnels. Both tunnels must be
! configured on your Customer Gateway.
!
! You may need to populate these values throughout the config based on your setup:
! <interface_name/private_IP_on_outside_interface> - External interface of the CSR

! --------------------------------------------------------------------------------
! IPSec Tunnel #1
! --------------------------------------------------------------------------------
! #1: Internet Key Exchange (IKE) Configuration
!
! A policy is established for the supported ISAKMP encryption,
! authentication, Diffie-Hellman, lifetime, and key parameters.
! Please note, these sample configurations are for the minimum requirement of AES128, SHA1, and DH Group 2.
! Category "VPN" connections in the GovCloud region have a minimum requirement of AES128, SHA2, and DH Group 14.
! You will need to modify these sample configuration files to take advantage of AES256, SHA256, or other DH groups like 2, 14-18, 22, 23, and 24.
! NOTE: If you customized tunnel options when creating or modifying your VPN connection, you may need to modify these sample configurations to match the custom settings for your tunnels.
!
! Higher parameters are only available for VPNs of category "VPN," and not for "VPN-Classic".
! The address of the external interface for your customer gateway must be a static address.
! Your customer gateway may reside behind a device performing network address translation (NAT).
! To ensure that NAT traversal (NAT-T) can function, you must adjust your firewall !rules to unblock UDP port 4500.
! If not behind NAT, and you are not using an Accelerated VPN, we recommend disabling NAT-T. If you are using an Accelerated VPN, make sure that NAT-T is enabled.
!
! Note that there are a global list of ISAKMP policies, each identified by
! sequence number. This policy is defined as #200, which may conflict with
! an existing policy using the same number. If so, we recommend changing
! the sequence number to avoid conflicts.
!
crypto ikev2 proposal PROPOSAL1
  encryption aes-cbc-128
  integrity sha1
  group 2
exit

! Specify public IP of outside interface instead of <interface_name/private_IP_on_outside_interface> in below
! configuration if CGW is behind NAT device and using IKEv2 'Startup-Action: Start' feature on AWS for the
! tunnel.
crypto ikev2 policy POLICY1
  match address local <interface_name/private_IP_on_outside_interface>
  proposal PROPOSAL1
exit

! The ISAKMP keyring stores the Pre Shared Key used to authenticate the
! tunnel endpoints.
!
crypto ikev2 keyring KEYRING1
  peer [AWS側グローバルIP1]
  address [AWS側グローバルIP1]
  pre-shared-key xxxxxxxxxxxxxxxxxxxxxxxxxxxxxxxx
exit

! An ISAKMP profile is used to associate the keyring with the particular
! endpoint.
!
! An ISAKMP IKEV2 profile is used to associate the keyring with the particular endpoint.
! Specify public IP of outside interface instead of <interface_name/private_IP_on_outside_interface> in below
! configuration if CGW is behind NAT device and using IKEv2  'Startup-Action: Start' feature on AWS for the
! Tunnel.
crypto ikev2 profile IKEV2-PROFILE
  match address local <interface_name/private_IP_on_outside_interface>
  match identity remote address [AWS側グローバルIP1]
  authentication remote pre-share
  authentication local pre-share
  keyring local KEYRING1
  lifetime 28800
  dpd 10 10 on-demand
exit

! #2: IPSec Configuration
!
! The IPSec transform set defines the encryption, authentication, and IPSec
! mode parameters.
! Category "VPN" connections in the GovCloud region have a minimum requirement of AES128, SHA2, and DH Group 14.
! Please note, you may use these additionally supported IPSec parameters for encryption like AES256 and other DH groups like 2, 5, 14-18, 22, 23, and 24.
! Higher parameters are only available for VPNs of category "VPN," and not for "VPN-Classic".
!
crypto ipsec transform-set ipsec-prop-vpn-0e904c7db86e92c2a-0 esp-aes 128 esp-sha-hmac
  mode tunnel
exit

! The IPSec profile references the IPSec transform set and further defines
! the Diffie-Hellman group and security association lifetime.
!
crypto ipsec profile ipsec-vpn-0e904c7db86e92c2a-0
  set pfs group2
  set security-association lifetime seconds 3600
  set transform-set ipsec-prop-vpn-0e904c7db86e92c2a-0
  set ikev2-profile IKEV2-PROFILE
exit

! Additional parameters of the IPSec configuration are set here. Note that
! these parameters are global and therefore impact other IPSec
! associations.
! This option instructs the router to clear the "Don't Fragment"
! bit from packets that carry this bit and yet must be fragmented, enabling
! them to be fragmented.
!
crypto ipsec df-bit clear

! This option enables IPSec Dead Peer Detection, which causes periodic
! messages to be sent to ensure a Security Association remains operational.
! If you are using Accelerated AWS VPN, please configure periodic Dead Peer Detection.
! isakmp keepalive threshold 10 retry 10 periodic
!
crypto isakmp keepalive 10 10

! This configures the gateway's window for accepting out of order
! IPSec packets. A larger window can be helpful if too many packets
! are dropped due to reordering while in transit between gateways.
!
crypto ipsec security-association replay window-size 128

! This option instructs the router to fragment the unencrypted packets
! (prior to encryption).
!
crypto ipsec fragmentation before-encryption


! --------------------------------------------------------------------------------
! #3: Tunnel Interface Configuration
!
! A tunnel interface is configured to be the logical interface associated
! with the tunnel. All traffic routed to the tunnel interface will be
! encrypted and transmitted to the VPC. Similarly, traffic from the VPC
! will be logically received on this interface.
!
! Association with the IPSec security association is done through the
! "tunnel protection" command.
!
! The address of the interface is configured with the setup for your
! Customer Gateway.  If the address changes, the Customer Gateway and VPN
! Connection must be recreated with Amazon VPC.
!
interface Tunnel1
  ip address 169.254.254.22 255.255.255.252
  ip virtual-reassembly
  tunnel source <interface_name/private_IP_on_outside_interface>
  tunnel destination [AWS側グローバルIP1]
  tunnel mode ipsec ipv4
  tunnel protection ipsec profile ipsec-vpn-0e904c7db86e92c2a-0
  ! This option causes the router to reduce the Maximum Segment Size of
  ! TCP packets to prevent packet fragmentation.
  ip tcp adjust-mss 1379
  no shutdown
exit

! --------------------------------------------------------------------------------

! #4: Border Gateway Protocol (BGP) Configuration
!
! BGP is used within the tunnel to exchange prefixes between the
! Virtual Private Gateway and your Customer Gateway. The Virtual Private Gateway
! will announce the prefix corresponding to your VPC.
!
! Your Customer Gateway may announce a default route (0.0.0.0/0),
! which can be done with the 'network' and 'default-originate' statements.
!
! The BGP timers are adjusted to provide more rapid detection of outages.
!
! The local BGP Autonomous System Number (ASN) (65000) is configured
! as part of your Customer Gateway. If the ASN must be changed, the
! Customer Gateway and VPN Connection will need to be recreated with AWS.
!
! 'Network' command will be used here to advertised CGW network to AWS via BGP. An example for a CGW with the prefix 192.168.100.0/24 is provided below:

router bgp 65000
  bgp log-neighbor-changes
  bgp graceful-restart
  address-family ipv4 unicast
    neighbor 169.254.254.21 remote-as 64512
    neighbor 169.254.254.21 ebgp-multihop 255
    neighbor 169.254.254.21 activate
    network 192.168.100.0 mask 255.255.255.0
    no auto-summary
    no synchronization
  exit-address-family
 exit
!
! --------------------------------------------------------------------------------
! IPSec Tunnel #2
! --------------------------------------------------------------------------------
! #1: Internet Key Exchange (IKE) Configuration
!
! A policy is established for the supported ISAKMP encryption,
! authentication, Diffie-Hellman, lifetime, and key parameters.
! Please note, these sample configurations are for the minimum requirement of AES128, SHA1, and DH Group 2.
! Category "VPN" connections in the GovCloud region have a minimum requirement of AES128, SHA2, and DH Group 14.
! You will need to modify these sample configuration files to take advantage of AES256, SHA256, or other DH groups like 2, 14-18, 22, 23, and 24.
! NOTE: If you customized tunnel options when creating or modifying your VPN connection, you may need to modify these sample configurations to match the custom settings for your tunnels.
!
! Higher parameters are only available for VPNs of category "VPN," and not for "VPN-Classic".
! The address of the external interface for your customer gateway must be a static address.
! Your customer gateway may reside behind a device performing network address translation (NAT).
! To ensure that NAT traversal (NAT-T) can function, you must adjust your firewall !rules to unblock UDP port 4500.
! If not behind NAT, and you are not using an Accelerated VPN, we recommend disabling NAT-T. If you are using an Accelerated VPN, make sure that NAT-T is enabled.
!
! Note that there are a global list of ISAKMP policies, each identified by
! sequence number. This policy is defined as #201, which may conflict with
! an existing policy using the same number. If so, we recommend changing
! the sequence number to avoid conflicts.
!
crypto ikev2 proposal PROPOSAL1
  encryption aes-cbc-128
  integrity sha1
  group 2
exit

! Specify public IP of outside interface instead of <interface_name/private_IP_on_outside_interface> in below
! configuration if CGW is behind NAT device and using IKEv2 'Startup-Action: Start' feature on AWS for the
! tunnel.
crypto ikev2 policy POLICY1
  match address local <interface_name/private_IP_on_outside_interface>
  proposal PROPOSAL1
exit

! The ISAKMP keyring stores the Pre Shared Key used to authenticate the
! tunnel endpoints.
!
crypto ikev2 keyring KEYRING1
  peer [AWS側グローバルIP2]
  address [AWS側グローバルIP2]
  pre-shared-key yyyyyyyyyyyyyyyyyyyyyyyyyyyyyyyy
exit

! An ISAKMP profile is used to associate the keyring with the particular
! endpoint.
!
! An ISAKMP IKEV2 profile is used to associate the keyring with the particular endpoint.
! Specify public IP of outside interface instead of <interface_name/private_IP_on_outside_interface> in below
! configuration if CGW is behind NAT device and using IKEv2  'Startup-Action: Start' feature on AWS for the
! Tunnel.
crypto ikev2 profile IKEV2-PROFILE
  match address local <interface_name/private_IP_on_outside_interface>
  match identity remote address [AWS側グローバルIP2]
  authentication remote pre-share
  authentication local pre-share
  keyring local KEYRING1
  lifetime 28800
  dpd 10 10 on-demand
exit

! #2: IPSec Configuration
!
! The IPSec transform set defines the encryption, authentication, and IPSec
! mode parameters.
! Category "VPN" connections in the GovCloud region have a minimum requirement of AES128, SHA2, and DH Group 14.
! Please note, you may use these additionally supported IPSec parameters for encryption like AES256 and other DH groups like 2, 5, 14-18, 22, 23, and 24.
! Higher parameters are only available for VPNs of category "VPN," and not for "VPN-Classic".
!
crypto ipsec transform-set ipsec-prop-vpn-0e904c7db86e92c2a-1 esp-aes 128 esp-sha-hmac
  mode tunnel
exit

! The IPSec profile references the IPSec transform set and further defines
! the Diffie-Hellman group and security association lifetime.
!
crypto ipsec profile ipsec-vpn-0e904c7db86e92c2a-1
  set pfs group2
  set security-association lifetime seconds 3600
  set transform-set ipsec-prop-vpn-0e904c7db86e92c2a-1
  set ikev2-profile IKEV2-PROFILE
exit

! Additional parameters of the IPSec configuration are set here. Note that
! these parameters are global and therefore impact other IPSec
! associations.
! This option instructs the router to clear the "Don't Fragment"
! bit from packets that carry this bit and yet must be fragmented, enabling
! them to be fragmented.
!
crypto ipsec df-bit clear

! This option enables IPSec Dead Peer Detection, which causes periodic
! messages to be sent to ensure a Security Association remains operational.
! If you are using Accelerated AWS VPN, please configure periodic Dead Peer Detection.
! isakmp keepalive threshold 10 retry 10 periodic
!
crypto isakmp keepalive 10 10

! This configures the gateway's window for accepting out of order
! IPSec packets. A larger window can be helpful if too many packets
! are dropped due to reordering while in transit between gateways.
!
crypto ipsec security-association replay window-size 128

! This option instructs the router to fragment the unencrypted packets
! (prior to encryption).
!
crypto ipsec fragmentation before-encryption


! --------------------------------------------------------------------------------
! #3: Tunnel Interface Configuration
!
! A tunnel interface is configured to be the logical interface associated
! with the tunnel. All traffic routed to the tunnel interface will be
! encrypted and transmitted to the VPC. Similarly, traffic from the VPC
! will be logically received on this interface.
!
! Association with the IPSec security association is done through the
! "tunnel protection" command.
!
! The address of the interface is configured with the setup for your
! Customer Gateway.  If the address changes, the Customer Gateway and VPN
! Connection must be recreated with Amazon VPC.
!
interface Tunnel2
  ip address 169.254.175.218 255.255.255.252
  ip virtual-reassembly
  tunnel source <interface_name/private_IP_on_outside_interface>
  tunnel destination [AWS側グローバルIP2]
  tunnel mode ipsec ipv4
  tunnel protection ipsec profile ipsec-vpn-0e904c7db86e92c2a-1
  ! This option causes the router to reduce the Maximum Segment Size of
  ! TCP packets to prevent packet fragmentation.
  ip tcp adjust-mss 1379
  no shutdown
exit

! --------------------------------------------------------------------------------

! #4: Border Gateway Protocol (BGP) Configuration
!
! BGP is used within the tunnel to exchange prefixes between the
! Virtual Private Gateway and your Customer Gateway. The Virtual Private Gateway
! will announce the prefix corresponding to your VPC.
!
! Your Customer Gateway may announce a default route (0.0.0.0/0),
! which can be done with the 'network' and 'default-originate' statements.
!
! The BGP timers are adjusted to provide more rapid detection of outages.
!
! The local BGP Autonomous System Number (ASN) (65000) is configured
! as part of your Customer Gateway. If the ASN must be changed, the
! Customer Gateway and VPN Connection will need to be recreated with AWS.
!
! 'Network' command will be used here to advertised CGW network to AWS via BGP. An example for a CGW with the prefix 192.168.100.0/24 is provided below:

router bgp 65000
  bgp log-neighbor-changes
  bgp graceful-restart
  address-family ipv4 unicast
    neighbor 169.254.175.217 remote-as 64512
    neighbor 169.254.175.217 ebgp-multihop 255
    neighbor 169.254.175.217 activate
    network 192.168.100.0 mask 255.255.255.0
    no auto-summary
    no synchronization
  exit-address-family
 exit
!


! Additional Notes and Questions
!  - Amazon Virtual Private Cloud Getting Started Guide:
!       http://docs.amazonwebservices.com/AmazonVPC/latest/GettingStartedGuide
!  - Amazon Virtual Private Cloud Network Administrator Guide:
!       http://docs.amazonwebservices.com/AmazonVPC/latest/NetworkAdminGuide
ファイル内に「<interface_name/private_IP_on_outside_interface>」と記載されている部分は各環境により書き換える必要があるので、ファイルダウンロード後、手動で書き換えます。
今回のようなIPsecパススルーで転送している場合は、インターネットルータと接続しているセグメントのIPアドレスを指定してください。
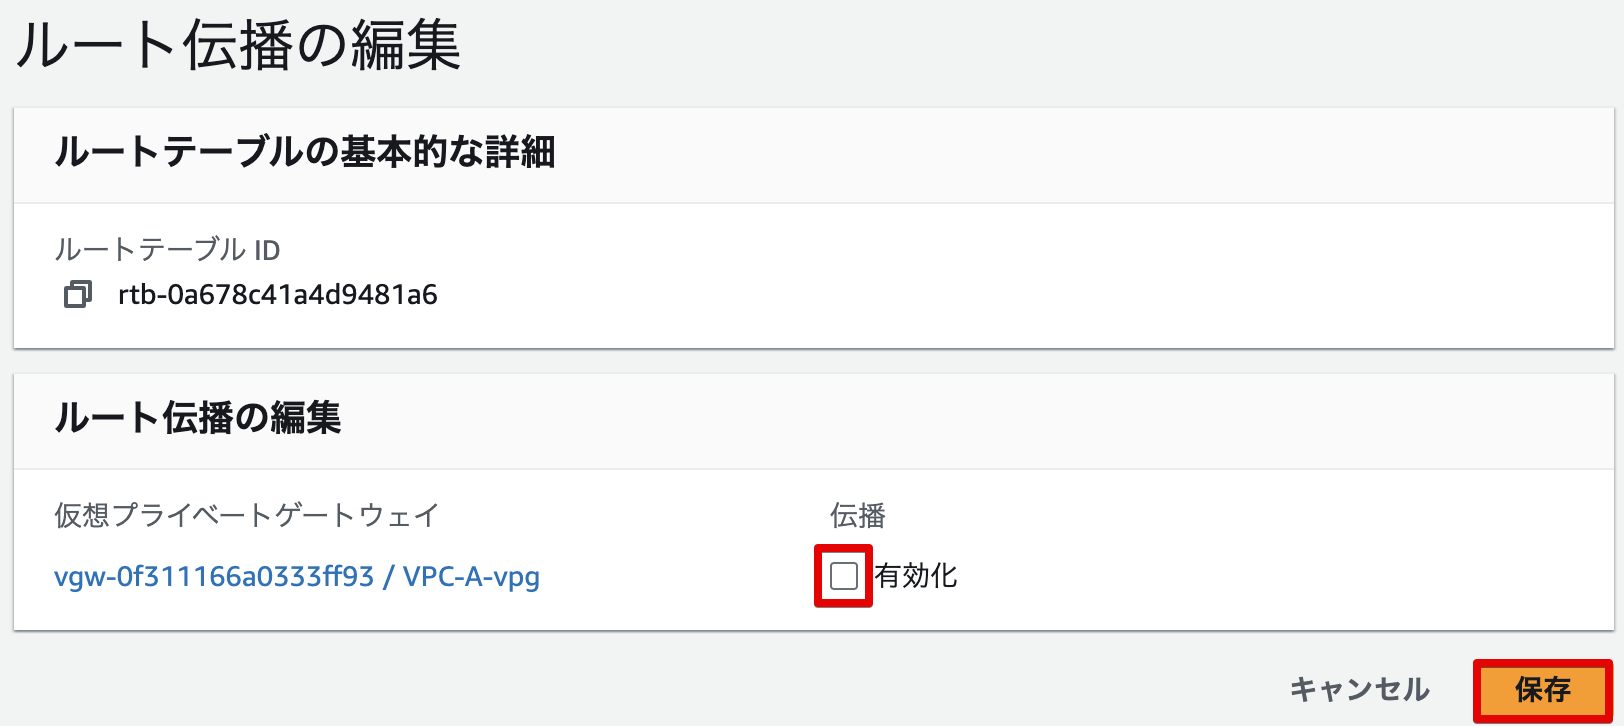
ルート伝播の設定
VPNトンネル接続後にオンプレミス側のネットワークからのルートを受け取るため、ルートテーブルでルート伝播の設定を行います。
「VPCダッシュボード」から「仮想プライベートクラウド」→「ルートテーブル」より、VPC-Aのルートテーブルを選択し、「ルート伝播」タブから「ルート伝播の編集」で、以下のように伝播を有効化します。
オンプレミスネットワーク側の設定
オンプレミスネットワーク側は、環境によって機器も設定も異なるため、要点のみ説明していきます。
IPsecパススルーの設定
今回はVPNルータ以外にインターネット接続用のルータが存在する構成なので、IPsecパススルーの設定を行い、IPsec通信が来た際に、VPNルータに転送する設定を入れておきます。
筆者の場合はヤマハのルータを使用しているので、以下のように静的IPマスカレードの設定でESPとUDP 500,4500をVPNルータに転送しています。

VPNルータの設定
先程ダウンロードしたファイルをVPNルータに設定していきます。
設定が被っている部分もありますが、基本的にはコピペで設定できるはずです。
問題なく接続できればトンネルのステータスが「Up」になるので、Upになっていれば成功です。
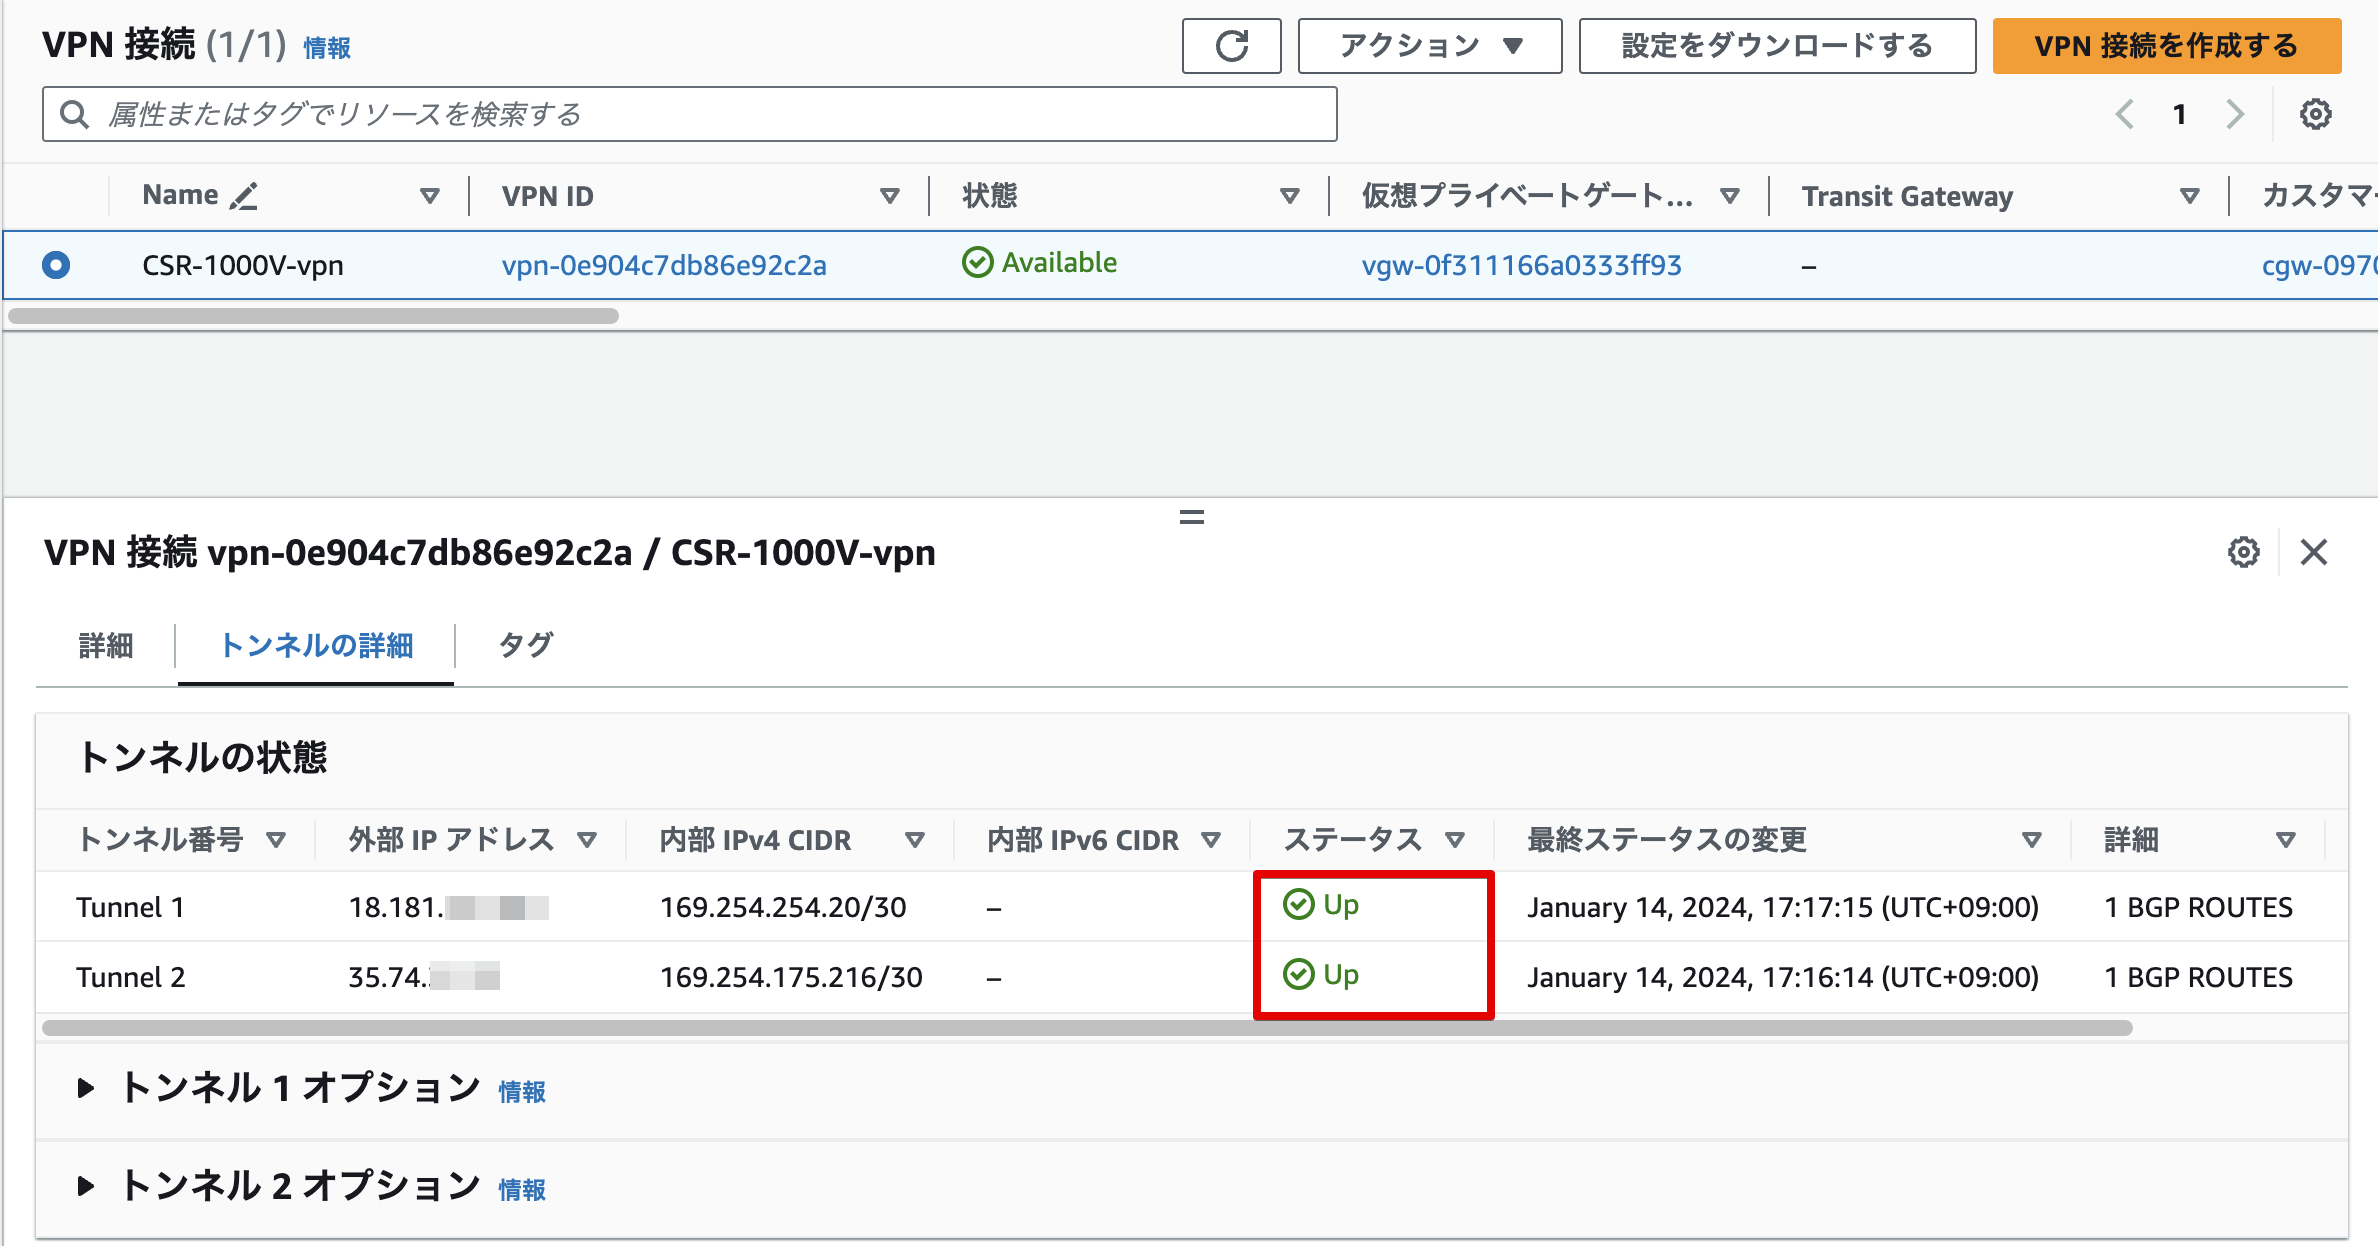
接続できていないようであれば、オンプレミス側VPNルータのルーティングやIPsecの設定など確認してみてください。
疎通確認
Site-to-Site VPNの設定ができたので、オンプレミス側、AWS側双方から疎通できるか確認してみます。
以下それぞれの端末からpingで疎通確認した結果。
[ec2-user@ip-10-20-0-207 ~]$ ping -c 3 192.168.100.100
PING 192.168.100.100 (192.168.100.100) 56(84) bytes of data.
64 bytes from 192.168.100.100: icmp_seq=1 ttl=63 time=9.69 ms
64 bytes from 192.168.100.100: icmp_seq=2 ttl=63 time=9.51 ms
64 bytes from 192.168.100.100: icmp_seq=3 ttl=63 time=9.77 ms

--- 192.168.100.100 ping statistics ---
3 packets transmitted, 3 received, 0% packet loss, time 2003ms
rtt min/avg/max/mdev = 9.506/9.655/9.768/0.109 ms
cisco@server-0:~$ ping -c 3 10.20.0.207
PING 10.20.0.207 (10.20.0.207): 56 data bytes
64 bytes from 10.20.0.207: seq=0 ttl=126 time=9.491 ms
64 bytes from 10.20.0.207: seq=1 ttl=126 time=9.595 ms
64 bytes from 10.20.0.207: seq=2 ttl=126 time=9.586 ms

--- 10.20.0.207 ping statistics ---
3 packets transmitted, 3 packets received, 0% packet loss
round-trip min/avg/max = 9.491/9.557/9.595 ms
おわりに
今回はSite-to-Site VPNでオンプレミス側のネットワーク機器とVPN接続を行ってみました。
IPsecの接続はハマりどころが多いので中々すんなり行かないことが多いですが、対応しているベンダーのコンフィグであれば、そのまま流し込むだけで設定できるコンフィグファイルをダウンロードすることができるので、設定については比較的簡単に行えるのではないかと思います。
ただ、対応していない機器を使用している場合は、IPsec VPNの仕様や機器の仕様とにらめっこしながらパラメータを調節していく必要があるため、対応していない機器を使用する場合は検証期間を長くとるようにしましょう。
次回は本題となるTransit Gatewayの設定を行ってみようと思います。