目的
Android Studio で Android アプリの開発環境を構築して、
Amazon Simple Notification Service (SNS) + Google Cloud Messaging for Android (GCM) で PUSH 通知するアプリを作ってみましたので、その記録です。
やりたいこと
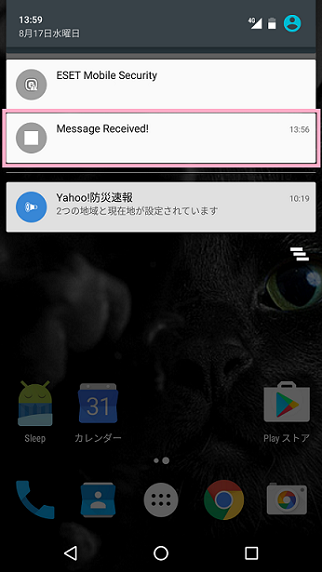
これ。
実施環境
Windows 7 / 32bit
Android 6.0.1 (Nexus 5X)
概要
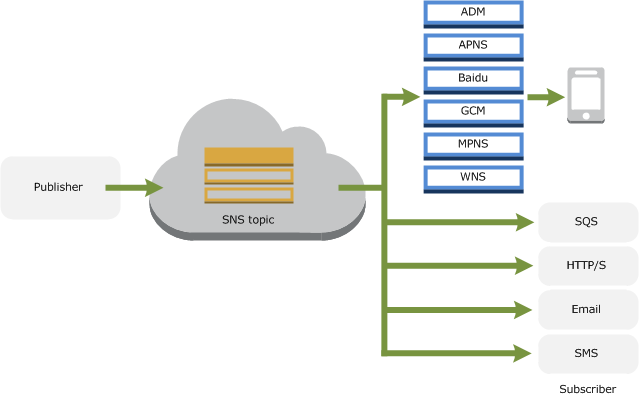
( 画像引用元:https://docs.aws.amazon.com/ja_jp/sns/latest/dg/SNSMobilePush.html )
Amazon SNS から Android 端末へは GCM を利用して PUSH 通知します。Amazon SNS を利用すると iOS (APNS) やメール通知なども同じ仕組みで PUSH できるのがいいところですね。
実施結果
Android Studio は触るところから初めてだったので、試行錯誤しながらで丸2日ほどかかりました。
Eclipse を使用したら (AWS のデモ Android アプリは Eclipse 向けに作られているので)もっと早くできたかもしれません。
iOS も試してみたいんだけれど、iPhone が手元にないので iPhone5 中古購入しようかな。
前提資料
こちらを見ながら進めました。
- Google Cloud Messaging for Android の使用開始 - Amazon Simple Notification Service
- Try Cloud Messaging for Android | Cloud Messaging | Google Developers
実施内容
Google Cloud Messaging から API キー取得
https://developers.google.com/mobile/add?platform=android
こちらから API キーを取得します。手続きには Goolge アカウントが必要ですのでログインしてから臨みます。
アプリケーション情報を入力
とくに使う情報ではないので、てきとうに入力します。
- AppName:MYAPPNAME
- Android Package Name: MY.ANDROID.PACKAGE.NAME
- Your country/region: 日本
Cloud Messaging を選択して有効化
- ENABLE CLOUD MESSAGING
APIキーが表示される
Server API Key は AWS の Application に。 Sender ID は Android アプリケーションに埋め込みますので控えておきます。
- メモ
- Server API Key:xxxxxxxxxxxxxxxxxxxxxxxxxxxxxxxx_xxxxxx
- Sender ID(プロジェクト番号):000000000000
Android Studio にて APK 作成

Android Studio インストール
https://developer.android.com/studio/index.html
android-studio-bundle-143.2915827-windows.exe
※インストール手順は省略
サンプルプログラムのダウンロード
https://docs.aws.amazon.com/ja_jp/sns/latest/dg/mobile-push-gcm.html#create-project-gcm
リンク先にある snsmobilepush.zip をダウンロード、ローカルに解凍します。
インポート
リンクには「Eclipseで開いてね」とあるけれど、あえて Android Studio でやります。
先ほど解凍したパスをインポート。
- MENU > File > New > Import Project
- snsmobilepush\AndroidMobilePushApp\AndroidMobilePushApp
strings.xmlファイルを編集
さきほどメモした API の Sender ID(プロジェクト番号) で strings.xml の project_number を更新入力。
- PROJECT > app > res > values
- strings.xml
<string name="project_number">000000000000</string>
ビルドに向けた修正作業
本来はこれだけやればビルドに進めるのはずなのですが、Android Studio ではインポートしただけではビルドできませんでした1。以下に Android Studio でビルドまでこぎつける手順を記載します。
※ビルド時の試行錯誤は記事後半にもメモしてあります。
SDK の追加
Android SDK Manager を開き、SDK をインストール。
- Estras
- Google Play services (extras;google;google_play_services)
- Google USB Driver (extras;google;usb_driver)
png→jpgリネーム
- PROJECT > app > src > main > res
- drawable-hdpi
- ic_launcher.png
- drawable-mdpi
- ic_launcher.png
- drawable-xhdpi
- ic_launcher.png
- drawable-xxhdpi
- ic_launcher.png
- drawable-hdpi
これらの .png を .jpg にリネームします2。
ビルドファイル修正
- PROJECT > app
- build.gradle
※プロジェクト直下の build.gradle ではなく、app 配下のほうを修正します。
コンパイル SDK のバージョンを 18 -> 23 に修正、下位 SKD を 8 -> 9 に修正。
android {
    compileSdkVersion 23
    buildToolsVersion "24.0.1"

    defaultConfig {
        applicationId "com.amazonaws.androidtest"
        minSdkVersion 9
        targetSdkVersion 23
    }
以下を追記してライブラリ参照を追加。
dependencies {
    compile 'com.google.android.gms:play-services:+'
    compile 'com.android.support:support-v4:+'
}
Manifest も修正
- PROJECT > app > src > main
- AndroidManifest.xml
コンパイル SDK のバージョンを 18 -> 23 に修正、下位 SKD を 8 -> 9 に修正。
    <uses-sdk
        android:minSdkVersion="9"
        android:targetSdkVersion="23" />
ビルド確認
メニューから APK を作成してみて、ビルドエラーが起きないことをとりあえず確認します。
- MENU > Build > Build APK
Android 端末と接続
先ほど Google USB Drivers をインストールしているので、規定では下記パスに USB ドライバがあるはずです。
- C:\Users\USERNAME\AppData\Local\Android\Sdk\extras\google\usb_driver
Android 端末と Windows PC を USB 接続し、次のデバイスのドライバを更新します。
- コンピュータの管理 > デバイスマネージャ > ほかのデバイス
- Android ADB Interface
Android 端末の設定
Android 端末側では、USBデバッグを有効化します。
※説明省略
デバッグで起動
Android Studio に戻り、Debug 'app'を実行すると
Android 端末に APK がインストールされて起動します。
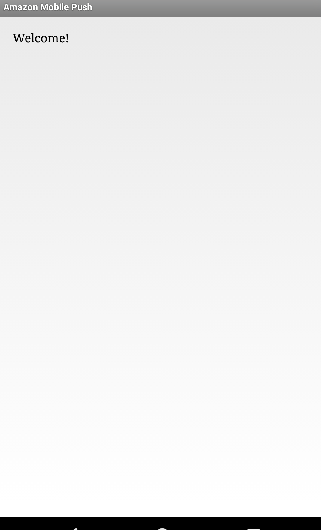
Registration ID 取得
この Wecome! 画面はさほど重要じゃないのでログを確認します。
Android Monitor ウィンドウを見ると、registrationId という文字列が表示されていて、このIDを控えます。
08-17 13:15:14.565 31789-31890/com.amazonaws.androidtest I/OpenGLRenderer: Initialized EGL, version 1.4
08-17 13:15:14.587 31789-31789/com.amazonaws.androidtest I/onResume: no missed messages
08-17 13:15:14.873 31789-31890/com.amazonaws.androidtest V/RenderScript: 0x7f79a82000 Launching thread(s), CPUs 6
08-17 13:15:14.921 31789-31895/com.amazonaws.androidtest I/registrationId: xxxxxxxxxxxxxxxxxxxxxxxxxxxxxxxxxxxxxxxxxxxxxxxxxxxxxxxxxxxxxxxxxxxxxxxxxxxxxxxxxxxxxxxxxxxxxxxxxxxxxxxxxxxxxxxxxxxxxxxxxxxxxxxxxxxxxxxxxxxxx
08-17 13:15:18.573 31789-31789/com.amazonaws.androidtest I/onResume: no missed messages
- メモ
- registrationId: xxxxxxxxxxxxxxxxxxxxxxxxxxxxxxxxxxxxxxxxxxxxxxxxxxxxxxxxxxxxxxxxxxxxxxxxxxxxxxxxxxxxxxxxxxxxxxxxxxxxxxxxxxxxxxxxxxxxxxxxxxxxxxxxxxxxxxxxxxxxx
やっと Android 側の作業が終わりました。(後半、説明をだいぶ端折りました)
AWS から PUSH

AWS Console に移動します。
- AWS CONSOLE > SNS
Create Topic
トピックを作成します。エンドポイントに配信する単位グループのようです。以下設定値は箇条書きです。
- Topic name: TOPICNAME
- Display name: DISPLAYNAME
作成後に表示される ARN(TopicARN) をメモしておきます。のちほど SNS のエンドポイント(配信端末)として設定します。
- メモ
- TopicARN: arn:aws:sns:ap-northeast-1:000000000000:TOPICNAME
Applications
Endpoint に Android 端末を登録します。GCM から取得した Sender ID(プロジェクト番号)を Device token として入力。
- Add Endpoint
- Device token: xxxxxxxxxxxxxxxxxxxxxxxxxxxxxxxxxxxxxxxxxxxxxxxxxxxxxxxxxxxxxxxxxxxxxxxxxxxxxxxxxxxxxxxxxxxxxxxxxxxxxxxxxxxxxxxxxxxxxxxxxxxxxxxxxxxxxxxxxxxxx
- User data: MYANDROIDDEVICE
アプリケーションを作成します。GCM(Android) + APNS(iOS) など複数設定もできますが、今回は GCM のみ設定します。
- Create Platform Application
- Application name: APPLICATIONNAME
- Push notification platform: Google Cloud Messaging (GCM)
- API Key: xxxxxxxxxxxxxxxxxxxxxxxxxxxxxxxx_xxxxxx
作成後に ARN のリンクをクリックして、 表示される EndPointARN をメモしておきます。
- メモ
- EndPointARN: arn:aws:sns:ap-northeast-1:000000000000:endpoint/GCM/APPLICATIONNAME/xxxxxxxx-xxxx-xxxx-xxxx-xxxxxxxxxxxx
Subscriptions
先ほどの Topic にアプリケーションを登録3します。
- Create Subscription
- Topic ARN: arn:aws:sns:ap-northeast-1:000000000000:TOPICNAME
- Protocol: Application
- Endpoint: arn:aws:sns:ap-northeast-1:000000000000:endpoint/GCM/APPLICATIONNAME/xxxxxxxx-xxxx-xxxx-xxxx-xxxxxxxxxxxx
やっと配信
- Topics
- TOPICNAME にチェック
- Publish To Topic
- TOPICNAME にチェック
- Raw
- 適当な本文
- Publish Message
- 適当な本文
できました!!
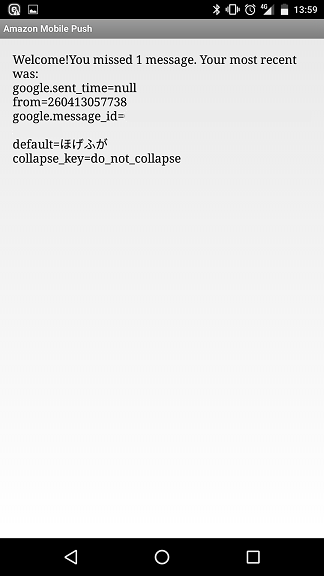
(以上、おつかれさまでした)
おまけのエラー集
いたるところで躓いたので、エラーログと対応をメモとして残します。
ビルドエラー:Module 'AndroidMobilePushApp' is not backed by gradle
インポートしたプロジェクトでは、Android SDK Platform 18 が入っていないとbuild.grable にてビルドエラーが発生しました。Build Platform を変更するか SKD Platform 18 を入れる必要がありそうです。
Error running build:
Module 'AndroidMobilePushApp' is not backed by gradle
ビルドエラー:libpng error: Not a PNG file
ic_launcher.png がどうのこうのというエラーがおきました。ic_launcher.png というファイルはよく見ると jpeg 形式で2拡張子どおりのフォーマットで読み込めないのが原因でした。すべてpng に変換してあげるか、拡張子を jpg に変えてあげる必要がありそうです。
20:51:45 Executing tasks: [:app:assembleDebug]
20:51:50 Gradle build finished with 1 error(s) in 5s 86ms
20:51:50 Build APK: Errors while building APK. You can find the errors in the 'Messages' view.
Information:Gradle tasks [:app:assembleDebug]
:app:preBuild UP-TO-DATE
:app:preDebugBuild UP-TO-DATE
:app:checkDebugManifest
:app:prepareDebugDependencies
:app:compileDebugAidl UP-TO-DATE
:app:compileDebugRenderscript UP-TO-DATE
:app:generateDebugBuildConfig UP-TO-DATE
:app:mergeDebugShaders UP-TO-DATE
:app:compileDebugShaders UP-TO-DATE
:app:generateDebugAssets UP-TO-DATE
:app:mergeDebugAssets UP-TO-DATE
:app:generateDebugResValues UP-TO-DATE
:app:generateDebugResources UP-TO-DATE
:app:mergeDebugResources
AAPT err(Facade for 2289226): libpng error: Not a PNG file
AAPT err(Facade for 15740726): libpng error: Not a PNG file
AAPT err(Facade for 27895062): libpng error: Not a PNG file
AAPT err(Facade for 30208515): libpng error: Not a PNG file
Error:Execution failed for task ':app:mergeDebugResources'.
> Crunching Cruncher ic_launcher.png failed, see logs
ビルドエラー:Gradle DSL method not found: 'compile()'
アプリケーションのビルド定義
- PROJECT > app > build.grandle
ではなく、プロジェクトのビルド定義
- PROJECT > build.grandle
にまちがって dependencies ~の定義を追記していたところエラーがおきていた。
Error:(18, 1) A problem occurred evaluating root project 'AndroidMobilePushApp'.
> Could not find method compile() for arguments [com.google.android.gms:play-services:+] on root project 'AndroidMobilePushApp'.
Error:(18, 0) Gradle DSL method not found: 'compile()'
Possible causes:<ul><li>The project 'AndroidMobilePushApp' may be using a version of Gradle that does not contain the method.
<a href="open.wrapper.file">Open Gradle wrapper file</a></li><li>The build file may be missing a Gradle plugin.
<a href="apply.gradle.plugin">Apply Gradle plugin</a></li>
Android Studio プロキシ設定
社内ネットワーク環境であるため、Android SDK Manager にもプロキシ設定が必要でした。次の各項目を埋めました。
- Appearance & Behavior > System Settings > HTTP Proxy
- Manual Proxy Configuration
- Host Name
- Port Number
- Proxy authnenication
- Login
- Password
ビルドエラー:Manifest merger failed with multiple errors
minSdkVersion は 8 にしろ、と出ていました。
:app:processDebugManifest
C:\Users\USERNAME\AndroidStudioProjects\AndroidMobilePushApp\app\src\main\AndroidManifest.xml:20:5-71 Warning:
	Element uses-permission#android.permission.GET_ACCOUNTS at AndroidManifest.xml:20:5-71 duplicated with element declared at AndroidManifest.xml:18:5-71
C:\Users\USERNAME\AndroidStudioProjects\AndroidMobilePushApp\app\src\main\AndroidManifest.xml:13:5-15:41 Error:
	uses-sdk:minSdkVersion 8 cannot be smaller than version 9 declared in library [com.google.android.gms:play-services:9.4.0] C:\Users\USERNAME\AndroidStudioProjects\AndroidMobilePushApp\app\build\intermediates\exploded-aar\com.google.android.gms\play-services\9.4.0\AndroidManifest.xml
	Suggestion: use tools:overrideLibrary="com.google.android.gms.play_services" to force usage
See http://g.co/androidstudio/manifest-merger for more information about the manifest merger.
:app:processDebugManifest FAILED
Error:Execution failed for task ':app:processDebugManifest'.
> Manifest merger failed with multiple errors, see logs
ビルドエラー:To run dex in process, the Gradle daemon needs a larger heap.
ヒープサイズ不足、2048 MB 必要なところ、989 MB しか確保できませんでしたとのこと。環境によってはおきないと思う。
:app:transformClassesWithDexForDebug
To run dex in process, the Gradle daemon needs a larger heap.
It currently has approximately 989 MB.
For faster builds, increase the maximum heap size for the Gradle daemon to more than 2048 MB.
To do this set org.gradle.jvmargs=-Xmx2048M in the project gradle.properties.
For more information see https://docs.gradle.org/current/userguide/build_environment.html
Error:The number of method references in a .dex file cannot exceed 64K.
Learn how to resolve this issue at https://developer.android.com/tools/building/multidex.html
:app:transformClassesWithDexForDebug FAILED
Error:Execution failed for task ':app:transformClassesWithDexForDebug'.
> com.android.build.api.transform.TransformException: com.android.ide.common.process.ProcessException: java.util.concurrent.ExecutionException: com.android.ide.common.process.ProcessException: org.gradle.process.internal.ExecException: Process 'command 'C:\Program Files\Java\jdk1.8.0_101\bin\java.exe'' finished with non-zero exit value 2
エラーのとおり、下記ファイルを追記修正。2048 MB も空きがないので 1024 MB を設定してみる。
- PROJECT > gradle.properties
org.gradle.jvmargs=-Xmx1024M
ビルドエラー:Error occurred during initialization of VM
Java VM のヒープサイズエラー。2097152KB も確保できないとのこと。
Gradle 'AndroidMobilePushApp' project refresh failed
Error:Unable to start the daemon process.
This problem might be caused by incorrect configuration of the daemon.
For example, an unrecognized jvm option is used.
Please refer to the user guide chapter on the daemon at https://docs.gradle.org/2.10/userguide/gradle_daemon.html
Please read the following process output to find out more:
-----------------------
Error occurred during initialization of VM
Could not reserve enough space for 2097152KB object heap
Information:Gradle tasks [assemble]
Error:Failed to complete Gradle execution.

Cause:
Unable to start the daemon process.
This problem might be caused by incorrect configuration of the daemon.
For example, an unrecognized jvm option is used.
Please refer to the user guide chapter on the daemon at https://docs.gradle.org/2.10/userguide/gradle_daemon.html
Please read the following process output to find out more:
-----------------------
Error occurred during initialization of VM
Could not reserve enough space for 2097152KB object heap
2048 MB 割り当てから 1024 MB 割り当てに変更。
- PROJECT > gradle.properties
org.gradle.jvmargs=-Xmx1024M
ビルドエラー:The number of method references in a .dex file cannot exceed 64K
.dex ファイルがでっかくなっちゃった、みたいな。
Error:The number of method references in a .dex file cannot exceed 64K.
Learn how to resolve this issue at https://developer.android.com/tools/building/multidex.html
:app:transformClassesWithDexForDebug FAILED
Error:Execution failed for task ':app:transformClassesWithDexForDebug'.
> com.android.build.api.transform.TransformException: com.android.ide.common.process.ProcessException: java.util.concurrent.ExecutionException: com.android.ide.common.process.ProcessException: org.gradle.process.internal.ExecException: Process 'command 'C:\Program Files\Java\jdk1.8.0_101\bin\java.exe'' finished with non-zero exit value 2
multiDexEnabled true を追記する。
- PROJECT > app > build.grandle
    defaultConfig {
        applicationId "com.amazonaws.androidtest"
        minSdkVersion 9
        targetSdkVersion 23
        multiDexEnabled true
    }
参考リンク
(お世話になりました)
- EclipseからAndroid Studioにプロジェクトを移行 の続き - ikechampionのブログ
- Android StudioでSyncすると、「gradle dsl method not found 'compile()'」エラー - 日々精進
- Android Studio への引っ越しトラブル ~ Manifest Merger編 ~
- build.gradleに設定するAndroid SDKやbuildTools,versionCode等について - Qiita
- Android StudioでビルドしたらGradleが「Could not reserve enough space for object heap」と嘆きだした時の設定箇所 - Qiita
- Configure Apps with Over 64K Methods | Android Studio
- Google Cloud Messagingでハマったこと - Qiita
-
素直に Eclipse でやればよかったかも。。。 ↩
-
目GREPをちょっと覚えました。Stirling 等のヘキサエディタで開いてヘッダを見ます。SJIS表示で JPEG は "JFIF"、PNG は "臼NG" が確認できます。参考:http://www.slideshare.net/murachue/grep-8132856 ↩ ↩2
-
おまけ:メール配信の場合はEmailを選択、指定したメールには事前に承認依頼(title:AWS Notification - Subscription Confirmation) が届き、承認リンクのクリックまではステータスが「PendingConfirmation」になるようです。何故かとどかねーなと思ったら迷惑メールフォルダを確認しましょう。 ↩