概要
現在、Railsでアプリケーションを作成しています。
この記事ではRubyのGem deviseを用いて、「アカウント情報編集機能」を実装する手順を紹介します。
具体的には下記の事項について触れていきます。
- devise controller 作成時の注意
- devise 利用時のリダイレクト先の変更
環境
- macOS Catalina 10.15.6
- ruby 2.6.5
- Rails 6.0.3.4
- MySQL : 5.6.47
- Bootstrap : 4.3.1
- devise : 4.7.3
前提
この記事ではdeviseを導入している前提で話を進めます。
念のため本アプリケーションでのdevise実装手順を以下に示します。
① gemfileに以下のように記載します。
# 最後の行に記載
gem 'devise'
② deviseのインストール
% bundle install

% rails g devise:install
③ deviseのビューを編集できるようにします(Bootstrap用)
% rails g devise:views

=> app/views/devise内にビューファイル生成
④ deviseで使用するUserモデルを作成 (nicknameカラムを追加)
% rails g devise user
  ▼
  # migrationファイルにnicknameを追加
  ▼
% rails db:migrate
アカウント情報編集機能の実装
1. ビューの作成
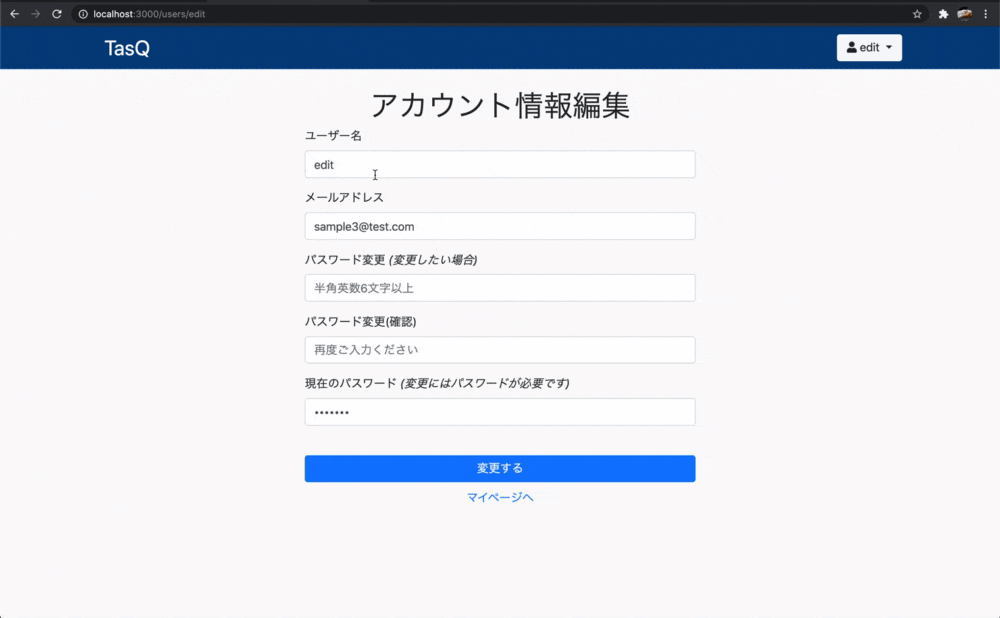
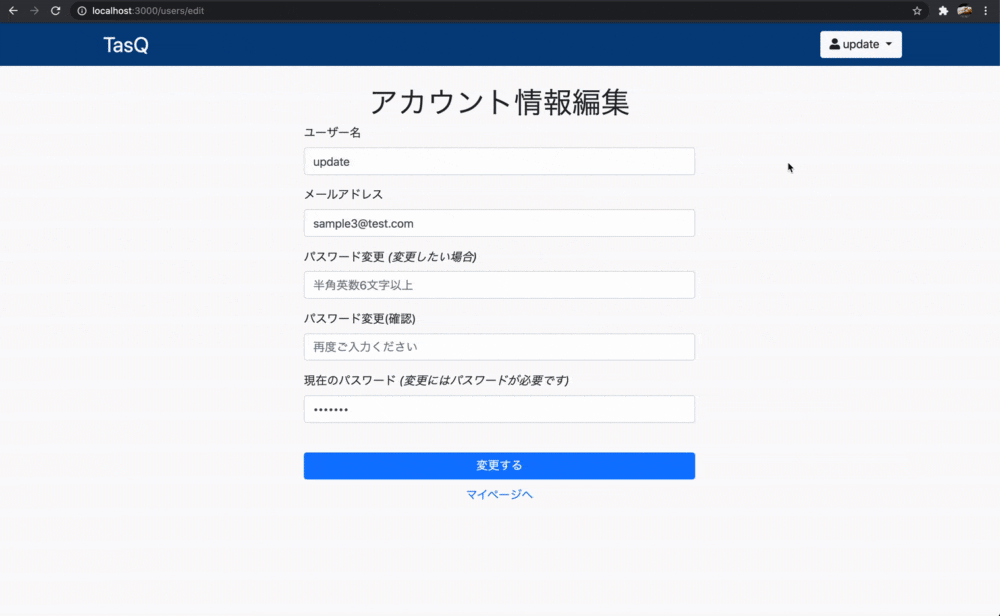
今回はapp/views/devise/registrations/edit.html.erbに、Bootstrapを用いてフォームを作成します。
このページでは次のカラムを更新できるようにします。
- ユーザー名 : nickname
- メールアドレス : email
- パスワード : password
デフォルトの設定では現在のパスワードを入力することで更新が完了します。
その機能は残して、下記のようにコーディングします。
(2021/02/03 追記)
Rail6 では form_for は非推奨であり、本来であれば form_with で記載する必要があります。
記事の本質部分ではないので修正は行いませんが、実際にこちらのコードを参考にされる場合はお気をつけ下さい。
なお、上に示した環境では問題なく動作します。
<div class="container">
  <h1 class="form-title">アカウント情報編集</h1>
  <div class="row">
    <div class="col-md-6 col-md-offset-3 form-wrapper">
      <%= form_for(resource, as: resource_name, url: registration_path(resource_name), html: { method: :put }) do |f| %>
        <%= render "devise/shared/error_messages", resource: resource %>
        <div class = 'form-group'>
          <%= f.label :nickname, "ユーザー名" %>
          <%= f.text_field :nickname, autofocus: true, class: "form-control", placeholder: "最大10文字", maxlength: 10 %>
        </div>
        <div class = 'form-group'>
          <%= f.label :email, "メールアドレス" %>
          <%= f.email_field :email, autocomplete: "email", class: "form-control", placeholder: "xxx@email.com" %>
        </div>
        <% if devise_mapping.confirmable? && resource.pending_reconfirmation? %>
          <div>Currently waiting confirmation for: <%= resource.unconfirmed_email %></div>
        <% end %>
        <div class="form-group">
          <%= f.label :password, "パスワード変更" %><i> (変更したい場合)</i>
          <%= f.password_field :password, autocomplete: "new-password", class: "form-control", placeholder: "半角英数6文字以上" %>
        </div>
        <div class="form-group">
          <%= f.label :password_confirmation, "パスワード変更(確認)" %>
          <%= f.password_field :password_confirmation, autocomplete: "new-password", class: "form-control", placeholder: "再度ご入力ください" %>
        </div>
        <div class="form-group">
          <%= f.label :current_password %> <i>(変更にはパスワードが必要です)</i><br />
          <%= f.password_field :current_password, autocomplete: "current-password",class: "form-control", placeholder: "必須項目です" %>
        </div>
        <%= f.submit "変更する", class: "btn btn-primary form-submit-btn" %>
        <%= link_to  "マイページへ", root_path, class: "link-below-user-form" %>
      <% end %>
    </div>
  </div>
</div>
2. ストロングパラメータの設定
deviseはデフォルトで取得できるパラメータが決まっています。
よって、新たに自分で設定したカラムについては別途ストロングパラメータを設定して取得する必要があります。
今回は情報更新時に"nickname"のパラメータを取得しなければなりません。
なのでapp/controllers/application_controller.rbで下記の記載をします。
class ApplicationController < ActionController::Base
  # deviseのコントローラを使う前に呼ばれるアクション
  before_action :configure_permitted_parameters, if: :devise_controller?

  private

  def configure_permitted_parameters
    # 新規登録時にnicknameの取得を許可
    devise_parameter_sanitizer.permit(:sign_up, keys: [:nickname])
    # 情報更新時にnicknameの取得を許可
    devise_parameter_sanitizer.permit(:account_update, keys: [:nickname])
  end
end
(少し深堀り)ストロングパラメータの初期値について
deviseのストロングパラメータの項を見ると、次のように書いています。
There are just three actions in Devise that allow any set of parameters to be passed down to the model, therefore requiring sanitization. Their names and default permitted parameters are:
- sign_in (Devise::SessionsController#create) - Permits only the authentication keys (like email)
- sign_up (Devise::RegistrationsController#create) - Permits authentication keys plus password and password_confirmation
- account_update (Devise::RegistrationsController#update) - Permits authentication keys plus password, password_confirmation and current_password
(和訳)
deviseはモデルにパラメータを渡せるアクションが3つしかないので、サニタイズ(無害化 : 取得する値の制限)が必要です。
それらの名前とデフォルトで許可されるパラメータは次のとおりです。
| アクション | パラメータ |
|---|---|
| sign_in | 認証キーのみ(emailなど) |
| sign_up | 認証キー + password + password_confirmation |
| account_update | 認証キー + password + password_confirmation + current_password |
今回は、deviseで作成したUserモデルにnicknameカラムを追加しています。
ですがこれはデフォルトで許可されるパラメータに含まれていません。なので手動で「nicknameの値もパラメータに入れて!」とアプリに指示を出す必要があります。
今回のアプリでnicknameカラムに値を保存(更新)するのは次の2つの場合です。
新規登録 : sign_up情報更新 : account_update
よって、これらのアクションを使う際には、パラメータにnicknameを追加しなければ、nicknameの値は更新されないままです。
そこで用いるのが、deviseコントローラで用いるストロングパラメータ的存在のdevise_parameter_sanitizerです。
このパラメータにpermitを適用し、扱えるパラメータの数を増やします。
それが先程示したprivateメソッドの
def configure_permitted_parameters
  # 新規登録時にnicknameの取得を許可
  devise_parameter_sanitizer.permit(:sign_up, keys: [:nickname])
  # 情報更新時にnicknameの取得を許可
  devise_parameter_sanitizer.permit(:account_update, keys: [:nickname])
end
です。
この記述により、sign_up account_updateアクションでnicknameをパラメータで取得できるようになりました。
3. 更新後のリダイレクト先を変更
さて、アカウント情報編集機能は以上で実装完了です。
ですが、現状では次のように動作します。
- アカウント情報を更新
- トップページにリダイレクト
しかし、情報を編集したならその変更をすぐに確認したいもの。
なのでリダイレクト先はトップページよりもマイページを指定したほうが親切といえます。
これはdeviseのコントローラを編集することで実装できます。
続いてその手順を示します。
3-1. devise controllerの作成
ターミナルを開き、アプリのディレクトリ上で下記のコマンドを入力することで、deviseのコントローラを作成できます。
% rails g devise:controllers users
このコマンドでapp/controllers/usersディレクトリにdeviseのコントローラが生成されます。
3-2. devise controllerを使うためのルーティング変更
rails g devise:controllers usersコマンド実行により、deviseで用いるコントローラをapp/controllers/usersディレクトリに作成しました。
このディレクトリ内のファイルを変更することでdeviseコントローラを編集できます。
続いて、これらのコントローラをルーティングに割り当てましょう。
例えば今、ユーザー情報更新に関するアクションのルーティングは次のように指定されています。
| Verb | URI Pattern | Controller#Acrion |
|---|---|---|
| PUT | /users | devise/registrations#update |
このControllerはdeviseディレクトリ/registrationsコントローラを指しています。
これを新たに作成したusersディレクトリ/registrationsコントローラに変更しましょう。
ルーティングに次のように記載します。
Rails.application.routes.draw do
  # 大事なのはここです!
  devise_for :users, controllers: {
    sessions: "users/sessions",
    registrations: "users/registrations"
  }

  # マイページのルーティング
  get 'users/:id/profile', to: 'users#show', as: 'user_profile'
  # トップページのルーティング
  root to: 'home#top'
end
devise_for :usersに続けて記載した部分により、ルーティングが次のように変化します。
| Verb | URI Pattern | Controller#Acrion |
|---|---|---|
| PUT | /users | users/registrations#update |
これで、作成したdeviseコントローラがルーティングに割り当てられました。
3-3. リダイレクト先の指定
いよいよリダイレクト先の指定です。
まず、結論から。
app/controllers/users/registrations_controller.rbに次の記載をすることで、情報更新時のリダイレクト先を指定できます。
class Users::RegistrationsController < Devise::RegistrationsController
  # (略)
  protected

  def after_update_path_for(resource)
    # 自分で設定した「マイページ」へのパス
    user_profile_path(current_user)
  end
  # (略)
end
registrations#updateアクション後に、after_update_path_forのパスにリダイレクトします。
それを設定したことで、情報更新後にマイページにリダイレクトされるようになりました。
3-4. デフォルトでのリダイレクト先の確認
3-3での記述により、リダイレクト先の変更に成功しました。
ここで、deviseのデフォルトのリダイレクト先を確認しておきましょう。
例のごとく deviseのGithub を参照すると、リダイレクトについて次のように書かれていました。
After signing in a user, confirming the account or updating the password, Devise will look for a scoped root path to redirect to. For instance, when using a :user resource, the user_root_path will be used if it exists; otherwise, the default root_path will be used.
(和訳)
ユーザーのサインイン、アカウントの確認、またはパスワードの更新後、Deviseはリダイレクト先のスコープ付きルートパスを探します。 たとえば、:userリソースを使用する場合、user_root_pathが存在する場合はそれが使用されます。 それ以外の場合は、デフォルトのroot_pathが使用されます。
今回使っているdeviseのモデルはUserモデルなので、deviseはまずuser_root_pathをリダイレクト先として指定します。
しかし、このパスはアプリ上に存在しません(指定していません)。
なので今回はデフォルトのリダイレクト先として、root_pathが指定されます。
こういうロジックでもって、最初の設定ではroot_pathに設定していたトップページ(home#top)にリダイレクトされた、ということでした。
ご参考まで。
まとめ
-
deviseのregistrations#updateを使用する際は、account_updateアクションを指定して、追加のパラメータの取得を許可する
-
devise controller作成後はルーティングを変更する
-
after_update_path_forにパスを設定すると、updateアクション後のリダイレクト先を指定できる
備考(ビューファイルの設置先について)
今回の件で気になったことがあります。
以前書いたこちらの記事(【Rails/ルーティング】自作したディレクトリ内のコントローラを参照する方法)で、下記のことを学習しました。
-
コントローラの名称はディレクトリの構造と一致している必要がある
-
Admin::UsersControllerの場合は、
app/controllers/adminディレクトリのusers_controller.rbに記述するのがルール -
このコントローラがレンダリングするビューは、
app/views/admin/***.html.erbテンプレート
この理論でいくと、今回のケースでは、
-
Users::ResistrationsControllerが、
app/controllers/usersディレクトリのresistrations_controller.rbに記述されている -
となるとレンダリングされるビューは
app/views/usersディレクトリ内のテンプレートファイル?
つまり、**特にビューファイルを移動していない現状「もしかしたらビューが表示されないのでは?」**と考えました。
今、ユーザーに関する全てのビューはapp/views/deviseディレクトリに入っていますからね。
しかし、結果はGIFで示したとおり。それにプラスして検証したところ、
- 新規登録 : devise/registrations/new.html.erb
- ログイン : devise/sessions/new.html.erb
- 編集 : devise/registrations/edit.html.erb
のページ表示と動作に問題はありませんでした。
一応、deviseのGithubを見ると、次のように記載があります。
Copy the views from devise/sessions to users/sessions. Since the controller was changed, it won't use the default views located in devise/sessions.
(和訳)
ビューをdevise/sessionsからusers/sessionsに移動してください。
コントローラが変更されたので、devise/sessionsに設置されたデフォルトのビューは使われません。
でも…アプリはちゃんと動くんですよね…。
ここは正直わかりませんでした。問題が出た際には、またQiitaに投稿したいと思います。