はじめに
社内や自宅でHTTPS対応をしようと思うと、お金を払って、面倒な手続きをやって、なおかつ何年かに一回更新もしなくてはいけなくて、それが面倒極まりない。
もちろんお金を払っているから、自由にHTTPS化なんてできないし、結局オレオレ証明書に落ち着くんだけど、それはそれでURLに「×」つくし、それを改善するために証明書をインポートする作業も正直面倒。
結局×ついたままやるんだけど、それだとwgetもまともにできないし、セキュアじゃないってネットで言われているし、じゃぁどうすんのよ!!
ってなった時に、満を持して登場したのが、「Let's Encrypt」!
いろいろあって公開が何度か延期していたが、この度ようやく「Public Beta」となり、誰でも自由に使えるようになったので紹介します!
Lets Encryptとは?

公式HP:https://letsencrypt.org/
Github:https://github.com/letsencrypt/letsencrypt
Lets Encryptは無料の認証局で、誰でも簡単に使えて、かつ自動化ができます!
Let’s Encrypt is a new Certificate Authority:
It’s free, automated, and open.
以下の順番で紹介していきたいと思います。
- ざくっとどんな感じ?
- プラグイン
- ケーススタディ
- 利用上の注意点
- 実際に使ってみる
- 成果物
ざくっとどんな感じ?
以下のような感じです。
- let's encryptクライアントが外部のサーバにアクセス
- 本家のサーバが、クライアントで指定されたドメインにHTTP(S)アクセス
- ドメインのアクセス先にいるWEBサーバが応答
- WEBサーバの応答が確認できたら、let's encryptクライアントに証明書送信

プラグイン
| Plugin | Auth | Inst |
|---|---|---|
| apache | Y | Y |
| standalone | Y | N |
| webroot | Y | N |
| manual | Y | N |
| nginx | Y | Y |
今回は比較的情報の多い、「standalone」「webroot」を使用します。
ざくっと説明すると、以下の通りです。
| プラグイン | 方法 |
|---|---|
| Stand Alone | 証明書の取得をlet's encrypt専用のWEBサーバで行う方法 |
| Web Root | 証明書の取得を既存のWEBサーバ上で行う方法 |

それぞれのプラグインにはそれぞれの用途があります。
そちらを次に説明します。
こんな時はこのPlugin!
前提として、 ドメインの取得が必須です!
ドメインを取得していないサーバ(ローカルドメインやIP)には使用できません。
しかしローカルドメインも、同じ名前のドメインを取得していれば使用できます。
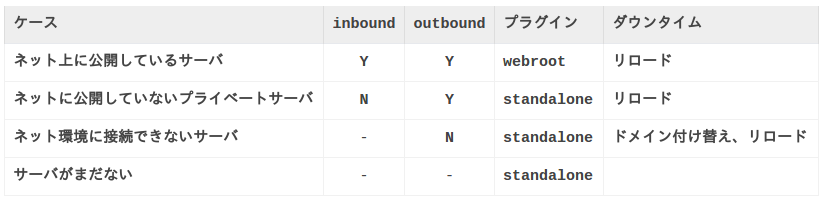
シンプルなパブリックサーバであれば、webrootで大丈夫ですが、ちょっと特殊な環境には stand aloneが有効かと思います。
ちなみにどっちの方法が楽かといえば、webrootの方が楽であることが多いです。
利用上の注意
- 証明書の有効期限は、MAX90日
- BETA版は1つのドメインに対して7日で5つの証明書まで
- ワイルドカードは使えない
- IPは使えない
実際に使ってみる
どんなコマンドが必要なのか、結論から言えば以下のようになります。
- stand alone on docker
$ sudo docker run -it --rm \
    --expose 80 \
    -p 80:80 \
    --name letsencrypt \
    -v "/etc/letsencrypt:/etc/letsencrypt" \
    -v "/var/lib/letsencrypt:/var/lib/letsencrypt" \
    quay.io/letsencrypt/letsencrypt:latest \
      certonly \
      --standalone \
      --standalone-supported-challenges http-01 \
      --register-unsafely-without-email \
      --renew-by-default \
      -d www.my-site.com \
      --agree-tos
www.my-site.comが、作成するDockerに接続できるようになっていれば、上記のコマンド実行後、/etc/letsencrypt以下に証明書が作成されているはずです。
現在の公式Dockerでは、443番ポートしか開かれていないので、80番で通信を受け付けるには、Exposeする必要があります。
- webroot
$ git clone https://github.com/letsencrypt/letsencrypt $HOME/letsencrypt
$ $HOME/letsencrypt/letsencrypt-auto --help
↑初回のみ実行
$ $HOME/letsencrypt/letsencrypt-auto
    certonly \
    --webroot \
    --webroot-path /usr/share/nginx/html \
    --register-unsafely-without-email \
    --renew-by-default \
    -d www.my-site.com \
    --agree-tos
- 引数
私が把握している引数一覧
| 引数 | 説明 |
|---|---|
| --standalone | プラグインの指定 |
| --standalone-supported-challenges http-01 | 認証チャレンジの時にHTTPを使用する |
| --standalone-supported-challenges tls-sni-01 | 認証チャレンジの時にHTTPSを使用する |
| --webroot | プラグインとしてwebrootを使用する |
| --webroot-path [document root] | Web serverのドキュメントルートを指定する |
| --no-verify-ssl | 証明書チェック無視 |
| --tls-sni-01-port [port] | 認証チャレンジでHTTPSを使用するときのポート指定 |
| --http-01-port [port] | 認証チャレンジでHTTPを使用するときのポート指定 |
| --register-unsafely-without-email | メール登録省略 |
| --renew-by-default | 証明書更新時の確認省略 |
| -d [domain] | ドメイン指定 |
| --agree-tos | 証明書発行時の承認省略 |
| --config-dir [dirctory] | 設定ファイルの場所 |
| --work-dir [directry] | ワーキングディレクトリの場所 |
| --logs-dir [directry] | ログディレクトリの場所 |
| --staging | 参考情報 |
| --debug | デバッグ表示 |
| -vvvvvvv | 超絶デバッグ表示 |
成果物
stand alone も webrootも成果物は同じ。
- 証明書取得後、作成されるもの(2回実行したあと)
$ sudo tree /etc/letsencrypt/

/etc/letsencrypt/
|-- accounts
|   `-- acme-v01.api.letsencrypt.org
|       `-- directory
|           `-- samplehashsamplehash
|               |-- meta.json
|               |-- private_key.json
|               `-- regr.json
|-- archive
|   `-- www.my-site.com
|       |-- cert1.pem
|       |-- cert2.pem
|       |-- chain1.pem
|       |-- chain2.pem
|       |-- fullchain1.pem
|       |-- fullchain2.pem
|       |-- privkey1.pem
|       `-- privkey2.pem
|-- csr
|   |-- 0000_csr-letsencrypt.pem
|   `-- 0001_csr-letsencrypt.pem
|-- keys
|   |-- 0000_key-letsencrypt.pem
|   `-- 0001_key-letsencrypt.pem
|-- live
|   `-- www.my-site.com
|       |-- cert.pem -> ../../archive/www.my-site.com/cert2.pem
|       |-- chain.pem -> ../../archive/www.my-site.com/chain2.pem
|       |-- fullchain.pem -> ../../archive/www.my-site.com/fullchain2.pem
|       `-- privkey.pem -> ../../archive/www.my-site.com/privkey2.pem
`-- renewal
    `-- www.my-site.com.conf
web serverには、live以下のシンボリックリンクを指定して使用する。
実行回数に従って、ファイルの末番がインクリメントされる。
live以下はドメインごとにディレクトリが切られているため、複数管理可能
csr keysのディレクトリはドメイン単位にディレクトリが分かれていないため、ドメインにかかわらず、共有的にインクリメントされる
- 設定ファイル
初回実行時、設定ファイルが生成される。
2回目以降は、ドメイン名をキーとして、設定ファイルを読んでから実行される。
従って、設定ファイルに記載されているものに関しては、2回目移行引数として渡す必要がない(と思う)
※ 毎回渡さないといけないものもある
# This is an example of the kind of things you can do in a configuration file.
# All flags used by the client can be configured here. Run Let's Encrypt with
# "--help" to learn more about the available options.

# Use a 4096 bit RSA key instead of 2048
rsa-key-size = 4096

# Always use the staging/testing server
server = https://acme-staging.api.letsencrypt.org/directory

# Uncomment and update to register with the specified e-mail address
# email = foo@example.com

# Uncomment and update to generate certificates for the specified
# domains.
# domains = example.com, www.example.com

# Uncomment to use a text interface instead of ncurses
# text = True

# Uncomment to use the standalone authenticator on port 443
# authenticator = standalone
# standalone-supported-challenges = tls-sni-01

# Uncomment to use the webroot authenticator. Replace webroot-path with the
# path to the public_html / webroot folder being served by your web server.
# authenticator = webroot
# webroot-path = /usr/share/nginx/html
- 証明書の設定、配置
NginxにHTTPS対応をする場合は下記のように設定すれば大丈夫です!
# HTTPS server

server {
    listen       443 ssl;
    server_name  localhost;

    ssl_certificate      /etc/letsencrypt/live/www.my-site.com/fullchain.pem; # 追加
    ssl_certificate_key  /etc/letsencrypt/live/www.my-site.com/privkey.pem; # 追加
#    ssl_certificate      /etc/nginx/cert.pem; # コメントアウト
#    ssl_certificate_key  /etc/nginx/cert.key; # コメントアウト

    ssl_session_cache shared:SSL:1m;
    ssl_session_timeout  5m;

    ssl_ciphers  HIGH:!aNULL:!MD5;
    ssl_prefer_server_ciphers   on;

    location / {
        root   /usr/share/nginx/html;
        index  index.html index.htm;
    }
}
最後に
以上となります。
使い勝手もよく、セキュリティもしっかり考えた設計がされているのかなという印象です。
しかし、コマンド実行時にホスト側でsudoを打つのがいけてない(そこまでlet's encryptを信頼できない)という声もあり、それに対応したものもあります。
diafygi/letsencrypt-nosudo
Let's Encryptは少なからず、証明書業界にダメージを与えるものとなるでしょう。
是非機会があれば、試してみてください。