Introduction
※マイクが使えないので、このページを読んでください。ごめんなさい!
最終課題は数当てゲームで学んだコードを利用してコンピューター相手にジャンケンをするゲームを作りました。
今からこのゲームの一番シンプルなバージョンと、見た目を整えたバージョンを紹介します。
シンプルなバージョン
見た目は、以下の通りです。
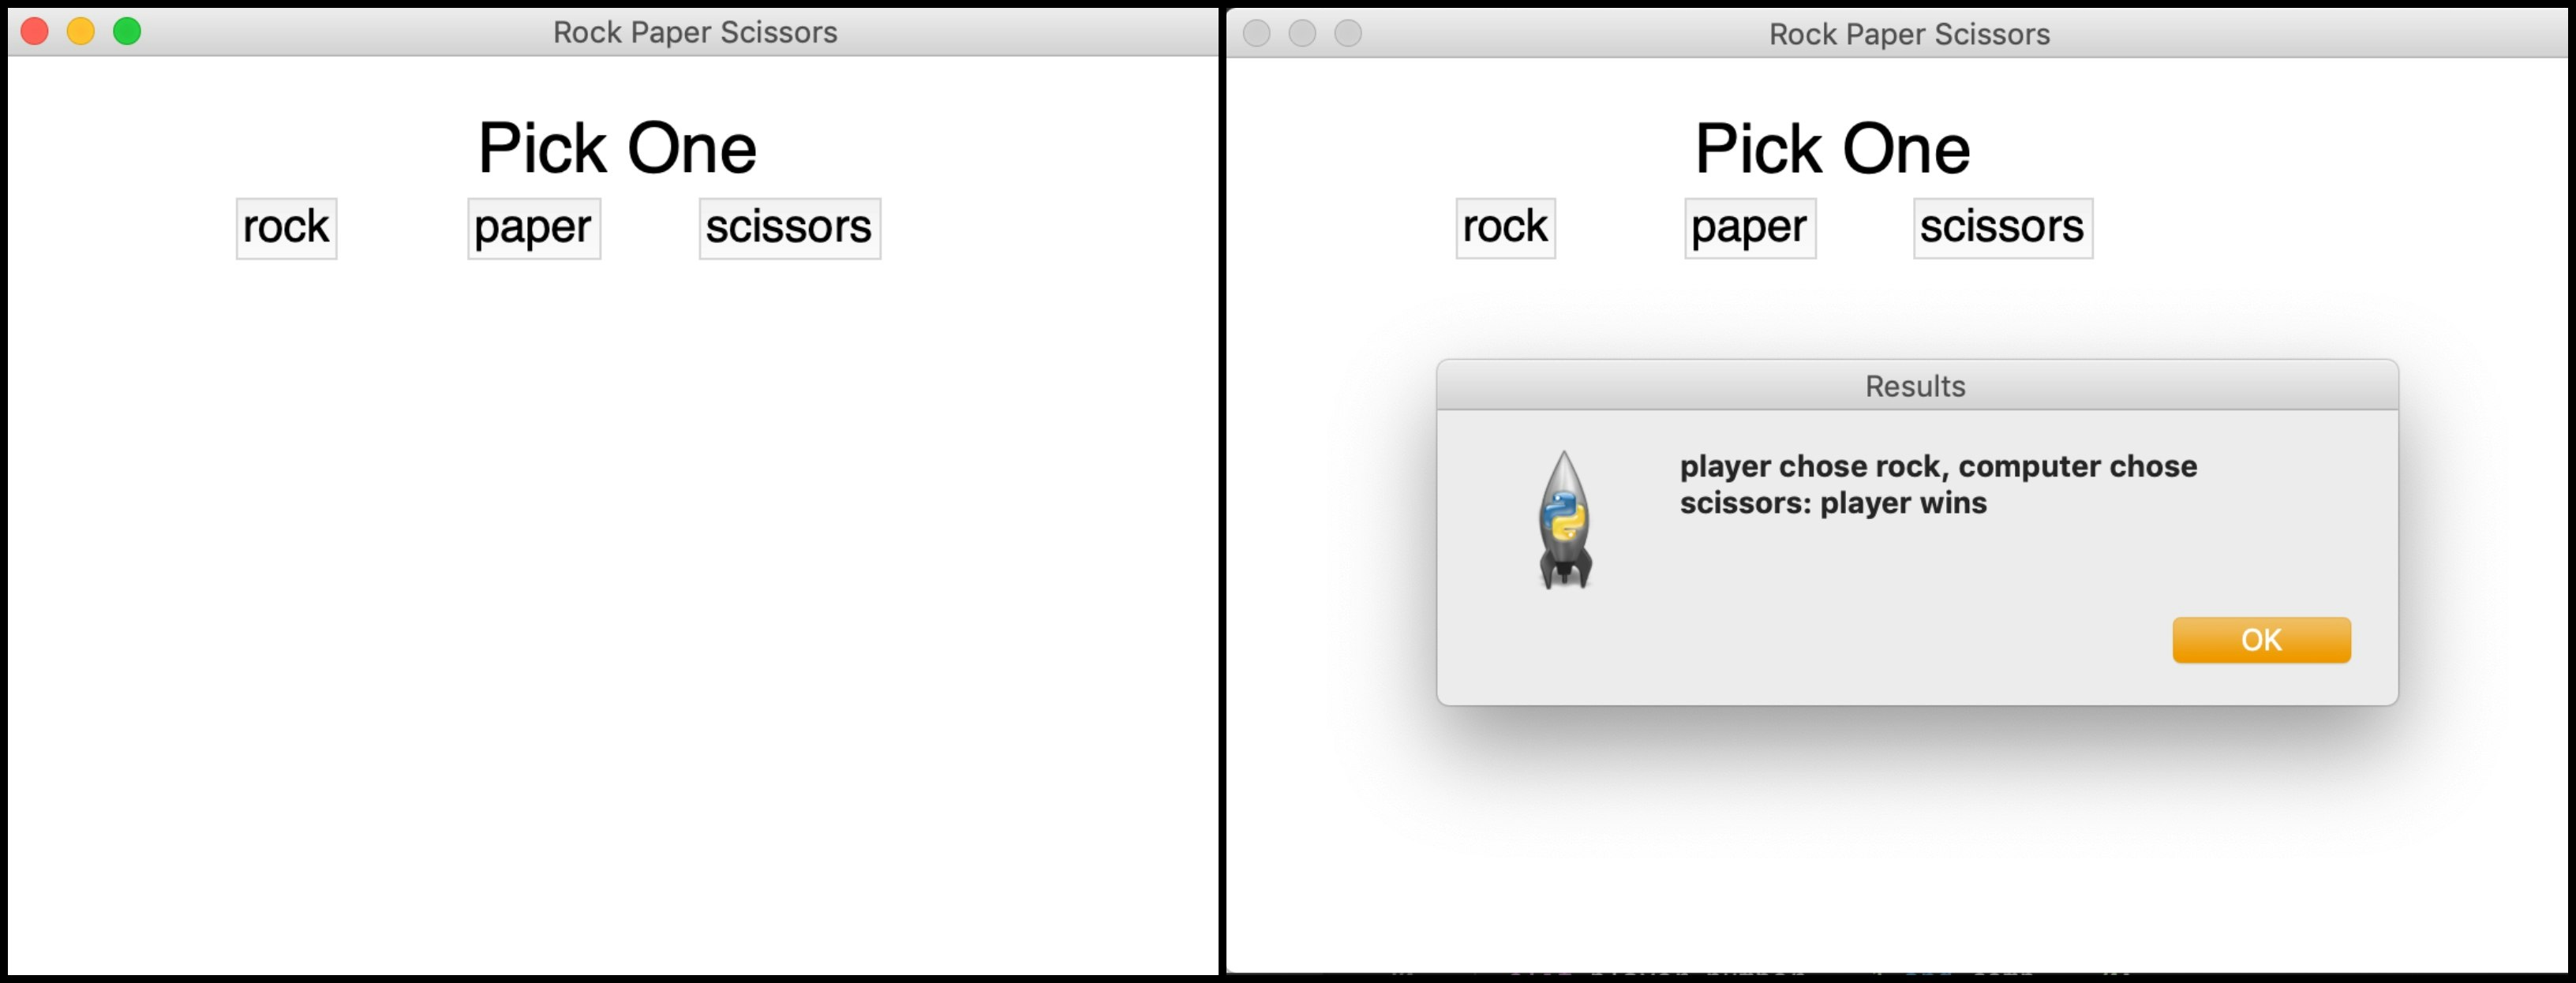
開始すると、左の写真に写っている画面が出てきて、ボタンを押すと右の写真に写っているポップアップで勝敗(または引き分け)を通知します。Okを押すとポップアップは閉じるけどゲームのウィンドウは開いたままです。
次に、このゲームのコードを紹介します。
まず、以下のコードを使います。
import random
import tkinter as tk
import tkinter.messagebox as tmsg
コードの意味:
import random コンピューターにランダムな値を選ばせる
import tkinter as tk tkinterを挿入
import tkinter.messagebox as tmsg tkinterのポップアップを挿入
ウィンドウの作成
次に以下のコードを使います。
root=tk.Tk()
root.geometry("600x400")
root.title("Rock Paper Scissors")
label=tk.Label(root,text="Pick One",font=("Helvetica",30))
label.place(x=200,y=20)
コードの意味:
root=tk.Tk() ウィンドウの名前をrootに指名
root.geometry("600x400") root.title("Rock Paper Scissors")ウィンドウのサイズとタイトルを指定
label=tk.Label(root,text="Pick One",font=("Helvetica",30)) label.place(x=200,y=20)ウィンドウの文字、フォント、位置を指定
ボタンの作成
次に以下のコードを使います。
button0=tk.Button(root, text="rock", font=("Helvetica",20), command=ButtonClick0)
button0.place(x=100, y=60)
コードの意味:
button0=tk.Button(root, text="rock", font=("Helvetica",20), command=ButtonClick0) button0をボタンとして働くようにtk.Buttonにする
button0=tk.Button (root, text="rock", font=("Helvetica",20), command=ButtonClick0) button0をウィンドウの中に作成し、文字、サイズ、コマンド(ButtonClick0)を指定
上記のコードを各ボタンのために作成します。その部分の最終的な形は以下の通りになります。
button0=tk.Button(root, text="rock", font=("Helvetica",20), command=ButtonClick0)
button0.place(x=100, y=60)`

`button1=tk.Button(root, text="paper", font=("Helvetica",20), command=ButtonClick1)
button1.place(x=200, y=60)`

`button2=tk.Button(root, text="scissors", font=("Helvetica",20), command=ButtonClick2)
button2.place(x=300, y=60)
※値の意味:0=rock, 1=paper, 2=scissors
最後に、ボタンが押された時に行われるコマンドを作成します。
一つのコマンドのコードは以下の通りです。
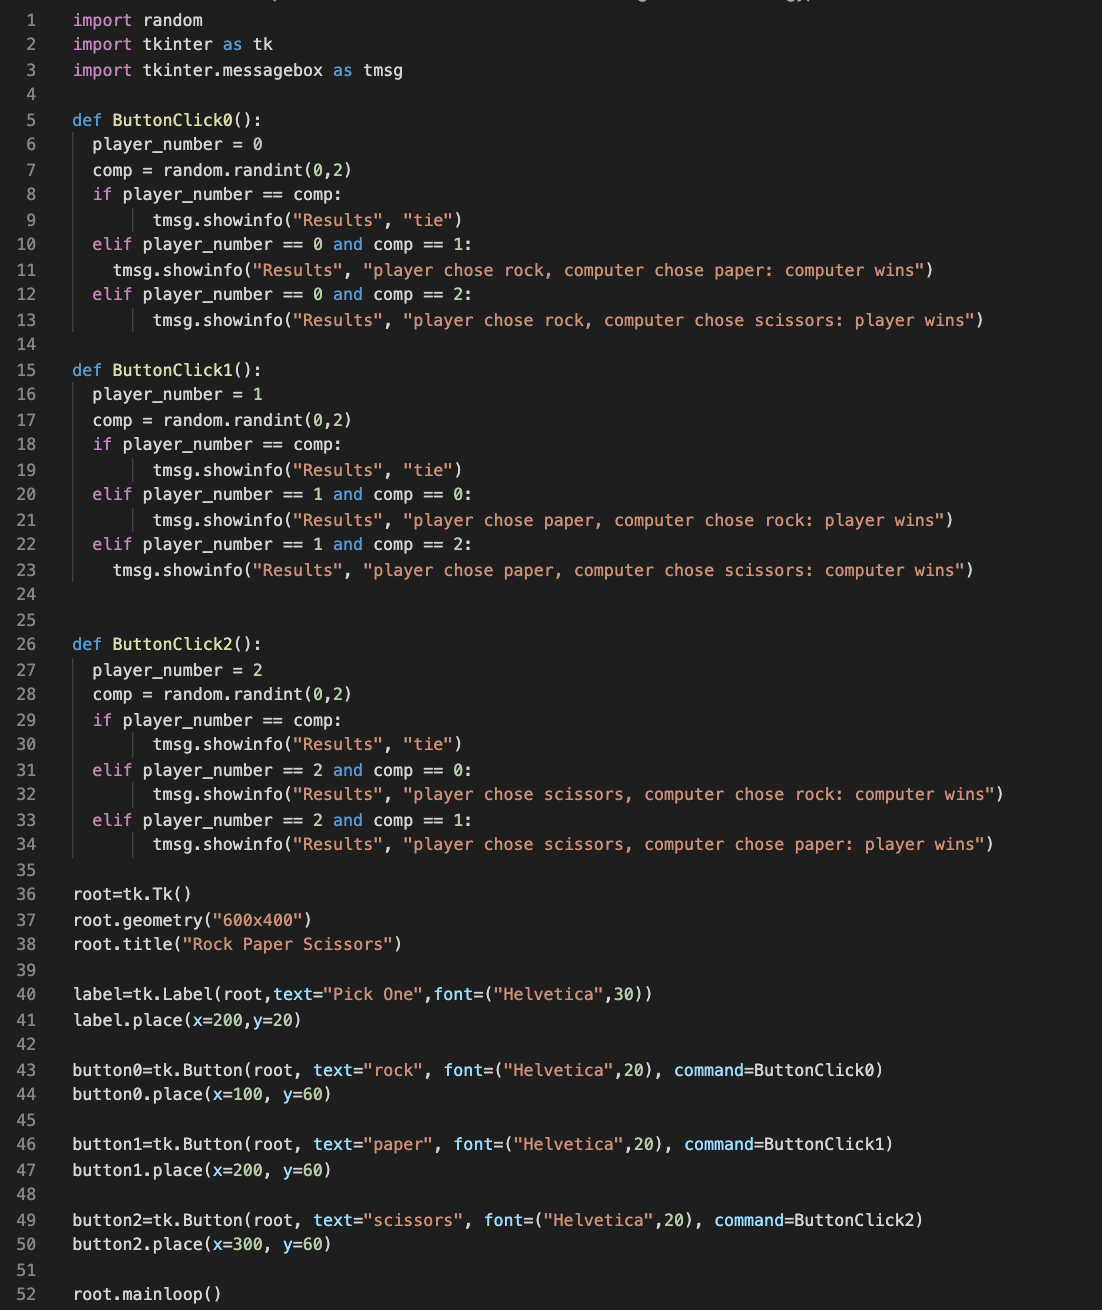
def ButtonClick0():
  player_number = 0
  comp = random.randint(0,2)
  if player_number == comp:
        tmsg.showinfo("Results", "tie")
  elif player_number == 0 and comp == 1:
    tmsg.showinfo("Results", "player chose rock, computer chose paper: computer wins")
  elif player_number == 0 and comp == 2:
        tmsg.showinfo("Results", "player chose rock, computer chose scissors: player wins")
コードの意味:
def ButtonClick0(): ButtonClick0というコマンドの動作を指定する
player_number=0 このボタンが押された時に、プレーヤーの値を0に設定する
comp=random.randint(0,2) このボタンが押された時にコンピューターは0-2の間のランダムな数字を選択する
if player_number == comp:
elif player_number == 0 and comp == 1:
elif player_number == 0 and comp == 2:
各条件(プレーヤーの数字(0)がコンピューターと同じ時、コンピューターの値が1、2の時)のコマンドを指定する
tmsg.showinfo("Results", "____")
各条件の時に出てくるポップアップのタイトルと文章を指定する
上記のコードをプレーヤーが選択できるすべての値について書きます。
完成品
完成したコードは以下の通りになります。
見た目を整えたバージョン
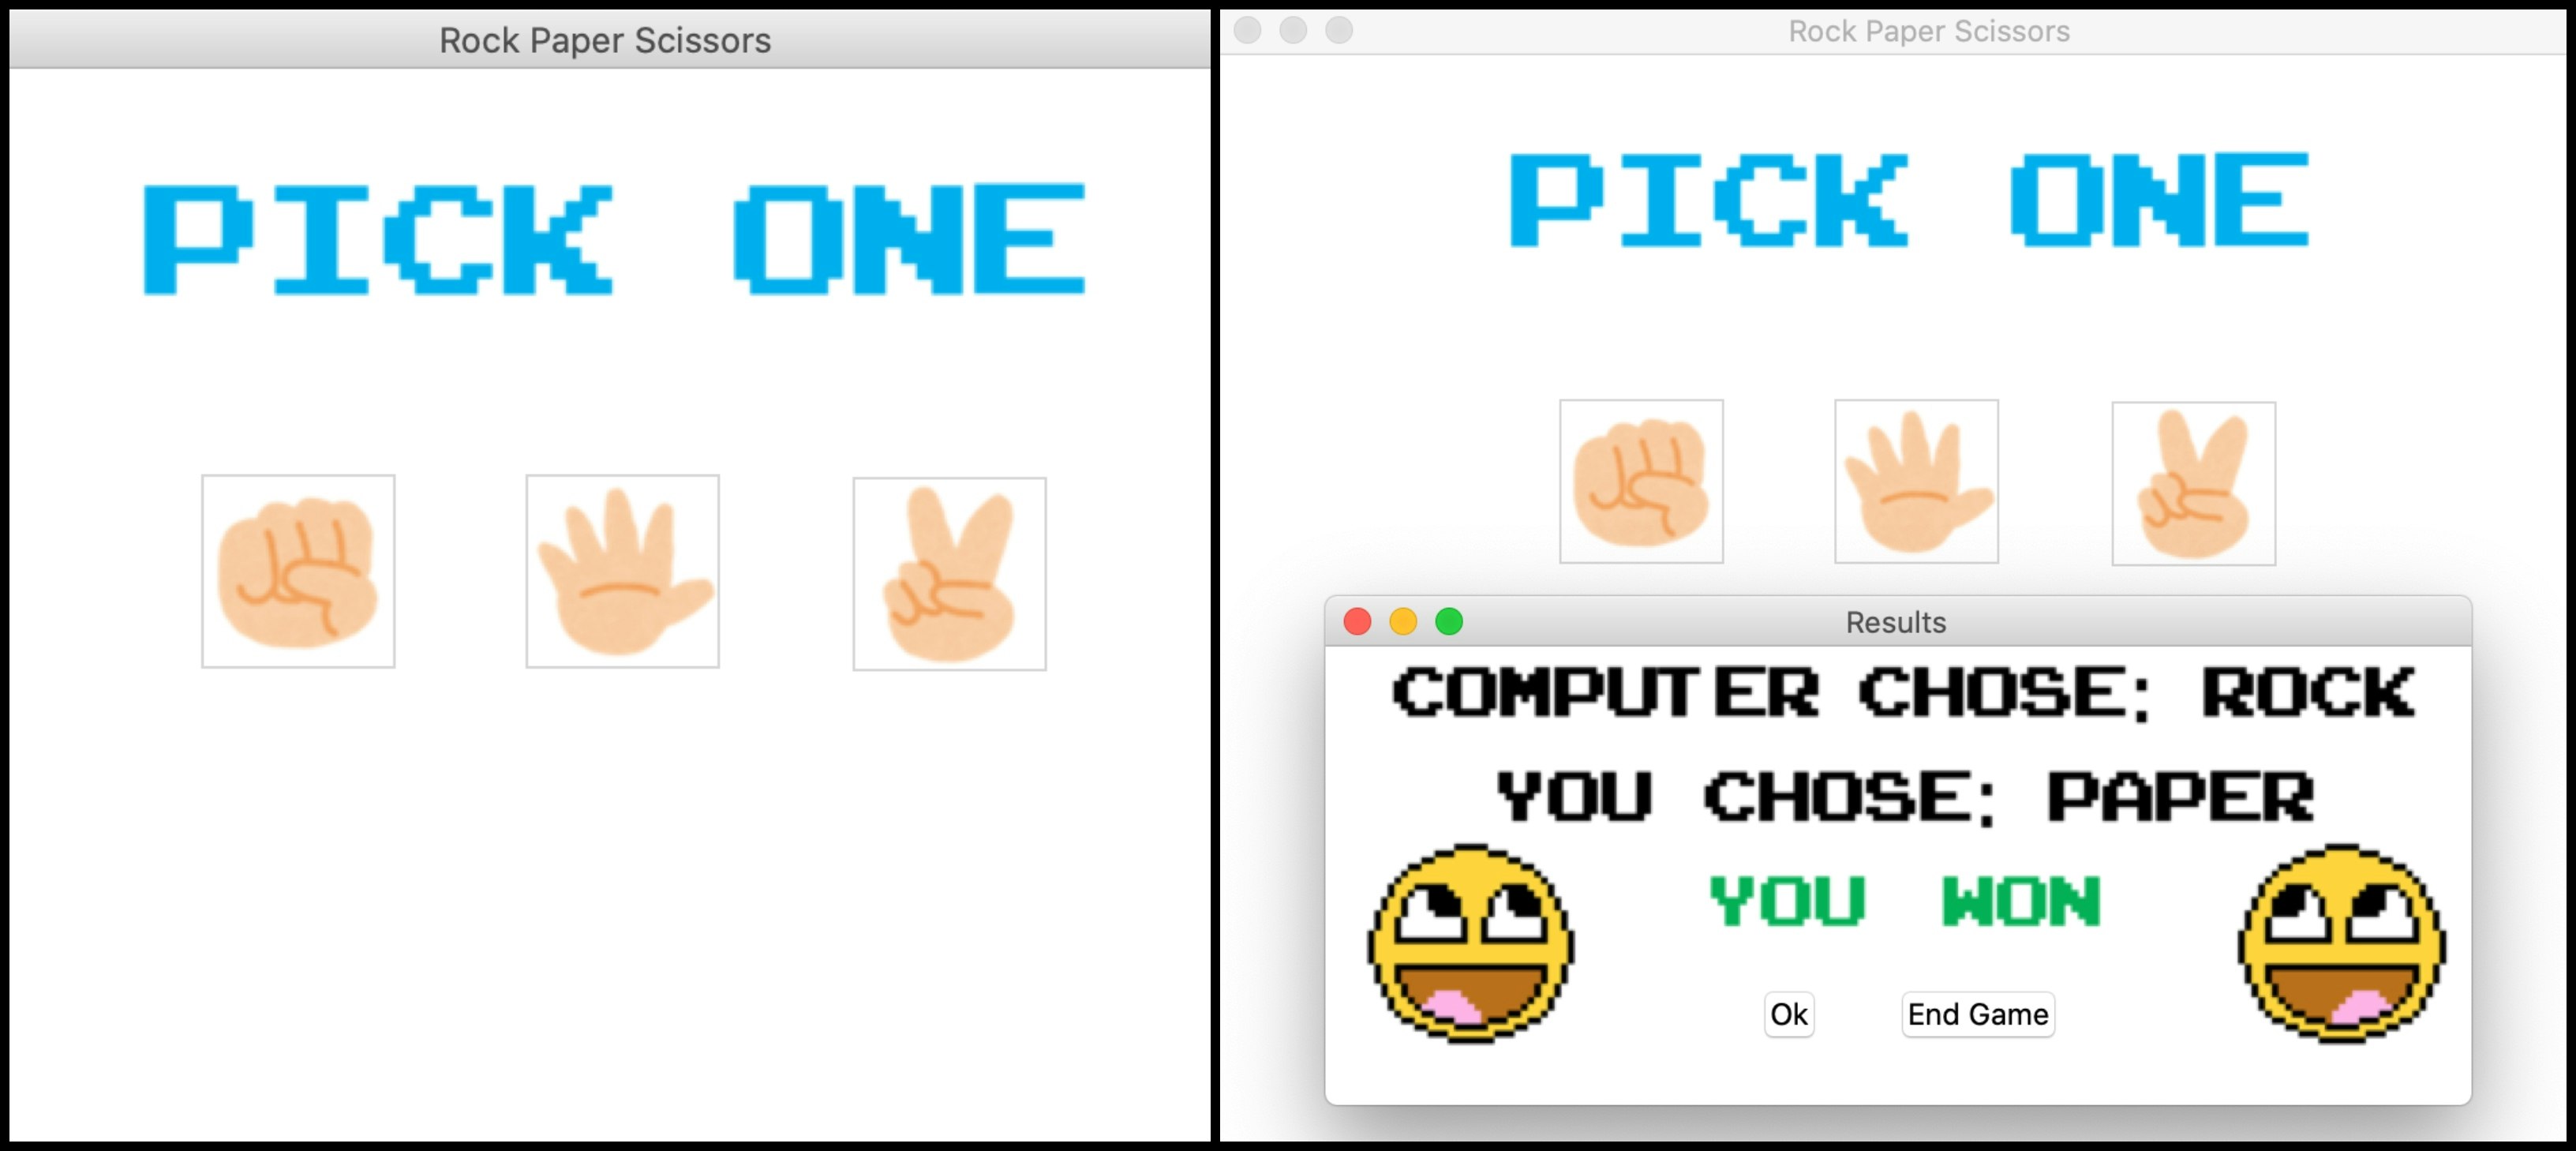
見た目は、以下の通りです。
コードの変更
まず、from PIL import ImageTk, Imageで写真を挿入できるようにします。
挿入する画像はすべて同じファイルに入っているので、dir = "/Users/satokamimura/Desktop/school/uni/コンピューター演習/newgame/"というストリングを作っておきます。こうすることによって、画像を挿入する際はdir+filename.pngを使うことができます。
次に、ウィンドウの文字を変えるためにlabelのコードを以下のコードに変えます。
title = ImageTk.PhotoImage(Image.open(dir+"text.png"))
titletext = tk.Label(root, image= title).place(x=100,y=20)
コードの意味:
title=ImageTk.PhotoImage画像の名前をtitleと指定
titletext=tk.Label次のLabelをtitletextという名前にする
(root, image= title).place(x=100,y=20) rootのウィンドウに表示し、画像を先ほど指定したtitleにし、ウィンドウ上の場所を指定
次に、ボタンのコードを以下の通りに変更します。
img = ImageTk.PhotoImage(Image.open(dir+"rock.png"))
button0=tk.Button(root, command=ButtonClick0, image = img).place(x=150, y=150)
コードの意味:
img=Image.Tk.PhotoImage 画像の名前をimgと指定
button0=tk.Buttonボタンの名前をbutton0に指定
(root, command=ButtonClick0, image = img).place(x=150, y=150)rootのウィンドウに表示、クリックされた時のコマンドをButtonClick0に指定、画像を先ほどのimgに指定、ボタンの場所を指定
同じことを残りの二つのボタンにも行うと、すべてのボタンがそれぞれのジャンケンの画像になります。
次に、結果を表示するためのウィンドウを作成します。ここではどの結果でも変わらないウィンドウのフォーマットの部分だけを指定します。
def popup():
  global win
  win=tk.Toplevel()
  win.geometry("500x200")
  win.title('Results')
  tk.Button(win, text='Ok', command=win.destroy).place(x=190,y=172)
  tk.Button(win, text='End Game', command=root.destroy).place(x=250,y=172)
コードの意味:
global win 新しいウィンドウ'win'をグローバルに指定する(これを入れることによって、他のコードの部分で'win'が使えるようになります。これは、結果を表記するコードの部分で便利になります。)
win=tk.Toplevel()winという名前の新しいウィンドウを作成
win.geometry,win.titleウィンドウのサイズとタイトルを指定
tk.Button(win, text='Ok', command=win.destroy).place(x=190,y=172)押されると新しいウィンドウを閉じるOkボタンとその場所を指定
tk.Button(win, text='End Game', command=root.destroy).place(x=250,y=172)押されるとゲームのウィンドウも閉じるEnd Gameボタンとその場所を指定
次に、ボタンのコマンドを修正します。
すべてのコマンドのif, elifの後に続くコードをtmsg.showinfoから先ほど作った新しいウィンドウと、結果を示す画像を表示するように指定します。
ex.:
def ButtonClick0():
  player_number = 0
  comp = random.randint(0,2)
  popup()
コードの意味:
popup()結果がどうであれ、まず結果を表示するポップアップが表示されるようにする
次に、起こり得る各パターンの正しい結果を表示するようにします。
コードはパターンの名前と画像名以外すべて同じなので、ここでは一例のみを説明します。
if player_number == comp:
      rocktie= ImageTk.PhotoImage(Image.open(dir+"rocktie.png"))
      tk.Label(win, image=rocktie).place(x=0, y=0)
      popup.pack()
コードの意味:
rocktie=ImageTk.PhotoImage 画像の名前をrocktieに指定
tk.Label(win, image=rocktie).place(x=0, y=0) 画像をウィンドウに表示し、場所を指定
popup.pack()ポップアップのウィンドウが画像付きで出てくるようにするために必要なコード
すべての結果のパターンの画像を作り、上のコードをすべてのパターンに指定します。
使った画像は全パターンの合計9枚です。

完成したコードは次の通りです。
import random
import tkinter as tk
from PIL import ImageTk, Image

dir = "/Users/satokamimura/Desktop/school/uni/コンピューター演習/newgame/"


root=tk.Tk()
root.geometry("600x400")
root.title("Rock Paper Scissors")

def popup():
  global win
  win=tk.Toplevel()
  win.geometry("500x200")
  win.title('Results')
  tk.Button(win, text='Ok', command=win.destroy).place(x=190,y=172)
  tk.Button(win, text='End Game', command=root.destroy).place(x=250,y=172)

def ButtonClick0():
  player_number = 0
  comp = random.randint(0,2)
  popup()
  if player_number == comp:
      rocktie= ImageTk.PhotoImage(Image.open(dir+"rocktie.png"))
      tk.Label(win, image=rocktie).place(x=0, y=0)
      popup.pack()
  elif player_number == 0 and comp == 1:
      rocklose= ImageTk.PhotoImage(Image.open(dir+"rocklose.png"))
      tk.Label(win, image=rocklose).place(x=0, y=0)
      popup.pack()
  elif player_number == 0 and comp == 2:
      rockwin= ImageTk.PhotoImage(Image.open(dir+"rockwin.png"))
      tk.Label(win, image=rockwin).place(x=0, y=0)
      popup.pack()

def ButtonClick1():
  player_number = 1
  comp = random.randint(0,2)
  popup()
  if player_number == comp:
    papertie= ImageTk.PhotoImage(Image.open(dir+"papertie.png"))
    tk.Label(win, image=papertie).place(x=0,y=0)
    popup.pack()
  elif player_number == 1 and comp == 0:
    paperwin= ImageTk.PhotoImage(Image.open(dir+"paperwin.png"))
    tk.Label(win, image=paperwin).place(x=0,y=0)
    popup.pack()
  elif player_number == 1 and comp == 2:
    paperlose= ImageTk.PhotoImage(Image.open(dir+"paperlose.png"))
    tk.Label(win, image=paperlose).place(x=0,y=0)
    popup.pack()

def ButtonClick2():
  player_number = 2
  comp = random.randint(0,2)
  popup()
  if player_number == comp:
    scissorstie= ImageTk.PhotoImage(Image.open(dir+"scissorstie.png"))
    tk.Label(win, image=scissorstie).place(x=0,y=0)
    popup.pack()
  elif player_number == 2 and comp == 0:
    scissorslose= ImageTk.PhotoImage(Image.open(dir+"scissorslose.png"))
    tk.Label(win, image=scissorslose).place(x=0,y=0)
    popup.pack()
  elif player_number == 2 and comp == 1:
    scissorswin= ImageTk.PhotoImage(Image.open(dir+"scissorswin.png"))
    tk.Label(win, image=scissorswin).place(x=0,y=0)
    popup.pack()

title = ImageTk.PhotoImage(Image.open(dir+"text.png"))
tk.Label(root, image= title).place(x=100,y=20)

img = ImageTk.PhotoImage(Image.open(dir+"rock.png"))
button0=tk.Button(root, command=ButtonClick0, image = img).place(x=150, y=150)

img1 = ImageTk.PhotoImage(Image.open(dir+"paper.png"))
button1=tk.Button(root, command=ButtonClick1, image=img1).place(x=270, y=150)

img2 = ImageTk.PhotoImage(Image.open(dir+"scissors.png"))
button2=tk.Button(root, command=ButtonClick2, image=img2).place(x=390, y=150)

root.mainloop()
難しかった部分
結果のポップアップの見た目を変えたいと思ったが、tkinterのshowinfoで変更できることはすごく限られているので、最終的にはポップアップのような形式の新しいウィンドウを作ることにしました。この時に新しいウィンドウの作り方がいまいちわからなかったのでそこが一番大変でした。また、画像の挿入も最初は少し手こずりました。
このゲームを最初に作った時はすべての結果のパターンに新しいウィンドウを指定していたので、ものすごい行数のコードでした。それを省略するためにポップアップの基本的なコードをまとめたのですが、最初は思うように画像の表示のコードと連携できなかったので難しかったです。
使ってよかったと思ったポイント
- コマンドの名前をパターン化すること
- コマンドの名前をそのコマンドの内容に関連付けることによって、コードをパッと見た時に何を意味するかがわかる
- 似たようなことをするコマンドをいくつも使う時にコピーペーストして少し変えるだけで済むから、手間が省けます。
- 関連するファイルを一つのフォルダーにまとめる
- 同じプロジェクトで使うファイル(画像ファイル)などは一つのフォルダーにまとめておくことによって、複数の画像を使う時にコードをコピーペーストしてファイル名だけを変えるだけで済みます
- これは、画像を挿入する度にファイルのpathを打ち直さなくて済むので便利です。
- コードをテストするために別のファイルを作る
- 使ったことないコードを初めて使うときは、そのコードがどのように使えるのかをまず理解した方がよりスムーズに進みます。
- そのため、その新しいコードのみで試すテスト用のファイルを作ると便利です。
参考文献
https://stackoverflow.com/questions/45228664/tkinter-nameerror-name-toplevel-is-not-defined
https://stackoverflow.com/questions/41574168/how-to-i-position-buttons-in-tkinter/41575504
https://stackoverflow.com/questions/10052410/tkinter-button-does-not-appear-on-toplevel
https://stackoverflow.com/questions/16242782/change-words-on-tkinter-messagebox-buttons
https://stackoverflow.com/questions/32060837/remove-border-of-tkinter-button-created-with-an-image
https://www.geeksforgeeks.org/pyqt5-add-image-icon-on-a-push-button/?ref=rp
https://stackoverflow.com/questions/25703446/whats-the-main-difference-between-if-and-else-if
https://docs.python-guide.org/scenarios/imaging/