はじめに
以前の記事で、ONTAPにてQtreeにQuotaを設定する方法について記載しましたが、QtreeはVolumeの直下にしか作成できないという制約があります。
とは言うものの、実際には3階層目や5階層目のフォルダにQuotaを設定したいというニーズも多いのではないでしょうか。ONTAPでこのような要件を満たすためには、VolumeをJunction-Pathで繋いでからQtree+Quota設定を利用するであるとか、WindowsサーバにLUNを見せてファイルサーバ化する方法が一般的に考えられますが、実はQtree+Quota設定を使わなくてもJunctionPathとシンプロ構成を利用することで、類似の構成を実現することも可能です。
本記事では、JunctionPathとシンプロを利用した容量制限について実現できないか考えてみます。

何をしたい?できる?
Aggregateを単一Volumeと見なして、JunctionPath+シンプロで階層構造の作成
Quotaの代わりにVolumeサイズとis-space-XXオプションを使用
実現したい事
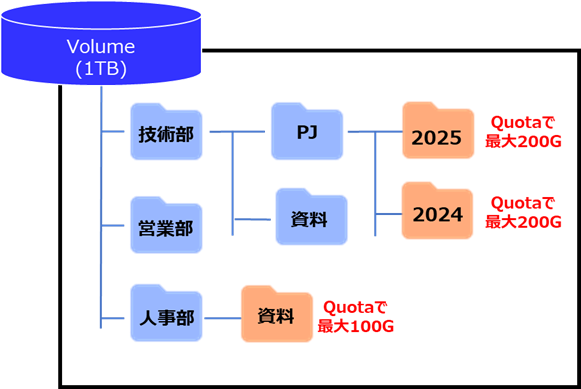
以下のような単体のFlexVolume構成では実現できない環境を作成したいとします。
- 深い階層のディレクトリへQuota掛ける
- Quotaの掛かったディレクトリをmountすると、Quota制限サイズで表示される
-
Quota掛かってない部分にVolumeサイズ(1TB)分使用すると、全体で書き込み不可
(volumeサイズ以上の書き込みはできない)
記事における環境情報
本記事では、以下の環境で実施した内容となります。
ONTAP9.5以降の機能しか使ってないので、比較的古い環境でも実現できますが、Volume作成個数の制約があるので、大量のQtree使用環境の代わりにはならないです。
但し、容量効率的にAggregate重複排除の利用したAFFやC-Seriseが推奨です。
また、Volume作成数には制約があるので、Qtree Quotaを大量に作成する環境の代わりにはならないです。
- ONTAP : 9.7
- Windows Workgroup環境

作成する構成概要
以下のような環境をJuncthion pathを利用して作成します。

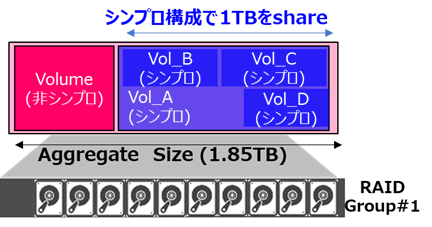
これだけでは、各Volumeの合計サイズ分の利用(1.5TB分)が可能となるので、実現したい事に記載した構成のように1 Volumeのサイズまでの書き込みしかできないようにシンプロビジョニングを使い工夫します。

- Aggregateサイズ=Volumeサイズだと、容量の拡張・縮小の柔軟性が無くなり、ONTAP Upgrade時に必要となる空き容量で弊害がありそうなのでダミーのVolume作成
- ダミーのVolumeはSpace GuaranteeをVolume指定した非シンプロ構成で、Aggregateの容量調整やシンプロビジョニングVolumeの拡張時にサイズ調整を行う-
- 残った約1TBのAggregate容量を各Volumeで共有することで、1Volume内にあるのと同等の形に見立てる
- Junction-pathで繋げるVolumeサイズは200GBや100GBなので、この上限がQuotaとなりVolumeサイズ以上の書き込みができない形とする(Quotaの有効化は不要)
-Snapshot予約領域を考慮すると計算や構成の考慮が大変なので、Snaoshotの予約割合を0%にしてsnapshotの差分込みのVolumeサイズとなるのがデメリット
確認手順
1. Aggregateの作成
少ないDisk数でAggregateの作成を実行する場合は、SSD搭載の機器が推奨になります。
> aggr create -aggregate node1_aggr_test -diskcount 7 -node PS-8200cl02-01

Info: The layout for aggregate "node1_aggr_test" on node "PS-8200cl02-01" would be:

      First Plex

        RAID Group rg0, 7 disks (block checksum, raid_dp)
                                                            Usable Physical
          Position   Disk                      Type           Size     Size
          ---------- ------------------------- ---------- -------- --------
          shared     1.0.17                    SSD               -        -
          shared     1.0.18                    SSD               -        -
          shared     1.0.19                    SSD         420.0GB  420.0GB
          shared     1.0.20                    SSD         420.0GB  420.0GB
          shared     1.0.21                    SSD         420.0GB  420.0GB
          shared     1.0.10                    SSD         420.0GB  420.0GB
          shared     1.0.11                    SSD         420.0GB  420.0GB

      Aggregate capacity available for volume use would be 1.85TB.

Do you want to continue? {y|n}: y
[Job 56] Job succeeded: DONE
2. SVMとVolumeの作成
2-1. SVM作成
CIFSのWorkGroup環境を作成するので、security styleはntfsを指定して作成します。
> vserver create -vserver quota_test -subtype default -aggregate node1_aggr_test -rootvolume-security-style ntfs
[Job 57] Job succeeded:
Vserver creation completed.
2-1. volumeの作成
データ格納Volumeの作成をシンプロビジョニングを有効にした形で実施します。
(-space-guarantee noneの指定)
当然シンプロビジョニング構成で作成しているので、Aggregateの使用量は1TBにはなりません。

# シンプロビジョニングVolumeの作成
> volume create -vserver quota_test -volume vol_A -size 1tb -aggregate node1_aggr_test -space-guarantee none -junction-path /vol_A

Warning: The export-policy "default" has no rules in it. The volume will therefore be inaccessible over NFS and CIFS protocol.
Do you want to continue? {y|n}: y
[Job 61] Job succeeded: Successful


# Aggregate容量の確認
> aggr show -aggregate node1_aggr_test -fields size,usedsize,availsize
aggregate       availsize size   usedsize
--------------- --------- ------ --------
node1_aggr_test 1.84TB    1.85TB 1.57GB


> df -A -h node1_aggr_test
Aggregate                total       used      avail capacity
node1_aggr_test         1890GB     1612MB     1888GB       0%
node1_aggr_test/.snapshot   0B         0B         0B       0%
2 entries were displayed.
2-2. サイズ調整用のダミーVolume作成
Aggregateの容量調整を行うダミーVolumeの作成を非シンプロ構成で実施します。
(-space-guarantee volumeの指定)
ダミーVolumeによって、Aggregateの空き容量がVolumeサイズ分、占有されるので、今後シンプロビジョニング用Volume作成しても、合計で1TBの書き込み範囲内となります。

# サイズ調整用のダミーVolume作成
> volume create -vserver quota_test -volume dummy -size 883g -aggregate node1_aggr_test -space-guarantee volume
[Job 79] Job succeeded: Successful


# Aggregate容量の確認
> aggr show -aggregate node1_aggr_test -fields size,usedsize,availsize
aggregate       availsize size   usedsize
--------------- --------- ------ --------
node1_aggr_test 1000GB    1.85TB 889.5GB


> df -A -h node1_aggr_test
Aggregate                total       used      avail capacity
node1_aggr_test         1890GB      889GB     1000GB      47%
node1_aggr_test/.snapshot   0B         0B         0B       0%
2 entries were displayed.
3. Workgroup環境の作成とVolumeへのフォルダ作成
3-1. LIFの作成
LIFを作成しIPアドレスの付与を実施します。
# データ疎通用のLIF作成
> net int create -vserver quota_test -lif data100 -service-policy default-data-files -role data -data-protocol nfs,cifs,fcache -address 172.16.20.93 -netmask 255.255.255.0 -home-node PS-8200cl02-01 -home-port a0a-20
  (network interface create)


> net int show -vserver quota_test
  (network interface show)
            Logical    Status     Network            Current       Current Is
Vserver     Interface  Admin/Oper Address/Mask       Node          Port    Home
----------- ---------- ---------- ------------------ ------------- ------- ----
quota_test
            data100      up/up    172.16.20.93/24    PS-8200cl02-01 a0a-20    true
3-2. Workgroupo環境の作成
CIFSサービスをWorkgroup環境で作成します。
アクセスする為のユーザをSVM上に作成が必要になる為、合わせてローカルユーザの作成を実施します。
# CIFSサービスをWorkgroup環境で作成
> cifs create -vserver quota_test -cifs-server quota_test -workgroup WORKGROUP

Info: SMB1 protocol version is disabled on this CIFS server. If required, use the (privilege: advanced) command "vserver cifs options modify -vserver
quota_test -smb1-enabled true" to enable it.


# CIFSサーバへのアクセス用ローカルユーザ作成
> vserver cifs users-and-groups local-user create -user-name wgadmin -is-account-disabled false

Enter the password:
Confirm the password:


# 作成したユーザをAdministratorsグループに所属させる
> vserver cifs users-and-groups local-group add-members -vserver quota_test -group-name BUILTIN\Administrators -member-names wgadmin


# ローカルグループのメンバー確認
> vserver cifs users-and-groups local-group  show-members  -vserver quota_test -group-name BUILTIN\Administrators

           Vserver: quota_test
        Group Name: BUILTIN\Administrators
       Member Name: QUOTA_TEST\Administrator
                    QUOTA_TEST\wgadmin
3-3. CIFS共有の作成とフォルダ構成を作成
CIFS共有を作成します。
# CIFS共有の作成
> cifs share create -vserver quota_test -share-name vol_A -path /vol_A
LIF作成時に指定したIPへアクセスを実施します。
アクセス時には上記で作成したアカウントを使用します。
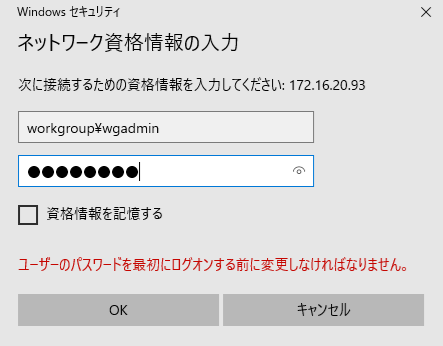
アクセス完了後にフォルダ階層を作成します。


4. 容量制限のあるVolumeを作成
Qtree Quotaの代わりとなるようなVolumeを作成します。
ダミーVolumeの効果で、シンプロビジョニング設定でVolumeを作成すると、親元になるVolumeのサイズ(1TB)内で調整しているようになります。
また、Volume作成時は、以下の接続となるようなJunction-path設定にします。

また、Volumeをドライブレター接続する際に、Quota設定と同じような容量表示にする為、is-space-reporting-logicalとis-space-enforcement-logicalのオプションを有効化します。
# Volumeの作成
> volume create -vserver quota_test -volume vol_B -size 200g -aggregate node1_aggr_test -space-guarantee none -junction-path /vol_A/技術部/PJ/2025 -is-space-reporting-logical true -is-space-enforcement-logical true

> volume create -vserver quota_test -volume vol_C -size 200g -aggregate node1_aggr_test -space-guarantee none -junction-path /vol_A/技術部/PJ/2024 -is-space-reporting-logical true -is-space-enforcement-logical true

> volume create -vserver quota_test -volume vol_D -size 100g -aggregate node1_aggr_test -space-guarantee none -junction-path /vol_A/人事部/資料 -is-space-reporting-logical true -is-space-enforcement-logical true


# snapshotの予約領域を0%にする(接続Volumeを合計して1TBまでしか利用させない為)
> vol modify -vserver quota_test -volume vol_* -percent-snapshot-space 0
Volume modify successful on volume vol_A of Vserver quota_test.
Volume modify successful on volume vol_B of Vserver quota_test.
Volume modify successful on volume vol_C of Vserver quota_test.
Volume modify successful on volume vol_D of Vserver quota_test.
4 entries were modified.


# 作成したVolumeの確認
> volume show -vserver quota_test -fields size,space-guarantee,junction-path
vserver    volume size  junction-path space-guarantee
---------- ------ ----- ------------- ---------------
quota_test dummy  883GB -             volume
quota_test quota_test_root
                  1GB   /             volume
quota_test vol_A  1TB   /vol_A        none
quota_test vol_B  200GB /vol_A/技術部/PJ/2025
                                      none
quota_test vol_C  200GB /vol_A/技術部/PJ/2024
                                      none
quota_test vol_D  100GB /vol_A/人事部/資料
                                      none
6 entries were displayed.
5. WIndowsクライアントからの確認
windowsクライアントで確認すると、フォルダのように見えます。
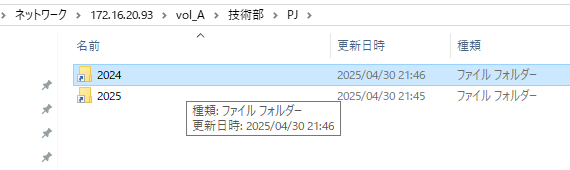
容量制限を掛けたVolumeをドライブレター接続するとQuota設定の時のような重複排除前の使用容量が確認できます。

# 重複排除の有無の確認
> vol efficiency show -volume vol_D
Vserver    Volume           State     Status      Progress           Policy
---------- ---------------- --------- ----------- ------------------ ----------
quota_test vol_D            Enabled   Idle        Idle for 00:02:53  -


# Storageとしては使用量は365MB
> vol show -volume vol_D -fields size,used
vserver    volume size  used
---------- ------ ----- -------
quota_test vol_D  100GB 365.0MB


> df -h -s -volume vol_D
Filesystem                used      saved       %saved  Vserver
/vol/vol_D/              365MB      359MB          50%  quota_test
参考及びリンク
Namespaces and junction points overview