はじめに
本記事では、ONTAPのDefault Tree Quota設定について説明します。
Quotaは、Storage上のVolumeに対して使用量を管理・制限するための機能であり、ユーザー、グループ、またはディレクトリ(Qtree)に対して容量の上限を設定することができます。
Quota機能のRule追加でDefault Quotaを事前に設定しておくことで、Quota Rule変更(追加)時のQuota初期化(Scan)が不要という利点があります。これにより、運用中のシステムにおいても安心してQuota管理が可能となります。

何をしたい?できる?
- Volumeの新規作成時にDefault Tree Quota設定をしておく
- Qtree作成の度に設定したQuota値が設定されている事の確認
- Default Tree Quotaを使用しないとQtree作成時にQuotaのOff/Onが必要となる点を確認
記事における環境情報
本記事では、以下の環境で実施した内容となります。
分かり易くするために、Network構成は単純化しています。
- ONTAP : 9.15.1
- CIFS環境

設定手順
CIFSアクセス可能なSVMに対してのQuota設定を実施します。
手順内で指定されているSVM名やパラメータは、環境により異なるので適宜変更して下さい。
1. QuotaのPolicy作成と制限値の編集
1-1. Quota policyを作成して、SVMに適用
Quota Policyを作成して利用しているSVMへ適用します。
作成における考慮事項は以下の通りです。
- SVMには、常に1つのQuota Policyが割り当てられている
- SVM作成時に空のQuota Policy作成され、SVM に割り当て(defaultという名前)
- SVMに最大5つのQuota Policyを作成可能
- Quota制限値や対象VolumeはQuota PolicyにRuleという形で記載
# SVMに適用されているQuota Policyの確認(Rule設定値も空白)
> vserver show -vserver vs_cifs10 -fields quota-policy
vserver  quota-policy
-------- ------------
vs_cifs10 default

> quota policy rule show  -vserver vs_cifs10 -policy-name default
There are no entries matching your query.


# Quota Policyを作成しSVMへ割り当て
> quota policy create -vserver vs_cifs10 -policy-name policy01

> vserver modify -vserver vs_cifs10 -quota-policy policy01

> vserver show -vserver vs_cifs10 -fields quota-policy
vserver   quota-policy
--------- ------------
vs_cifs10 policy01
1-2. Quota policyにRuleの追加(Quota制限値の追記)
Quota設定の為の値を追記しますが、追記内容は以下とします。
- volumeサイズはそれぞれ50GBで作成
- cifs100というVolumeにDefault Tree Quotaの設定
-
cifs200にはqtree200というQtreeへの明示的なQuota設定
(CLI設定でエラーを出さない為、事前にcifs200にはqtree作成) - Quota値は1GBのHard Quota設定
# Volumeサイズの確認
> vol show -vserver vs_cifs10 -volume cifs*
Vserver   Volume       Aggregate    State      Type       Size  Available Used%
--------- ------------ ------------ ---------- ---- ---------- ---------- -----
vs_cifs10 cifs100      aggr1_node1  online     RW         50GB    37.91GB   20%
vs_cifs10 cifs200      aggr1_node1  online     RW         50GB    47.11GB    0%
2 entries were displayed.

# cifs200というVolumeへQtreeの作成(Rule追加対象を事前に作成する必要がある)
> qtree create -vserver vs_cifs10 -volume cifs200 -qtree qtree200

> qtree show -vserver vs_cifs10 -volume cifs*
Vserver    Volume        Qtree        Style        Oplocks   Status
---------- ------------- ------------ ------------ --------- --------
vs_cifs10  cifs100       ""           ntfs         enable    normal
vs_cifs10  cifs200       ""           ntfs         enable    normal
vs_cifs10  cifs200       qtree200     ntfs         enable    normal
3 entries were displayed.


# Qtreeを対象としたQuota Ruleの追加
> volume quota policy rule create -vserver vs_cifs10 -policy-name policy01 -volume cifs100 -type tree -target "" -disk-limit 1G

> volume quota policy rule create -vserver vs_cifs10 -policy-name policy01 -volume cifs200 -type tree -target "qtree200" -disk-limit 1G


# Quota Ruleの設定値確認
> quota policy rule show -vserver vs_cifs10 -policy-name policy01

Vserver: vs_cifs10         Policy: policy01          Volume: cifs100

                                               Soft             Soft
                         User         Disk     Disk   Files    Files
Type   Target    Qtree   Mapping     Limit    Limit   Limit    Limit  Threshold
-----  --------  ------- -------  --------  -------  ------  -------  ---------
tree   ""        ""      -             1GB        -       -        -          -

Vserver: vs_cifs10         Policy: policy01          Volume: cifs200

                                               Soft             Soft
                         User         Disk     Disk   Files    Files
Type   Target    Qtree   Mapping     Limit    Limit   Limit    Limit  Threshold
-----  --------  ------- -------  --------  -------  ------  -------  ---------
tree   qtree200  ""      -             1GB        -       -        -          -
2 entries were displayed.
2. Quotaの有効化
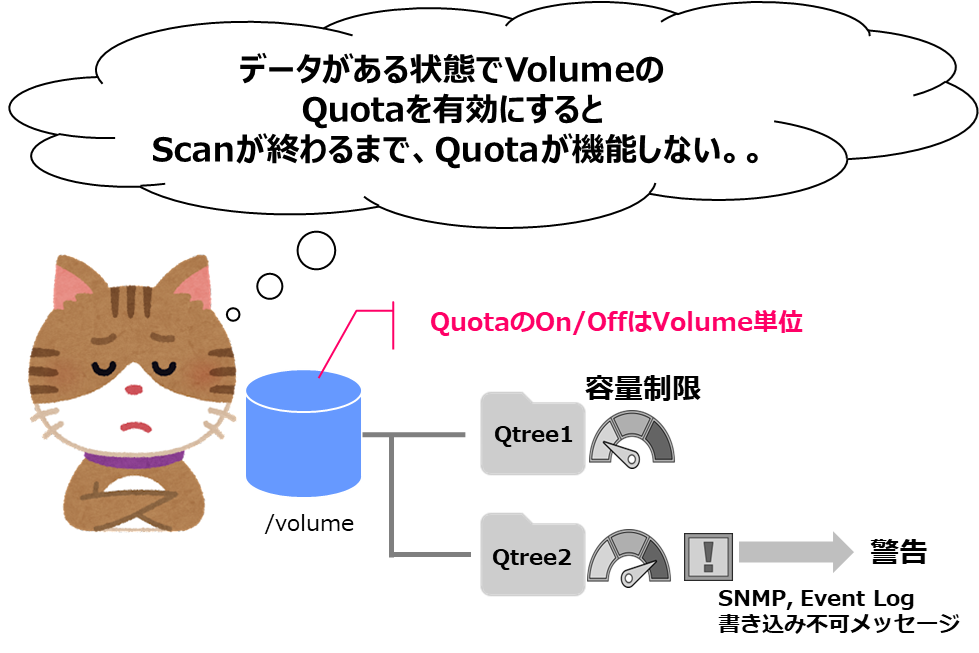
Quotaを有効化しますが、有効化の単位はVolume単位になります。
# 各Volumeに対してQuotaを有効化します
> quota show -vserver vs_cifs10 -volume cifs*
                                          Scan
Vserver    Volume        State            Status
---------  ------------  ---------------  ------
vs_cifs10  cifs100       off                   -
vs_cifs10  cifs200       off                   -
2 entries were displayed.


> quota on -vserver vs_cifs10 -volume cifs100
[Job 2072] Job is queued: "quota on" performed for quota policy "policy01" on volume "cifs100" in Vserver "vs_cifs10".

> quota on -vserver vs_cifs10 -volume cifs200
[Job 2073] Job is queued: "quota on" performed for quota policy "policy01" on volume "cifs200" in Vserver "vs_cifs10".


> quota show -vserver vs_cifs10 -volume cifs*
                                          Scan
Vserver    Volume        State            Status
---------  ------------  ---------------  ------
vs_cifs10  cifs100       on                    -
vs_cifs10  cifs200       on                    -
2 entries were displayed.

# quota Reportで確認できるようになります
> quota report -vserver vs_cifs10 -volume cifs*
Vserver: vs_cifs10

                                    ----Disk----  ----Files-----   Quota
Volume   Tree      Type    ID        Used  Limit    Used   Limit   Specifier
-------  --------  ------  -------  -----  -----  ------  ------   ---------
cifs100            tree    *           0B    1GB       0       -   *
cifs200  qtree200  tree    1           0B    1GB       1       -   qtree200
2 entries were displayed.
このタイミングでWindows側からのネットワークドライブの割り当てを行うと以下のように見えてきます。
- cifs100を割り当てるとVolumeサイズ
- cifs200のQtree200を割り当てるとQuotaで定義した値

3. Qtree作成とQuota Reportの確認
3-1. cifs100というVolumeへQtreeの作成
Default Tree Quotaの対象としているnfs100というVolumeへQtreeを作成し、QuotaのRule追加無しにQuota値が有効となっている事を確認します。
Quota Ruleを追加することなくQuota設定値の1GB制限が有効なので、Default Tree Quotaが有効になっている点が確認できます。
(resize操作では新規Qtreeへの設定はできない)

# Qtreeの作成
> qtree create -vserver vs_cifs10 -volume cifs100 -qtree qtree100

> qtree show -vserver vs_cifs10 -volume cifs*
Vserver    Volume        Qtree        Style        Oplocks   Status
---------- ------------- ------------ ------------ --------- --------
vs_cifs10  cifs100       ""           ntfs         enable    normal
vs_cifs10  cifs100       qtree100     ntfs         enable    normal
vs_cifs10  cifs200       ""           ntfs         enable    normal
vs_cifs10  cifs200       qtree200     ntfs         enable    normal
4 entries were displayed.


#QuotaのRuleの確認(Ruleに追記が無くてもReportに表示される事の確認)
> quota policy rule show -vserver vs_cifs10 -policy-name policy01

Vserver: vs_cifs10         Policy: policy01          Volume: cifs100

                                               Soft             Soft
                         User         Disk     Disk   Files    Files
Type   Target    Qtree   Mapping     Limit    Limit   Limit    Limit  Threshold
-----  --------  ------- -------  --------  -------  ------  -------  ---------
tree   ""        ""      -             1GB        -       -        -          -

Vserver: vs_cifs10         Policy: policy01          Volume: cifs200

                                               Soft             Soft
                         User         Disk     Disk   Files    Files
Type   Target    Qtree   Mapping     Limit    Limit   Limit    Limit  Threshold
-----  --------  ------- -------  --------  -------  ------  -------  ---------
tree   qtree200  ""      -             1GB        -       -        -          -
2 entries were displayed.


# Quota Reportの確認(Ruleに追記が無くてもReportに表示される事の確認)
> quota report -vserver vs_cifs10 -volume cifs*
Vserver: vs_cifs10

                                    ----Disk----  ----Files-----   Quota
Volume   Tree      Type    ID        Used  Limit    Used   Limit   Specifier
-------  --------  ------  -------  -----  -----  ------  ------   ---------
cifs100  qtree100  tree    1           0B    1GB       1       -   qtree100
cifs100            tree    *           0B    1GB       0       -   *
cifs200  qtree200  tree    1           0B    1GB       1       -   qtree200
3 entries were displayed.
このタイミングでWindows側からのネットワークドライブの割り当てをQtreeを指定した形でを行うと以下のようQuotaの制限値で見えてきます。
(QuotaをoffにするとVolumeサイズに表示が変更されます)

3-2. データ書き込み時の値を確認
Quotaが効いているQtreeにデータのWriteを行うと、重複排除を無視した値が表示されるようになります。

Storage側では重複排除が効いているので、ONTAP側でのVolume使用率は重複排除後の値になります。
(重複排除用メタデータが含まれるので、クライアント側ファイルサイズの合計とズレる)
一方でQuota Reportについては、書き込まれた論理値が表示されます。
# ONTAP側でVolume使用率の確認
> vol show -vserver vs_cifs10 -volume cifs200 -fields size,used,dedupe-space-saved-percent
vserver   volume  size used    dedupe-space-saved-percent
--------- ------- ---- ------- --------------------------
vs_cifs10 cifs200 50GB 406.9MB 43%


# Quota Reportの確認
> quota report -vserver vs_cifs10 -volume cifs200
Vserver: vs_cifs10

                                    ----Disk----  ----Files-----   Quota
Volume   Tree      Type    ID        Used  Limit    Used   Limit   Specifier
-------  --------  ------  -------  -----  -----  ------  ------   ---------
cifs200  qtree200  tree    1        618.3MB  1GB       3       -   qtree200
4. Default Tree Quotaを使っていないQtreeへのQuota適用
4-1. cifs200へ新しいQtreeを作成してNFS mountの実施
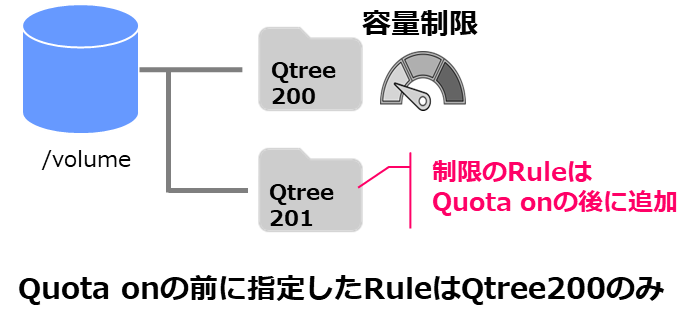
cifs200側では、個別のQtree単位でRule指定をしているので、Qtreeの作成を実施しても新規に作成されたQtreeに対して自動でQuotaが有効にならない点が確認できます。
(Default Tree Quotaでは無い)
Default Tree Quotaの対象では無いVolumeの為、Quotaを有効化するには、以下の手順が必要になります。
- Qtreeの作成
- Quota Ruleの追加
- 対象VolumeへのQuotaのOff/On
Quotaの無効化/有効化を実施が必要となりますが、有効化中にVolume内のファイル数やサイズのScanが走っている最中は、既存のQuotaは無効化されてしまいます。

# 新しいQtreeの作成
> qtree create -vserver vs_cifs10 -volume cifs200 -qtree qtree201

> qtree show -vserver vs_cifs10 -volume cifs200
Vserver    Volume        Qtree        Style        Oplocks   Status
---------- ------------- ------------ ------------ --------- --------
vs_cifs10  cifs200       ""           ntfs         enable    normal
vs_cifs10  cifs200       qtree200     ntfs         enable    normal
vs_cifs10  cifs200       qtree201     ntfs         enable    normal
3 entries were displayed.


# Quota Reportの確認
> quota report -vserver vs_cifs10 -volume cifs200
Vserver: vs_cifs10

                                    ----Disk----  ----Files-----   Quota
Volume   Tree      Type    ID        Used  Limit    Used   Limit   Specifier
-------  --------  ------  -------  -----  -----  ------  ------   ---------
cifs200  qtree200  tree    1        618.3MB  1GB       3       -   qtree200
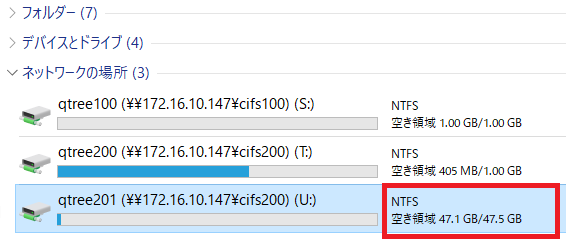
このタイミングでWindows側からのネットワークドライブの割り当てをQtreeを指定した形で行うと、以下のようにQuotaの設定されていないQtreeはVolumeサイズで表示される事が確認できます。
また、本記事ではONTAP側でもVolumeのis-space-reporting-logicalオプションを有効にしていないので、重複排除後の使用量が表示されます。
重複排除前の容量を表示させるis-space-reporting-logicalオプションについては過去の記事の下方を参照頂ければと思います。

4-2. cifs200に作成したQtreeに対してQuota Ruleの追加適用
この時点ではQuotaを再有効化していないので、Quota Reportへ新しく作成したQtreeは表示されません。
# 新しいQtree名を対象としたQuota Rule追加
> volume quota policy rule create -vserver vs_cifs10 -policy-name policy01 -volume cifs200 -type tree -target "qtree201" -disk-limit 1G

> volume quota policy rule show -vserver vs_cifs10 -policy-name policy01 -volume cifs200

Vserver: vs_cifs10         Policy: policy01          Volume: cifs200

                                               Soft             Soft
                         User         Disk     Disk   Files    Files
Type   Target    Qtree   Mapping     Limit    Limit   Limit    Limit  Threshold
-----  --------  ------- -------  --------  -------  ------  -------  ---------
tree   qtree200  ""      -             1GB        -       -        -          -
tree   qtree201  ""      -             1GB        -       -        -          -
2 entries were displayed.


# Quota Reportの確認
> quota report -vserver vs_cifs10 -volume cifs200
Vserver: vs_cifs10

                                    ----Disk----  ----Files-----   Quota
Volume   Tree      Type    ID        Used  Limit    Used   Limit   Specifier
-------  --------  ------  -------  -----  -----  ------  ------   ---------
cifs200  qtree200  tree    1        618.3MB  1GB       3       -   qtree200
4-3. VolumeへのQuotaの再有効化
nfs200というVolumeへQuotaを再有効化します。
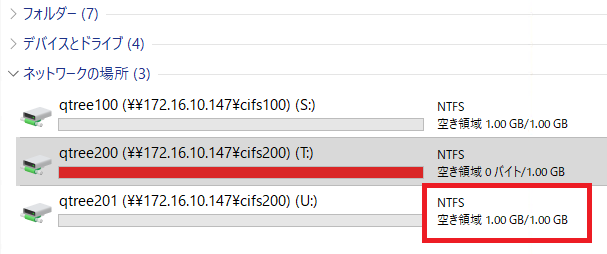
再有効化中は以前のQuota設定も無効化になっているので、Quota Rule以上の書き込みが成功します。
# QuotaのOff/Onの実施
> quota off -vserver vs_cifs10 -volume cifs200
[Job 2076] Job is queued: "quota off" performed on volume "cifs200" in Vserver "vs_cifs10".

> quota on -vserver vs_cifs10 -volume cifs200
[Job 1823] Job is queued: "quota on" performed for quota policy "policy01" on volume "nfs200" in Vserver "vs_nfs01".
このOFFからONのタイミング直後(VolumeのScan中)では、コピーが成功します。また、Quotaが適用された後はネットワークドライブの表示が、Volumeサイズからquotaの制限値に表示が変更されます。

QuotaのReportを確認すると、Quota溢れを起こしているQtreeの確認と、新規作成したQtreeへのQuotaの有効化が確認できます。
> quota report -vserver vs_cifs10 -volume cifs200
Vserver: vs_cifs10

                                    ----Disk----  ----Files-----   Quota
Volume   Tree      Type    ID        Used  Limit    Used   Limit   Specifier
-------  --------  ------  -------  -----  -----  ------  ------   ---------
cifs200  qtree200  tree    1        1.21GB   1GB       5       -   qtree200
cifs200  qtree201  tree    2           0B    1GB       1       -   qtree201
2 entries were displayed.