はじめに
こちらの記事は、PyLadies Japan Advent Calendar 2020 24日目の記事です。
私は普段、データサイエンティスト・MLエンジニアとして働いていて、趣味でプログラミングスクールの講師・TAをやっています。
大学の研究室でAI・pythonに出会い、PythonやSQLを軸としたデータ分析・バックエンドシステム開発をしていますが、最近はフロント開発(HTML/CSS/JS/Vuejs/(react))も勉強 & 実装しています。
プログラミングもpythonもエンジニアという仕事も大好きなので、たくさんの人にプログラミングの面白さを知っていただき、いつか一緒に働けたらいいなと思っています。
よろしくお願いします!
今回は、画像を特緒量に変換して、特徴量の類似度でクラスタリングを行い、似たような画像の特徴量の類似度をtensorboardで表示しました。
内容
前準備
使用したライブラリ
- keras
- scikit-learn
- tensorflow
- opencv
実行環境
GPUを使いたかったので、google colabratoryを使用しました。
自分で環境構築して実行するときは、pip installでライブラリを入れれば動作すると思います。
$ pip install scikit-learn tensorflow keras opencv-python
※GPU環境で実行する場合は、tensorflow -> tensorflow-gpu
画像を特徴量に変換
画像を次元圧縮した値を特徴量として用いました。
今回はkerasのautoencoderを使用しています。
今回は実装をメインにするため、autoencoderの説明は割愛します!
(時間があったら追記します。)
import numpy as np
from keras import layers
from keras import models
from keras import callbacks
from keras import backend as K
from keras.datasets import cifar10
from matplotlib import pyplot as plt
from matplotlib import cm
import itertools


class AutoEncoder:
  def __init__(self):
    self._load_cifar10_data()
    self.model = self.load_model()
    self.train_model

  def _load_cifar10_data(self):
    # cifar10 データセットを読み込む
    (x_train, train), (x_test, y_test) = cifar10.load_data()
    self.image = x_test
    image_height, image_width, channel = 32, 32, 3

    # バックエンドに依存したチャネルの位置を調整する
    if K.image_data_format() == 'channels_last':
        x_train = x_train.reshape(x_train.shape[0],
                                  image_height, image_width, channel)
        x_test = x_test.reshape(x_test.shape[0],
                                image_height, image_width, channel)
        self.input_shape = (image_height, image_width, channel)
    else:
        x_train = x_train.reshape(x_train.shape[0],
                                  channel, image_height, image_width)
        x_test = x_test.reshape(x_test.shape[0],
                                channel, image_height, image_width)
        self.input_shape = (channel, image_height, image_width)

    # Min-Max Normalization (0. ~ 1. の範囲に値を収める)
    x_train = x_train.astype('float32')
    x_test = x_test.astype('float32')
    self.x_train = (x_train - x_train.min()) / (x_train.max() - x_train.min())
    self.x_test = (x_test - x_test.min()) / (x_test.max() - x_test.min())

  def load_model(self):
    # 畳み込み演算を用いた AutoEncoder のネットワーク (Sequential API)
    model = models.Sequential()
    # 28 x 28 x 1
    model.add(layers.Conv2D(16, kernel_size=(3, 3),
                            activation='relu', padding='same',
                            input_shape=self.input_shape))
    # 28 x 28 x 16
    model.add(layers.MaxPooling2D(pool_size=(2, 2), padding='same'))
    # 14 x 14 x 16
    model.add(layers.Conv2D(8, kernel_size=(3, 3),
                            activation='relu', padding='same'))
    # 14 x 14 x 8
    model.add(layers.MaxPooling2D(pool_size=(2, 2), padding='same'))
    # 7 x 7 x 8
    model.add(layers.Conv2D(8, kernel_size=(3, 3),
                            activation='relu', padding='same'))
    # 7 x 7 x 8
    model.add(layers.UpSampling2D(size=(2, 2)))
    # 14 x 14 x 8
    model.add(layers.Conv2D(16, kernel_size=(3, 3),
                            activation='relu', padding='same'))
    # 14 x 14 x 16
    model.add(layers.UpSampling2D(size=(2, 2)))
    # 28 x 28 x 16
    model.add(layers.Conv2D(1, kernel_size=(3, 3),
                            activation='sigmoid', padding='same'))
    # 28 x 28 x 1
    model.compile(optimizer='adam',
                  loss='binary_crossentropy')

    # モデルの構造を確認する
    print(model.summary())
    return model

  def train_model(self):

    fit_callbacks = [
        callbacks.EarlyStopping(monitor='val_loss',
                                patience=5,
                                mode='min')
    ]

    # モデルを学習させる
    self.model.fit(self.x_train, self.x_train,
              epochs=1000,
              batch_size=4096,
              shuffle=True,
              validation_data=(x_test, x_test),
              callbacks=fit_callbacks,
              )

    # テストデータの損失を確認しておく
    score = self.model.evaluate(self.x_test, self.x_test, verbose=0)
    print('test xentropy:', score)

  def encode_image(self, image_list):

    # 学習済みのモデルを元に、次元圧縮だけするモデルを用意する
    encoder = models.clone_model(self.model)
    encoder.compile(optimizer='adam',
                    loss='binary_crossentropy')
    encoder.set_weights(self.model.get_weights())

    # 中間層までのレイヤーを取り除く
    encoder.pop()
    encoder.pop()
    encoder.pop()
    encoder.pop()

    # 次元圧縮だけする場合
    x_test_sampled_enc = encoder.predict_proba(image_list,
                                               verbose=0)
    return x_test_sampled_enc

  @staticmethod
  def flatten_3d(input_image):
    return list(itertools.chain.from_iterable(itertools.chain.from_iterable(input_image)))

  @staticmethod
  def flatten_3d_list(input_images):
    result = []
    for image in input_images:
      result.append(list(itertools.chain.from_iterable(itertools.chain.from_iterable(image))))
    return result
使用方法
autoencoder = AutoEncoder()
encode_data = autoencoder.encode_image(autoencoder.x_test)
encode_feature = autoencoder.flatten_3d_list(encode_data)
このようにすることで、cifar-10の画像(32×32×3)を512次元に次元圧縮できました。
クラスタリング
クラスタリングはscikit_learnのk-meansを使用しました。
3行で書くことができてとても便利です!!
from sklearn.cluster import KMeans
kmeans_model = KMeans(n_clusters=10)
predict_clus = kmeans_model.fit_predict(encode_feature)
tensorboardで可視化
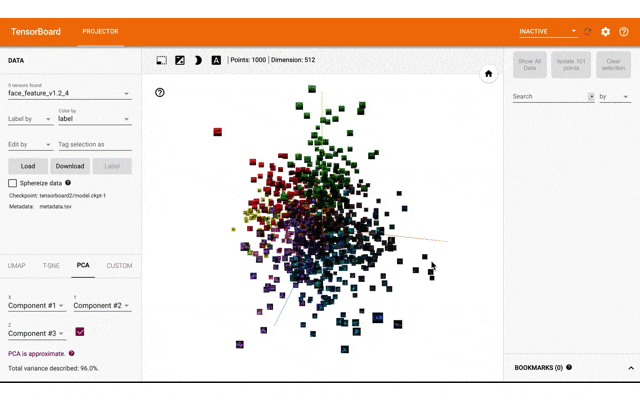
tensorboarのprojector機能で特徴量と画像を表示するのが直感的にみてわかりやすいと思ったので、実装して表示しました。
import tensorflow.compat.v1 as tf
tf.disable_v2_behavior()
import numpy as np
import pandas as pd
import os
import cv2
from tensorboard.plugins import projector

def tensorboard_visualization(data, label, images):
    x_data = pd.DataFrame(data)
    meta_data = pd.DataFrame()
    meta_data['label'] = label

    embedding_var = tf.Variable(x_data, name='face_feature_v1.2')
    LOG_DIR = 'tensorboard'
    if os.path.exists(LOG_DIR) is False:
        os.makedirs(LOG_DIR)
    summary_writer = tf.summary.FileWriter(LOG_DIR)

    config = projector.ProjectorConfig()
    embedding = config.embeddings.add()
    embedding.tensor_name = embedding_var.name

    meta_data.to_csv(os.path.join(LOG_DIR, 'metadata.tsv'), sep='\t')
    embedding.metadata_path = 'metadata.tsv'

    create_sprite_image(images)
    embedding.sprite.image_path = 'sprite_image.png'
    embedding.sprite.single_image_dim.extend([32, 32])

    projector.visualize_embeddings(summary_writer, config)

    sess = tf.InteractiveSession()
    sess.run(tf.global_variables_initializer())
    saver = tf.train.Saver()
    saver.save(sess, os.path.join(LOG_DIR, "model.ckpt"), 1)

# sprite画像の作成
def create_sprite_image(images):

    """Returns a sprite image consisting of images passed as argument. Images should be count x width x height"""
    # 画像サイズは(4032, 3024)なので、(28, 21)にresizeする
    img_h = 32
    img_w = 32

    # 画像数の平方根(切上)を計算(Sprite Imageの1辺の長さに使用)
    n_plots = int(np.ceil(np.sqrt(len(images))))

    # 全要素0の配列作成
    spriteimage = np.zeros((img_h * n_plots ,img_w * n_plots, 3))

    for i in range(n_plots):
        for j in range(n_plots):
            this_filter = i * n_plots + j

            # 画像がある限り実行(n_plotsが割り切れないためSprite Imageは少し余る)
            if this_filter < len(images):
                image = images[this_filter]
                image_np = cv2.resize(image, (img_w, img_h))

                # Sprite Imageの所定の配列に画像を挿入
                spriteimage[i * img_h:(i + 1) * img_h, j * img_w:(j + 1) * img_w, :] = image_np
    cv2.imwrite('tensorboard/sprite_image.png', spriteimage)
全データ(10000枚)だと重くてわかりづらいので、1000件だけ取得して表示します。
tensorboard_visualization(encode_feature[:1000], predict_clus[:1000], autoencoder.image[:1000])
- colab notebook上で表示したい場合
%load_ext tensorboard
%tensorboard --logdir tensorboard/
- PC上で確認したい場合
$ tensorboard --logdir tensorboard/
※tensorboard/には、上記コードで作成したフォルダへのpathを指定します。
ブラウザで↓アクセスすると、同様のボードがみれます。
http://localhost:6006/
今回表示したtensorboard
終わりに
今回は、Auto Encoderを使って、画像を特徴量化し、kmeanによるクラスタリングとtensorboardによる可視化を行ました。
画像を扱うのはやっぱりとても楽しいですね😁
またいろいろ遊んでみようと思います!
参考資料