deviseとOmniAuthを使ったログインを実現する手続きを紹介した記事は多いものの、ログイン後、Google APIを使ってデータを取得する際に必要となるrefresh_tokenについて書かれたページがあまり見つからず、複数の記事の内容をピックアップしながら実装する必要に迫られたので、その時に参照した内容をまとめました。
- 環境
- ruby 2.3.1p112
- Rails 4.2.6
1.下準備
必要なgemをGemfileに追記してインストールします。
gem 'devise'
gem 'omniauth'
gem 'omniauth-google-oauth2'
$ bundle install
deviseのセットアップと、deviseでUserモデルを作成します。
$ rails g devise:install
$ rails g devise user
$ rails g migration add_omniauth_to_users
2.データベースの用意
deviseが作成したUserモデルにOmniAuthで必要となるカラムを追加します。
class AddOmniauthToUsers < ActiveRecord::Migration
  def change
    add_column :users, :provider, :string
    add_column :users, :uid, :string
    add_column :users, :name, :string
    add_column :users, :refresh_token, :string
    add_column :users, :access_token, :string
  end
end
データベースを作成します。
$ rake db:create
$ rake db:migrate
3.OmniAuthの設定など
deviseでは、デフォルトでOmniAuthが有効になっていないことから、app/models/user.rbを編集して有効にします。
class User < ActiveRecord::Base
  # Include default devise modules. Others available are:
  # :confirmable, :lockable, :timeoutable and :omniauthable
  devise :database_authenticatable, :registerable, :recoverable,
         :rememberable, :trackable, :validatable,:omniauthable,
         :omniauthable, :omniauth_providers => [:google_oauth2]

  def self.find_for_google_oauth2(auth)
    user = User.where(email: auth.info.email).first
    unless user
      user = User.create(name:     auth.info.name,
                         provider: auth.provider,
                         uid:      auth.uid,
                         email:    auth.info.email,
                         token:    auth.credentials.token,
                         password: Devise.friendly_token[0, 20])
    end
    user
  end
end
deviseの起動時の設定を行うため、config/initializers/omniauth.rbファイルを作成して次のとおり編集します。1
Rails.application.config.middleware.use OmniAuth::Builder do
  provider :google_oauth2,
    Rails.application.secrets.google_client_id,
    Rails.application.secrets.google_client_secret,
    {
# ログイン後にGoogle Calendarのデータを取得したいので、scopeに
# https://www.googleapis.com/auth/calendarを記述しています。
# また、promptとaccess_typeを以下の設定にするとrefresh_tokenが得られる
# (その他の組み合わせは試していません)。
      scope: "https://www.googleapis.com/auth/userinfo.email,
              https://www.googleapis.com/auth/userinfo.profile,
              https://www.googleapis.com/auth/calendar",
      prompt: "select_account",
      access_type: "offline"
    }
end
Google API Console で割り当てられたクライアントIDなどをconfig/secret.ymlに記述します。2 なお、クライアントIDの割り当て等を含めたGoogle APIの設定については、以下のページが参考になります。
googleからのログイン実装 - Qiita
google_client_id: #[google api console]で割り当てられたクライアントIDを記入
google_client_secret: #[google api console]で割り当てられたクライアントシークレットを記入
app/controllers/users/omniauth_callbacks_controller.rbを編集する。
class Users::OmniauthCallbacksController < Devise::OmniauthCallbacksController
  def google_oauth2
   @user = User.find_for_google_oauth2(request.env["omniauth.auth"])

    if @user.persisted?
      flash[:notice] = I18n.t "devise.omniauth_callbacks.success",
                              :kind => "Google"
      sign_in_and_redirect @user, :event => :authentication
    else
      session["devise.google_data"] = request.env["omniauth.auth"]
      redirect_to new_user_registration_url
    end
  end
# 以下省略
end
ログイン用のリンクを表示する画面とログイン後に表示する画面を作成するため、以下のコマンドを実行し、作成されたファイルを以下のとおり編集します。
$ rails g controller welcome  #コントローラー名は自由
$ rails g controller user
class WelcomeController < ApplicationController
  def index
  end
end
class UserController < ApplicationController
  def user_cal
  end
end
app/views/welcome/index.html.erbとapp/views/user/user_cal.html.erbを作成して以下のとおり編集します。
<h1>Google OAuth2 Test</h1>

<p>app/views/welcome/index.html.erb</p>

<%= link_to "Sign in with Google", user_google_oauth2_omniauth_authorize_path %>
<h1><%= current_user.name %>のカレンダー</h1>
<hr>
# 実際のカレンダー表示部分は後ほど作成
route.rbを以下のとおり編集してルーティングを設定します。
Rails.application.routes.draw do
  devise_for :users, controllers: {
    :omniauth_callbacks => "users/omniauth_callbacks",
  }
  get 'user/cal', as: 'user_root'  #ログイン後に表示する画面の設定
  root to: 'welcome#index'
# 以下省略
4.実際にログインしてみる
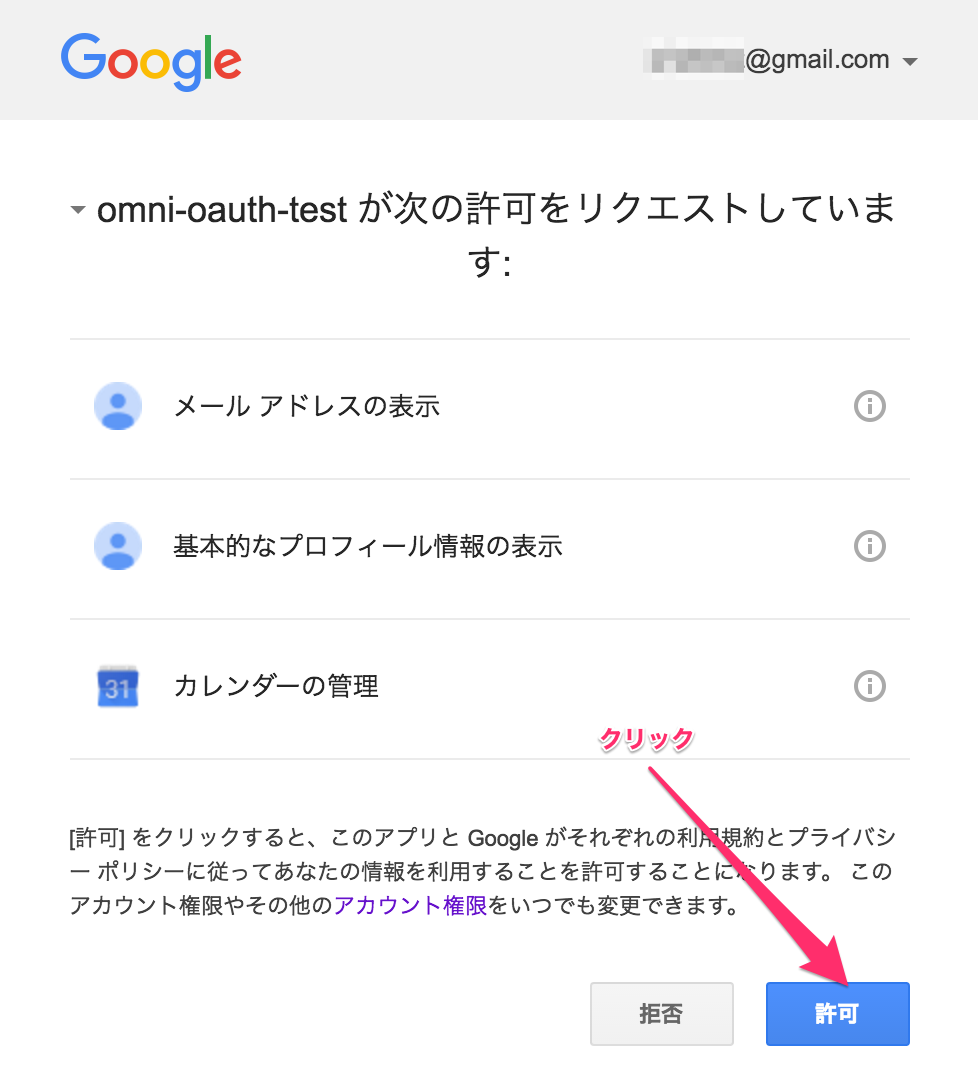
これでhttp://localhost:3000にアクセスすると、以下の画面が表示されるので、Sign in with Googleをクリックします。

Googleの認証画面が表示されるので、許可をクリックします。
この画面が表示されるはず。
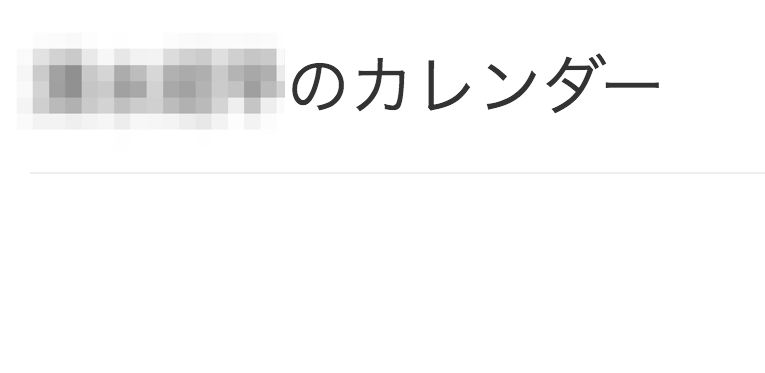
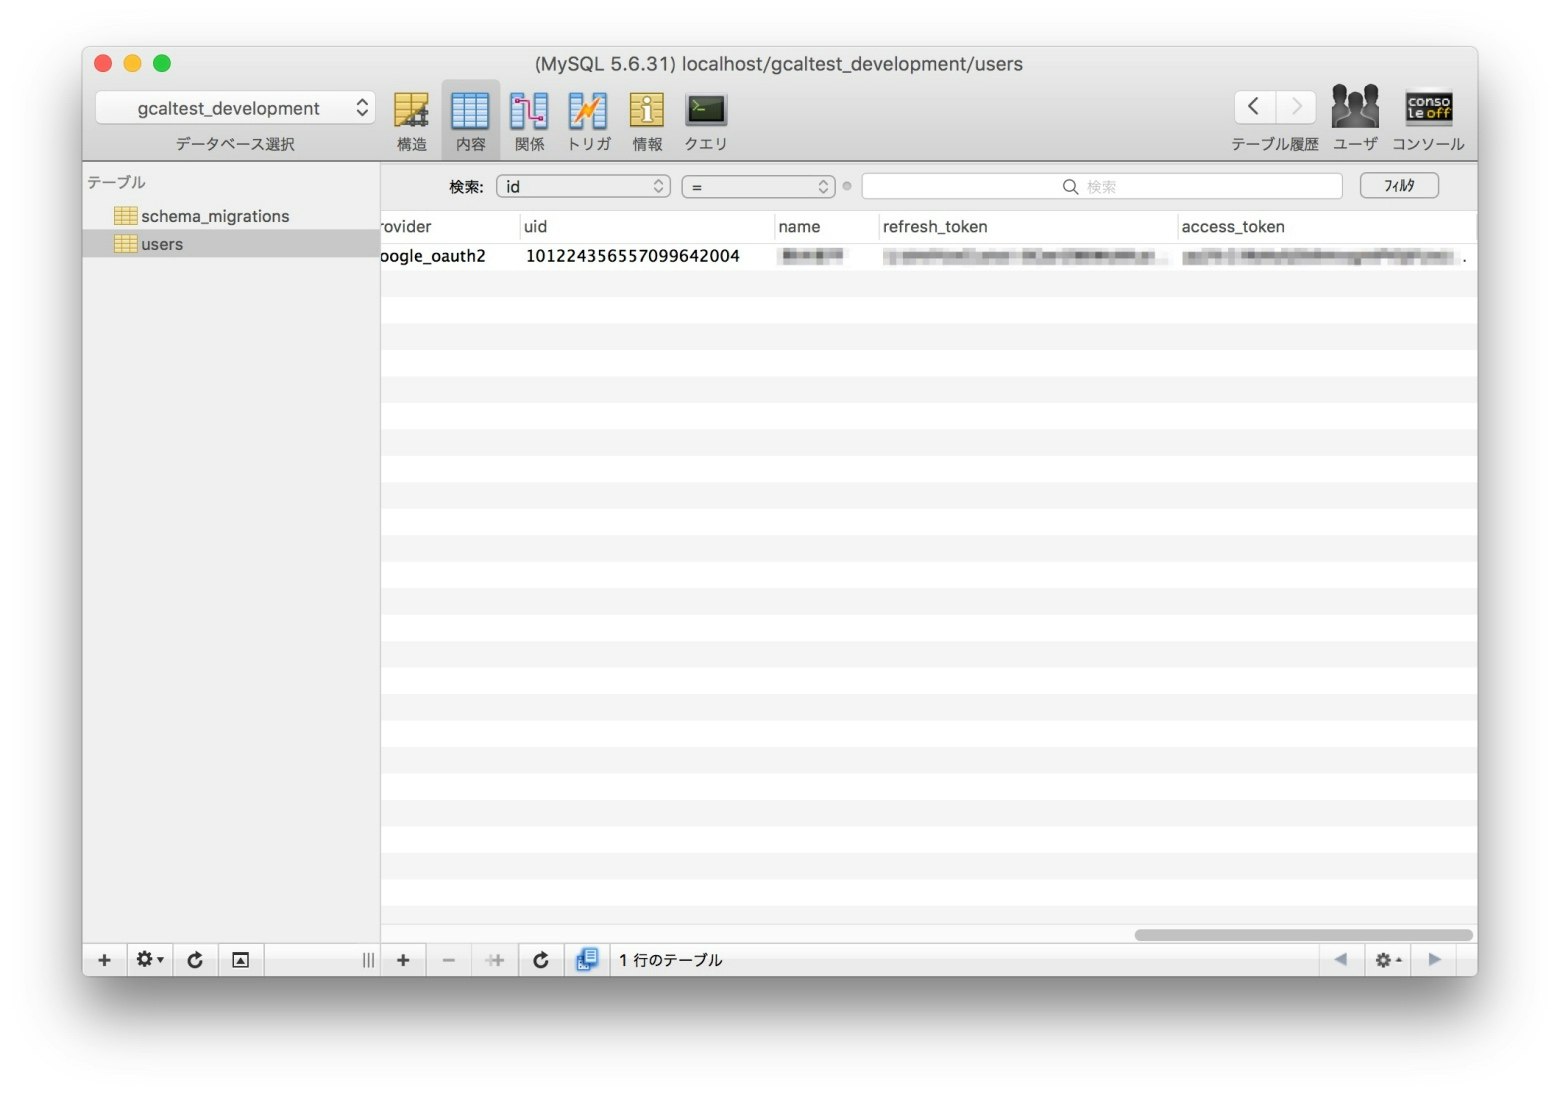
また、作成しておいたusersテーブルに、refresh_tokenとaccess_tokenが保存されているはず。
参考にしたウェブサイト
GitHub - plataformatec/devise: Flexible authentication solution for Rails with Warden.
GitHub - zquestz/omniauth-google-oauth2: Oauth2 strategy for Google
googleからのログイン実装 - Qiita
devise に関する routes まとめ - Qiita
Rails 4.1 + devise + omniauth-google-oauth2 で認証機能を実装する – Oh My Enter!
omniauth-google-oauth2でハマったメモ - blog.takuyan.com 3