はじめに
中の人はエンジニアのeの字も知らない初学者です。
現在卒業アルバムを自動生成するアプリを最終目標に勉強中です。
前回,第1段階としてFaceAPIをつかって顔検出をしました。
→StramlitでFaceAPIを用いた顔検出アプリの作成&Herokuでのデプロイ
今回はそれを活用して嵐のメンバーを分類するアプリを制作しました。
初学者ゆえ,至らぬ点や非効率なコードなどもあると思いますが,暖かくご指摘・コメントいただければ幸いです。
1.モデルの作成
GoogleColaboratoryを使用して作成しました。
(1)画像の収集
画像の収集にはicrawlerを使用しました。まずはインストール
pip install icrawler
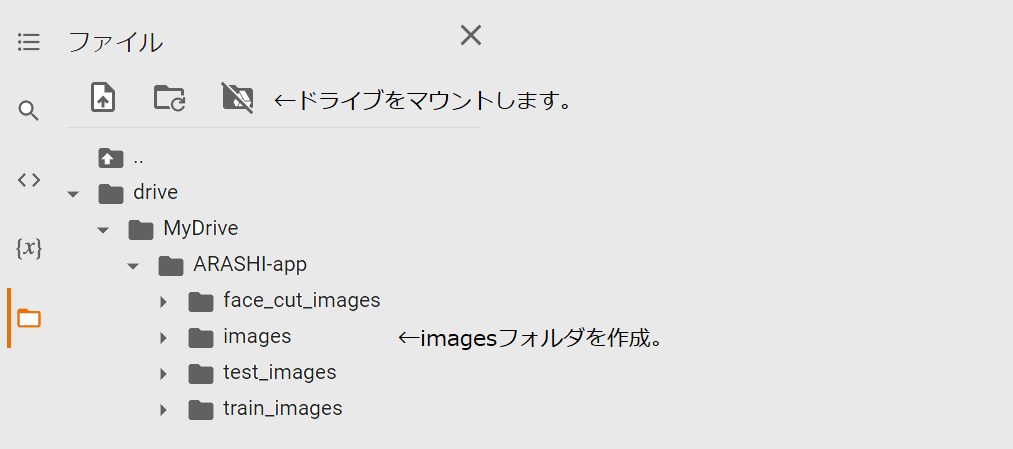
続いて画像を保存するフォルダを作ります。初めにドライブをマウントします。
するとMyDriveフォルダが現れるので,ARASHI-appフォルダ,imagesフォルダを作成します。
以下のコードを実行すると,imagesフォルダに自動的にメンバーのフォルダが作成され,画像が保存されます。
# 作業ディレクトリをimagesへ
%cd /content/drive/MyDrive/ARASHI-app/images

from icrawler.builtin import BingImageCrawler

# 保存するフォルダ名を指定
root_dirs = ['櫻井翔','大野智','二宮和也','松本潤','相葉雅紀']
# 検索するワードを指定
keywords = ['嵐 櫻井','嵐 大野','嵐 二宮','嵐 松本','嵐 相葉']

# 画像のスクレイピング。
for root_dir, keyword in zip(root_dirs, keywords):
    crawler = BingImageCrawler(storage={"root_dir": root_dir})
    crawler.crawl(keyword=keyword, max_num=500)
URLが切れているのか,保存が成功したのはリクエストの半分くらいでした。
max_num=500としたので,メンバーにもよりますが250~300枚の画像が用意できました。
(2)画像の切り抜き
機械学習では正方形の画像を用いて学習するので,FaceAPIで画像から顔を検出し切り抜きました。
まずはインストール
pip install azure
pip install azure-cognitiveservices-vision-face
顔の検出と切り抜き
import glob
import cv2
import time
from azure.cognitiveservices.vision.face import FaceClient
from msrest.authentication import CognitiveServicesCredentials
from PIL import Image

# キーとエンドポイントを取得
KEY = "KEY"
ENDPOINT = "URL"
# サブスクリプションキー情報を使用してインスタンス化
face_client = FaceClient(ENDPOINT, CognitiveServicesCredentials(KEY))

members_name = ['櫻井翔','大野智','二宮和也','松本潤','相葉雅紀']
image_size = 100
os.makedirs("./face_cut_images", exist_ok=True)

# 認識された顔周辺に四角を描く関数
def getRectangle(faceDictionary):
  rect = faceDictionary.face_rectangle
  left = rect.left
  top = rect.top
  right = left + rect.width
  bottom = top + rect.height
  return [left, top, right, bottom]

for member_name in members_name:
  # ディレクトリを指定
  IMAGE_DIR = "images/{}/".format(member_name)
  CUT_DIR = "face_cut_images/{}/".format(member_name)
  # 画像データをリストに格納
  file_list = glob.glob("{}*.jpg".format(IMAGE_DIR))

  # 画像データをバイナリー形式で開く
  for i, img_name in enumerate(file_list):
    img = Image.open(img_name)
    img.save("tmb.jpg")
    image_data = open("tmb.jpg", 'rb')

    # 顔の検出
    detected_faces = face_client.face.detect_with_stream(
        image_data,
        return_face_landmarks=True)

    # イメージオブジェクト生成
    drawing = cv2.imread(img_name)

    # 関数を呼び出して、顔に四角を描く
    for face in detected_faces:
        x, y, w, h = getRectangle(face)
        face_cut = drawing[y:h, x:w]
        face_cut = cv2.resize(face_cut, (image_size, image_size))
        cv2.imwrite(CUT_DIR + "{}.jpg".format(str(i).zfill(4)), face_cut)
        time.sleep(3)
(3)テストデータ・訓練データに分割
import os, glob
import random
import shutil

members =  ['櫻井翔','大野智','二宮和也','松本潤','相葉雅紀']

# 30%をtest_imagesに移行
IMAGE_DIR = "face_cut_images"
os.makedirs("./test_images", exist_ok=True)

for member in members:
    files = glob.glob(os.path.join(IMAGE_DIR, member + "/*.jpg"))
    random.shuffle(files)
    os.makedirs('./test_images/' + member, exist_ok=True)
    n = round(len(files) * 0.3)

    for i in range(n):
        shutil.move(str(files[i]), "./test_images/" + member)
(4)画像の水増し
import os
import numpy as np
import matplotlib.pyplot as plt
import cv2
import glob

def scratch_image(img, flip=True, thr=True, filt=True, resize=True, erode=True):
    # 水増しの手法を配列にまとめる
    methods = [flip, thr, filt, resize, erode]
    # imgの型はOpenCVのcv2.read()によって読み込まれた画像データの型
    # 水増しした画像データを配列にまとめて返す

    # 画像のサイズを習得、ぼかしに使うフィルターの作成
    img_size = img.shape
    filter1 = np.ones((3, 3))
    # オリジナルの画像データを配列に格納
    images = [img]
    # 手法に用いる関数
    scratch = np.array([
        lambda x: cv2.flip(x, 1),# 左右で反転
        lambda x: cv2.threshold(x, 100, 255, cv2.THRESH_TOZERO)[1],# しきい値より大きい値はそのまま、小さい値は0にする
        lambda x: cv2.GaussianBlur(x, (5, 5), 0),# ぼかし: 自分自身のまわりの 5×5 個のピクセルを用いる
        lambda x: cv2.resize(cv2.resize(x, (img_size[1] // 5, img_size[0] // 5)),(img_size[1], img_size[0])),# モザイク: 解像度 1/5
        lambda x: cv2.erode(x, filter1)# 収縮: 自身を囲む8ピクセルを用いる
    ])
    # 関数と画像を引数に、加工した画像を元と合わせて水増しする関数
    doubling_images = lambda f, imag: (imag + [f(i) for i in imag])
    # methodsがTrueの関数で水増し
    for func in scratch[methods]:
        images = doubling_images(func, images)

    return images

# imageディレクトリにあるメンバーの画像を拡張する
IMAGE_DIR = "face_cut_images"
members =  ['櫻井翔','大野智','二宮和也','松本潤','相葉雅紀']

for member in members:
    files = glob.glob(os.path.join(IMAGE_DIR, member + "/*.jpg"))

    for index, file in enumerate(files):
        member_image = cv2.imread(file)
        data_aug_list = scratch_image(member_image)

        # 拡張した画像を出力するディレクトリを作成
        os.makedirs("train_images/{}".format(member), exist_ok=True)
        output_dir = "train_images/{}".format(member)

        # 保存
        for j, img in enumerate(data_aug_list):
            cv2.imwrite("{}/{}_{}.jpg".format(output_dir, str(index).zfill(3), str(j).zfill(2)), img)
(5)転移学習
import os, glob
import random
import cv2
import numpy as np
import matplotlib.pyplot as plt
from tensorflow.keras.utils import to_categorical
from tensorflow.keras import Input, Sequential, Model
from tensorflow.keras.models import load_model, save_model
from tensorflow.keras.layers import Dense, Conv2D, Flatten, Dropout, MaxPooling2D
from tensorflow.keras.preprocessing.image import ImageDataGenerator, img_to_array, load_img
from tensorflow.keras.applications.vgg16 import VGG16
from tensorflow.keras.optimizers import SGD
from keras.callbacks import EarlyStopping

members =  ['櫻井翔','大野智','二宮和也','松本潤','相葉雅紀']
num_classes = len(members)
image_size = 100

IMAGE_DIR_TRAIN = "train_images"
IMAGE_DIR_TEST = "test_images"

# 訓練データとテストデータをわける
X_train = []
X_test  = []
y_train = []
y_test  = []

# 訓練データをリストに代入
for index, member in enumerate(members):
    files = glob.glob(os.path.join(IMAGE_DIR_TRAIN, member + "/*.jpg"))
    for file in files:
        image = load_img(file)
        image = image.resize((image_size, image_size))
        image = img_to_array(image)
        X_train.append(image)
        y_train.append(index)

# テストデータをリストに代入
for index, member in enumerate(members):
    files = glob.glob(os.path.join(IMAGE_DIR_TEST, member + "/*.jpg"))
    for file in files:
        image = load_img(file)
        image = image.resize((image_size, image_size))
        image = img_to_array(image)
        X_test.append(image)
        y_test.append(index)

# テストデータと訓練データをシャッフル
p = list(zip(X_train, y_train))
random.shuffle(p)
X_train, y_train = zip(*p)

q = list(zip(X_test, y_test))
random.shuffle(q)
X_test, y_test = zip(*q)

# Numpy配列に変換
X_train = np.array(X_train)
X_test = np.array(X_test)
y_train = np.array(y_train)
y_test = np.array(y_test)

# データの正規化
X_train = X_train / 255.0
X_test = X_test / 255.0

# One-hot表現
y_train = to_categorical(y_train, num_classes)
y_test = to_categorical(y_test, num_classes)

# VGG16のインスタンスの生成
input_tensor = Input(shape=(image_size, image_size, 3))
vgg16 = VGG16(include_top=False, weights="imagenet", input_tensor=input_tensor)

# モデルの生成 基本的にはモデルは変更しない。微調整程度。Dropoutはなくてもよい。
top_model = Sequential()
top_model.add(Flatten(input_shape=vgg16.output_shape[1:]))
top_model.add(Dense(256, activation="relu"))
top_model.add(Dropout(0.5))
top_model.add(Dense(128, activation="relu"))
top_model.add(Dropout(0.5))
top_model.add(Dense(num_classes, activation="softmax"))

# モデルの結合
model = Model(inputs=vgg16.input, outputs=top_model(vgg16.output))

# model.summary()

# 15層目までのパラメータを固定
for layer in model.layers[:15]:
    layer.trainable = False

# モデルのコンパイル(学習処理の設定)
# optimizer(最適化関数)はSGD(確率的勾配降下法),lr(学習率),momentum(運動量)
optimizer = SGD(lr=1e-4, momentum=0.9)
# loss(誤差関数,目的関≒誤差の評価)はクロスエントロピー, metrics(評価関数のリスト)
model.compile(optimizer=optimizer, loss="categorical_crossentropy", metrics=["accuracy"])

# モデルの学習
batch_size = 32
epochs = 50

# EaelyStoppingの設定(monitorの値がpatience回改善しない場合は終了)
early_stopping =  EarlyStopping(
                            monitor='val_loss',
                            min_delta=0.0,
                            patience=3,
)

# モデルの学習・結果をhistoryに代入
history = model.fit(X_train,
                    y_train,
                    batch_size=batch_size,
                    epochs=epochs,
                    verbose=1,
                    callbacks=[early_stopping],
                    validation_data=(X_test, y_test)
)

# モデルの評価(汎化精度の計算)
scores = model.evaluate(X_test, y_test, verbose=1)


# 可視化
fig = plt.figure(figsize=(15,5))
plt.subplots_adjust(wspace=0.4, hspace=0.6)

ax1 = fig.add_subplot(1, 2, 1)
ax1.plot(history.history["accuracy"], c="b", label="acc")
ax1.plot(history.history["val_accuracy"], c="r", label="val_acc")
ax1.set_xlabel("epochs")
ax1.set_ylabel("accuracy")
plt.legend(loc="best")

ax2 = fig.add_subplot(1, 2, 2)
ax2.plot(history.history["loss"], c="b", label="loss")
ax2.plot(history.history["val_loss"], c="r", label="val_loss")
ax2.set_xlabel("epochs")
ax2.set_ylabel("loss")
plt.legend(loc="best")

fig.show()

# print('Test loss:', scores[0])
# print('Test accuracy:', scores[1])
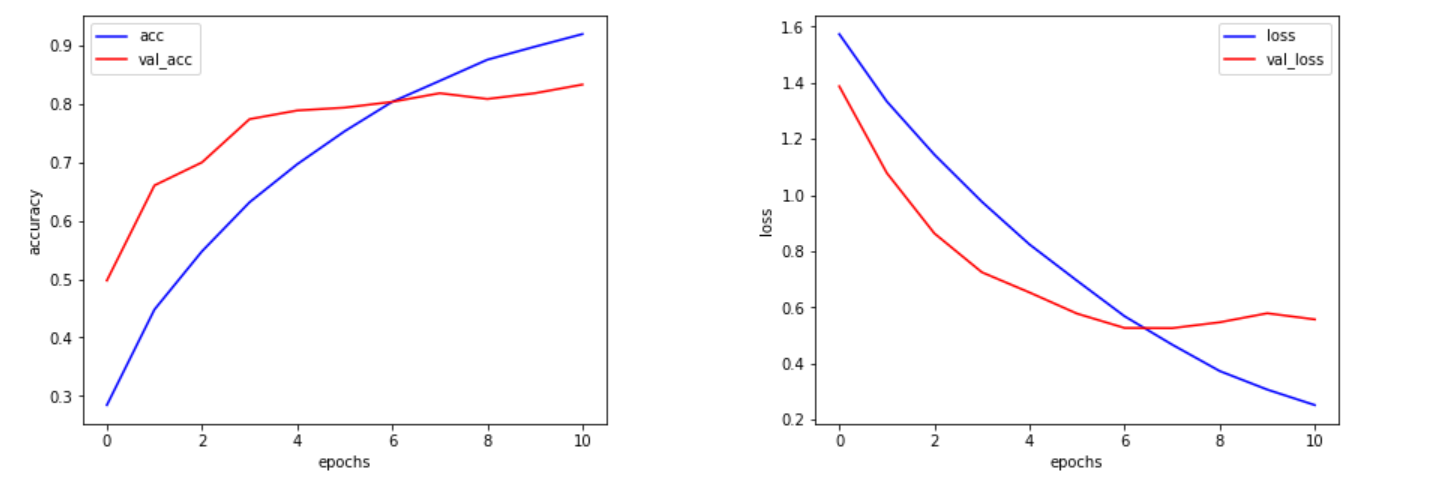
以下がグラフです。
確認のため検証データの10枚の分類結果を表示してみました。
# データの可視化(検証データの先頭の10枚)
for i in range(10):
    plt.subplot(2, 5, i+1)
    plt.imshow(X_test[i], 'gray')
plt.suptitle("10 images of test data",fontsize=20)
plt.show()

# 予測(検証データの先頭の10枚)
pred = np.argmax(model.predict(X_test[0:10]), axis=1)
pred_list = []
for n in pred:
  pred_list.append(members[n])
print(pred_list)

# model.summary()

いい結果です。
(5)モデルの保存
model.save("./model.h5")
ダウンロードフォルダにモデルが保存されました。
2.デプロイの準備
今回必要になったファイルおよびフォルダは以下の通りです。
・staticフォルダ
・templatesフォルダ
・uploadsフォルダ
・Aptfile
・main.py
・model.h5
・Procfile
・requirements.txt
・runtime.txt
主にVSCodeで作成しました。
上から順番にコードを載せていきます。
(1)staticフォルダ
stylesheet.cssを格納するフォルダです。
stylesheet.css
header {
    background-color: #76B55B;
    height: 60px;
    margin: -8px;
    display: flex;
    flex-direction: row-reverse;
    justify-content: space-between;
}

.header-logo {
    color: #fff;
    font-size: 25px;
    margin: 15px 25px;
}

.header_img {
    height: 25px;
    margin: 15px 25px;
}

.main {
    height: 370px;
}

h2 {
    color: #444444;
    margin: 90px 0px;
    text-align: center;
}

p {
    color: #444444;
    margin: 70px 0px 30px 0px;
    text-align: center;
}

.answer {
    color: #444444;
    margin: 70px 0px 30px 0px;
    text-align: center;
}

form {
    text-align: center;
}

footer {
    background-color: #F7F7F7;
    height: 110px;
    margin: -8px;
    position: relative;
}

.footer_img {
    height: 25px;
    margin: 15px 25px;
}

small {
    margin: 15px 25px;
    position: absolute;
    left: 0;
    bottom: 0;
}
(2)templatesフォルダ
index.htmlを格納します。
index.html
<!DOCTYPE html>
<html lang="ja">
<head>
<meta charset="UTF-8">
<meta name="viewport" content="width=device-width, initial-scale=1.0">
<meta http-equiv="X-UA-Compatible" content="ie=edge">
<title>ARASHI Classifier</title>
<link rel="stylesheet" href="./static/stylesheet.css">
</head>
<body>
<header>
<img class="header_img" src="https://aidemyexstorage.blob.core.windows.net/aidemycontents/1621500180546399.png" alt="Aidemy">
<a class="header-logo" href="#">ARASHI Classifier</a>
</header>
<div class="main">
<h2> AIが送信された画像から嵐のメンバーを判定します</h2>
<p>画像を送信してください</p>
<form method="POST" enctype="multipart/form-data">
<input class="file_choose" type="file" name="file">
<input class="btn" value="submit!" type="submit">
</form>
<div class="answer">{{answer}}</div>
</div>
<footer>
<img class="footer_img" src="https://aidemyexstorage.blob.core.windows.net/aidemycontents/1621500180546399.png" alt="Aidemy">
<small>© 2019 Aidemy, inc.</small>
</footer>
</body>
</html>
(3)uploadsフォルダ
アップロードした画像を保存するフォルダです。
(4)Aptfile
HerokuでOpenCVを使用するために必要なファイルです。
Aptfile
libsm6
libxrender1
libfontconfig1
libice6
(5)main.py
from distutils.log import debug
import os
import cv2
import numpy as np
from flask import Flask, request, redirect, render_template, flash
from werkzeug.utils import secure_filename
from tensorflow.keras.models import Sequential, load_model
from tensorflow.keras.preprocessing import image
from azure.cognitiveservices.vision.face import FaceClient
from msrest.authentication import CognitiveServicesCredentials
from PIL import Image, ImageDraw, ImageFont

# キーとエンドポイントを取得
KEY = os.environ.get('KEY')
ENDPOINT = "URL"

# サブスクリプションキー情報を使用してインスタンス化
face_client = FaceClient(ENDPOINT, CognitiveServicesCredentials(KEY))

classes = ['櫻井翔','大野智','二宮和也','松本潤','相葉雅紀']
image_size = 100

# 認識された顔周辺に四角を描く関数
def getRectangle(faceDictionary):
  rect = faceDictionary.face_rectangle
  left = rect.left
  top = rect.top
  right = left + rect.width
  bottom = top + rect.height

  return [left, top, right, bottom]

UPLOAD_FOLDER = "uploads"
ALLOWED_EXTENSIONS = set(['png', 'jpg', 'jpeg', 'gif'])

app = Flask(__name__)

# 学習済みモデルをロード
model = load_model('./model.h5')

@app.route('/', methods=['GET', 'POST'])
def upload_file():
    # request.methodがPOSTなら以下を実行
    if request.method == 'POST':
        # POSTリクエストにファイルデータが含まれているか。ファイルにデータがあるか。
        if 'file' not in request.files:
            flash('ファイルがありません')
            return redirect(request.url)
        file = request.files['file']
        if file.filename == '':
            flash('ファイルがありません')
            return redirect(request.url)
        # ファイルの拡張子をチェック
        if file:
            img = Image.open(file)
            # PILで保存
            img.save("tmb.jpg")
            # バイナリーデータに変換
            image_data = open("tmb.jpg", 'rb')
            # 顔の情報を取得
            detected_faces = face_client.face.detect_with_stream(image_data, return_face_landmarks=True)
            # cv2で開く
            drawing = cv2.imread("tmb.jpg")

            if len(detected_faces) == 0:
                return render_template("index.html",answer="顔が検出されませんでした")

            for face in detected_faces:
                x, y, w, h = getRectangle(face)
                face_cut = drawing[y:h, x:w]
                im = cv2.resize(face_cut, (image_size, image_size))

            # パスの結合・パスにアップロードされた画像を保存
            # 保存する画像のRGBを入れ替え
            im = im[:, :, [2, 1, 0]]
            # cv2で編集した画像をPILに変換,保存
            im = Image.fromarray(im)
            im.save(os.path.join(UPLOAD_FOLDER, "result.jpg"))
            #file.save(os.path.join(UPLOAD_FOLDER, file))
            # パスの保存
            filepath = os.path.join(UPLOAD_FOLDER, "result.jpg")

            #受け取った画像を読み込み、np形式に変換
            img = image.load_img(filepath, grayscale=False, target_size=(image_size,image_size))
            img = image.img_to_array(img)
            data = np.array([img])
            #変換したデータをモデルに渡して予測する
            result = model.predict(data)[0]
            predicted = result.argmax()
            pred_answer = "この画像は " + classes[predicted] + " です"

            return render_template("index.html",answer=pred_answer)

    return render_template("index.html",answer="")

if __name__ == "__main__":
    port = int(os.environ.get('PORT', 8080))
    app.run(host ='0.0.0.0',port = port)
(6)model.h5
[1.(5)モデルの保存]
(https://qiita.com/drafts/4e8a82505cd31356e608/edit#5%E3%83%A2%E3%83%87%E3%83%AB%E3%81%AE%E4%BF%9D%E5%AD%98)でダウンロードしたモデルを使用します。
(7)Procfile
Procfile
web: python main.py
(8)requirements.txt
requirements.txt
Pillow
msrest
azure-cognitiveservices-vision-face
opencv-python-headless==4.2.0.32
absl-py==0.9.0
astor==0.8.1
bleach==3.1.5
bottle==0.12.18
click==7.1.2
certifi==2020.6.20
chardet==3.0.4
flask==2.0.1
future==0.18.2
gast==0.3.3
grpcio==1.31.0
gunicorn==20.0.4
h5py==2.10.0
html5lib==1.1
itsdangerous==2.0
idna==2.10
Jinja2==3.0.1
line-bot-sdk==1.16.0
Markdown==3.2.2
MarkupSafe==2.0
numpy==1.18.0
oauthlib==3.1.0
pillow==7.2.0
protobuf==3.12.4
PyYAML==5.4.1
python-dotenv==0.14.0
requests==2.25.1
scipy==1.4.1
six==1.15.0
tensorboard==2.3.0
tensorflow-cpu==2.3.0
termcolor==1.1.0
urllib3==1.26.5
Werkzeug==2.0.0
(9)runtime.txt
runtime.txt
python-3.8.10
3.アプリのデプロイ
ここからは,
StramlitでFaceAPIを用いた顔検出アプリの作成&Herokuでのデプロイ
の3-②「Gitでデプロイ」と同じ流れでアプリをデプロイしました。
4.躓いた点と解決方法
(1)FaceAPIのリクエスト上限に達した
1.(2)画像の切り抜きでFaceAPIのエラーが出ました。
APIErrorException: (429) Requests to the Face - Detect Operation under Face API - v1.0 have exceeded rate limit of your current Face F0 pricing tier. Please retry after 36 seconds. To increase your rate limit switch to a paid tier.
調べてみると,無料版は1分間に20回までということで,time.sleep(3)を使用することで解決しました。
また,1日の使用回数も決まっているようです。
メンバー全員の切り抜きを一度に終えることはできず,3日程度費やしました。
(2)GoogleColaboratoryのRAM使用上限に達した
1.5転移学習で「使用可能な RAM をすべて使用した後で、
セッションがクラッシュしました。」と表示され,以下の画面になりました。
image_size = 100とし,画像サイズを小さくすることで解決しました。
(3)リスト以外のオブジェクトに添え字を指定
2.(5)main.pyで以下のエラー
TypeError: 'NoneType' object is not subscriptable
調べてみるとリスト以外のオブジェクトに添え字を指定したときのエラーメッセージだそうです。
x, y, w, h = getRectangle(face)でx, y, w, hが取得できていなかったことが原因のよう。
drawing = cv2.imread("file")としてしまっていたところを
drawing = cv2.imread("tmb.jpg")として解決しました。
(4)HerokuでOpenCVの使用
アプリのデプロイをしていると,アプリケーションエラーが発生しました。
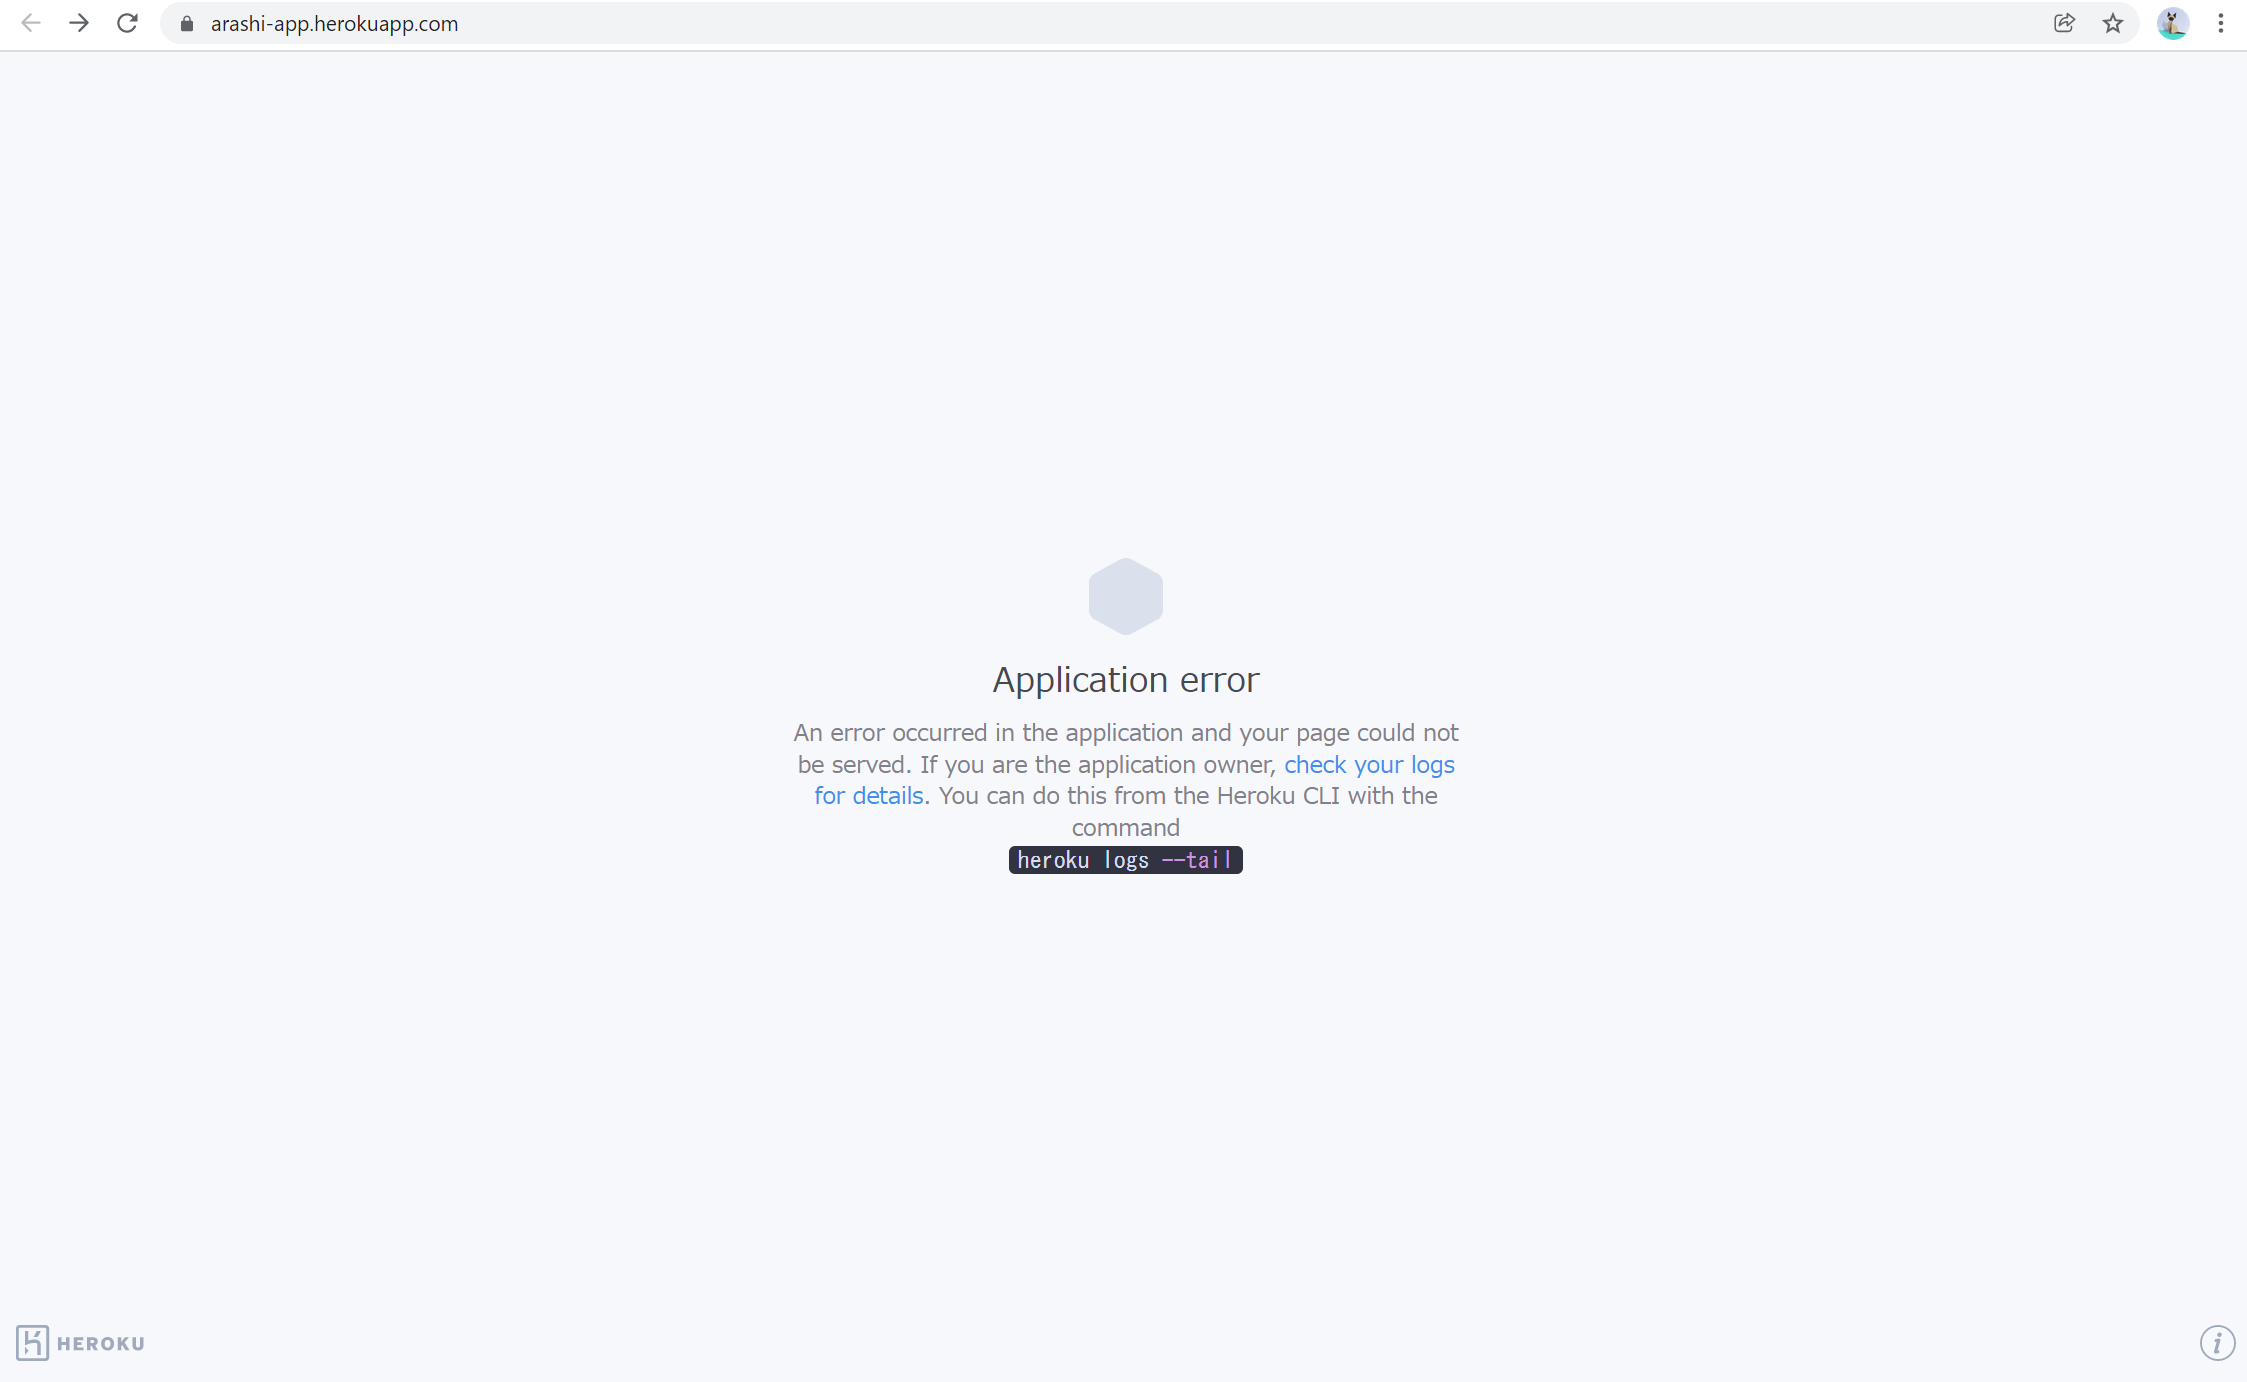
heroku logs --tailを確認すると以下のエラー文が見つかりました。
remote:        ERROR: Could not find a version that satisfies the requirement cv2 (from versions: none)
remote:        ERROR: No matching distribution found for cv2
ImportError: libGL.so.1: cannot open shared object file: No such file or directory
HerokuでOpenCVを使用するには特別な処理が必要だそうです。
[python : HerokuでOpenCVを使用する方法]
(https://www.fixes.pub/program/465156.html)
に従い,Aptfileの作成とrequirements.txtにopencv-python-headless==4.2.0.32を記入しました。
このサイトには以下をビルドパックに設定する必要があるとありますが,設定してもうまくいかず,逆に消去することで解決しました。
https://github.com/heroku/heroku-buildpack-apt
もしかしたら設定が変わったのかもしれませんね。
5.振り返り
Webアプリケーションの作成を始めた時点では,以下のステップで擬似卒アル作成アプリを作ろうとしていました。
①嵐の顔を判定する
②嵐の顔から特定の人物を抽出する
③抽出した写真を集めてアルバム風に出力する
しかしその過程で,FaceAPIには同じ顔を検出してそれぞれのIDをグループごとに振り分けるPersonGroupOperationsというものがあることを知りました。
今回の嵐分類器は機械学習の勉強として作成しましたが,あくまで私の目的は卒業アルバムを作成するアプリケーションです。
よって次回はPersonGroupOperationsを使用して機械学習なしでアルバムを作成するアプリケーションの作成を目指そうと思います。
参考サイト
以下の記事に大変お世話になりました。ありがとうございました。
・Niziuのメンバーを機械学習で分類してみた
・[python : HerokuでOpenCVを使用する方法]
(https://www.fixes.pub/program/465156.html)