はじめに
前回 GitHubを初めて使ってみる でGitHubへの登録から、プッシュするまでを書かせていただきました。
今回は、その続きで、ブランチ作成からマージするまでを記載していきます!!
現在のGitHubはこんな感じになってます。
masterブランチにgit.txtが存在し、以下のような内容で保存されています。

Hello git?
ブランチを作成してみよう
さっそくブランチをgit branch (ブランチ名)で作成してみます。
$ git branch test
できました!!!?
Linuxからなにも返してきませんでしたが、本当にできているのかgit branchで確認してみましょう。
$ git branch
* master
  test
無事できていますね。
「*」がついているところが、現在いるブランチになります。
作成したブランチに切り替えるには、git checkout (ブランチ名)を実行します。
$ git checkout test
Switched to branch 'test'
$ git branch
  master
* test
「*」がtestブランチに移動しました。
作成したブランチでプッシュしてみる
testブランチで、git.txtを編集してコミットし、プッシュしてみます。
?を!!!に変更してみました。
Hello git!!!
$ vim git.txt
$ git add --all
$ git commit -m "testブランチにプッシュ"
$ git push origin test
git push origin testでは
新しく作成したtestブランチを指定します。
testブランチで作業をしているので、必ず自分のブランチにプッシュしましょう!
GitHubで確認してみます。Branchのプルダウンメニューをtestブランチに変えてみてみると・・・
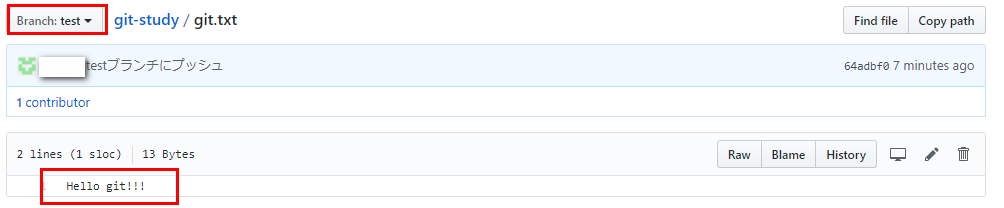
testブランチではファイルが変更されていました!
また、masterブランチに切り替えてみると、まだ変更されていないのが分かると思います。
マージしてみよう
では、最後にmasterブランチにtestブランチの変更を統合させていきます。
git merge (ブランチ名)でマージできます。
その前に、マージさせたいブランチに移動します。
今回はmasterブランチに移動して、testブランチをマージします。
そして、masterブランチにプッシュしてみます!
$ git checkout master
Switched to branch 'master'
$ git branch
* master
  test
$ git merge test
$ git push origin master
GitHubで確認してみます。再度masterブランチに変更してみてみると・・・
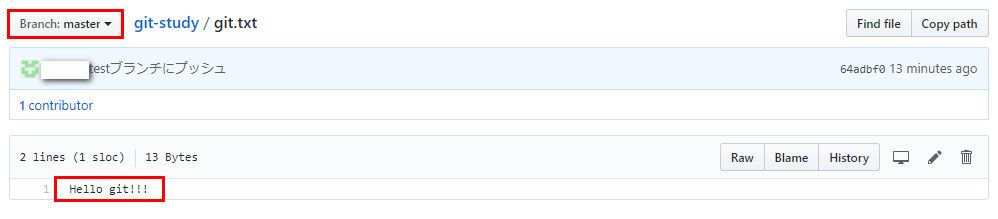
masterブランチに、testブランチの変更が反映されました!!!
まとめ
ブランチとマージについて記載してみました。
次があればプルとかやってみたいと思います!!