はじめに
各社から AI エージェントの開発・運用基盤が次々とリリースされ、自社のクラウド基盤次第では、クロスクラウド構成になってくるケースもでてきました。たとえば、Amazon Bedrock AgentCore 上で Strands Agents を動かしつつ、LLM バックエンドには Google Cloud Vertex AI (Gemini) を採用する、といった構成です。
こうしたクロスクラウド構成で課題になるのが 認証 です。サービスアカウントキー(JSON キーファイル)を使う方法もありますが、キーの漏洩リスクやローテーション管理の手間を考えるとセキュリティ的なリスクが伴います。
本記事では、Workload Identity Federation (WIF) を活用し、 AWS の IAM ロールと GCP のサービスアカウントを紐づけてセキュアな認証を実現する方法を紹介します。
Workload Identity Federation とは
サービスアカウントキーの代わりにフェデレーション ID を使用して、オンプレミスまたはマルチクラウドのワークロードに Google Cloud リソースへのアクセス権を付与することができるGoogle Cloudのサービスです。
以下はサービスアカウントキーによる認証とWorkload Identity Federationによる認証の比較です。
| サービスアカウントキー | Workload Identity Federation | |
|---|---|---|
| キーの管理 | JSON ファイルを安全に保管・配布が必要 | 秘匿情報ではないためSecretとしての管理が不要 |
| 漏洩リスク | 高い(長期間有効なキー) | 低い(一時トークンのみ) |
| セットアップ | シンプル | やや複雑(初回のみ) |
google-auth ライブラリがこの一連の認証フローを自動的に済ませてくれるため、アプリケーション側では認証情報をライブラリに渡すだけで済みます。
GCP コンソールでの設定手順
1. Workload Identity Pool の作成
まず、外部 ID を管理する「プール」を作成します。
- GCP コンソールで [IAM と管理] > [Workload Identity 連携] に移動
- [プールを作成] をクリック
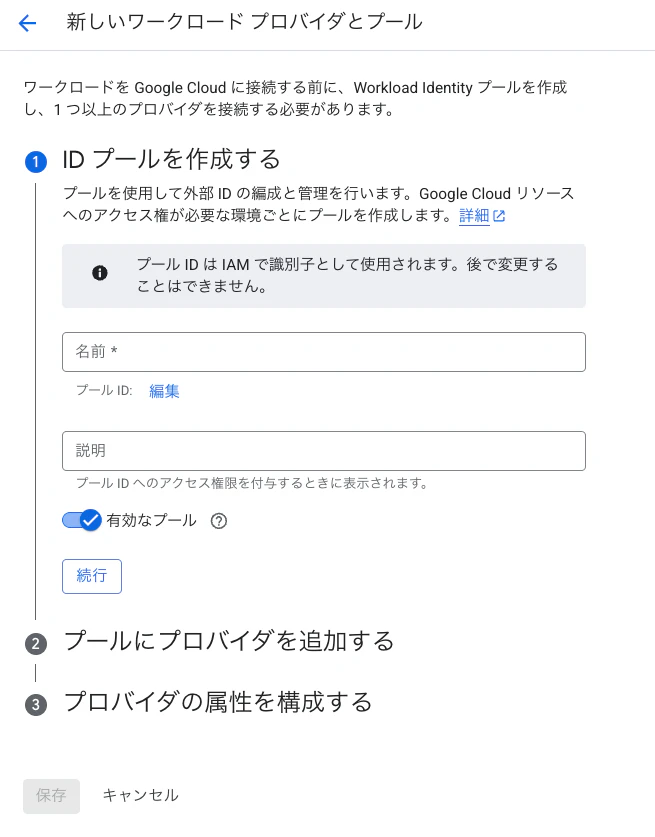
| 設定項目 | 値 | 説明 |
|---|---|---|
| プール名 | aws-agentcore-pool |
任意の識別名 |
| プール ID | aws-agentcore-pool |
API で使用される一意 ID |
| 説明 | AWS AgentCore からのアクセス用 | 任意 |
2. AWS Provider の追加
プール内に AWS 用のプロバイダを追加します。
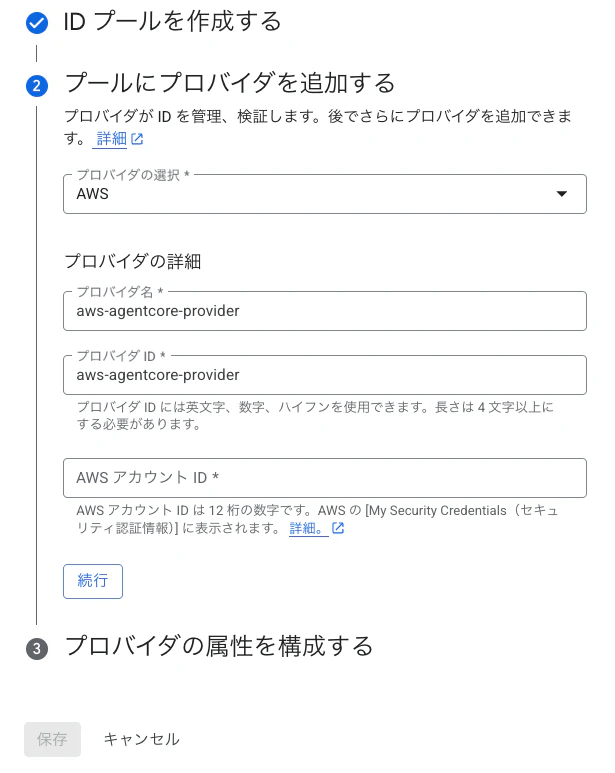
| 設定項目 | 値 | 説明 |
|---|---|---|
| プロバイダの選択 | AWS | AWS アカウントからのアクセス |
| プロバイダ名 | aws-agentcore-provider |
任意の識別名 |
| プロバイダ ID | aws-agentcore-provider |
API で使用される一意 ID |
| AWS アカウント ID | 123456789012 |
接続元の AWS アカウント ID |
AWS アカウント ID を指定することで、そのアカウント内のリソースのみがこのプロバイダを通じて認証できるようになります。
3. 属性マッピングの設定
AWS の属性を GCP の属性にマッピングします。AWS プロバイダを選択すると、以下のデフォルトマッピングが設定されます。
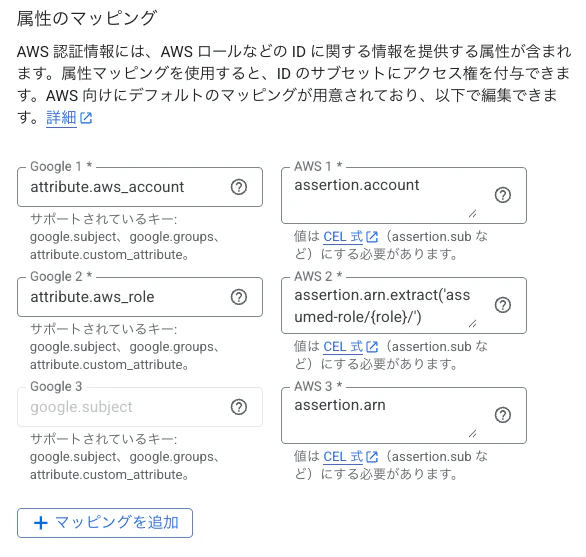
| Google 属性 | AWS 属性 |
|---|---|
attribute.aws_account |
assertion.account |
attribute.aws_role |
assertion.arn.extract('assumed-role/{role}/') |
google.subject |
assertion.arn |
4. 属性条件の設定
属性条件を設定することで、認証を許可する ID のサブセットを制限できます。
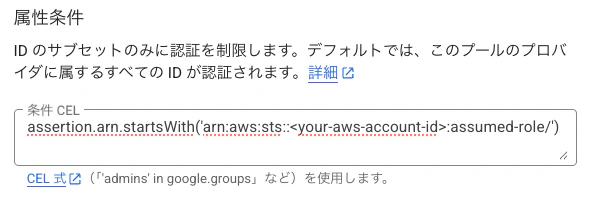
| 設定項目 | 値 |
|---|---|
| 条件 CEL | assertion.arn.startsWith('arn:aws:sts::<AWSアカウントID>:assumed-role/') |
この条件により、AssumeRole 経由のアクセスのみが許可されます。IAM ユーザーの直接アクセスなど、意図しない経路からの認証を防止できます。
5. Service Account への権限付与
WIF 経由でアクセスする際に使用するサービスアカウントに、適切な権限を付与します。
# サービスアカウントの作成(未作成の場合)
gcloud iam service-accounts create my-agent-sa \
    --display-name="Agent Service Account" \
    --project=my-gcp-project

# Vertex AI 利用権限の付与
gcloud projects add-iam-policy-binding my-gcp-project \
    --member="serviceAccount:my-agent-sa@my-gcp-project.iam.gserviceaccount.com" \
    --role="roles/aiplatform.user"

# WIF からのサービスアカウント権限借用を許可
gcloud iam service-accounts add-iam-policy-binding \
    my-agent-sa@my-gcp-project.iam.gserviceaccount.com \
    --project=my-gcp-project \
    --role="roles/iam.workloadIdentityUser" \
    --member="principalSet://iam.googleapis.com/projects/PROJECT_NUMBER/locations/global/workloadIdentityPools/aws-agentcore-pool/attribute.aws_role/arn:aws:sts::123456789012:assumed-role/MY_AGENTCORE_ROLE"
Python 実装
Strands Agents で Vertex AI (Gemini) を利用する
Strands Agents の公式ドキュメントでは、API キーによる Google AI 経由の利用方法が紹介されています。しかし、本構成では Vertex AI 経由 で Gemini を利用します。
両方式の違いを比較します。
| API キー方式(公式ドキュメント) | Vertex AI + WIF 方式(本記事) | |
|---|---|---|
| 認証方法 | API キー | WIF → サービスアカウント |
| エンドポイント | Google AI (generativelanguage.googleapis.com) | Vertex AI (aiplatform.googleapis.com) |
| セキュリティ | API キーの管理が必要 | キーレス |
| セットアップ | GeminiModel(client_args={"api_key": "..."}) |
GeminiModel(client=client) + WIF credentials |
以下、認証からGemini利用までの実装を順に見ていきます。
WIF 認証情報の取得
WIF の設定ファイルは、GCP コンソールの [Workload Identity 連携] からプロバイダを選択し、[クライアント ライブラリの構成をダウンロード] で取得できます。ダウンロードされる credentials-configuration-file.json の内容は以下のようになります。
{
    "universe_domain": "googleapis.com",
    "type": "external_account",
    "audience": "//iam.googleapis.com/projects/000000000000/locations/global/workloadIdentityPools/aws-agentcore-pool/providers/aws-provider",
    "subject_token_type": "urn:ietf:params:aws:token-type:aws4_request",
    "service_account_impersonation_url": "https://iamcredentials.googleapis.com/v1/projects/-/serviceAccounts/my-agent-sa@my-gcp-project.iam.gserviceaccount.com:generateAccessToken",
    "token_url": "https://sts.googleapis.com/v1/token",
    "credential_source": {
        "environment_id": "aws1",
        "region_url": "http://169.254.169.254/latest/meta-data/placement/availability-zone",
        "url": "http://169.254.169.254/latest/meta-data/iam/security-credentials",
        "regional_cred_verification_url": "https://sts.{region}.amazonaws.com?Action=GetCallerIdentity&Version=2011-06-15"
    }
}
AWSの一部サービスでは上記の情報に加え、 IMDSv2(Instance Metadata Service Version 2)が要求されます。
2026/3時点ではGoogle Cloudコンソールではimdsv2_session_token_urlが自動で生成されないため、下記のように手動で追加する必要があります。これを忘れると、AgentCoreからの認証に失敗するので注意してください。
{
    "universe_domain": "googleapis.com",
    "type": "external_account",
    "audience": "//iam.googleapis.com/projects/000000000000/locations/global/workloadIdentityPools/aws-agentcore-pool/providers/aws-provider",
    "subject_token_type": "urn:ietf:params:aws:token-type:aws4_request",
    "service_account_impersonation_url": "https://iamcredentials.googleapis.com/v1/projects/-/serviceAccounts/my-agent-sa@my-gcp-project.iam.gserviceaccount.com:generateAccessToken",
    "token_url": "https://sts.googleapis.com/v1/token",
    "credential_source": {
        "environment_id": "aws1",
        "region_url": "http://169.254.169.254/latest/meta-data/placement/availability-zone",
        "url": "http://169.254.169.254/latest/meta-data/iam/security-credentials",
        "regional_cred_verification_url": "https://sts.{region}.amazonaws.com?Action=GetCallerIdentity&Version=2011-06-15",
        "imdsv2_session_token_url": "http://169.254.169.254/latest/api/token" <-- これを手動で追加
    }
}
Python での WIF 認証情報の利用
ここまでで取得した credentials-configuration-file.json を Python コードで読み込み、認証情報を取得します。
"""GCP認証モジュール。"""

import json

from google.auth import aws
from google.auth.transport.requests import Request

logger = logging.getLogger(__name__)


def get_credentials():
    logger.info("Using Workload Identity Federation (AWS → GCP)")

    with open("credentials-configuration-file.json") as f:
        config = json.load(f)

    credentials = aws.Credentials.from_info(
        config,
        scopes=["https://www.googleapis.com/auth/cloud-platform"],
    )
    credentials.refresh(Request())
    return credentials
Strands Agents での AI エージェント実装
あとはWIF で取得した認証情報を google-genai クライアントに渡すだけで、Strands Agents の GeminiModel を通じて Vertex AI経由でGeminiを呼び出せます。
from google import genai
from strands.models.gemini import GeminiModel
from bedrock_agentcore.runtime import BedrockAgentCoreApp

from auth import get_credentials

GOOGLE_CLOUD_PROJECT = "my-gcp-project"
GOOGLE_CLOUD_LOCATION = "global"

credentials = get_credentials()

client = genai.Client(vertexai=True, project=GOOGLE_CLOUD_PROJECT, location=GOOGLE_CLOUD_LOCATION, credentials=credentials)
model = GeminiModel(client=client, model_id="gemini-2.5-flash")

app = BedrockAgentCoreApp()

@app.entrypoint
async def invoke(payload: Dict[str, Any]):
    agent = Agent(
        model=model,
        name="SampleAgent",
        system_prompt="あなたは優秀なアシスタントです。ユーザーの質問に対して、適切な回答を提供してください。",
    )

    stream = agent.stream_async(user_message)
    async for event in stream:
        yield event

if __name__ == "__main__":
    app.run()